Difference between revisions of "Action Cutin (Irina)"
(Created blank page) |
|||
| Line 1: | Line 1: | ||
| + | {{MvPlugin | ||
| + | |preview = <html><img src='https://img.itch.zone/aW1hZ2UvNDExMjU5LzIwNDUxNjIuZ2lm/347x500/%2FwuPWD.gif'></html> | ||
| + | |link1 = <html><iframe src="https://itch.io/embed/411259" height="167" width="552" frameborder="0"></iframe></html> | ||
| + | }} | ||
| + | |||
| + | == Introduction == | ||
| + | |||
| + | <html><img src='https://img.itch.zone/aW1nLzIwNDUxODUuZ2lm/original/5AeM2%2B.gif'></html> | ||
| + | |||
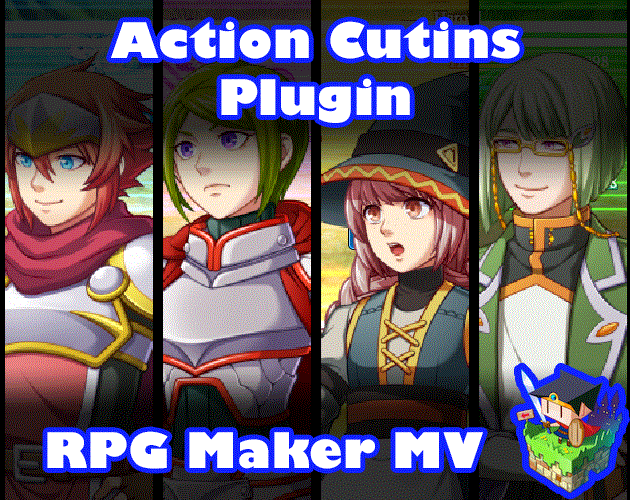
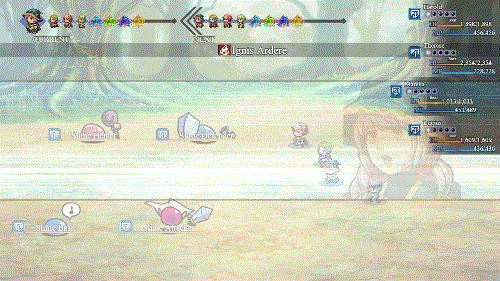
| + | This RPG Maker MV plugin lets you add action cutins display actor and enemy faces in a cutout box with speedlines going through the back. It can be used inside and outside of battle provided that you use the right notetags and/or script calls with them. It can be used to put emphasis on which actor or enemy is currently performing an action or it can be solely used for very strong attacks. The choice is yours. | ||
| + | |||
| + | You will be able to customize how action cutins look for each facet of a skill or item or even make templates when used with multiple battlers at a time. You can also choose what graphic to use for each actor/enemy when a cutin appears, as well as the scaling, the offsets, and anti-aliasing. | ||
| + | |||
| + | Those who lack the time and/or ability to make their own graphics for cutins, don't worry. This plugin will automatically convert face graphics and enemy graphics* into a usable form for cutin effects as it will work right out of the box as long as you download the Speedlines graphic that comes with this plugin. | ||
| + | |||
| + | *Note: The automatic conversion will not be applied to animated Dragonbones battlers because that's a whole different animal to tackle and you're better off using still graphics for that. | ||
| + | |||
| + | == Recommendations == | ||
| + | |||
| + | This plugin works best with the following plugins: | ||
| + | |||
| + | ; [[Battle Engine Core (YEP)|Battle Engine Core]] | ||
| + | |||
| + | : This plugin gives access to new action sequences that become available if Battle Engine Core is installed in the same project. The action sequences allow you to set up cutins anywhere and anytime you want them during an action sequence with a full range of customization settings. | ||
| + | |||
| + | ; [[Animation Screen Effects (Aries)|Animation Screen Effects]] | ||
| + | |||
| + | or | ||
| + | |||
| + | ; [[Screen Shake Effects (Aries)|Screen Shake Effects]] | ||
| + | |||
| + | : Both of these plugins give access to a better looking screen shake, which makes cutins appear even more intense as they zoom across the screen. | ||
| + | |||
| + | For those who want portraits to use with this plugin, you can grab them from [[Caz Wolf|Caz]]! | ||
| + | |||
| + | <html><iframe src="https://itch.io/embed/177198" height="167" width="552" frameborder="0"></iframe></html> | ||
| + | |||
| + | == Instructions == | ||
| + | |||
| + | <html><img src='https://img.itch.zone/aW1nLzIwNDUxMDcucG5n/original/VAgrYs.png' width='630'></html> | ||
| + | |||
| + | # Download the 'Speedlines' graphic from this plugin's page. | ||
| + | # Place it inside your project's img/pictures/ folder. | ||
| + | # If you're using YEP_BattleEngineCore, place this plugin beneath it. | ||
| + | # If you're using MogHunter's Battle HUD, place this plugin above it. | ||
| + | # Configure the settings in the Plugin Parameters to your liking. | ||
| + | # Configure your actors, enemies, skills, and items with notetags. | ||
| + | # Use action sequences and script calls to call action cutins outside of the normal scope of item and skill usage. | ||
| + | |||
| + | {{Plugin Parameters MV}} | ||
| + | |||
| + | === General Settings === | ||
| + | |||
| + | <html><img src='https://img.itch.zone/aW1nLzIwNDUyMDcucG5n/original/%2BvnH2r.png' width='630'></html> | ||
| + | |||
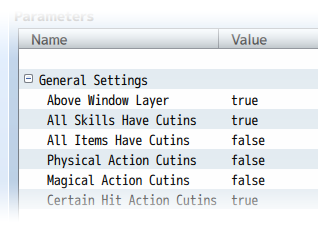
| + | === Above Window Layer === | ||
| + | |||
| + | Cutins have their own graphics layer. They can be placed either beneath the Window Layer or above it. If it is beneat the Window Layer, then the UI elements added to the game's Window Layer will be visible. If it is above it, then the UI elements will appear behind the cutins, though parts of the UI can be seen if the cutins use certain blend modes. | ||
| + | |||
| + | === All ___ Have Cutins === | ||
| + | |||
| + | These settings allow you to automatically set certain subsets of skills and/or items to have cutins appear whenever used. Keep in mind that just because one is set to false doesn't mean they're forever kept away from having cutins. As long as another condition is met, cutins will appear. You can also force cutins to appear with the <Action Cutin> notetag placed inside of a skill or item's notebox. Likewise, you can prevent them from appearing if the <No Action Cutin> notetag is present as well. The settings from these auto cutins will occur whenever a "perform start" action sequence occurs, or if you're using the default battle system, the "performActionStart" entry occurs in Window_BattleLog. | ||
| + | |||
| + | === Templates === | ||
| + | |||
| + | <html><img src='https://img.itch.zone/aW1nLzIwNDUxOTEuZ2lm/original/6ad92W.gif' width='630'></html> | ||
| + | |||
| + | <html><img src='https://img.itch.zone/aW1nLzIwNDUxOTYuZ2lm/original/B8vcOd.gif' width='630'></html> | ||
| + | |||
| + | <html><img src='https://img.itch.zone/aW1nLzIwNDUyMTAucG5n/original/qQnUmO.png' width='630'></html> | ||
| + | |||
| + | JavaScript users can create their own action cutin templates here to make certain styles of cutins occur. Included with this plugin are two example pieces for a group "horizontal" and "vertical" action cutin combo where multiple appear at once. Look further down in the help file to learn how to use templates. | ||
| + | |||
| + | === Default Speedlines === | ||
| + | |||
| + | <html><img src='https://img.itch.zone/aW1nLzIwNDUyMTIucG5n/original/KxXkb2.png' width='630'></html> | ||
| + | |||
| + | <html><img src='https://img.itch.zone/aW1nLzIwNDUyMTYucG5n/original/%2BFhqhy.png' width='630'></html> | ||
| + | |||
| + | These settings determine the default settings for the speedlines graphic that appears with the action cutins. These settings aren't final for all action cutins, but instead, serve as the base/default settings and can always be changed with notetags, action sequences, and templates. | ||
| + | |||
| + | === Default Face Settings === | ||
| + | |||
| + | <html><img src='https://img.itch.zone/aW1nLzIwNDUyMTgucG5n/original/3ogmDQ.png' width='630'></html> | ||
| + | |||
| + | The face that appears during a cutin sequence will move from one direction to the other. You can adjust the settings here to change how it moves by default. These settings aren't final for all action cutins, but instead, serve as the base/default settings and can always be changed with notetags, action sequences, and templates. | ||
| + | |||
| + | === Auto-Flash === | ||
| + | |||
| + | <html><img src='https://img.itch.zone/aW1nLzIwNDUyMjkucG5n/original/fjNJ0k.png' width='630'></html> | ||
| + | |||
| + | Turning this on will accompany a screen flash when the action cutin appears. Here, you can adjust the default color and duration of the flash. These settings aren't final for all action cutins, but instead, serve as the base/default settings and can always be changed with notetags, action sequences, and templates. | ||
| + | |||
| + | === Auto-Shake === | ||
| + | |||
| + | <html><img src='https://img.itch.zone/aW1nLzIwNDUyMjgucG5n/original/s1kvLL.png' width='630'></html> | ||
| + | |||
| + | Turning this on will accompany a screen shake when the action cutin appears. Here, you can adjust the power, speed, and duration of the shake. These settings aren't final for all action cutins, but instead, serve as the base/default settings and can always be changed with notetags, action sequences, and templates. | ||
| + | |||
| + | === Auto-Sound === | ||
| + | |||
| + | <html><img src='https://img.itch.zone/aW1nLzIwNDUyMzIucG5n/original/cYG%2BRt.png' width='630'></html> | ||
| + | |||
| + | Turning this on will accompany a sound effect when the action cutin appears. Here, you can pick the file, volume, pitch, and pan of the sound. These settings aren't final for all action cutins, but instead, serve as the base/default settings and can always be changed with notetags, action sequences, and templates. | ||
| + | |||
| + | === Other === | ||
| + | |||
| + | <html><img src='https://img.itch.zone/aW1nLzIwNDUyMzQucG5n/original/eiHinx.png' width='630'></html> | ||
| + | |||
| + | These are the other settings that you can adjust for action cutins, including the total duration of the action cutin and the opacity speed at which it fades in and out. These settings aren't final for all action cutins, but instead, serve as the base/default settings and can always be changed with notetags, action sequences, and templates. | ||
| + | |||
| + | {{Notetags MV}} | ||
| + | |||
| + | Insert the following notetags in the appropriate database entries. The notetags placed into Actor and Enemy noteboxes are used to define their own personal cutins. The notetags placed inside Skill and Item noteboxes are used to define the cutin settings associated when using that skill/item. | ||
| + | |||
| + | === Actor, Actor, and Enemy Notetags === | ||
| + | |||
| + | <html><img src='https://img.itch.zone/aW1nLzIwNDU1MTYucG5n/original/HIp0Ob.png' width='630'></html> | ||
| + | |||
| + | If you are using these notetags for actors and classes, priority will be given to the actor notetags before given to the class notetags. | ||
| + | |||
| + | <pre> | ||
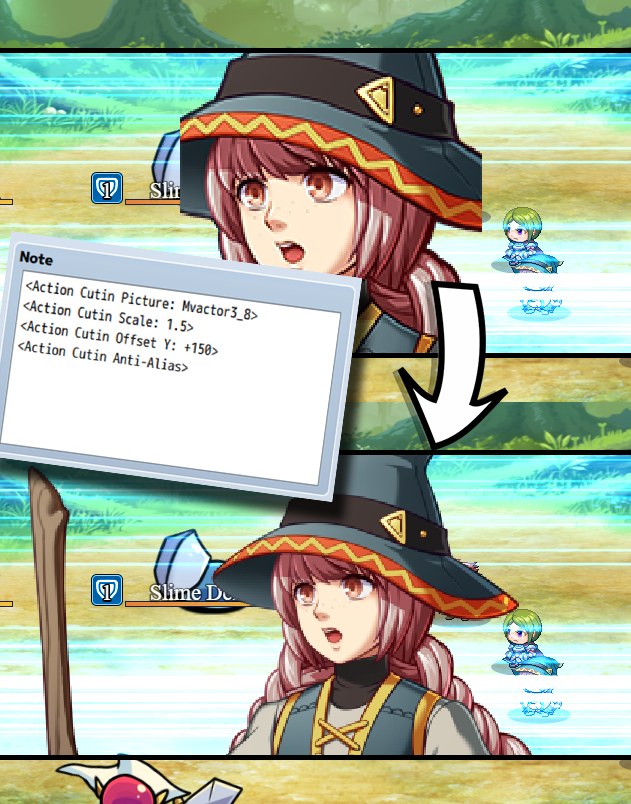
| + | <Action Cutin Picture: filename> | ||
| + | Changes this actor/enemy's cutin to use that of a picture. | ||
| + | - Replace 'filename' with the filename of a graphic in img/pictures/ | ||
| + | - The filename is case sensitive! | ||
| + | <Action Cutin Face: filename, index> | ||
| + | Changes this actor/enemy's cutin to use that of a face graphic. | ||
| + | - Replace 'filename' with the filename of a graphic in img/faces/ | ||
| + | - The filename is case sensitive! | ||
| + | - Replace 'index' with a number indicating the cell of the graphic. | ||
| + | - Index starts from 0 and counts upwards. | ||
| + | <Action Cutin SV: filename, index> | ||
| + | Changes this actor/enemy's cutin to use that of a SV Actor graphic. | ||
| + | - Replace 'filename' with the filename of a graphic in img/sv_actors/ | ||
| + | - The filename is case sensitive! | ||
| + | - Replace 'index' with a number indicating the cell of the graphic. | ||
| + | - Index starts from 0 and counts upwards. | ||
| + | <Action Cutin Battler: filename> | ||
| + | <Action Cutin Battler: filename, hue> | ||
| + | Changes this actor/enemy's cutin to use that of a battler graphic. | ||
| + | - Replace 'filename' with the filename of a graphic in either img/enemies/ or img/sv_enemies/ depending on if your game is front view or sideview. | ||
| + | - Replace 'hue' with a numeric value between (0 to 360) representing hue. | ||
| + | <Action Cutin Scale: n> | ||
| + | Changes the actor/enemy's cutin graphic's scale. | ||
| + | - Replace 'n' with a numeric value to represent scale. | ||
| + | - 1.0 is 100%. 0.5 is 50%. 2.25 is 225%. | ||
| + | <Action Cutin Offset X: +n> | ||
| + | <Action Cutin Offset X: -n> | ||
| + | <Action Cutin Offset Y: +n> | ||
| + | <Action Cutin Offset Y: -n> | ||
| + | Changes the actor/enemy's cutin graphic's offset position for X and Y. | ||
| + | - Replace 'n' with a numeric value in pixels to alter the x/y offset. | ||
| + | <Action Cutin Anti-Alias> | ||
| + | <Action Cutin No Anti-Alias> | ||
| + | Changes the anti-alias settings for the cutin graphic. | ||
| + | </pre> | ||
| + | |||
| + | === Skill and Item Notetags === | ||
| + | |||
| + | <html><img src='https://img.itch.zone/aW1nLzIwNDU1MTkucG5n/original/S6Q3ZK.png' width='630'></html> | ||
| + | |||
| + | <pre> | ||
| + | <Action Cutin> | ||
| + | <No Action Cutin> | ||
| + | Changes whether or not this skill/item will have an action cutin or not. This will bypass the settings in the Plugin Parameters. | ||
| + | <Action Cutin Image: filename> | ||
| + | Changes the speedline graphic behind the face cutin to a different image. | ||
| + | - Replace 'filename' with the filename of a graphic in img/pictures/ | ||
| + | - The filename is case sensitive! | ||
| + | |||
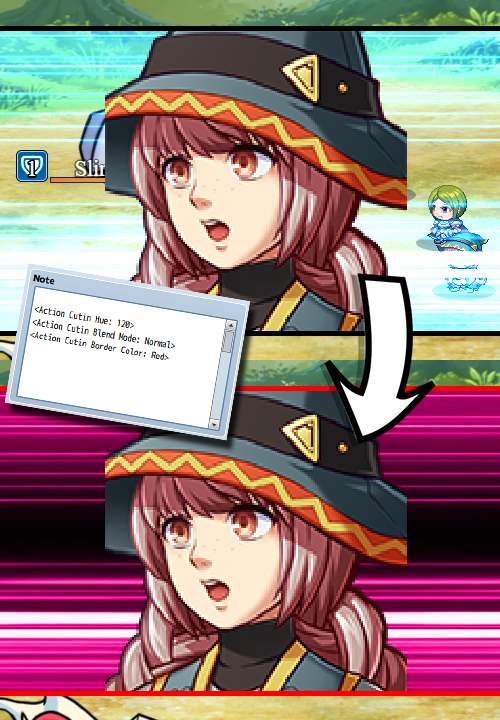
| + | <Action Cutin Hue: n> | ||
| + | Changes the hue of the speedline graphic behind the face cutin. | ||
| + | - Replace 'n' with a numeric value between (0 to 360) representing hue. | ||
| + | <Action Cutin Blend Mode: Normal> | ||
| + | <Action Cutin Blend Mode: Additive> | ||
| + | <Action Cutin Blend Mode: Multiply> | ||
| + | <Action Cutin Blend Mode: Screen> | ||
| + | Changes the blend mode of the speedline graphic behind the face cutin. | ||
| + | |||
| + | <Action Cutin Border Thickness: n> | ||
| + | Changes the thickness of the borders for the action cutin. | ||
| + | - Replace 'n' with a numeric value in pixels to represent border thickness. | ||
| + | |||
| + | <Action Cutin Border Color: color> | ||
| + | Changes the color of the borders for the action cutin. | ||
| + | - Replace 'color' with the name of a color or a hex code representing color. | ||
| + | |||
| + | <Action Cutin Screen X: n> | ||
| + | <Action Cutin Screen Y: n> | ||
| + | Changes the speedline graphic's screen X and Y positions. | ||
| + | - Replace 'n' with a numeric value representing their coordinates. | ||
| + | - The X position will be the far left of the speedlines graphic. | ||
| + | - The Y position will be the middle of the speedlines graphic. | ||
| + | |||
| + | <Action Cutin Shift Distance X: n> | ||
| + | <Action Cutin Shift Distance Y: n> | ||
| + | Changes how far the face shifts from side to side. | ||
| + | - Replace 'n' with a numeric value representing the distance in pixels. | ||
| + | <Action Cutin Shift Frames: n> | ||
| + | Changes the duration of the shift. | ||
| + | - Replace 'n' with a numeric value representing the duration in frames. | ||
| + | |||
| + | <Action Cutin Flash> | ||
| + | <Action Cutin No Flash> | ||
| + | Changes whether or not the screen flash is enabled or disabled. | ||
| + | |||
| + | <Action Cutin Flash Color: red, green, blue, intensity> | ||
| + | Changes the color of the screen flash. | ||
| + | - Replace 'red' with a numeric value (0 to 255). | ||
| + | - Replace 'green' with a numeric value (0 to 255). | ||
| + | - Replace 'blue' with a numeric value (0 to 255). | ||
| + | - Replace 'intensity' with a numeric value (0 to 255). | ||
| + | |||
| + | <Action Cutin Flash Duration: n> | ||
| + | Changes the duration of the screen flash. | ||
| + | - Replace 'n' with a numeric value representing the duration in frames. | ||
| + | |||
| + | <Action Cutin Shake> | ||
| + | <Action Cutin No Shake> | ||
| + | Changes whether or not the screen shake is enabled or disabled. | ||
| + | |||
| + | <Action Cutin Shake Power: n> | ||
| + | Changes the power of the screen shake. | ||
| + | - Replace 'n' with a numeric value representing the shake power. | ||
| + | |||
| + | <Action Cutin Shake Speed: n> | ||
| + | Changes the speed of the screen speed. | ||
| + | - Replace 'n' with a numeric value representing the shake speed. | ||
| + | |||
| + | <Action Cutin Shake Duration: n> | ||
| + | Changes the duration of the screen shake. | ||
| + | - Replace 'n' with a numeric value representing the duration in frames. | ||
| + | |||
| + | <Action Cutin Sound> | ||
| + | <Action Cutin No Sound> | ||
| + | Changes whether or not a sound is played when this action cutin occurs. | ||
| + | |||
| + | <Action Cutin Sound Filename: filename> | ||
| + | Changes the sound played for the sound effect. | ||
| + | - Replace 'filename' with the filename of a sound in audio/se/ | ||
| + | - The filename is case sensitive! | ||
| + | |||
| + | <Action Cutin Sound Volume: n> | ||
| + | Changes the volume of the sound effect played. | ||
| + | - Replace 'n' with a numeric value representing the volume. | ||
| + | |||
| + | <Action Cutin Sound Pitch: n> | ||
| + | Changes the pitch of the sound effect played. | ||
| + | - Replace 'n' with a numeric value representing the pitch. | ||
| + | |||
| + | <Action Cutin Sound Pan: n> | ||
| + | Changes the pan of the sound effect played. | ||
| + | - Replace 'n' with a numeric value representing the pan. | ||
| + | - Negative for left. | ||
| + | - Positive for right. | ||
| + | |||
| + | <Action Cutin Duration: n> | ||
| + | Changes the duration of the action cutin. | ||
| + | - Replace 'n' with a numeric value representing the duration in frames. | ||
| + | |||
| + | <Action Cutin Opacity Speed: n> | ||
| + | Changes the rate at which the action cutin fades in and out. | ||
| + | - Replace 'n' with a numeric value representing the change. | ||
| + | - Lower numbers are slower. | ||
| + | - Higher numbers are faster. | ||
| + | |||
| + | <Action Cutin Forced Scale: n> | ||
| + | Forces the face graphic of the battler to be scaled a certain value. | ||
| + | - Replace 'n' with a numeric value to represent scale. | ||
| + | - 1.0 is 100%. 0.5 is 50%. 2.25 is 225%. | ||
| + | |||
| + | <Action Cutin Forced Anti-Alias> | ||
| + | <Action Cutin Forced No Anti-Alias> | ||
| + | Forces the face graphic of the battler to use anti-alias or not. | ||
| + | |||
| + | <Action Cutin Forced Offset X: +n> | ||
| + | <Action Cutin Forced Offset X: -n> | ||
| + | <Action Cutin Forced Offset Y: +n> | ||
| + | <Action Cutin Forced Offset Y: -n> | ||
| + | Forces the actor/enemy's cutin graphic's offset position for X and Y. | ||
| + | - Replace 'n' with a numeric value in pixels to alter the x/y offset. | ||
| + | </pre> | ||
| + | |||
| + | {{Script Calls MV}} | ||
| + | |||
| + | <html><img src='https://img.itch.zone/aW1nLzIwNDU1MjgucG5n/original/d4xNHK.png' width='630'></html> | ||
| + | |||
| + | Action cutins can be called upon and used in either in battle or on the map screen. To call them, there's various ways of doing so. Look below for instructions on how to get each one working. These require knowledge of how to use JavaScript to utilize. I am not responsible for improper usage or teaching you how to use JavaScript so you can further use these. If you wish to understand how to use RPG Maker MV's JavaScript base, I suggest taking a look at Trihan's "Jump Into JavaScript" article found here: | ||
| + | |||
| + | https://rpgmaker.net/tutorials/1230/ | ||
| + | |||
| + | === Single Battler Action Cutin === | ||
| + | |||
| + | <html><img src='https://img.itch.zone/aW1nLzIwNDUxODcuZ2lm/original/Ns7Jix.gif' width='630'></html> | ||
| + | |||
| + | <pre> | ||
| + | var battler = $gameActors.actor(1); | ||
| + | var settings = $actionCutinSettings(); | ||
| + | $actionCutin(battler, settings); | ||
| + | - This will create a singular cutin of the designated battler while using the default cutin settings defined in the Plugin Parameters. In the above example, it creates a singular action cutin of actor 1 while using the default cutin settings. | ||
| + | |||
| + | var battler = $gameActors.leader(); | ||
| + | var settings = $actionCutinSettings($dataSkills[10]); | ||
| + | $actionCutin(battler, settings); | ||
| + | - This will create a singular cutin of the designated battler while using the cutin settings associated with a skill's notetags in the database. In the above example, it creates a singular action cutin of the party leader while using skill 10's notetag settings. | ||
| + | |||
| + | var battler = $gameTroop.members()[0]; | ||
| + | var settings = $actionCutinSettings($dataItems[20]); | ||
| + | $actionCutin(battler, settings); | ||
| + | - This will create a singular cutin of the designated battler while using the cutin settings associated with an item's notetags in the database. In the above example, it creates a singular action cutin of the game troop member with index 0 while using item 20's notetag settings. | ||
| + | </pre> | ||
| + | |||
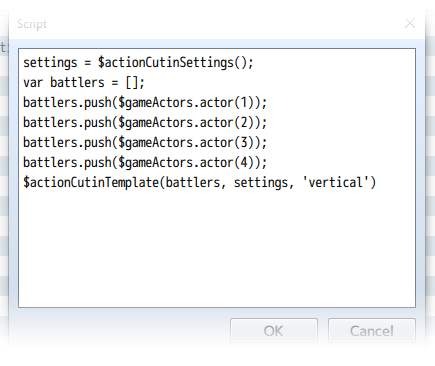
| + | === Multiple Battlers Action Cutin === | ||
| + | |||
| + | <html><img src='https://img.itch.zone/aW1nLzIwNDUxODguZ2lm/original/cbQMAW.gif' width='630'></html> | ||
| + | |||
| + | <pre> | ||
| + | var battlers = []; | ||
| + | battlers.push($gameActors.actor(1)); | ||
| + | battlers.push($gameActors.actor(2)); | ||
| + | battlers.push($gameActors.actor(3)); | ||
| + | battlers.push($gameActors.actor(4)); | ||
| + | var settings = $actionCutinSettings($dataSkills[10]); | ||
| + | var template = 'Horizontal'; | ||
| + | $actionCutinTemplate(battlers, settings, template); | ||
| + | - This uses the templates found in the Plugin Parameters to create multiple cutins of battlers at a time and using certain notetag settings from a designated skill selected by the game dev. In the above example, actors 1 through 4 are listed as a part of the battlers, with notetag settings from skill 10 in the database, and the 'Horizontal' template that's defined in the Plugin Parameters. | ||
| + | var battlers = []; | ||
| + | battlers.push($gameParty.members()[0]); | ||
| + | battlers.push($gameParty.members()[1]); | ||
| + | battlers.push($gameParty.members()[2]); | ||
| + | battlers.push($gameParty.members()[3]); | ||
| + | var settings = $actionCutinSettings($dataItems[20]); | ||
| + | var template = 'Vertical'; | ||
| + | $actionCutinTemplate(battlers, settings, template); | ||
| + | - This uses the templates found in the Plugin Parameters to create multiple cutins of battlers at a time and using certain notetag settings from a designated item selected by the game dev. In the above example, party members with an index value between 0 and 3 are listed as a part of the battlers, with notetag settings from item 20 in the database, and the 'Vertical' template that's defined in the Plugin Parameters. | ||
| + | var battlers = []; | ||
| + | battlers.push($gameTroop.members()[0]); | ||
| + | battlers.push($gameTroop.members()[1]); | ||
| + | battlers.push($gameTroop.members()[2]); | ||
| + | battlers.push($gameTroop.members()[3]); | ||
| + | var settings = $actionCutinSettings(); | ||
| + | var template = 'Horizontal'; | ||
| + | $actionCutinTemplate(battlers, settings, template); | ||
| + | - This uses the templates found in the Plugin Parameters to create multiple cutins of battlers at a time and using the default cutin settings defined in the Plugin Parameters. In the above example, enemy troop members with an index value between 0 and 3 are listed as a part of the battlers, with default cutin settings, and the 'Horizontal' template that's defined in the Plugin Parameters. | ||
| + | Custom Settings | ||
| + | |||
| + | |||
| + | If you don't like the settings made in certain skills/items or would just like to create your own without having to create new skills/items, then start with the following code. | ||
| + | |||
| + | var settings = $actionCutinSettings(); | ||
| + | This grabs the default cutin settings. As long as you modify it before inserting it into $actionCutin or $actionCutinTemplate, then the settings will behave differently from the default. Below is a list of the various things you can do to your code to change it up. You're not required to use all of them. Just pick the settings alterations that need changing. | ||
| + | |||
| + | settings.backgroundImg = 'Speedlines'; | ||
| + | settings.backgroundHue = 0; | ||
| + | settings.blendMode = 1; | ||
| + | settings.borderThickness = 5; | ||
| + | settings.borderColor = 'black'; | ||
| + | settings.x = 0; | ||
| + | settings.y = Graphics.boxHeight / 2; | ||
| + | settings.width = Graphics.boxWidth; | ||
| + | settings.height = 300; | ||
| + | settings.speedX = 40; | ||
| + | settings.speedY = 0; | ||
| + | settings.shiftDistanceX = 480; | ||
| + | settings.shiftDistanceY = 0; | ||
| + | settings.shiftFrames = 16; | ||
| + | settings.flash = true; | ||
| + | settings.flashColor = [255, 255, 255, 170]; | ||
| + | settings.flashDuration = 20; | ||
| + | settings.shake = true; | ||
| + | settings.shakePower = 5; | ||
| + | settings.shakeSpeed = 5; | ||
| + | settings.shakeDuration = 20; | ||
| + | settings.sound = true; | ||
| + | settings.soundName = 'Magic3'; | ||
| + | settings.soundVolume = 90; | ||
| + | settings.soundPitch = 150; | ||
| + | settings.soundPan = 0; | ||
| + | settings.duration = 90; | ||
| + | settings.opacitySpeed = 16; | ||
| + | settings.forcedScale = 2.0; | ||
| + | settings.forcedAntiAlias = false; | ||
| + | settings.forcedOffsetX = 0; | ||
| + | settings.forcedOffsetY = 0; | ||
| + | Pick and choose the setting changes you want before inserting them into $actionCutin or $actionCutinTemplate's arguments. Below is an example of how to use it in a complete script call. | ||
| + | |||
| + | var battler = $gameParty.leader(); | ||
| + | var settings = $actionCutinSettings(); | ||
| + | settings.backgroundHue = 180; | ||
| + | settings.blendMode = 0; | ||
| + | $actionCutin(battler, settings); | ||
| + | The above script call changes the speedlines to have a hue of 180 while changing the blend mode to 'Normal'. A regular single battler action cutin is then used through the $actionCutin function. | ||
| + | |||
| + | Changing Battler Face Cutins | ||
| + | |||
| + | |||
| + | var battler = $gameActors.actor(1); | ||
| + | battler.changeActionCutinFaceData(type, filename, index, hue); | ||
| + | - Replace 'type' with 'picture', 'face', 'svbattler', or 'battler' (keep the quotes). This determines the type of asset to use. | ||
| + | - Replace 'filename' with the filename of the associated graphic. | ||
| + | - The filename is case sensitive! | ||
| + | - Replace 'index' with a numeric value starting from 0 to determine the cell. | ||
| + | - Index is used with 'face' and 'svbattler'. | ||
| + | - Replace 'hue' with a numeric value (0 to 360) to determine its hue. | ||
| + | - Hue is used with 'battler'. | ||
| + | var battler = $gameActors.actor(1); | ||
| + | battler.changeActionCutinFaceScale(scale); | ||
| + | - Replace 'scale' with a numeric value to determine the cutin's scale. | ||
| + | - 1.0 is 100%. 0.5 is 50%. 2.25 is 225%. | ||
| + | var battler = $gameActors.actor(1); | ||
| + | battler.changeActionCutinFaceOffset(offsetX, offsetY); | ||
| + | - Replace 'offsetX' and 'offsetY' with numeric values to determine how many pixels to offset the face cutin by. | ||
| + | var battler = $gameActors.actor(1); | ||
| + | battler.changeActionCutinFaceAntiAlias(boolean); | ||
| + | - Replace 'boolean' with 'true' or 'false' (remove the quotes) to determine if the face cutin graphic will use anti-alias or not. | ||
| + | var battler = $gameActors.actor(1); | ||
| + | battler.clearActionCutinFaceData(); | ||
| + | - Removes all changes made to the designated battler regarding face cutins. This will revert the battler to using its original face cutin data that's made through notetags or through the plugin's defaults. | ||
| + | Action Sequences | ||
| + | |||
| + | |||
| + | This section only applies to you if you use Yanfly's Battle Engine Core and its action sequences. If you don't use either, you're free to ignore this section. This part of the document will be formatted like Yanfly's Action Sequence help file to bring about a sense of familiarity. | ||
| + | |||
| + | ============================================================================= | ||
| + | ACTION CUTIN targets: arguments | ||
| + | (optional parameters) | ||
| + | TEMPLATE name | ||
| + | IMG filename | ||
| + | HUE value | ||
| + | BLENDMODE NORMAL | ||
| + | BLENDMODE ADDITIVE | ||
| + | BLENDMODE MULTIPLY | ||
| + | BLENDMODE SCREEN | ||
| + | BORDER THICKNESS value | ||
| + | BORDER COLOR color | ||
| + | SCREEN X value | ||
| + | SCREEN Y value | ||
| + | WIDTH value | ||
| + | HEIGHT value | ||
| + | SPEED X value | ||
| + | SPEED Y value | ||
| + | SHIFT X value | ||
| + | SHIFT Y value | ||
| + | SHIFT FRAMES value | ||
| + | FLASH ON | ||
| + | FLASH OFF | ||
| + | SHAKE ON | ||
| + | SHAKE OFF | ||
| + | SOUND ON | ||
| + | SOUND OFF | ||
| + | DURATION value | ||
| + | OPACITY SPEED value | ||
| + | FORCED SCALE value | ||
| + | FORCED ANTIALIAS ON | ||
| + | FORCED ANTIALIAS OFF | ||
| + | FORCED OFFSET x y | ||
| + | - - - - - - - - - - - - - - - - - - - - - - - - - - - - - - - - - - - - - - - | ||
| + | Plays an action cutin during the action sequence. The action cutin will use the default cutin settings unless you use the optional arguments listed. The following below explain what each argument does: | ||
| + | Template: picks a template from the Plugin Parameters matching the name used | ||
| + | Img: picks a speedline graphic of a matching filename from img/pictures/ | ||
| + | Hue: changes the speedline graphic's hue (pick a number between 0 and 360) | ||
| + | BlendMode: changes the blend mode of the speedline graphic | ||
| + | Border Thickness: changes the border thickness to 'value' | ||
| + | Border Color: changes the color of the border to 'color' | ||
| + | Screen X: sets the speedline graphic's left x position to 'value' | ||
| + | Screen Y: sets the speedline graphic's middle y position to 'value' | ||
| + | Width: sets the speedline graphic's width to 'value' | ||
| + | Height: sets the speedline graphic's height to 'value' | ||
| + | Speed X: sets the speedline's x movement speed to 'value' | ||
| + | Speed Y: sets the speedline's y movement speed to 'value' | ||
| + | Shift X: sets the distance the face cutin travels horizontally to 'value' | ||
| + | Shift Y: sets the distance the face cutin travels vertically to 'value' | ||
| + | Shift Frames: sets the time in frames the face cutin travels in 'value' | ||
| + | Flash On/Off: Turns on/off the default Screen Flash for this action cutin | ||
| + | Shake On/Off: Turns on/off the default Screen Shake for this action cutin | ||
| + | Sound On/Off: Turns on/off the default Sound Effect for this action cutin | ||
| + | Duration: sets the duration of the action cutin to 'value' | ||
| + | Opacity Speed: sets the opacity speed ford fading in/out to 'value' | ||
| + | Forced Scale: If used, forces all cutins to use this scale 'value' | ||
| + | Forced AntiAlias On/Off: If used, forces anti-alias to be on/off | ||
| + | Forced Offset: If used, forces face cutin to be offset by 'x' and 'y' pixels | ||
| + | - - - - - - - - - - - - - - - - - - - - - - - - - - - - - - - - - - - - - - - | ||
| + | Usage Example: Action Cutin User | ||
| + | Action Cutin Allies: template Horizontal | ||
| + | Action Cutin Targets: template Vertical, Hue 360, BlendMode Normal | ||
| + | ============================================================================= | ||
| + | |||
| + | {{Atelier Irina}} | ||
| + | |||
| + | == Changelog == | ||
| + | |||
| + | * April 27, 2019: Fixed a bug regarding the changeActionCutinFaceData script call. | ||
| + | * April 25, 2019: Added fail safes for compatibility issues regarding external plugins that aren't creating their window layer properly. | ||
| + | |||
| + | <!-- This is a comment, remove the arrows surrounding this for the categories you want to show --> | ||
| + | <!-- [[Category:RPG Maker MV Core Plugins]] --> | ||
| + | [[Category:RPG Maker MV Battle Plugins]] | ||
| + | <!-- [[Category:RPG Maker MV Item Plugins]] --> | ||
| + | [[Category:RPG Maker MV Skill Plugins]] | ||
| + | <!-- [[Category:RPG Maker MV Equip Plugins]] --> | ||
| + | <!-- [[Category:RPG Maker MV Status Menu Plugins]] --> | ||
| + | <!-- [[Category:RPG Maker MV Gameplay Plugins]] --> | ||
| + | <!-- [[Category:RPG Maker MV Movement Plugins]] --> | ||
| + | <!-- [[Category:RPG Maker MV Quest Plugins]] --> | ||
| + | <!-- [[Category:RPG Maker MV Options Plugins]] --> | ||
| + | <!-- [[Category:RPG Maker MV Eventing Plugins]] --> | ||
| + | <!-- [[Category:RPG Maker MV Utility Plugins]] --> | ||
| + | <!-- [[Category:RPG Maker MV Mechanical Plugins]] --> | ||
| + | [[Category:RPG Maker MV Visual Plugins]] | ||
| + | <!-- [[Category:RPG Maker MV Menu Plugins]] --> | ||
| + | <!-- [[Category:RPG Maker MV Message Plugins]] --> | ||
| + | <!-- [[Category:RPG Maker MV Quality of Life Plugins]] --> | ||
| + | <!-- [[Category:RPG Maker MV Plugin Tips & Tricks]] --> | ||
Revision as of 15:30, 24 June 2019


|
VisuStella, Caz Wolf, Fallen Angel Olivia, Atelier Irina, and other affiliated content creators.
Download
System
This is a plugin created for RPG Maker MV.
For help on how to install plugins, click here.
For help on how to update plugins, click here.
Got errors with your RPG Maker MV plugin? Click here.
Introduction

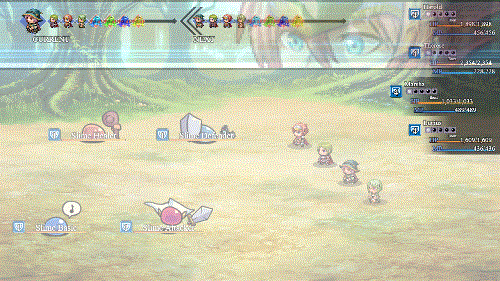
This RPG Maker MV plugin lets you add action cutins display actor and enemy faces in a cutout box with speedlines going through the back. It can be used inside and outside of battle provided that you use the right notetags and/or script calls with them. It can be used to put emphasis on which actor or enemy is currently performing an action or it can be solely used for very strong attacks. The choice is yours.
You will be able to customize how action cutins look for each facet of a skill or item or even make templates when used with multiple battlers at a time. You can also choose what graphic to use for each actor/enemy when a cutin appears, as well as the scaling, the offsets, and anti-aliasing.
Those who lack the time and/or ability to make their own graphics for cutins, don't worry. This plugin will automatically convert face graphics and enemy graphics* into a usable form for cutin effects as it will work right out of the box as long as you download the Speedlines graphic that comes with this plugin.
- Note: The automatic conversion will not be applied to animated Dragonbones battlers because that's a whole different animal to tackle and you're better off using still graphics for that.
Recommendations
This plugin works best with the following plugins:
- This plugin gives access to new action sequences that become available if Battle Engine Core is installed in the same project. The action sequences allow you to set up cutins anywhere and anytime you want them during an action sequence with a full range of customization settings.
or
- Both of these plugins give access to a better looking screen shake, which makes cutins appear even more intense as they zoom across the screen.
For those who want portraits to use with this plugin, you can grab them from Caz!
Instructions

- Download the 'Speedlines' graphic from this plugin's page.
- Place it inside your project's img/pictures/ folder.
- If you're using YEP_BattleEngineCore, place this plugin beneath it.
- If you're using MogHunter's Battle HUD, place this plugin above it.
- Configure the settings in the Plugin Parameters to your liking.
- Configure your actors, enemies, skills, and items with notetags.
- Use action sequences and script calls to call action cutins outside of the normal scope of item and skill usage.
Plugin Parameters
There are Plugin Parameters that you may configure for this plugin.
General Settings
Above Window Layer
Cutins have their own graphics layer. They can be placed either beneath the Window Layer or above it. If it is beneat the Window Layer, then the UI elements added to the game's Window Layer will be visible. If it is above it, then the UI elements will appear behind the cutins, though parts of the UI can be seen if the cutins use certain blend modes.
All ___ Have Cutins
These settings allow you to automatically set certain subsets of skills and/or items to have cutins appear whenever used. Keep in mind that just because one is set to false doesn't mean they're forever kept away from having cutins. As long as another condition is met, cutins will appear. You can also force cutins to appear with the <Action Cutin> notetag placed inside of a skill or item's notebox. Likewise, you can prevent them from appearing if the <No Action Cutin> notetag is present as well. The settings from these auto cutins will occur whenever a "perform start" action sequence occurs, or if you're using the default battle system, the "performActionStart" entry occurs in Window_BattleLog.
Templates

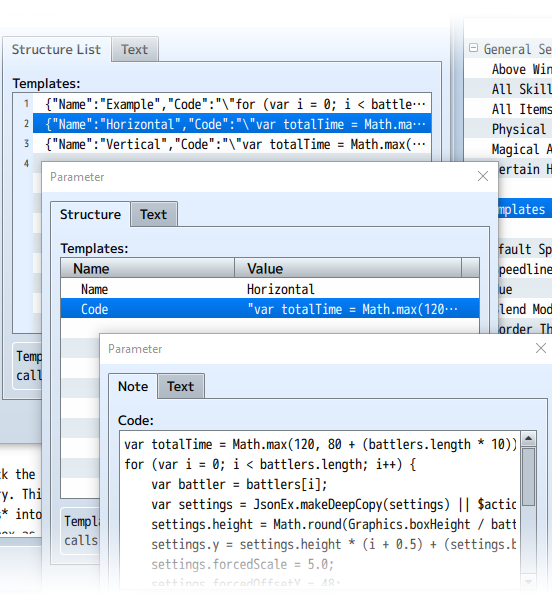
JavaScript users can create their own action cutin templates here to make certain styles of cutins occur. Included with this plugin are two example pieces for a group "horizontal" and "vertical" action cutin combo where multiple appear at once. Look further down in the help file to learn how to use templates.
Default Speedlines

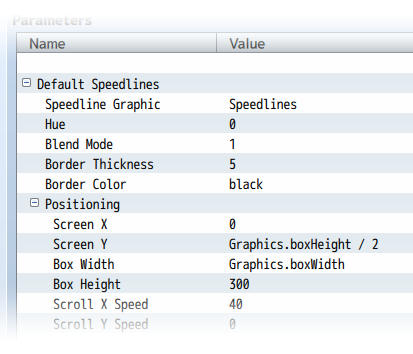
These settings determine the default settings for the speedlines graphic that appears with the action cutins. These settings aren't final for all action cutins, but instead, serve as the base/default settings and can always be changed with notetags, action sequences, and templates.
Default Face Settings
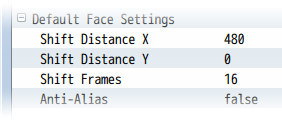
The face that appears during a cutin sequence will move from one direction to the other. You can adjust the settings here to change how it moves by default. These settings aren't final for all action cutins, but instead, serve as the base/default settings and can always be changed with notetags, action sequences, and templates.
Auto-Flash
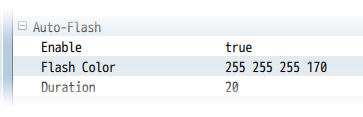
Turning this on will accompany a screen flash when the action cutin appears. Here, you can adjust the default color and duration of the flash. These settings aren't final for all action cutins, but instead, serve as the base/default settings and can always be changed with notetags, action sequences, and templates.
Auto-Shake
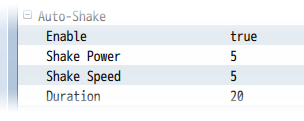
Turning this on will accompany a screen shake when the action cutin appears. Here, you can adjust the power, speed, and duration of the shake. These settings aren't final for all action cutins, but instead, serve as the base/default settings and can always be changed with notetags, action sequences, and templates.
Auto-Sound
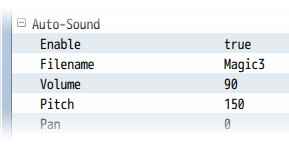
Turning this on will accompany a sound effect when the action cutin appears. Here, you can pick the file, volume, pitch, and pan of the sound. These settings aren't final for all action cutins, but instead, serve as the base/default settings and can always be changed with notetags, action sequences, and templates.
Other
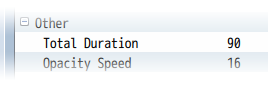
These are the other settings that you can adjust for action cutins, including the total duration of the action cutin and the opacity speed at which it fades in and out. These settings aren't final for all action cutins, but instead, serve as the base/default settings and can always be changed with notetags, action sequences, and templates.
Notetags

RPG Maker MV's editor is unable to allow for custom traits/properties that a game dev may wish to associate with a database object, event, map, etc. Notetags are used to work around such limitations by allowing the game dev to tag certain traits/properties using specific Notetags declared by the related plugin.
Here is a list of Notetag(s) that you may use.
---
Insert the following notetags in the appropriate database entries. The notetags placed into Actor and Enemy noteboxes are used to define their own personal cutins. The notetags placed inside Skill and Item noteboxes are used to define the cutin settings associated when using that skill/item.
Actor, Actor, and Enemy Notetags
If you are using these notetags for actors and classes, priority will be given to the actor notetags before given to the class notetags.
<Action Cutin Picture: filename>
Changes this actor/enemy's cutin to use that of a picture.
- Replace 'filename' with the filename of a graphic in img/pictures/
- The filename is case sensitive!
<Action Cutin Face: filename, index>
Changes this actor/enemy's cutin to use that of a face graphic.
- Replace 'filename' with the filename of a graphic in img/faces/
- The filename is case sensitive!
- Replace 'index' with a number indicating the cell of the graphic.
- Index starts from 0 and counts upwards.
<Action Cutin SV: filename, index>
Changes this actor/enemy's cutin to use that of a SV Actor graphic.
- Replace 'filename' with the filename of a graphic in img/sv_actors/
- The filename is case sensitive!
- Replace 'index' with a number indicating the cell of the graphic.
- Index starts from 0 and counts upwards.
<Action Cutin Battler: filename>
<Action Cutin Battler: filename, hue>
Changes this actor/enemy's cutin to use that of a battler graphic.
- Replace 'filename' with the filename of a graphic in either img/enemies/ or img/sv_enemies/ depending on if your game is front view or sideview.
- Replace 'hue' with a numeric value between (0 to 360) representing hue.
<Action Cutin Scale: n>
Changes the actor/enemy's cutin graphic's scale.
- Replace 'n' with a numeric value to represent scale.
- 1.0 is 100%. 0.5 is 50%. 2.25 is 225%.
<Action Cutin Offset X: +n>
<Action Cutin Offset X: -n>
<Action Cutin Offset Y: +n>
<Action Cutin Offset Y: -n>
Changes the actor/enemy's cutin graphic's offset position for X and Y.
- Replace 'n' with a numeric value in pixels to alter the x/y offset.
<Action Cutin Anti-Alias>
<Action Cutin No Anti-Alias>
Changes the anti-alias settings for the cutin graphic.
Skill and Item Notetags
<Action Cutin>
<No Action Cutin>
Changes whether or not this skill/item will have an action cutin or not. This will bypass the settings in the Plugin Parameters.
<Action Cutin Image: filename>
Changes the speedline graphic behind the face cutin to a different image.
- Replace 'filename' with the filename of a graphic in img/pictures/
- The filename is case sensitive!

<Action Cutin Hue: n>
Changes the hue of the speedline graphic behind the face cutin.
- Replace 'n' with a numeric value between (0 to 360) representing hue.
<Action Cutin Blend Mode: Normal>
<Action Cutin Blend Mode: Additive>
<Action Cutin Blend Mode: Multiply>
<Action Cutin Blend Mode: Screen>
Changes the blend mode of the speedline graphic behind the face cutin.

<Action Cutin Border Thickness: n>
Changes the thickness of the borders for the action cutin.
- Replace 'n' with a numeric value in pixels to represent border thickness.

<Action Cutin Border Color: color>
Changes the color of the borders for the action cutin.
- Replace 'color' with the name of a color or a hex code representing color.

<Action Cutin Screen X: n>
<Action Cutin Screen Y: n>
Changes the speedline graphic's screen X and Y positions.
- Replace 'n' with a numeric value representing their coordinates.
- The X position will be the far left of the speedlines graphic.
- The Y position will be the middle of the speedlines graphic.

<Action Cutin Shift Distance X: n>
<Action Cutin Shift Distance Y: n>
Changes how far the face shifts from side to side.
- Replace 'n' with a numeric value representing the distance in pixels.
<Action Cutin Shift Frames: n>
Changes the duration of the shift.
- Replace 'n' with a numeric value representing the duration in frames.

<Action Cutin Flash>
<Action Cutin No Flash>
Changes whether or not the screen flash is enabled or disabled.

<Action Cutin Flash Color: red, green, blue, intensity>
Changes the color of the screen flash.
- Replace 'red' with a numeric value (0 to 255).
- Replace 'green' with a numeric value (0 to 255).
- Replace 'blue' with a numeric value (0 to 255).
- Replace 'intensity' with a numeric value (0 to 255).

<Action Cutin Flash Duration: n>
Changes the duration of the screen flash.
- Replace 'n' with a numeric value representing the duration in frames.

<Action Cutin Shake>
<Action Cutin No Shake>
Changes whether or not the screen shake is enabled or disabled.

<Action Cutin Shake Power: n>
Changes the power of the screen shake.
- Replace 'n' with a numeric value representing the shake power.

<Action Cutin Shake Speed: n>
Changes the speed of the screen speed.
- Replace 'n' with a numeric value representing the shake speed.

<Action Cutin Shake Duration: n>
Changes the duration of the screen shake.
- Replace 'n' with a numeric value representing the duration in frames.

<Action Cutin Sound>
<Action Cutin No Sound>
Changes whether or not a sound is played when this action cutin occurs.

<Action Cutin Sound Filename: filename>
Changes the sound played for the sound effect.
- Replace 'filename' with the filename of a sound in audio/se/
- The filename is case sensitive!

<Action Cutin Sound Volume: n>
Changes the volume of the sound effect played.
- Replace 'n' with a numeric value representing the volume.

<Action Cutin Sound Pitch: n>
Changes the pitch of the sound effect played.
- Replace 'n' with a numeric value representing the pitch.

<Action Cutin Sound Pan: n>
Changes the pan of the sound effect played.
- Replace 'n' with a numeric value representing the pan.
- Negative for left.
- Positive for right.

<Action Cutin Duration: n>
Changes the duration of the action cutin.
- Replace 'n' with a numeric value representing the duration in frames.

<Action Cutin Opacity Speed: n>
Changes the rate at which the action cutin fades in and out.
- Replace 'n' with a numeric value representing the change.
- Lower numbers are slower.
- Higher numbers are faster.

<Action Cutin Forced Scale: n>
Forces the face graphic of the battler to be scaled a certain value.
- Replace 'n' with a numeric value to represent scale.
- 1.0 is 100%. 0.5 is 50%. 2.25 is 225%.

<Action Cutin Forced Anti-Alias>
<Action Cutin Forced No Anti-Alias>
Forces the face graphic of the battler to use anti-alias or not.

<Action Cutin Forced Offset X: +n>
<Action Cutin Forced Offset X: -n>
<Action Cutin Forced Offset Y: +n>
<Action Cutin Forced Offset Y: -n>
Forces the actor/enemy's cutin graphic's offset position for X and Y.
- Replace 'n' with a numeric value in pixels to alter the x/y offset.
Script Calls

Script Calls are event commands that are used to run JavaScript code during an event to call upon unique functions, usually added by the related plugin.
Here is a list of Script Call(s) that you may use:
Action cutins can be called upon and used in either in battle or on the map screen. To call them, there's various ways of doing so. Look below for instructions on how to get each one working. These require knowledge of how to use JavaScript to utilize. I am not responsible for improper usage or teaching you how to use JavaScript so you can further use these. If you wish to understand how to use RPG Maker MV's JavaScript base, I suggest taking a look at Trihan's "Jump Into JavaScript" article found here:
https://rpgmaker.net/tutorials/1230/
Single Battler Action Cutin
var battler = $gameActors.actor(1);
var settings = $actionCutinSettings();
$actionCutin(battler, settings);
- This will create a singular cutin of the designated battler while using the default cutin settings defined in the Plugin Parameters. In the above example, it creates a singular action cutin of actor 1 while using the default cutin settings.

var battler = $gameActors.leader();
var settings = $actionCutinSettings($dataSkills[10]);
$actionCutin(battler, settings);
- This will create a singular cutin of the designated battler while using the cutin settings associated with a skill's notetags in the database. In the above example, it creates a singular action cutin of the party leader while using skill 10's notetag settings.

var battler = $gameTroop.members()[0];
var settings = $actionCutinSettings($dataItems[20]);
$actionCutin(battler, settings);
- This will create a singular cutin of the designated battler while using the cutin settings associated with an item's notetags in the database. In the above example, it creates a singular action cutin of the game troop member with index 0 while using item 20's notetag settings.
Multiple Battlers Action Cutin
var battlers = []; battlers.push($gameActors.actor(1)); battlers.push($gameActors.actor(2)); battlers.push($gameActors.actor(3)); battlers.push($gameActors.actor(4)); var settings = $actionCutinSettings($dataSkills[10]); var template = 'Horizontal'; $actionCutinTemplate(battlers, settings, template); - This uses the templates found in the Plugin Parameters to create multiple cutins of battlers at a time and using certain notetag settings from a designated skill selected by the game dev. In the above example, actors 1 through 4 are listed as a part of the battlers, with notetag settings from skill 10 in the database, and the 'Horizontal' template that's defined in the Plugin Parameters. var battlers = []; battlers.push($gameParty.members()[0]); battlers.push($gameParty.members()[1]); battlers.push($gameParty.members()[2]); battlers.push($gameParty.members()[3]); var settings = $actionCutinSettings($dataItems[20]); var template = 'Vertical'; $actionCutinTemplate(battlers, settings, template); - This uses the templates found in the Plugin Parameters to create multiple cutins of battlers at a time and using certain notetag settings from a designated item selected by the game dev. In the above example, party members with an index value between 0 and 3 are listed as a part of the battlers, with notetag settings from item 20 in the database, and the 'Vertical' template that's defined in the Plugin Parameters. var battlers = []; battlers.push($gameTroop.members()[0]); battlers.push($gameTroop.members()[1]); battlers.push($gameTroop.members()[2]); battlers.push($gameTroop.members()[3]); var settings = $actionCutinSettings(); var template = 'Horizontal'; $actionCutinTemplate(battlers, settings, template); - This uses the templates found in the Plugin Parameters to create multiple cutins of battlers at a time and using the default cutin settings defined in the Plugin Parameters. In the above example, enemy troop members with an index value between 0 and 3 are listed as a part of the battlers, with default cutin settings, and the 'Horizontal' template that's defined in the Plugin Parameters. Custom Settings If you don't like the settings made in certain skills/items or would just like to create your own without having to create new skills/items, then start with the following code. var settings = $actionCutinSettings(); This grabs the default cutin settings. As long as you modify it before inserting it into $actionCutin or $actionCutinTemplate, then the settings will behave differently from the default. Below is a list of the various things you can do to your code to change it up. You're not required to use all of them. Just pick the settings alterations that need changing. settings.backgroundImg = 'Speedlines'; settings.backgroundHue = 0; settings.blendMode = 1; settings.borderThickness = 5; settings.borderColor = 'black'; settings.x = 0; settings.y = Graphics.boxHeight / 2; settings.width = Graphics.boxWidth; settings.height = 300; settings.speedX = 40; settings.speedY = 0; settings.shiftDistanceX = 480; settings.shiftDistanceY = 0; settings.shiftFrames = 16; settings.flash = true; settings.flashColor = [255, 255, 255, 170]; settings.flashDuration = 20; settings.shake = true; settings.shakePower = 5; settings.shakeSpeed = 5; settings.shakeDuration = 20; settings.sound = true; settings.soundName = 'Magic3'; settings.soundVolume = 90; settings.soundPitch = 150; settings.soundPan = 0; settings.duration = 90; settings.opacitySpeed = 16; settings.forcedScale = 2.0; settings.forcedAntiAlias = false; settings.forcedOffsetX = 0; settings.forcedOffsetY = 0; Pick and choose the setting changes you want before inserting them into $actionCutin or $actionCutinTemplate's arguments. Below is an example of how to use it in a complete script call. var battler = $gameParty.leader(); var settings = $actionCutinSettings(); settings.backgroundHue = 180; settings.blendMode = 0; $actionCutin(battler, settings); The above script call changes the speedlines to have a hue of 180 while changing the blend mode to 'Normal'. A regular single battler action cutin is then used through the $actionCutin function. Changing Battler Face Cutins var battler = $gameActors.actor(1); battler.changeActionCutinFaceData(type, filename, index, hue); - Replace 'type' with 'picture', 'face', 'svbattler', or 'battler' (keep the quotes). This determines the type of asset to use. - Replace 'filename' with the filename of the associated graphic. - The filename is case sensitive! - Replace 'index' with a numeric value starting from 0 to determine the cell. - Index is used with 'face' and 'svbattler'. - Replace 'hue' with a numeric value (0 to 360) to determine its hue. - Hue is used with 'battler'. var battler = $gameActors.actor(1); battler.changeActionCutinFaceScale(scale); - Replace 'scale' with a numeric value to determine the cutin's scale. - 1.0 is 100%. 0.5 is 50%. 2.25 is 225%. var battler = $gameActors.actor(1); battler.changeActionCutinFaceOffset(offsetX, offsetY); - Replace 'offsetX' and 'offsetY' with numeric values to determine how many pixels to offset the face cutin by. var battler = $gameActors.actor(1); battler.changeActionCutinFaceAntiAlias(boolean); - Replace 'boolean' with 'true' or 'false' (remove the quotes) to determine if the face cutin graphic will use anti-alias or not. var battler = $gameActors.actor(1); battler.clearActionCutinFaceData(); - Removes all changes made to the designated battler regarding face cutins. This will revert the battler to using its original face cutin data that's made through notetags or through the plugin's defaults. Action Sequences This section only applies to you if you use Yanfly's Battle Engine Core and its action sequences. If you don't use either, you're free to ignore this section. This part of the document will be formatted like Yanfly's Action Sequence help file to bring about a sense of familiarity.=================================================================
ACTION CUTIN targets: arguments (optional parameters) TEMPLATE name IMG filename HUE value BLENDMODE NORMAL BLENDMODE ADDITIVE BLENDMODE MULTIPLY BLENDMODE SCREEN BORDER THICKNESS value BORDER COLOR color SCREEN X value SCREEN Y value WIDTH value HEIGHT value SPEED X value SPEED Y value SHIFT X value SHIFT Y value SHIFT FRAMES value FLASH ON FLASH OFF SHAKE ON SHAKE OFF SOUND ON SOUND OFF DURATION value OPACITY SPEED value FORCED SCALE value FORCED ANTIALIAS ON FORCED ANTIALIAS OFF FORCED OFFSET x y - - - - - - - - - - - - - - - - - - - - - - - - - - - - - - - - - - - - - - - Plays an action cutin during the action sequence. The action cutin will use the default cutin settings unless you use the optional arguments listed. The following below explain what each argument does: Template: picks a template from the Plugin Parameters matching the name used Img: picks a speedline graphic of a matching filename from img/pictures/ Hue: changes the speedline graphic's hue (pick a number between 0 and 360) BlendMode: changes the blend mode of the speedline graphic Border Thickness: changes the border thickness to 'value' Border Color: changes the color of the border to 'color' Screen X: sets the speedline graphic's left x position to 'value' Screen Y: sets the speedline graphic's middle y position to 'value' Width: sets the speedline graphic's width to 'value' Height: sets the speedline graphic's height to 'value' Speed X: sets the speedline's x movement speed to 'value' Speed Y: sets the speedline's y movement speed to 'value' Shift X: sets the distance the face cutin travels horizontally to 'value' Shift Y: sets the distance the face cutin travels vertically to 'value' Shift Frames: sets the time in frames the face cutin travels in 'value' Flash On/Off: Turns on/off the default Screen Flash for this action cutin Shake On/Off: Turns on/off the default Screen Shake for this action cutin Sound On/Off: Turns on/off the default Sound Effect for this action cutin Duration: sets the duration of the action cutin to 'value' Opacity Speed: sets the opacity speed ford fading in/out to 'value' Forced Scale: If used, forces all cutins to use this scale 'value' Forced AntiAlias On/Off: If used, forces anti-alias to be on/off Forced Offset: If used, forces face cutin to be offset by 'x' and 'y' pixels - - - - - - - - - - - - - - - - - - - - - - - - - - - - - - - - - - - - - - - Usage Example: Action Cutin User Action Cutin Allies: template Horizontal Action Cutin Targets: template Vertical, Hue 360, BlendMode Normal=================================================================
Atelier Irina
This is a plugin created by Atelier Irina. You can also follow Atelier Irina on itch.io.
RPG Maker Version
This plugin is made for and tested on RPG Maker MV with version 1.6.2. I cannot guarantee if it works on lower versions. Some of the plugin parameters require the later updates of RPG Maker MV for you to be able to use their entries so please update RPG Maker MV to the latest version if you want the best experience in using this plugin.Terms of Use
You are only allowed to use the plugins made by Atelier Irina if you agree to all of the following: # These plugins may be used in free or commercial games. # 'RPG Maker Irina' must be given credit in your games. # You are allowed to edit the code. # Do NOT change the filename, parameters, and information of the plugin. # You are NOT allowed to redistribute these Plugins. # You may NOT take code for your own released Plugins.Changelog
* April 27, 2019: Fixed a bug regarding the changeActionCutinFaceData script call. * April 25, 2019: Added fail safes for compatibility issues regarding external plugins that aren't creating their window layer properly.