Difference between revisions of "Category:Action Sequences (MV)"
| Line 588: | Line 588: | ||
============================================================================= | ============================================================================= | ||
</pre> | </pre> | ||
| + | |||
| + | == [[Improved Battlebacks (YEP)|Improved Battlebacks]] == | ||
| + | |||
| + | <nowiki> | ||
| + | If you have YEP_BattleEngineCore.js installed with this plugin located | ||
| + | underneath it in the Plugin Manager, you can make use of these extra | ||
| + | damage related action sequences. | ||
| + | |||
| + | ============================================================================= | ||
| + | BATTLEBACK id ADD: folder, filename | ||
| + | BATTLEBACK id ADD: folder, filename, hue | ||
| + | - - - - - - - - - - - - - - - - - - - - - - - - - - - - - - - - - - - - - - - | ||
| + | Replace 'id' with the battleback you wish to alter as a number larger than 2 | ||
| + | (i.e. 3 or above). Replace 'folder' with the exact folder name in your | ||
| + | project's 'img' folder (case sensitive). Replace 'filename' with the image | ||
| + | filename without the file extension (case sensitive). If 'hue' is used, | ||
| + | replace 'hue' with a number between 0 and 360 to change the hue of the image | ||
| + | used. This will add a new battleback stacked on top of battlebacks 1 and 2 | ||
| + | with higher ID's being on top. When newly added, the new battleback will | ||
| + | start at opacity 0 and fade in with a duration of 20 frames. | ||
| + | - - - - - - - - - - - - - - - - - - - - - - - - - - - - - - - - - - - - - - - | ||
| + | Usage Example: battleback 3 add: battlebacks1, GrassMazePool | ||
| + | battleback 4 add: battlebacks2, GrassMaze, 180 | ||
| + | ============================================================================= | ||
| + | |||
| + | ============================================================================= | ||
| + | BATTLEBACK id REMOVE | ||
| + | - - - - - - - - - - - - - - - - - - - - - - - - - - - - - - - - - - - - - - - | ||
| + | Replace 'id' with the battleback you wish to alter as a number larger than | ||
| + | 2 (i.e. 3 or above). This will remove the battleback from being shown. When | ||
| + | this command is used, the battleback will fade with a duration of 20 frames. | ||
| + | Once it reaches 0 opacity, the battleback will be removed from the battle. | ||
| + | - - - - - - - - - - - - - - - - - - - - - - - - - - - - - - - - - - - - - - - | ||
| + | Usage Example: battleback 3 remove | ||
| + | battleback 4 remove | ||
| + | ============================================================================= | ||
| + | |||
| + | ============================================================================= | ||
| + | BATTLEBACK id CHANGE TO: folder, filename | ||
| + | BATTLEBACK id CHANGE TO: folder, filename, hue | ||
| + | - - - - - - - - - - - - - - - - - - - - - - - - - - - - - - - - - - - - - - - | ||
| + | Replace 'id' with the battleback you wish to alter. Replace 'folder' with | ||
| + | the exact folder name in your project's 'img' folder (case sensitive). | ||
| + | Replace 'filename' with the image filename without the file extension (case | ||
| + | sensitive). This will change the designated battleback's image to use the | ||
| + | desired image depicted by the folder and filename. If 'hue' is used, replace | ||
| + | 'hue' with a number between 0 and 360 to change the hue of the image used. | ||
| + | - - - - - - - - - - - - - - - - - - - - - - - - - - - - - - - - - - - - - - - | ||
| + | Usage Example: battleback 1 change to: parallaxes, SeaofClouds | ||
| + | battleback 2 change to: battlebacks2, Ship, 180 | ||
| + | ============================================================================= | ||
| + | |||
| + | ============================================================================= | ||
| + | BATTLEBACK id FADE OUT | ||
| + | BATTLEBACK id FADE OUT: duration | ||
| + | BATTLEBACK id FADE IN | ||
| + | BATTLEBACK id FADE IN: duration | ||
| + | - - - - - - - - - - - - - - - - - - - - - - - - - - - - - - - - - - - - - - - | ||
| + | Replace 'id' with the battleback you wish to alter. This will cause the | ||
| + | designated battleback to fade out/in. If 'duration' is used, replace it with | ||
| + | a number to indicate how many frames will be used for the fade out/in. If | ||
| + | no duration is specified, it will default to 20 frames. | ||
| + | - - - - - - - - - - - - - - - - - - - - - - - - - - - - - - - - - - - - - - - | ||
| + | Usage Example: battleback 1 fade out | ||
| + | battleback 2 fade out: 120 | ||
| + | battleback 1 fade in | ||
| + | battleback 2 fade in: 180 | ||
| + | ============================================================================= | ||
| + | |||
| + | ============================================================================= | ||
| + | BATTLEBACK id OPACITY: n | ||
| + | BATTLEBACK id OPACITY: n% | ||
| + | - - - - - - - - - - - - - - - - - - - - - - - - - - - - - - - - - - - - - - - | ||
| + | Replace 'id' with the battleback you wish to alter. Replace 'n' with the | ||
| + | opacity value you wish to achieve (from 0 to 255) or replace 'n%' with the | ||
| + | opacity rate you wish to set the battleback to (from 0% to 100%). This will | ||
| + | set the designated battleback's opacity to that value. If there are any fade | ||
| + | in or out commands occurring as this command is issued, they'll be disabled. | ||
| + | - - - - - - - - - - - - - - - - - - - - - - - - - - - - - - - - - - - - - - - | ||
| + | Usage Example: battleback 1 opacity: 127 | ||
| + | battleback 2 opacity: 50% | ||
| + | ============================================================================= | ||
| + | |||
| + | ============================================================================= | ||
| + | BATTLEBACK id SCROLL SPEED X: +n | ||
| + | BATTLEBACK id SCROLL SPEED X: -n | ||
| + | BATTLEBACK id SCROLL SPEED Y: +n | ||
| + | BATTLEBACK id SCROLL SPEED Y: -n | ||
| + | - - - - - - - - - - - - - - - - - - - - - - - - - - - - - - - - - - - - - - - | ||
| + | Replace 'id' with the battleback you wish to alter. Replace 'n' with the | ||
| + | value you wish to change the scroll speed X or scroll speed Y of. The higher | ||
| + | the 'n' value, the faster it scrolls. | ||
| + | - - - - - - - - - - - - - - - - - - - - - - - - - - - - - - - - - - - - - - - | ||
| + | Usage Example: battleback 1 scroll speed x: +1 | ||
| + | battleback 1 scroll speed y: +2 | ||
| + | battleback 2 scroll speed x: -3 | ||
| + | battleback 2 scroll speed y: -4 | ||
| + | ============================================================================= | ||
| + | |||
| + | ============================================================================= | ||
| + | BATTLEBACK id RESET SCROLL SPEED | ||
| + | - - - - - - - - - - - - - - - - - - - - - - - - - - - - - - - - - - - - - - - | ||
| + | Replace 'id' with the battleback you wish to alter. Resets the scroll | ||
| + | speeds for X and Y back to 0. | ||
| + | - - - - - - - - - - - - - - - - - - - - - - - - - - - - - - - - - - - - - - - | ||
| + | Usage Example: battleback 1 reset scroll speed | ||
| + | ============================================================================= | ||
| + | </nowiki> | ||
== [[Weather In Battle (YEP)|Weather In Battle]] == | == [[Weather In Battle (YEP)|Weather In Battle]] == | ||
Revision as of 18:11, 25 June 2019






|
VisuStella, Caz Wolf, Fallen Angel Olivia, Atelier Irina, and other affiliated content creators.
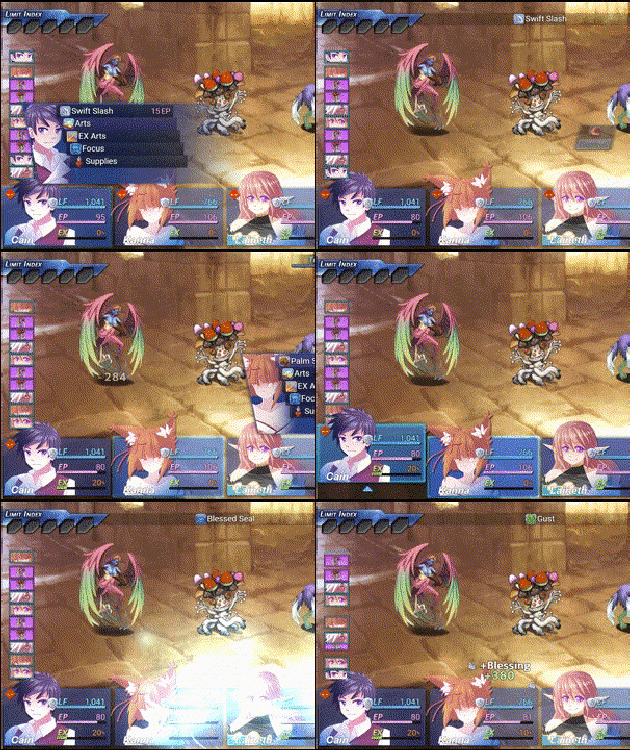
Action Cutin
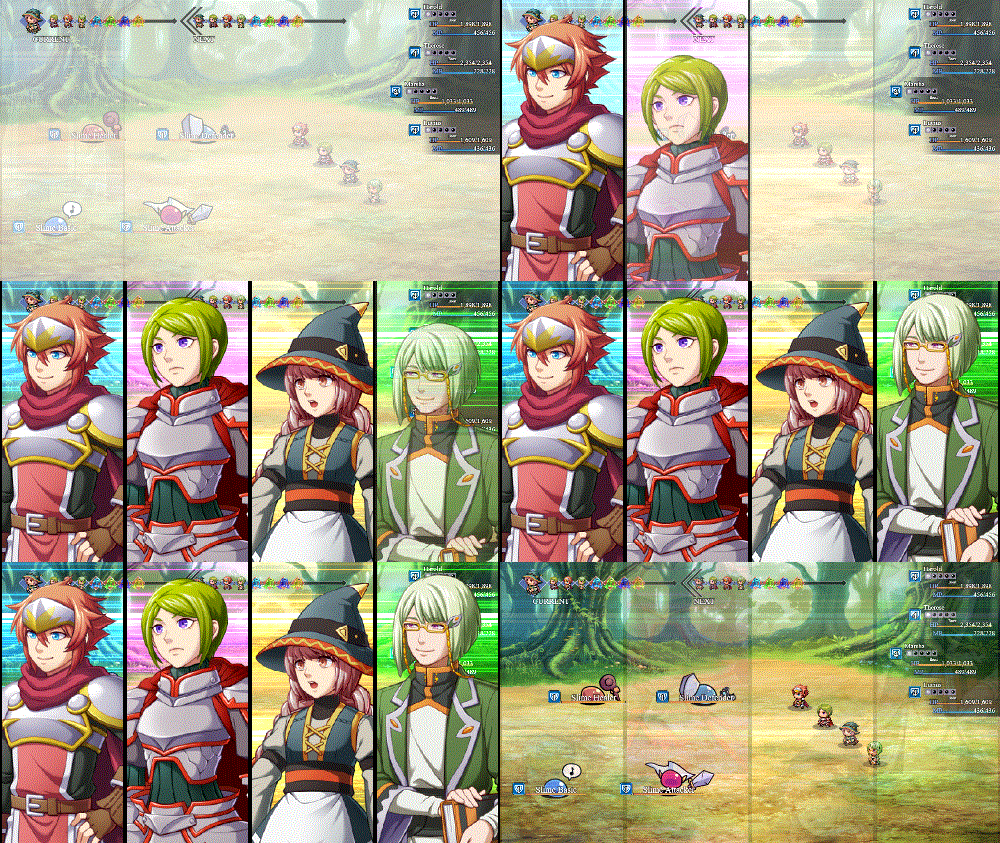
This section only applies to you if you use Yanfly's Battle Engine Core and its action sequences. If you don't use either, you're free to ignore this section. This part of the document will be formatted like Yanfly's Action Sequence help file to bring about a sense of familiarity.
=============================================================================
ACTION CUTIN targets: arguments
(optional parameters)
TEMPLATE name
IMG filename
HUE value
BLENDMODE NORMAL
BLENDMODE ADDITIVE
BLENDMODE MULTIPLY
BLENDMODE SCREEN
BORDER THICKNESS value
BORDER COLOR color
SCREEN X value
SCREEN Y value
WIDTH value
HEIGHT value
SPEED X value
SPEED Y value
SHIFT X value
SHIFT Y value
SHIFT FRAMES value
FLASH ON
FLASH OFF
SHAKE ON
SHAKE OFF
SOUND ON
SOUND OFF
DURATION value
OPACITY SPEED value
FORCED SCALE value
FORCED ANTIALIAS ON
FORCED ANTIALIAS OFF
FORCED OFFSET x y
- - - - - - - - - - - - - - - - - - - - - - - - - - - - - - - - - - - - - - -
Plays an action cutin during the action sequence. The action cutin will use the
default cutin settings unless you use the optional arguments listed. The following below explain what each argument does:
Template: picks a template from the Plugin Parameters matching the name used
Img: picks a speedline graphic of a matching filename from img/pictures/
Hue: changes the speedline graphic's hue (pick a number between 0 and 360)
BlendMode: changes the blend mode of the speedline graphic
Border Thickness: changes the border thickness to 'value'
Border Color: changes the color of the border to 'color'
Screen X: sets the speedline graphic's left x position to 'value'
Screen Y: sets the speedline graphic's middle y position to 'value'
Width: sets the speedline graphic's width to 'value'
Height: sets the speedline graphic's height to 'value'
Speed X: sets the speedline's x movement speed to 'value'
Speed Y: sets the speedline's y movement speed to 'value'
Shift X: sets the distance the face cutin travels horizontally to 'value'
Shift Y: sets the distance the face cutin travels vertically to 'value'
Shift Frames: sets the time in frames the face cutin travels in 'value'
Flash On/Off: Turns on/off the default Screen Flash for this action cutin
Shake On/Off: Turns on/off the default Screen Shake for this action cutin
Sound On/Off: Turns on/off the default Sound Effect for this action cutin
Duration: sets the duration of the action cutin to 'value'
Opacity Speed: sets the opacity speed ford fading in/out to 'value'
Forced Scale: If used, forces all cutins to use this scale 'value'
Forced AntiAlias On/Off: If used, forces anti-alias to be on/off
Forced Offset: If used, forces face cutin to be offset by 'x' and 'y' pixels
- - - - - - - - - - - - - - - - - - - - - - - - - - - - - - - - - - - - - - -
Usage Example: Action Cutin User
Action Cutin Allies: template Horizontal
Action Cutin Targets: template Vertical, Hue 360, BlendMode Normal
=============================================================================
Action Sequence Pack 3
The following contains a list of the actions you can use inside the five
action sequences. Each action has a unique function and requires certain
formats to operate properly.

=============================================================================
CAMERA CLAMP ON
CAMERA CLAMP OFF
- - - - - - - - - - - - - - - - - - - - - - - - - - - - - - - - - - - - - - -
By default, the camera clamp is on, which forces the camera to never pan
outside of the battlefield's boundaries. However, in the event you wish to
turn this off, use 'camera clamp off' to shut off the clamp. The clamp,
however, will be turned back on at the end of each 'perform finish' action.
- - - - - - - - - - - - - - - - - - - - - - - - - - - - - - - - - - - - - - -
Usage Example: camera clamp on
               camera clamp off
=============================================================================

=============================================================================
CAMERA FOCUS: target, (location), (frames)
- - - - - - - - - - - - - - - - - - - - - - - - - - - - - - - - - - - - - - -
CAMERA FOCUS: target, FRONT BASE, (frames)
CAMERA FOCUS: target, BASE, (frames)
CAMERA FOCUS: target, BACK BASE, (frames)
CAMERA FOCUS: target, FRONT CENTER, (frames)
CAMERA FOCUS: target, CENTER, (frames)
CAMERA FOCUS: target, BACK CENTER, (frames)
CAMERA FOCUS: target, FRONT HEAD, (frames)
CAMERA FOCUS: target, HEAD, (frames)
CAMERA FOCUS: target, BACK HEAD, (frames)
- - - - - - - - - - - - - - - - - - - - - - - - - - - - - - - - - - - - - - -
This will focus on a target(s) (refer to target typing) and a location. If
the location is omitted, the camera will focus on the target(s)'s center.
Note: The camera will not shift past screen boundaries.
- - - - - - - - - - - - - - - - - - - - - - - - - - - - - - - - - - - - - - -
Usage Example: camera focus: user
               camera focus: target, front, 40
               camera focus: enemies, center, 30
=============================================================================

=============================================================================
CAMERA OFFSET: DIRECTION, DISTANCE
- - - - - - - - - - - - - - - - - - - - - - - - - - - - - - - - - - - - - - -
CAMERA OFFSET: LEFT, distance
CAMERA OFFSET: RIGHT, distance
CAMERA OFFSET: UP, distance
CAMERA OFFSET: DOWN, distance
- - - - - - - - - - - - - - - - - - - - - - - - - - - - - - - - - - - - - - -
Offsets the camera a direction by (distance) amount.
- - - - - - - - - - - - - - - - - - - - - - - - - - - - - - - - - - - - - - -
Usage Example: camera offset: left, 200
               camera offset: right, Graphics.boxWidth / 4
               camera offset: up, 300
               camera offset: down, $gameVariables.value(3);
=============================================================================

=============================================================================
CAMERA PAN
- - - - - - - - - - - - - - - - - - - - - - - - - - - - - - - - - - - - - - -
CAMERA PAN: LEFT, distance, (frames)
CAMERA PAN: RIGHT, distance, (frames)
CAMERA PAN: UP, distance, (frames)
CAMERA PAN: DOWN, distance, (frames)
- - - - - - - - - - - - - - - - - - - - - - - - - - - - - - - - - - - - - - -
Pans the camera a direction a certain distance in pixels. You can use a
combination of left/right and up/down to perform a diagonal camera pan.
Using 'frames' will allow you to adjust the duration of the camera pan.
Omitting 'frames' will set the camera pan duration to 30 frames.
Note: The camera will not shift past screen boundaries.
- - - - - - - - - - - - - - - - - - - - - - - - - - - - - - - - - - - - - - -
Usage Example: camera pan: left, 200
               camera pan: up, 250
               camera pan: right, 500, 60
               camera pan: down: 300, 60
=============================================================================

=============================================================================
CAMERA SCREEN
- - - - - - - - - - - - - - - - - - - - - - - - - - - - - - - - - - - - - - -
CAMERA SCREEN: TOP LEFT, (frames)
CAMERA SCREEN: FAR LEFT, (frames)
CAMERA SCREEN: BOTTOM LEFT, (frames)
CAMERA SCREEN: TOP CENTER, (frames)
CAMERA SCREEN: CENTER, (frames)
CAMERA SCREEN: BOTTOM CENTER, (frames)
CAMERA SCREEN: TOP RIGHT, (frames)
CAMERA SCREEN: FAR RIGHT, (frames)
CAMERA SCREEN: BOTTOM RIGHT, (frames)
CAMERA SCREEN: POINT, x, y, (frames)
CAMERA SCREEN: target, FRONT, (frames)
CAMERA SCREEN: target, BASE, (frames)
CAMERA SCREEN: target, BACK, (frames)
CAMERA SCREEN: target, FRONT CENTER, (frames)
CAMERA SCREEN: target, CENTER, (frames)
CAMERA SCREEN: target, BACK CENTER, (frames)
CAMERA SCREEN: target, FRONT TOP, (frames)
CAMERA SCREEN: target, TOP, (frames)
CAMERA SCREEN: target, BACK TOP, (frames)
- - - - - - - - - - - - - - - - - - - - - - - - - - - - - - - - - - - - - - -
Moves the camera to a certain part of the screen. If you choose a target,
the camera will lock to that part of the target. Using (frames) will
determine the duration of the time the camera will move over to the target
location. Omitting (frames) will set the camera pan duration to 30 frames.
Note: The camera will not shift past screen boundaries.
- - - - - - - - - - - - - - - - - - - - - - - - - - - - - - - - - - - - - - -
Usage Example: camera screen: top left
               camera screen: far right, 30
               camera screen: point, 400, 300, 60
               camera screen: user, base
               camera screen: targets, base, 60
=============================================================================

=============================================================================
RESET CAMERA: (frames)
- - - - - - - - - - - - - - - - - - - - - - - - - - - - - - - - - - - - - - -
Resets the camera location back to default location, which is the center of
the battlefield. Using (frames) will allow you to adjust the duration in
which the camera resets. Omitting 'frames' will set the camera to reset in
30 frames.
Note: The camera will not shift past screen boundaries.
- - - - - - - - - - - - - - - - - - - - - - - - - - - - - - - - - - - - - - -
Usage Example: reset camera
               reset camera: 30
=============================================================================

=============================================================================
RESET ZOOM: (frames)
- - - - - - - - - - - - - - - - - - - - - - - - - - - - - - - - - - - - - - -
Resets the camera zoom back to default zoom, which is 100%. Using (frames)
will allow you to adjust the duration in which the zoom resets. Omitting
'frames' will set the zoom to reset in 30 frames.
Note: The camera will not shift past screen boundaries.
Note: Zooming only works with Sideview.
- - - - - - - - - - - - - - - - - - - - - - - - - - - - - - - - - - - - - - -
Usage Example: reset zoom
               reset zoom: 30
=============================================================================

=============================================================================
WAIT FOR CAMERA
- - - - - - - - - - - - - - - - - - - - - - - - - - - - - - - - - - - - - - -
Waits for the camera to finish panning before going on to the next action in
the action sequence.
- - - - - - - - - - - - - - - - - - - - - - - - - - - - - - - - - - - - - - -
Usage Example: wait for camera
=============================================================================

=============================================================================
WAIT FOR ZOOM
- - - - - - - - - - - - - - - - - - - - - - - - - - - - - - - - - - - - - - -
Waits for the zoom to finish changing before going on to the next action in
the action sequence.
- - - - - - - - - - - - - - - - - - - - - - - - - - - - - - - - - - - - - - -
Usage Example: wait for zoom
=============================================================================

=============================================================================
ZOOM: x%, (frames)
ZOOM: x.y, (frames)
- - - - - - - - - - - - - - - - - - - - - - - - - - - - - - - - - - - - - - -
Zooms to x% or x.y rate. Using (frames) will allow you to adjust the
duration in which the zooming occurs. Omitting 'frames' will set the zoom
duration to 30 frames.
- - - - - - - - - - - - - - - - - - - - - - - - - - - - - - - - - - - - - - -
Usage Example: zoom: 200%
               zoom: 1.5, 45
=============================================================================
Action Sequence Impact
- Prev Target, Next Target

Before I begin on the Action Sequences, I want to say there's two new additions to the targeting mechanism. You know the parts where you put in "user" or "targets"? Now, during the <Target Actions> phase, you can use either "Prev Target" or "Next Target" to grab either the previous one or the next target in the list.
- New Stuff
This part of the document will now be formatted like Yanfly's Action Seq help file to bring about a sense of familiarity.
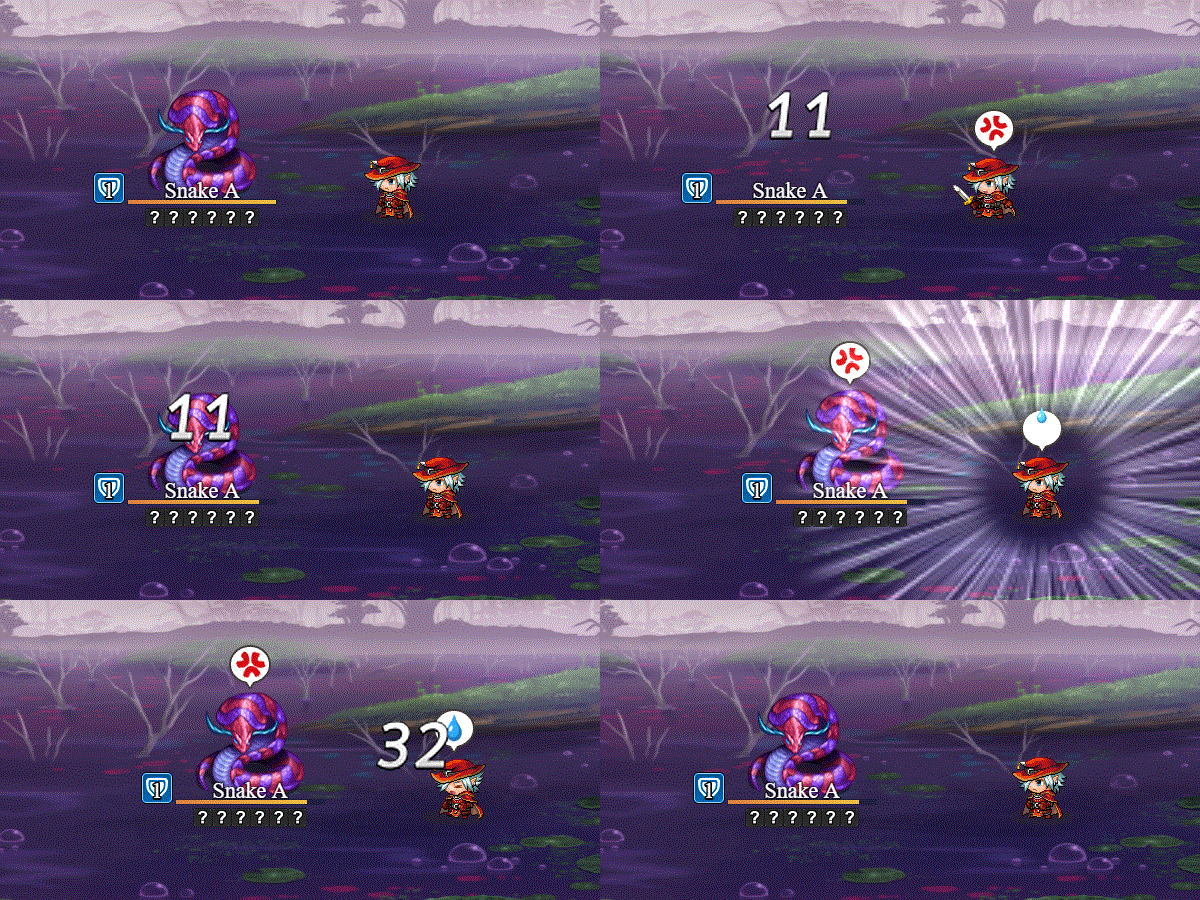
- Balloon
=============================================================================
BALLOON type: targets
- - - - - - - - - - - - - - - - - - - - - - - - - - - - - - - - - - - - - - -
Plays a balloon emote that you normally see on the map scene but in battle
instead. For types, replace that word with any of the following:

     !
     Exclamation

     ?
     Question

     Music
     Note
     Music Note

     Heart

     Anger
     Pissed

     Sweat

     Cobweb

     Silence
     ...

     Lightbulb
     Idea

     zzz
     Sleep

     User-Defined 1
     User-Defined 2
     User-Defined 3
     User-Defined 4
     User-Defined 5
     User1
     User2
     User3
     User4
     User5

- - - - - - - - - - - - - - - - - - - - - - - - - - - - - - - - - - - - - - -
Usage Example: balloon heart: user
               balloon !: target
=============================================================================
- Move Type
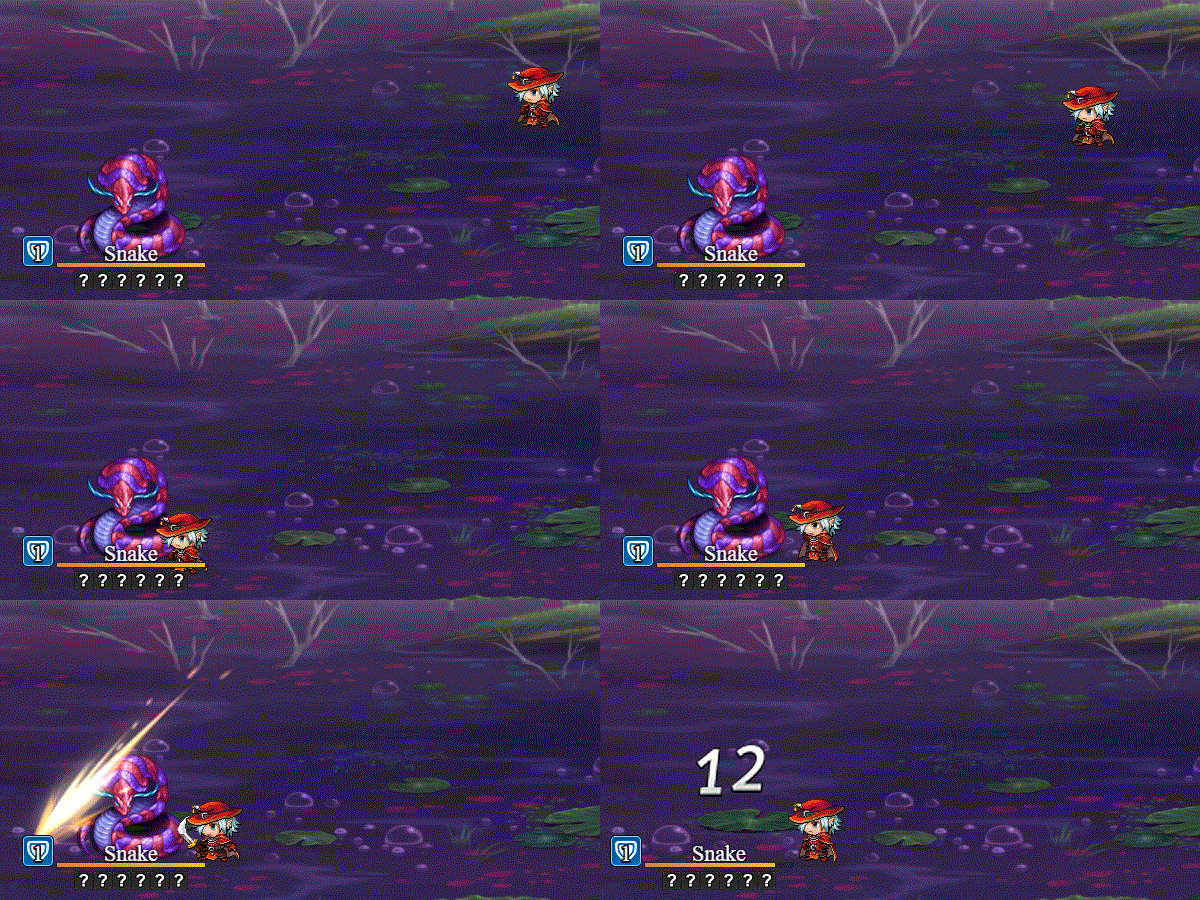
=============================================================================
MOVE TYPE: target, easing
- - - - - - - - - - - - - - - - - - - - - - - - - - - - - - - - - - - - - - -
Changes the way the target moves (until the end of the skill/item is done)
using easing. Replace 'easing' with any of the following:

     Linear ......... No easing, no acceleration

     InSine ......... Slight acceleration from zero to full speed
     OutSine ........ Slight deceleration at the end
     InOutSine ...... Slight accel. at beginning and slight decel. at end

     InQuad ......... LV2 Accelerating from zero velocity
     OutQuad ........ LV2 Decelerating to zero velocity
     InOutQuad ...... LV2 Acceleration until halfway, then deceleration

     InCubic ........ LV3 Accelerating from zero velocity
     OutCubic ....... LV3 Decelerating to zero velocity
     InOutCubic ..... LV3 Acceleration until halfway, then deceleration

     InQuart ........ LV4 Accelerating from zero velocity
     OutQuart ....... LV4 Decelerating to zero velocity
     InOutQuart ..... LV4 Acceleration until halfway, then deceleration

     InQuint ........ LV5 Accelerating from zero velocity
     OutQuint ....... LV5 Decelerating to zero velocity
     InOutQuint ..... LV5 Acceleration until halfway, then deceleration

     InExpo ......... Accelerate exponentially until finish
     OutExpo ........ Initial exponential acceleration slowing to stop
     InOutExpo ...... Exponential acceleration and deceleration

     InCirc ......... Increasing velocity until stop
     OutCirc ........ Start fast, decreasing velocity until stop
     InOutCirc ...... Fast increase in velocity, fast decrease in velocity

     InBack ......... Slow movement backwards then fast snap to finish
     OutBack ........ Fast snap to backwards point then slow to finish
     InOutBack ...... Back In, then Back Out

     InElastic ...... Bounces slowly then quickly to finish
     OutElastic ..... Fast acceleration, bounces to zero
     InOutElastic ... Slow start and end, two bounces sandwich a fast motion

     InBounce ....... Bounce increasing in velocity until completion
     OutBounce ...... Bounce to completion
     InOutBounce .... Bounce in and bounce out

- - - - - - - - - - - - - - - - - - - - - - - - - - - - - - - - - - - - - - -
Usage Example: move type: user, InOutBack
               move type: target, OutBounce
=============================================================================
- Move Offset
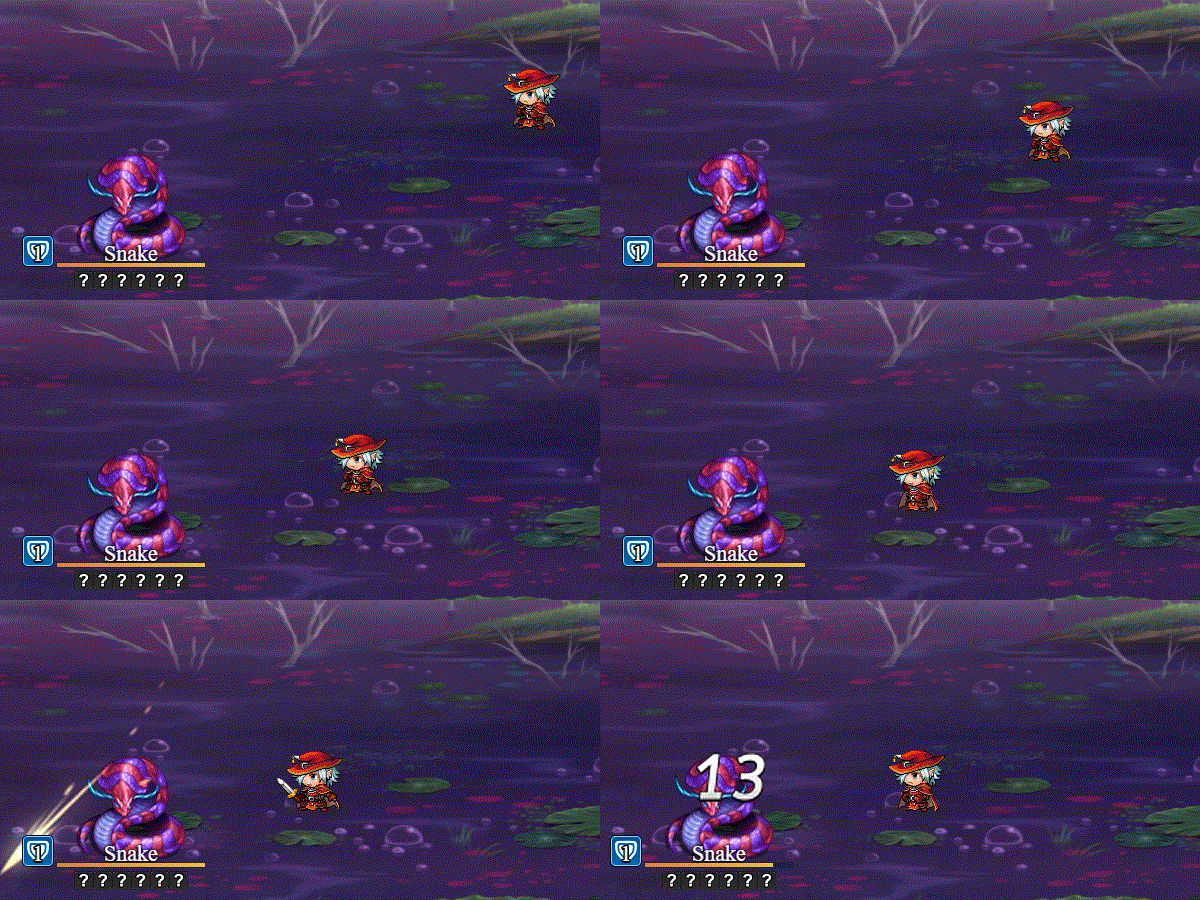
=============================================================================
MOVE target OFFSET: +X, +Y
- - - - - - - - - - - - - - - - - - - - - - - - - - - - - - - - - - - - - - -
Use this after a Move Action Sequence. This lets you adjust the movement
location goal of the target by +x and +y. You can use negative numbers, too.
A positive number will mean further past the goal. A negative number means
before the goal. This is done this way to not have absolutes making tricky
calculations depending on which way the battler is facing
- - - - - - - - - - - - - - - - - - - - - - - - - - - - - - - - - - - - - - -
Usage Example: move user offset: +100, +0
               move target offset: -50, +25
=============================================================================
- Projectile
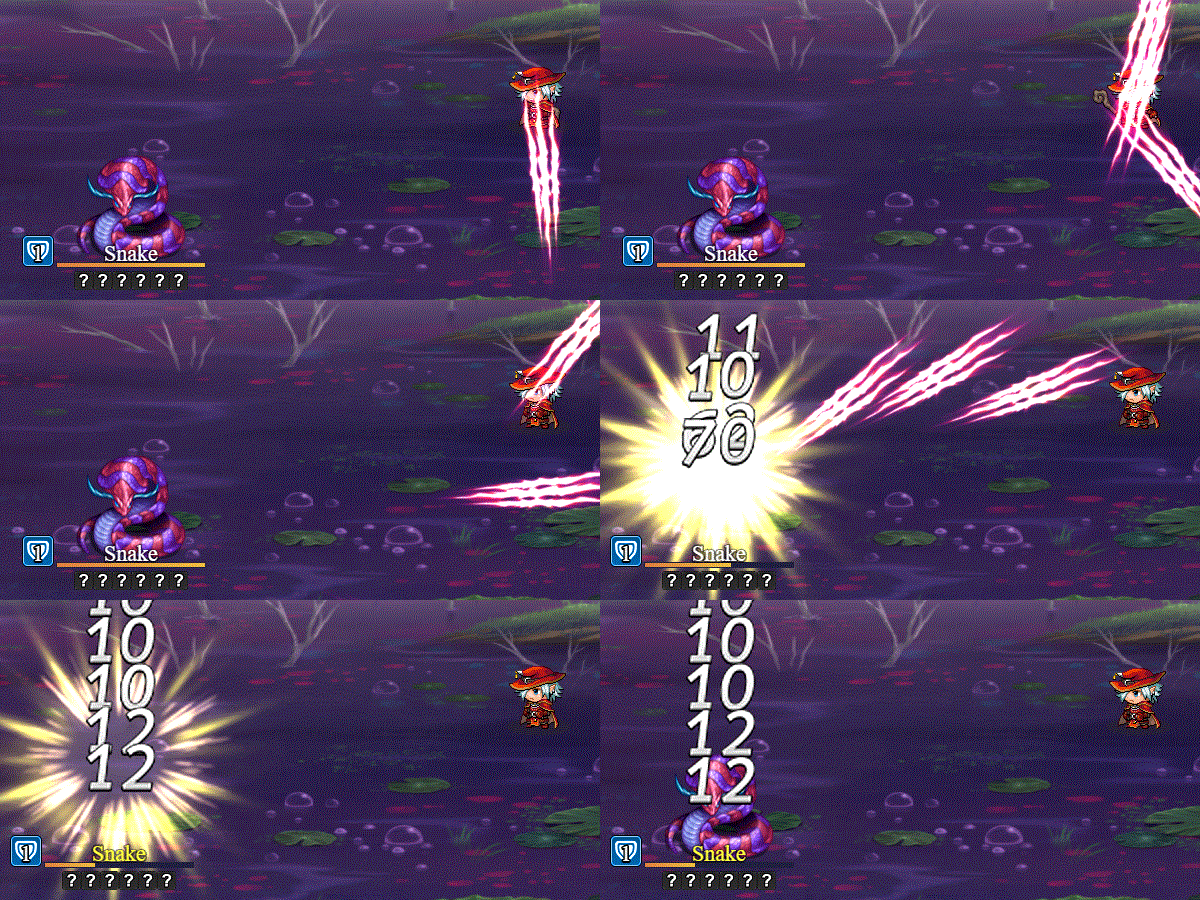
=============================================================================
PROJECTILE ICON id: START x y, GOAL x y
PROJECTILE ICON id: START target, GOAL target

PROJECTILE ANI id: START x y, GOAL x y
PROJECTILE ANI id: START target, GOAL target
PROJECTILE ANIMATION id: START x y, GOAL x y
PROJECTILE ANIMATION id: START target, GOAL target

(optional parameters)
DURATION d
ARC a
EASE type
SPIN s
ICON SCALE i
ANGLE
START OFFSET +x +y
START OFFSET -x -y
GOAL OFFSET +x +y
GOAL OFFSET -x -y
- - - - - - - - - - - - - - - - - - - - - - - - - - - - - - - - - - - - - - -
Replace id with either the icon index or the battle animation graphic you
want to use with the projectile. Choose a starting X and Y position or link
it to a target. Then choose a goal X and Y position or link that to a target
too. The rest of the parameters are optional and can be used in any order
you want, but I'll go through each of them.

If the starting targets have more than one member in them, projectiles will
be spawned from each target as a source. If the goal targets have more than
one member, projectiles will be made for each target. This means for each
source and each goal, a projectile will be made.

Duration: replace the d with the number of frames of duration. Default: 20
Arc: replace the a with the maximum arc height in pixels
Ease: replace type with an easing type from the Move Type list above
Spin: replace s with how fast you want the projectile to spin.
Icon Scale: replce i with the scale you want to increase your icons by
Angle: If you want the projectile to "arrow head" towards its goal, use this
Start Offset: lets you adjust the x and y offset of the starting position
Goal Offset: lets you adjust the x and y offset of the goal position

You can use as many projectiles on the screen at once as you want.
- - - - - - - - - - - - - - - - - - - - - - - - - - - - - - - - - - - - - - -
Usage Example: projectile icon 161: start user, goal target
               projectile ani 71: start user, goal target

projectile icon 176: duration 60, arc 300, spin 1.5
projectile ani 71: duration 60, arc 50, ease InOutBack, angle
=============================================================================
- Wait for Projectile
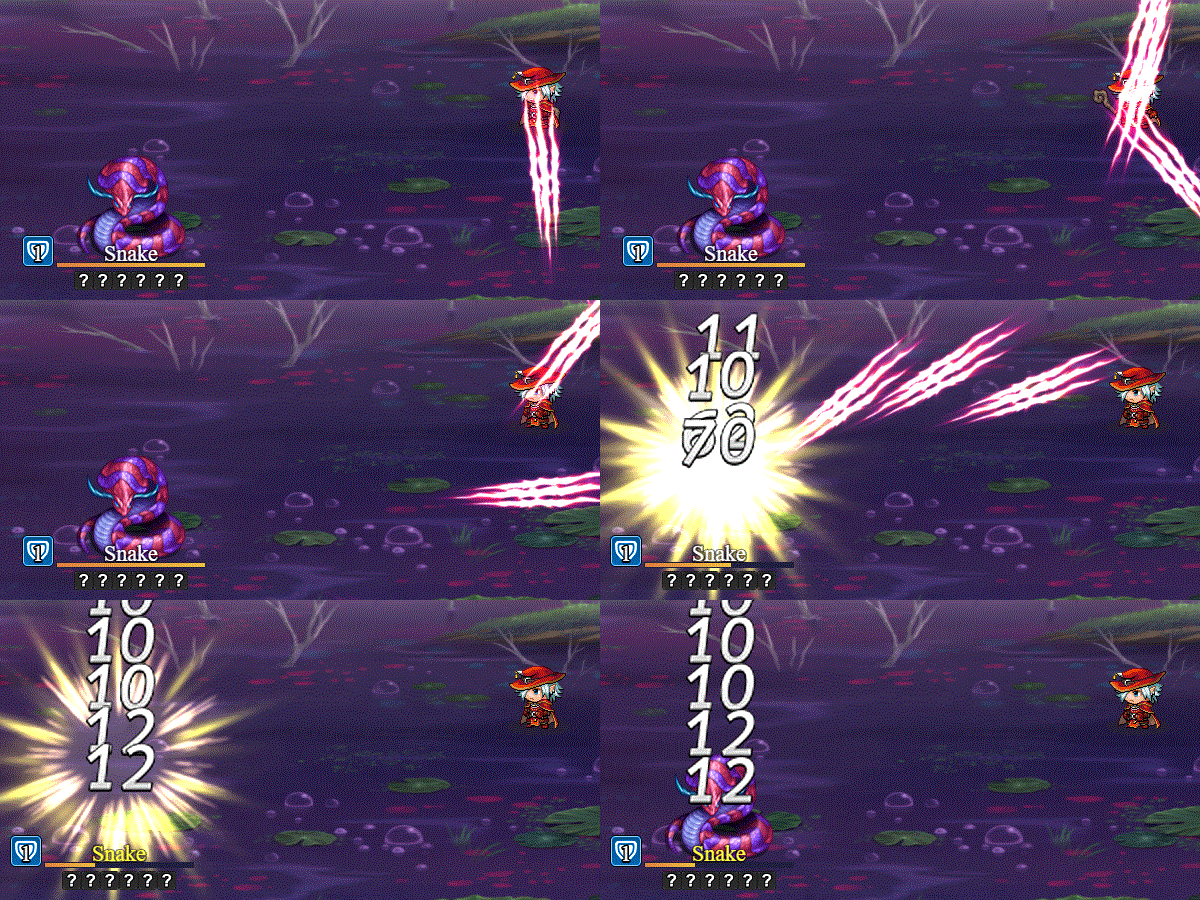
=============================================================================
WAIT FOR PROJECTILE
- - - - - - - - - - - - - - - - - - - - - - - - - - - - - - - - - - - - - - -
Waits for all the projectiles on the screen to reach their targets before
moving on with the rest of the Action Sequence list.
- - - - - - - - - - - - - - - - - - - - - - - - - - - - - - - - - - - - - - -
Usage Example: wait for projectile
=============================================================================
- Afterglow

=============================================================================
AFTERGLOW target

(optional parameters)
SCALE s
BRIGHTNESS b
DURATION d
- - - - - - - - - - - - - - - - - - - - - - - - - - - - - - - - - - - - - - -
(requires Olivia's Battle Impact plugin)
Makes an afterglow effect on the target.

Scale: replace s with the scale of the glow.
Brightness: replace b with how bright the effect is.
Duration: replace d with the duration of the effect in frames.
- - - - - - - - - - - - - - - - - - - - - - - - - - - - - - - - - - - - - - -
Usage Example: afterglow user
               afterglow target: scale 1.5
               afterglow target: brightness 2
               afterglow user: duration 20
               afterglow user: scale 2, brightness 4, duration 60
=============================================================================
- Apply Icon, Remove Icon
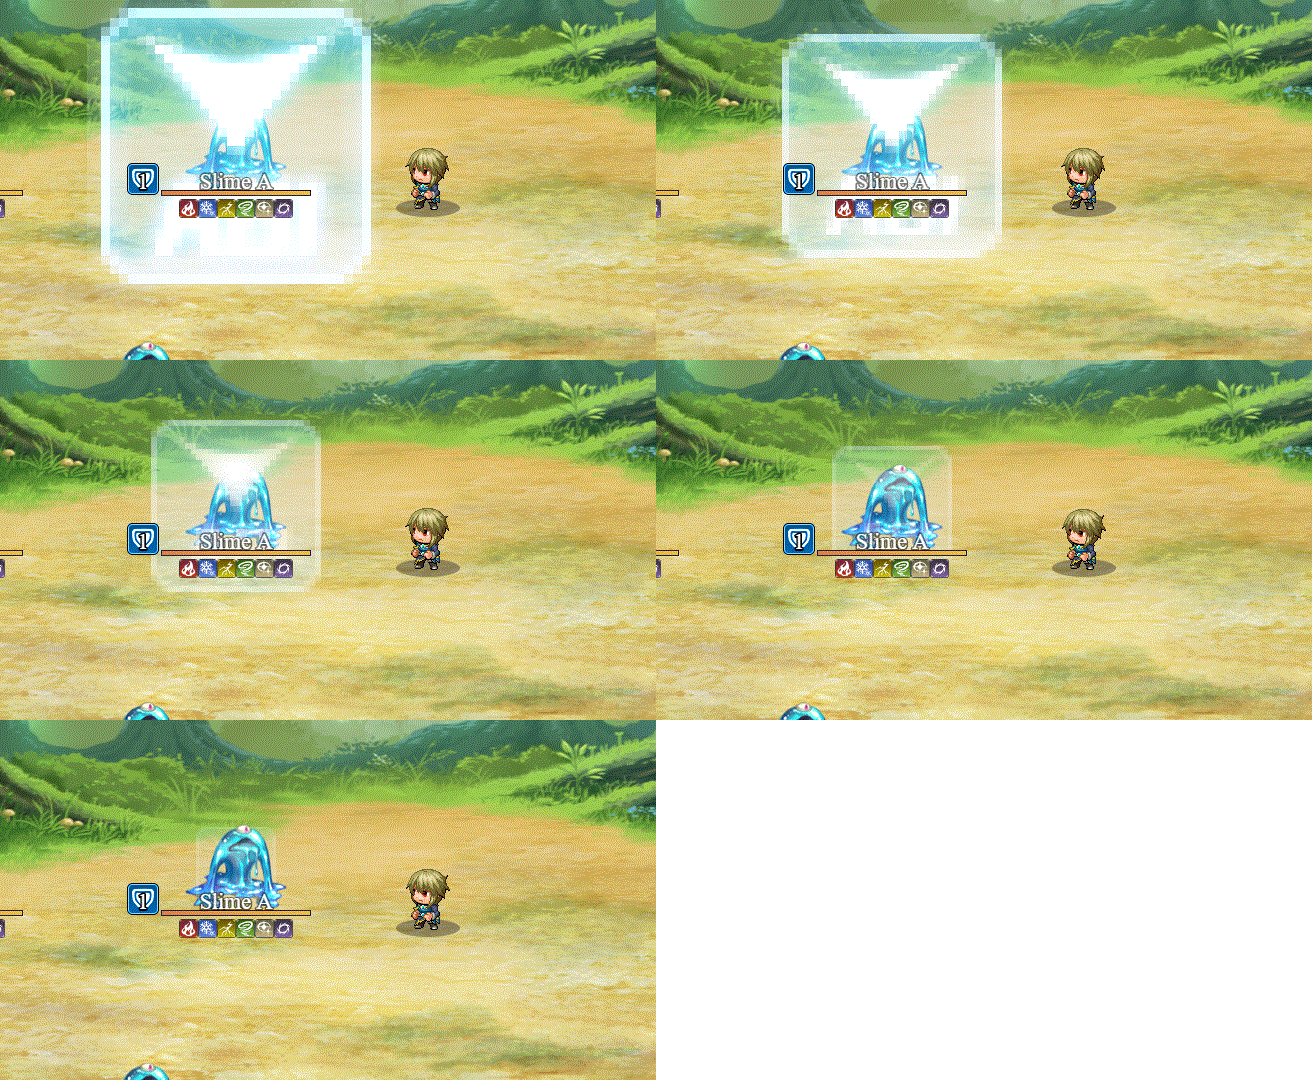
=============================================================================
APPLY ICON id: target
REMOVE ICON id: target
- - - - - - - - - - - - - - - - - - - - - - - - - - - - - - - - - - - - - - -
(requires Olivia's Battle Impact plugin)
Apply/Remove icon effect for the target. Replace id with an icon index.
- - - - - - - - - - - - - - - - - - - - - - - - - - - - - - - - - - - - - - -
Usage Example: Apply Icon 2: target
               Remove Icon 1: user
=============================================================================
- Color Break
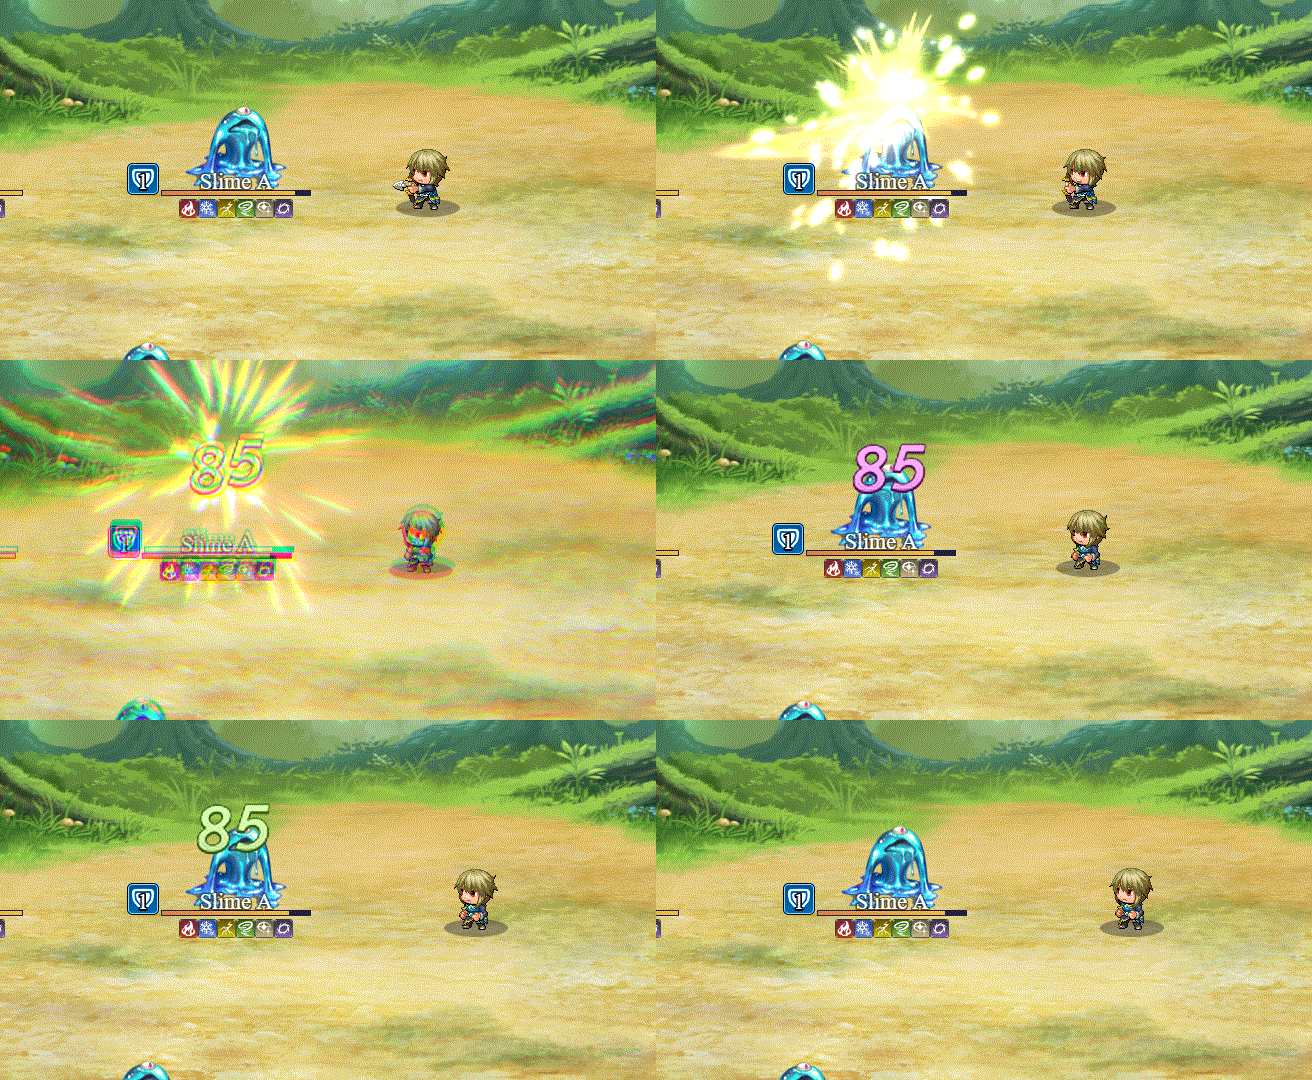
=============================================================================
COLOR BREAK

(optional parameters)
INTENSITY i
DURATION d
- - - - - - - - - - - - - - - - - - - - - - - - - - - - - - - - - - - - - - -
(requires Olivia's Battle Impact plugin)
Makes the colors on the screen break up before coming back together.

Intensity: Replace i with the intensity level of the break effect.
Duration: Replace d with the duration of the effect in frames.
- - - - - - - - - - - - - - - - - - - - - - - - - - - - - - - - - - - - - - -
Usage Example: color break
               color break: intensity 30
               color break: duration 20
               color break: intensity 60, duration 10
=============================================================================
- Motion Blur
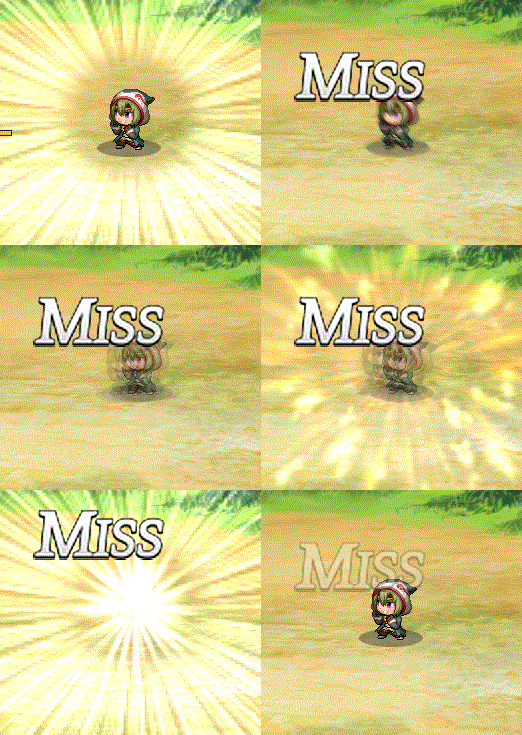
=============================================================================
MOTION BLUR target

(optional parameters)
VELOCITY x y
OFFSET o
DURATION d
- - - - - - - - - - - - - - - - - - - - - - - - - - - - - - - - - - - - - - -
(requires Olivia's Battle Impact plugin)
Makes a motion blur effect on the target before dissolving.

Velocity: Replace x and y with the horizontal and vertical velocity power.
Offset: Replace o to determine how much to offset this effect by.
Duration: Replace d with the duration of the effect in frames.
- - - - - - - - - - - - - - - - - - - - - - - - - - - - - - - - - - - - - - -
Usage Example: motion blur user
               motion blur target: velocity 30 60
               motion blur target: offset 10
               motion blur target: duration 20
               motion blur user: velocity 40 40, offset 100, duration 60
=============================================================================
- Shockwave
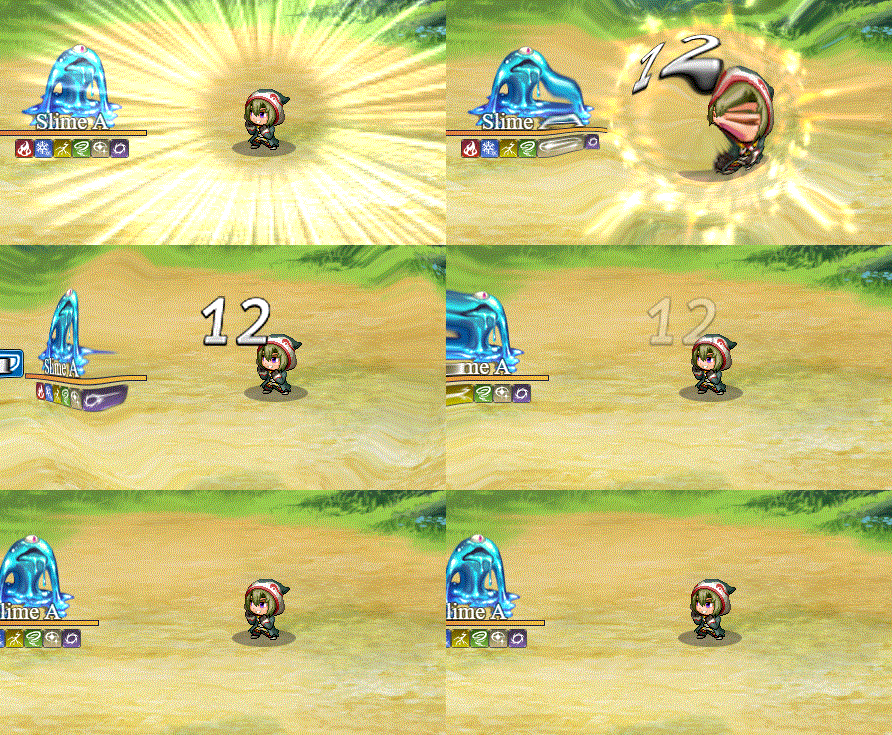
=============================================================================
SHOCKWAVE: CENTER x y
SHOCKWAVE: CENTER target

(optional parameters)
AMPLITUDE a
WAVELENGTH w
SPEED s
- - - - - - - - - - - - - - - - - - - - - - - - - - - - - - - - - - - - - - -
(requires Olivia's Battle Impact plugin)
Makes a shockwave at either X, Y coordinates or at a target's center.

Amplitude: Replace a with how powerful you want the amplitude to be.
Wavelength: Replace w with how big the wavelengths are.
Speed: Replace s with how fast it is. Use a number between 0 and 1.
- - - - - - - - - - - - - - - - - - - - - - - - - - - - - - - - - - - - - - -
Usage Example: shockwave: center 300 400
          shockwave: center target
          shockwave: center target, amplitude 30
          shockwave: center target, wavelength 160
          shockwave: center user, speed 0.2
          shockwave: center user, amplitude 20, wavelength 120, speed 0.1
=============================================================================
Improved Battlebacks
If you have YEP_BattleEngineCore.js installed with this plugin located
underneath it in the Plugin Manager, you can make use of these extra
damage related action sequences.

=============================================================================
BATTLEBACK id ADD: folder, filename
BATTLEBACK id ADD: folder, filename, hue
- - - - - - - - - - - - - - - - - - - - - - - - - - - - - - - - - - - - - - -
Replace 'id' with the battleback you wish to alter as a number larger than 2
(i.e. 3 or above). Replace 'folder' with the exact folder name in your
project's 'img' folder (case sensitive). Replace 'filename' with the image
filename without the file extension (case sensitive). If 'hue' is used,
replace 'hue' with a number between 0 and 360 to change the hue of the image
used. This will add a new battleback stacked on top of battlebacks 1 and 2
with higher ID's being on top. When newly added, the new battleback will
start at opacity 0 and fade in with a duration of 20 frames.
- - - - - - - - - - - - - - - - - - - - - - - - - - - - - - - - - - - - - - -
Usage Example: battleback 3 add: battlebacks1, GrassMazePool
               battleback 4 add: battlebacks2, GrassMaze, 180
=============================================================================

=============================================================================
BATTLEBACK id REMOVE
- - - - - - - - - - - - - - - - - - - - - - - - - - - - - - - - - - - - - - -
Replace 'id' with the battleback you wish to alter as a number larger than
2 (i.e. 3 or above). This will remove the battleback from being shown. When
this command is used, the battleback will fade with a duration of 20 frames.
Once it reaches 0 opacity, the battleback will be removed from the battle.
- - - - - - - - - - - - - - - - - - - - - - - - - - - - - - - - - - - - - - -
Usage Example: battleback 3 remove
               battleback 4 remove
=============================================================================

=============================================================================
BATTLEBACK id CHANGE TO: folder, filename
BATTLEBACK id CHANGE TO: folder, filename, hue
- - - - - - - - - - - - - - - - - - - - - - - - - - - - - - - - - - - - - - -
Replace 'id' with the battleback you wish to alter. Replace 'folder' with
the exact folder name in your project's 'img' folder (case sensitive).
Replace 'filename' with the image filename without the file extension (case
sensitive). This will change the designated battleback's image to use the
desired image depicted by the folder and filename. If 'hue' is used, replace
'hue' with a number between 0 and 360 to change the hue of the image used.
- - - - - - - - - - - - - - - - - - - - - - - - - - - - - - - - - - - - - - -
Usage Example: battleback 1 change to: parallaxes, SeaofClouds
               battleback 2 change to: battlebacks2, Ship, 180
=============================================================================

=============================================================================
BATTLEBACK id FADE OUT
BATTLEBACK id FADE OUT: duration
BATTLEBACK id FADE IN
BATTLEBACK id FADE IN: duration
- - - - - - - - - - - - - - - - - - - - - - - - - - - - - - - - - - - - - - -
Replace 'id' with the battleback you wish to alter. This will cause the
designated battleback to fade out/in. If 'duration' is used, replace it with
a number to indicate how many frames will be used for the fade out/in. If
no duration is specified, it will default to 20 frames.
- - - - - - - - - - - - - - - - - - - - - - - - - - - - - - - - - - - - - - -
Usage Example: battleback 1 fade out
               battleback 2 fade out: 120
               battleback 1 fade in
               battleback 2 fade in: 180
=============================================================================

=============================================================================
BATTLEBACK id OPACITY: n
BATTLEBACK id OPACITY: n%
- - - - - - - - - - - - - - - - - - - - - - - - - - - - - - - - - - - - - - -
Replace 'id' with the battleback you wish to alter. Replace 'n' with the
opacity value you wish to achieve (from 0 to 255) or replace 'n%' with the
opacity rate you wish to set the battleback to (from 0% to 100%). This will
set the designated battleback's opacity to that value. If there are any fade
in or out commands occurring as this command is issued, they'll be disabled.
- - - - - - - - - - - - - - - - - - - - - - - - - - - - - - - - - - - - - - -
Usage Example: battleback 1 opacity: 127
               battleback 2 opacity: 50%
=============================================================================

=============================================================================
BATTLEBACK id SCROLL SPEED X: +n
BATTLEBACK id SCROLL SPEED X: -n
BATTLEBACK id SCROLL SPEED Y: +n
BATTLEBACK id SCROLL SPEED Y: -n
- - - - - - - - - - - - - - - - - - - - - - - - - - - - - - - - - - - - - - -
Replace 'id' with the battleback you wish to alter. Replace 'n' with the
value you wish to change the scroll speed X or scroll speed Y of. The higher
the 'n' value, the faster it scrolls.
- - - - - - - - - - - - - - - - - - - - - - - - - - - - - - - - - - - - - - -
Usage Example: battleback 1 scroll speed x: +1
               battleback 1 scroll speed y: +2
               battleback 2 scroll speed x: -3
               battleback 2 scroll speed y: -4
=============================================================================

=============================================================================
BATTLEBACK id RESET SCROLL SPEED
- - - - - - - - - - - - - - - - - - - - - - - - - - - - - - - - - - - - - - -
Replace 'id' with the battleback you wish to alter. Resets the scroll
speeds for X and Y back to 0.
- - - - - - - - - - - - - - - - - - - - - - - - - - - - - - - - - - - - - - -
Usage Example: battleback 1 reset scroll speed
=============================================================================
Weather In Battle
If you have YEP_BattleEngineCore.js installed with this plugin located
underneath it in the Plugin Manager, you can make use of these extra
damage related action sequences.

=============================================================================
WEATHER: type, (power), (duration)
- - - - - - - - - - - - - - - - - - - - - - - - - - - - - - - - - - - - - - -
Replace 'type' with either 'none', 'rain', 'storm', or 'snow'.
Replace 'power' with a value between 1 and 9.
Replace 'duration' with the number of frames you want the change to be.
- - - - - - - - - - - - - - - - - - - - - - - - - - - - - - - - - - - - - - -
Usage Example: weather: rain, 5, 20
               weather: storm, 7, 60
               weather: snow, 9, 90
               weather: none, 1, 60
=============================================================================
Pages in category "Action Sequences (MV)"
The following 17 pages are in this category, out of 17 total.