Category:Plugin Commands (MZ)


|
VisuStella, Caz Wolf, Fallen Angel Olivia, Atelier Irina, and other affiliated content creators.
Contents
- 1 Aggro Control System VisuStella MZ
- 2 Animated Map Destination VisuStella MZ
- 3 Animated Pictures VisuStella MZ
- 4 Attached Pictures VisuStella MZ
- 5 Battle Core VisuStella MZ
- 5.1 Action Sequence - Action Sets
- 5.2 Action Sequences - Angle (Camera)
- 5.3 Action Sequences - Animations
- 5.4 Action Sequences - Battle Log
- 5.5 Action Sequences - Camera
- 5.6 Action Sequences - Dragonbones
- 5.7 Action Sequences - Elements
- 5.8 Action Sequences - Grid
- 5.9 Action Sequences - Horror Effects
- 5.10 Action Sequences - Impact
- 5.11 Action Sequences - Inject
- 5.12 Action Sequences - Mechanics
- 5.13 Action Sequences - Motion
- 5.14 Action Sequences - Movement
- 5.15 Action Sequences - Projectiles
- 5.16 Action Sequences - Skew (Camera)
- 5.17 Action Sequences - Target
- 5.18 Action Sequences - Voice
- 5.19 Action Sequences - Weapon
- 5.20 Action Sequences - Zoom (Camera)
- 6 Battle Cursor VisuStella MZ
- 7 Battle Grid System VisuStella MZ
- 8 Battle System - ATB VisuStella MZ
- 9 Battle System - BTB VisuStella MZ
- 10 Battle System - CTB VisuStella MZ
- 11 Battle System - ETB VisuStella MZ
- 12 Battle System - FTB VisuStella MZ
- 13 Battle System - OTB VisuStella MZ
- 14 Battle System - PTB VisuStella MZ
- 15 Battle System - STB VisuStella MZ
- 16 Battle Voices VisuStella MZ
- 17 Bestiary VisuStella MZ
- 18 Bright Effects VisuStella MZ
- 19 Button Common Events VisuStella MZ
- 20 Button Trigger Events VisuStella MZ
- 21 CG Gallery VisuStella MZ
- 22 Chain Battles VisuStella MZ
- 23 Challenge System VisuStella MZ
- 24 Character Creation System VisuStella MZ
- 25 Class Change System VisuStella MZ
- 26 Combat Log VisuStella MZ
- 27 Common Event Menu VisuStella MZ
- 28 Core Engine VisuStella MZ
- 28.1 Animation Commands
- 28.2 Audio Plugin Commands
- 28.3 Debug Plugin Commands
- 28.4 Export Plugin Commands
- 28.5 Game Plugin Commands
- 28.6 Gold Plugin Commands
- 28.7 Map Plugin Commands
- 28.8 Picture Plugin Commands
- 28.9 Screen Shake Plugin Commands
- 28.10 Switch Plugin Commands
- 28.11 System Plugin Commands
- 28.12 Text Popup Command
- 28.13 Variable Plugin Commands
- 29 Credits Page VisuStella MZ
- 30 Date and Time System VisuStella MZ
- 31 Dragonbones Union VisuStella MZ
- 32 Dice Rolls and RNG Seeds VisuStella MZ
- 33 Elements and Status Menu Core VisuStella MZ
- 34 Encounter Effects VisuStella MZ
- 35 Enemy Levels VisuStella MZ
- 36 Enhanced TP System VisuStella MZ
- 37 Equip Battle Skills VisuStella MZ
- 38 Equip Medal System VisuStella MZ
- 39 Equip Passive System VisuStella MZ
- 40 Event Chain Reactions VisuStella MZ
- 41 Event Signals VisuStella MZ
- 42 Event Title Scene VisuStella MZ
- 43 Events and Movement Core VisuStella MZ
- 43.1 Auto Movement Plugin Commands
- 43.2 Call Event Plugin Commands
- 43.3 Dash Plugin Commands
- 43.4 Event Icon Plugin Commands
- 43.5 Event Label Plugin Commands
- 43.6 Event Location Plugin Commands
- 43.7 Event Popup Plugin Commands
- 43.8 Event Timer Plugin Commands
- 43.9 Follower Control Plugin Commands
- 43.10 Global Switch Plugin Commands
- 43.11 Global Variable Plugin Commands
- 43.12 Morph Event Plugin Commands
- 43.13 Player Icon Plugin Commands
- 43.14 Self Data Plugin Commands
- 43.15 Self Switch Plugin Commands
- 43.16 Self Variable Plugin Commands
- 43.17 Spawn Event Plugin Commands
- 44 Extra Enemy Drops VisuStella MZ
- 45 Field Skills VisuStella MZ
- 46 Frontview Battle UI VisuStella MZ
- 47 Full Field Recovery VisuStella MZ
- 48 Furniture System VisuStella MZ
- 49 Gab Window VisuStella MZ
- 50 Horror Effects VisuStella MZ
- 51 Hospital Shop VisuStella MZ
- 52 Icon Balloons VisuStella MZ
- 53 Items and Equips Core VisuStella MZ
- 54 Item Crafting System VisuStella MZ
- 55 Lighting Effects VisuStella MZ
- 56 Main Menu Core VisuStella MZ
- 57 Map Camera Zoom VisuStella MZ
- 58 Map Damage Effect VisuStella MZ
- 59 Map Event Effects VisuStella MZ
- 60 Menu Cursor VisuStella MZ
- 61 Message Core VisuStella MZ
- 62 Message Letter Sounds VisuStella MZ
- 63 Message Log VisuStella MZ
- 64 Movement Effects VisuStella MZ
- 65 New Game Plus VisuStella MZ
- 66 One Time Purchase VisuStella MZ
- 67 Party System VisuStella MZ
- 68 Picture Choices VisuStella MZ
- 69 Picture Common Events VisuStella MZ
- 70 Picture Effects VisuStella MZ
- 70.1 Effects - A - Plugin Commands
- 70.2 Effects - B - Plugin Commands
- 70.3 Effects - C - Plugin Commands
- 70.4 Effects - D - Plugin Commands
- 70.5 Effects - E - Plugin Commands
- 70.6 Effects - F - Plugin Commands
- 70.7 Effects - G - Plugin Commands
- 70.8 Effects - H - Plugin Commands
- 70.9 Effects - I - Plugin Commands
- 70.10 Effects - J - Plugin Commands
- 70.11 Effects - L - Plugin Commands
- 70.12 Effects - M - Plugin Commands
- 70.13 Effects - O - Plugin Commands
- 70.14 Effects - P - Plugin Commands
- 70.15 Effects - Q - Plugin Commands
- 70.16 Effects - R - Plugin Commands
- 70.17 Effects - S - Plugin Commands
- 70.18 Effects - T - Plugin Commands
- 70.19 Effects - U - Plugin Commands
- 70.20 Effects - V - Plugin Commands
- 70.21 Effects - W - Plugin Commands
- 70.22 Effects - Z - Plugin Commands
- 71 Proximity Compass VisuStella MZ
- 72 Proximity Messages VisuStella MZ
- 73 Quest Journal System VisuStella MZ
- 74 QTE and Trigger System VisuStella MZ
- 75 Random Dungeon Maps VisuStella MZ
- 76 Randomize Shop VisuStella MZ
- 77 Recruiting Board VisuStella MZ
- 78 Save Core VisuStella MZ
- 79 Shop Common Events VisuStella MZ
- 80 Shop Bust Style UI VisuStella MZ
- 81 Side Chatter VisuStella MZ
- 82 Skill Cooldowns VisuStella MZ
- 83 Skill Learn System VisuStella MZ
- 84 Skill Mastery VisuStella MZ
- 85 Skill Shop VisuStella MZ
- 86 Skills and States Core VisuStella MZ
- 87 Tile Grafter System VisuStella MZ
- 88 Tutorial Panel System VisuStella MZ
- 89 Unique Tile Effects VisuStella MZ
- 90 Variable Gauges VisuStella MZ
- 91 Victory Aftermath VisuStella MZ
- 92 Visual Battle Environment VisuStella MZ
- 93 Visual Cutin Effect VisuStella MZ
- 94 Visual Fogs VisuStella MZ
- 95 Visual Novel Picture Busts VisuStella MZ
- 96 Visual Text Window VisuStella MZ
- 97 Visual Parallaxes VisuStella MZ
- 98 Voice Acting Control VisuStella MZ
- 99 Weather Effects VisuStella MZ
- 100 End of List
|
Plugin Commands are event commands that are used to call upon functions added by a plugin that aren't inherently a part of RPG Maker MZ. Here is a list of Plugin Command(s) that you may use: --- Aggro Control System VisuStella MZThe following are Plugin Commands that come with this plugin. They can be accessed through the Plugin Command event command. --- Actor Plugin Commands---
Actor: Change Aggro
- Changes target actor's aggro value.

  Actor ID:
  - Select which Actor ID to affect.

  Change Aggro By:
  - Change aggro by this amount.
  - Use negative numbers to reduce aggro.
---
Actor: Set Aggro
- Set target actor's aggro value.

  Actor ID:
  - Select which Actor ID to affect.

  Set Aggro To:
  - Sets target's aggro to this amount.
  - Aggro must be at least a value of 1.
--- Enemy Plugin Commands---
Enemy: Change Aggro
- Changes target enemy's aggro value.

  Enemy Index:
  - Select which Enemy Index to affect.

  Change Aggro By:
  - Change aggro by this amount.
  - Use negative numbers to reduce aggro.
---
Enemy: Set Aggro
- Set target enemy's aggro value.

  Enemy Index:
  - Select which Enemy Index to affect.

  Set Aggro To:
  - Sets target's aggro to this amount.
  - Aggro must be at least a value of 1.
--- Animated Map Destination VisuStella MZThe following are Plugin Commands that come with this plugin. They can be accessed through the Plugin Command event command. --- System Plugin Commands---
System: Alter Destination Type
- Alter the destination animation type.

  Sprite Type:
  - Change the sprite type to this.
  - None - No effect
  - Animation - Uses an animation from the database
  - Circle - Drawn circle effect
  - Image - Uses a custom image from img/system/
  - Square - Default box-like effect
---
System: Change Animation Settings
- Change settings used for a 'Animation' Sprite Type.

  Animation ID:
  - Select an animation to play.

  Mirror Animation?:
  - Mirror the animation played?

  Mute SFX?:
  - Mute any sound effects played by the animation?
---
System: Change Circle Settings
- Change settings used for a 'Circle' Sprite Type.

  Hex Color:
  - Use #rrggbb for a hex color.

  Blend Mode:
  - The blend mode used for the sprite.

  Opacity Multiplier:
  - Alter the opacity of the sprite as it animates.

  Scale Multiplier:
  - Increase the size of this sprite by a scale.
  - Use a value of 1.0 for 100% scale.
---
System: Change Image Settings
- Change settings used for a 'Image' Sprite Type.

  Filename:
  - Select an image from img/system/ to use as the sprite's bitmap.

  Blend Mode:
  - The blend mode used for the sprite.

  Opacity Multiplier:
  - Alter the opacity of the sprite as it animates.

  Rotate Speed:
  - Rotation speed for the sprite.
  - Use 0 for no rotation.

  Scale Multiplier:
  - Increase the size of this sprite by a scale.
  - Use a value of 1.0 for 100% scale.
---
System: Change Square Settings
- Change settings used for a 'Square' Sprite Type.

  Hex Color:
  - Use #rrggbb for a hex color.

  Blend Mode:
  - The blend mode used for the sprite.

  Opacity Multiplier:
  - Alter the opacity of the sprite as it animates.

  Rotate Speed:
  - Rotation speed for the sprite.
  - Use 0 for no rotation.

  Scale Multiplier:
  - Increase the size of this sprite by a scale.
  - Use a value of 1.0 for 100% scale.
--- Animated Pictures VisuStella MZThe following are Plugin Commands that come with this plugin. They can be accessed through the Plugin Command event command. --- Animated Picture Plugin Command---
Animated Picture: Change Properties
- Changes the properties used for the animated picture.

  Picture ID:
  - Select which Picture ID to affect.

  Loop?:
  - Animated pictures will loop back to beginning once it reaches the
    last frame.

  Wait Frames:
  - Number of frames to wait before moving to next picture cell.
--- Attached Pictures VisuStella MZThe following are Plugin Commands that come with this plugin. They can be accessed through the Plugin Command event command. --- Message Plugin Commands
--- Message: Attach Picture(s) - Select which Picture ID's to attach to the Message Window. Picture ID(s): - Select which Picture ID's to attach to the Message Window. --- Message: Remove Picture(s) - Select which Picture ID's to remove from the Message Window. Picture ID(s): - Select which Picture ID's to remove from the Message Window. --- Picture Plugin Commands
--- Picture: Attach Picture(s) - Select which Picture ID's to attach to another picture. Picture ID(s): - Select which Picture ID's to attach to another picture. Target Picture ID: - Select which Picture ID to attach the above picture(s) to. --- Picture: Remove Picture(s) - Select which Picture ID's to remove from any other pictures. Picture ID(s): - Select which Picture ID's to remove from any other pictures. --- Battle Core VisuStella MZ
Skills and items, when used in battle, have a pre-determined series of actions to display to the player as a means of representing what's going on with the action. For some game devs, this may not be enough and they would like to get more involved with the actions themselves. Action Sequences, added through this plugin, enable this. To give a skill or item a Custom Action Sequence, a couple of steps must be followed: ---
1. Insert the <Custom Action Sequence> notetag into the skill or item's notebox (or else this would not work as intended). 2. Give that skill/item a Common Event through the Effects box. The selected Common Event will contain all the Action Sequence data. 3. Create the Common Event with Action Sequence Plugin Commands and/or event commands to make the skill/item do what you want it to do. --- The Plugin Commands added through the Battle Core plugin focus entirely on Action Sequences. However, despite the fact that they're made for skills and items, some of these Action Sequence Plugin Commands can still be used for regular Troop events and Common Events. --- Action Sequence - Action Sets
Action Sequence Action Sets are groups of commonly used Action Sequence Commands put together for more efficient usage. --- ACSET: Setup Action Set - The generic start to most actions. Display Action: Immortal: On: Battle Step: Wait For Movement: Cast Animation: Wait For Animation: - Use this part of the action sequence? --- ACSET: All Targets Action Set - Affects all targets simultaneously performing the following. Dual/Multi Wield? - Add times struck based on weapon quantity equipped? Perform Action: Wait Count: Action Animation: Wait For Animation: Action Effect: Immortal: Off: - Use this part of the action sequence? - Insert values for the Wait Count(s). --- ACSET: Each Target Action Set - Goes through each target one by one to perform the following. Dual/Multi Wield? - Add times struck based on weapon quantity equipped? Perform Action: Wait Count: Action Animation: Wait Count: Action Effect: Immortal: Off: - Use this part of the action sequence? - Insert values for the Wait Count(s). --- ACSET: Finish Action - The generic ending to most actions. Immortal: Off: Wait For New Line: Wait For Effects: Clear Battle Log: Home Reset: Wait For Movement: - Use this part of the action sequence? --- Action Sequences - Angle (Camera)
These action sequences allow you to have control over the camera angle. Requires VisuMZ_3_ActSeqCamera! --- ANGLE: Change Angle - Changes the camera angle. - Requires VisuMZ_3_ActSeqCamera! Angle: - Change the camera angle to this many degrees. Duration: - Duration in frames to change camera angle. Angle Easing: - Select which easing type you wish to apply. - Requires VisuMZ_0_CoreEngine. Wait For Angle?: - Wait for angle changes to complete before performing next command? --- ANGLE: Reset Angle - Reset any angle settings. - Requires VisuMZ_3_ActSeqCamera! Duration: - Duration in frames to reset camera angle. Angle Easing: - Select which easing type you wish to apply. - Requires VisuMZ_0_CoreEngine. Wait For Angle?: - Wait for angle changes to complete before performing next command? --- ANGLE: Wait For Angle - Waits for angle changes to complete before performing next command. - Requires VisuMZ_3_ActSeqCamera! --- Action Sequences - Animations
These Action Sequences are related to the 'Animations' that can be found in the Animations tab of the Database. --- ANIM: Action Animation - Plays the animation associated with the action. Targets: - Select unit(s) to play the animation on. Mirror Animation: - Mirror the animation? Wait For Animation?: - Wait for animation to complete before performing next command? --- ANIM: Attack Animation - Plays the animation associated with the user's weapon. Targets: - Select unit(s) to play the animation on. Mirror Animation: - Mirror the animation? Wait For Animation?: - Wait for animation to complete before performing next command? --- ANIM: Attack Animation 2+ - Plays the animation associated with the user's other weapons. - Plays nothing if there is no other weapon equipped. Targets: - Select unit(s) to play the animation on. Slot: - Which weapon slot to get this data from? - Main-hand weapon is weapon slot 1. Mirror Animation: - Mirror the animation? Wait For Animation?: - Wait for animation to complete before performing next command? ---
ANIM: Balloon Animation
- Plays a balloon animation on target(s).

  Targets:
  - Select unit(s) to play the animation on.

  Balloon Type:
  - What kind of balloon should be played on target(s)?

  Wait for Completion:
  - Wait for balloon animation completion before continuing?
--- ANIM: Balloon Icon (Single) - Plays a balloon animation using an icon on target(s). - Requires VisuMZ_4_IconBalloons! Targets: - Select unit(s) to play the animation on. Icon Index: - Insert the ID of the icon to show. - Tip: Right click > Insert Icon Index Wait for Completion: - Wait for balloon animation completion before continuing? --- ANIM: Balloon Icon (Range) - Plays a balloon animation an icon range on target(s). - Requires VisuMZ_4_IconBalloons! Targets: - Select unit(s) to play the animation on. Starting Icon Index: - Insert the ID of the icon to show. - Tip: Right click > Insert Icon Index Ending Icon Index: - Insert the ID of the icon to show. - Tip: Right click > Insert Icon Index Wait for Completion: - Wait for balloon animation completion before continuing? --- ANIM: Balloon Icon (Specific) - Plays a balloon animation with specific icons on target(s). - Requires VisuMZ_4_IconBalloons! Targets: - Select unit(s) to play the animation on. Icons: - Insert the ID(s) of the icon to show. - Tip: Right click > Insert Icon Index Wait for Completion: - Wait for balloon animation completion before continuing? --- ANIM: Cast Animation - Plays the cast animation associated with the action. Targets: - Select unit(s) to play the animation on. Mirror Animation: - Mirror the animation? Wait For Animation?: - Wait for animation to complete before performing next command? --- ANIM: Change Battle Portrait - Changes the battle portrait of the actor (if it's an actor). - Can be used outside of battle/action sequences. Targets: - Select unit(s) to play the animation on. - Valid units can only be actors. Filename: - Select the file to change the actor's portrait to. --- ANIM: Change Battle Portrait (JS) - Changes the battle portrait of the actor through JavaScript. - Can be used outside of battle/action sequences. JS: Actor ID: - Enter which Actor ID to affect. - Uses JavaScript code. JS: Filename: - Enter the filename you wish to use. - Uses JavaScript code. --- ANIM: Guard Animation - Plays the animation associated with the user's guard action (if any). Targets: - Select unit(s) to play the animation on. Mirror Animation: - Mirror the animation? Wait For Animation?: - Wait for animation to complete before performing next command? --- ANIM: Item Animation - Plays the animation associated with a specific item. Item ID: - Which item ID will the animation come from? Targets: - Select unit(s) to play the animation on. Mirror Animation: - Mirror the animation? Wait For Animation?: - Wait for animation to complete before performing next command? ---
ANIM: Play at Coordinate
- Plays an animation on the screen at a specific x, y coordinate.
- Requires VisuMZ_0_CoreEngine!

  Animation ID:
  - Plays this animation.

  Coordinates:

    X:
    Y:
    - X/Y coordinate used for the animation.
      You may use JavaScript code.

  Mirror Animation?:
  - Mirror the animation?

  Mute Animation?:
  - Mute the animation?

  Wait for Completion?:
  - Wait the animation to finish before continuing?
--- ANIM: Show Animation - Plays the a specific animation on unit(s). Targets: - Select unit(s) to play the animation on. Animation ID: - Select which animation to play on unit(s). Mirror Animation: - Mirror the animation? Wait For Animation?: - Wait for animation to complete before performing next command? --- ANIM: Show Animation JS - Plays the a specific animation on unit(s). - Uses JavaScript to determine animation ID. Targets: - Select unit(s) to play the animation on. JS: Animation ID: - Select which animation to play on unit(s). - Uses JavaScript to determine animation ID. Mirror Animation: - Mirror the animation? Wait For Animation?: - Wait for animation to complete before performing next command? --- ANIM: Skill Animation - Plays the animation associated with a specific skill. Skill ID: - Which skill ID will the animation come from? Targets: - Select unit(s) to play the animation on. Mirror Animation: - Mirror the animation? Wait For Animation?: - Wait for animation to complete before performing next command? --- ANIM: Wait For Animation - Causes the interpreter to wait for any animation(s) to finish. --- Action Sequences - Battle Log
These Action Sequences are related to the Battle Log Window, the window found at the top of the battle screen. --- BTLOG: Add Text
- Adds a new line of text into the Battle Log.
Text:
- Add this text into the Battle Log.
- Text codes allowed.
Copy to Combat Log?:
- Copies text to the Combat Log.
- Requires VisuMZ_4_CombatLog
Combat Log Icon:
- What icon would you like to bind to this entry?
- Requires VisuMZ_4_CombatLog
--- BTLOG: Clear Battle Log - Clears all the text in the Battle Log. --- BTLOG: Display Action - plays the current action in the Battle Log. --- BTLOG: Pop Base Line - Removes the Battle Log's last added base line and all text up to its former location. --- BTLOG: Push Base Line - Adds a new base line to where the Battle Log currently is at. --- BTLOG: Refresh Battle Log - Refreshes the Battle Log. --- BTLOG: UI Show/Hide - Shows or hides the Battle UI (including the Battle Log). Show/Hide?: - Shows/hides the Battle UI. --- BTLOG: Wait For Battle Log - Causes the interpreter to wait for the Battle Log to finish. --- BTLOG: Wait For New Line - Causes the interpreter to wait for a new line in the Battle Log. --- Action Sequences - Camera
These Action Sequences are battle camera-related. Requires VisuMZ_3_ActSeqCamera! --- CAMERA: Clamp ON/OFF - Turns battle camera clamping on/off. - Requires VisuMZ_3_ActSeqCamera! Setting: - Turns camera clamping on/off. --- CAMERA: Focus Point - Focus the battle camera on a certain point in the screen. - Requires VisuMZ_3_ActSeqCamera! X Coordinate: - Insert the point to focus the camera on. - You may use JavaScript code. Y Coordinate: - Insert the point to focus the camera on. - You may use JavaScript code. Duration: - Duration in frames for camera focus change. Camera Easing: - Select which easing type you wish to apply. - Requires VisuMZ_0_CoreEngine. Wait For Camera? - Wait for camera changes to complete before performing next command? --- CAMERA: Focus Target(s) - Focus the battle camera on certain battler target(s). - Requires VisuMZ_3_ActSeqCamera! Targets: - Select unit(s) to focus the battle camera on. Duration: - Duration in frames for camera focus change. Camera Easing: - Select which easing type you wish to apply. - Requires VisuMZ_0_CoreEngine. Wait For Camera? - Wait for camera changes to complete before performing next command? --- CAMERA: Offset - Offset the battle camera from the focus target. - Requires VisuMZ_3_ActSeqCamera! Offset X: - How much to offset the camera X by. - Negative: left. Positive: right. Offset Y: - How much to offset the camera Y by. - Negative: up. Positive: down. Duration: - Duration in frames for offset change. Camera Easing: - Select which easing type you wish to apply. - Requires VisuMZ_0_CoreEngine. Wait For Camera? - Wait for camera changes to complete before performing next command? --- CAMERA: Reset - Reset the battle camera settings. - Requires VisuMZ_3_ActSeqCamera! Reset Focus?: - Reset the focus point? Reset Offset?: - Reset the camera offset? Duration: - Duration in frames for reset change. Camera Easing: - Select which easing type you wish to apply. - Requires VisuMZ_0_CoreEngine. Wait For Camera? - Wait for camera changes to complete before performing next command? --- CAMERA: Wait For Camera - Waits for camera changes to complete before performing next command. - Requires VisuMZ_3_ActSeqCamera! --- Action Sequences - Dragonbones
These Action Sequences are Dragonbones-related. Requires VisuMZ_2_DragonbonesUnion! --- DB: Dragonbones Animation - Causes the unit(s) to play a Dragonbones motion animation. - Requires VisuMZ_2_DragonbonesUnion! Targets: - Select which unit(s) to perform a motion animation. Motion Animation: - What is the name of the Dragonbones motion animation you wish to play? --- DB: Dragonbones Time Scale - Causes the unit(s) to change their Dragonbones time scale. - Requires VisuMZ_2_DragonbonesUnion! Targets: - Select which unit(s) to perform a motion animation. Time Scale: - Change the value of the Dragonbones time scale to this. --- Action Sequences - Elements
These Action Sequences can change up the element(s) used for the action's damage calculation midway through an action. They also require the VisuMZ_1_ElementStatusCore plugin to be present in order for them to work. --- ELE: Add Elements - Adds element(s) to be used when calculating damage. - Requires VisuMZ_1_ElementStatusCore! Elements: - Select which element ID to add onto the action. - Insert multiple element ID's to add multiple at once. --- ELE: Clear Element Changes - Clears all element changes made through Action Sequences. - Requires VisuMZ_1_ElementStatusCore! --- ELE: Force Elements - Forces only specific element(s) when calculating damage. - Requires VisuMZ_1_ElementStatusCore! Elements: - Select which element ID to force in the action. - Insert multiple element ID's to force multiple at once. --- ELE: Null Element - Forces no element to be used when calculating damage. - Requires VisuMZ_1_ElementStatusCore! --- Action Sequences - GridThese Action Sequences are Battle Grid System-related. Requires VisuMZ_2_BattleGridSystem! ---
GRID: Action Animation at Node
- Plays action animation at target node.
- Requires VisuMZ_2_BattleGridSystem!

  Action-Selected Node?:
  - Use Action-Selected Node Coordinates if possible?
  - Requires "Empty" or "Any" for <Target: x Grid Node>
  - If the no action is in effect or the action doesn't use that target
    structure, use the node coordinates below:

    Unit:
    - Which unit's Node do you want to play an animation on?

    Rank:
    - Input the number representing the Rank of the Node you want to play an
      animation on.

    Flank:
    - Input the number representing the Flank of the Node you want to play
      an animation on.

  Offset X:
  - Offsets the animation x position.
  - Negative: left. Positive: right.

  Offset Y:
  - Offsets the animation y position.
  - Negative: up. Positive: down.
---
GRID: Add Passive State(s) to Node
- Adds Passive State(s) at target node.
- Requires VisuMZ_2_BattleGridSystem!

  State ID(s):
  - Select which State ID(s) to add as a Passive State.

  Action-Selected Node?:
  - Use Action-Selected Node Coordinates if possible?
  - Requires "Empty" or "Any" for <Target: x Grid Node>
  - If the no action is in effect or the action doesn't use that target
    structure, use the node coordinates below:

    Unit:
    - Which unit do you want to add the Passive State Node effect for?

    Rank:
    - Input the number representing the Rank of the Node you want to add a
      Passive State(s) to.

    Flank:
    - Input the number representing the Flank of the Node you want to add a
      Passive State(s) to.
---
GRID: Add Trigger to Node
- Adds Trigger to target node.
- Target node cannot have battler.
- Each node can only contain ONE trigger!
- Otherwise, newly placed triggers will overwrite the old ones.
- Requires VisuMZ_2_BattleGridSystem!

  Skill ID:
  - Select which Skill ID(s) to add as the trigger.

  Action-Selected Node?:
  - Use Action-Selected Node Coordinates if possible?
  - Requires "Empty" or "Any" for <Target: x Grid Node>
  - If the no action is in effect or the action doesn't use that target
    structure, use the node coordinates below:

    Unit:
    - Which unit do you want to add the Trigger Node effect for?

    Rank:
    - Input the number representing the Rank of the Node you want to add a
      Trigger to.

    Flank:
    - Input the number representing the Flank of the Node you want to add a
      Trigger to.
--- GRID: Add Trigger to Node JS
- Adds JS Trigger to target node.
- Target node cannot have battler.
- Each node can only contain ONE trigger!
- Otherwise, newly placed triggers will overwrite the old ones.
- Requires VisuMZ_2_BattleGridSystem!
JS: Skill ID:
- Use JavaScript to determine what skill ID to add to this node.
Action-Selected Node?:
- Use Action-Selected Node Coordinates if possible?
- Requires "Empty" or "Any" for <Target: x Grid Node>
- If the no action is in effect or the action doesn't use that target
structure, use the node coordinates below:
Unit:
- Which unit do you want to add the Trigger Node effect for?
Rank:
- Input the number representing the Rank of the Node you want to add a
Trigger to.
Flank:
- Input the number representing the Flank of the Node you want to add a
Trigger to.
---
GRID: Animation ID at Node
- Plays specific animation ID at target node.

  Animation ID:
  - Play this animation at target node.

    Mirror?:
    - Mirror this animation?

    Mute?:
    - Mute this animation?

  Action-Selected Node?:
  - Use Action-Selected Node Coordinates if possible?
  - Requires "Empty" or "Any" for <Target: x Grid Node>
  - If the no action is in effect or the action doesn't use that target
    structure, use the node coordinates below:

    Unit:
    - Which unit's Node do you want to play an animation on?

    Rank:
    - Input the number representing the Rank of the Node you want to play an
      animation on.

    Flank:
    - Input the number representing the Flank of the Node you want to play
      an animation on.

  Offset X:
  - Offsets the animation x position.
  - Negative: left. Positive: right.

  Offset Y:
  - Offsets the animation y position.
  - Negative: up. Positive: down.
---
GRID: Animation JS at Node
- Uses JS to calculate which animation to play at target node.

  JS: Animation ID:
  - Calculate which animation to play on unit(s).
  - Uses JavaScript to determine animation ID.

    Mirror?:
    - Mirror this animation?

    Mute?:
    - Mute this animation?

  Action-Selected Node?:
  - Use Action-Selected Node Coordinates if possible?
  - Requires "Empty" or "Any" for <Target: x Grid Node>
  - If the no action is in effect or the action doesn't use that target
    structure, use the node coordinates below:

    Unit:
    - Which unit's Node do you want to play an animation on?

    Rank:
    - Input the number representing the Rank of the Node you want to play an
      animation on.

    Flank:
    - Input the number representing the Flank of the Node you want to play
      an animation on.

  Offset X:
  - Offsets the animation x position.
  - Negative: left. Positive: right.

  Offset Y:
  - Offsets the animation y position.
  - Negative: up. Positive: down.
---
GRID: Animation Type at Node
- Plays certain animation type at target node.
- Requires VisuMZ_2_BattleGridSystem!

  Type:
  - What is the animation type you would like to play?
    - Attack
    - Guard
    - Item
    - Skill

    Slot (Attack Type):
    - Which weapon slot to get this data from?
    - Main-hand weapon is weapon slot 1.

    Item ID (Item Type):
    - Which item ID will the animation come from?

    Skill ID (Skill Type):
    - Which skill ID will the animation come from?

  Action-Selected Node?:
  - Use Action-Selected Node Coordinates if possible?
  - Requires "Empty" or "Any" for <Target: x Grid Node>
  - If the no action is in effect or the action doesn't use that target
    structure, use the node coordinates below:

    Unit:
    - Which unit's Node do you want to play an animation on?

    Rank:
    - Input the number representing the Rank of the Node you want to play an
      animation on.

    Flank:
    - Input the number representing the Flank of the Node you want to play
      an animation on.

  Offset X:
  - Offsets the animation x position.
  - Negative: left. Positive: right.

  Offset Y:
  - Offsets the animation y position.
  - Negative: up. Positive: down.
---
GRID: Move Target(s) In Direction
- Moves target(s) in a specific direction to other Nodes.
- Requires VisuMZ_2_BattleGridSystem!
- This will bypass the "once per action" condition used for both the
  <rule Move User Node direction: x> & <rule Move Target Node direction: x>
  notetags as this is not a notetag effect.

  Targets:
  - Select unit(s) to move.

  Movement Type:
  - Select the Movement type rulings.
  - See VisuMZ_2_BattleGridSystem help file for details.

    Direction:
    - Select the movement direction.

    Distance:
    - The number of nodes to be moved.
    - You may use JavaScript code.

  Duration:
  - Input the number representing the frames used to move.

  Silent Change?:
  - Silent: Discreet changes shown. More apparent later.
  - Visual: Instant changes shown.
---
GRID: Pull To Target Node
- Pulls battlers towards target node.
- Requires VisuMZ_2_BattleGridSystem!

  Action-Selected Node?:
  - Use Action-Selected Node Coordinates if possible?
  - Requires "Empty" or "Any" for <Target: x Grid Node>

    Unit:
    - Which unit do you want to pull on?

    Rank:
    - Input the number representing the Rank of the Node you want to
      pull to.

    Flank:
    - Input the number representing the Flank of the Node you want to
      pull to.

  Strength:
  - Input the strength level of the pull.

  Duration:
  - Input the number representing the frames used to move.
---
GRID: Push From Target Node
- Pushes battlers away from target node.
- Requires VisuMZ_2_BattleGridSystem!

  Action-Selected Node?:
  - Use Action-Selected Node Coordinates if possible?
  - Requires "Empty" or "Any" for <Target: x Grid Node>

    Unit:
    - Which unit do you want to push from?

    Rank:
    - Input the number representing the Rank of the Node you want to
      push from.

    Flank:
    - Input the number representing the Flank of the Node you want to
      push from.

  Strength:
  - Input the strength level of the push.

  Duration:
  - Input the number representing the frames used to move.
---
GRID: Remove All Passive States from Node
- Removes all Passive State effects at target node.
- Requires VisuMZ_2_BattleGridSystem!

  Action-Selected Node?:
  - Use Action-Selected Node Coordinates if possible?
  - Requires "Empty" or "Any" for <Target: x Grid Node>
  - If the no action is in effect or the action doesn't use that target
    structure, use the node coordinates below:

    Unit:
    - Which unit do you want to clear the Node for?

    Rank:
    - Input the number representing the Rank of the Node you want to clear
      Passive States from.

    Flank:
    - Input the number representing the Flank of the Node you want to clear
      Passive States from.
---
GRID: Remove Passive State(s) from Node
- Remove Passive State(s) at target node.
- Requires VisuMZ_2_BattleGridSystem!

  State ID(s):
  - Select which State ID(s) to remove as a Passive State.

  Action-Selected Node?:
  - Use Action-Selected Node Coordinates if possible?
  - Requires "Empty" or "Any" for <Target: x Grid Node>
  - If the no action is in effect or the action doesn't use that target
    structure, use the node coordinates below:

    Unit:
    - Which unit do you want to remove the Passive State Node effect for?

    Rank:
    - Input the number representing the Rank of the Node you want to remove
      a Passive State(s) from.

    Flank:
    - Input the number representing the Flank of the Node you want to remove
      a Passive State(s) from.
---
GRID: Remove Trigger from Node
- Removes Trigger at target node.
- Requires VisuMZ_2_BattleGridSystem!

  Action-Selected Node?:
  - Use Action-Selected Node Coordinates if possible?
  - Requires "Empty" or "Any" for <Target: x Grid Node>
  - If the no action is in effect or the action doesn't use that target
    structure, use the node coordinates below:

    Unit:
    - Which unit do you want to clear Triggers for?

    Rank:
    - Input the number representing the Rank of the Node you want to clear
      Triggers from.

    Flank:
    - Input the number representing the Flank of the Node you want to clear
      Triggers from.
---
Action Sequences - Horror Effects
These Action Sequences are Horror Effects-related. Requires VisuMZ_2_HorrorEffects! --- HORROR: Clear All Filters - Clear all Horror Effects filters on the target battler(s). Targets: - Select unit(s) to remove Horror Effects for. --- HORROR: Glitch Create - Creates the glitch effect on the target battler(s). Targets: - Select unit(s) to create the Horror Effect for. Glitch Slices: - Glitch slices to be used with the target. Glitch Offset: - Default offset value. Glitch Animated?: - Animate the glitch effect? Glitch Frequency: - If animated, how frequent to make the glitch effect? - Lower = often Higher = rarer Glitch Strength: - If animated, how strong is the glitch effect? - Lower = weaker Higher = stronger --- HORROR: Glitch Remove - Removes the glitch effect on the target battler(s). Targets: - Select unit(s) to remove the Horror Effect for. --- HORROR: Noise Create - Creates the noise effect on the target battler(s). Targets: - Select unit(s) to create the Horror Effect for. Noise Rate: - Noise rate to be used with the target. Noise Animated: - Animate the noise for the target? --- HORROR: Noise Remove - Removes the noise effect on the target battler(s). Targets: - Select unit(s) to remove the Horror Effect for. --- HORROR: TV Create - Creates the TV effect on the target battler(s). Targets: - Select unit(s) to create the Horror Effect for. TV Line Thickness: - Default TV line thickness - Lower = thinner Higher = thicker TV Corner Size: - Default TV line corner size - Lower = smaller Higher = bigger TV Animated: - Animate the TV? TV Speed: - Speed used to animate the TV if animated - Lower = slower Higher = faster --- HORROR: TV Remove - Removes the TV effect on the target battler(s). Targets: - Select unit(s) to remove the Horror Effect for. ---
--- Action Sequences - ImpactThese Action Sequences are related to creating impact. Requires VisuMZ_3_ActSeqImpact! ---
IMPACT: Bizarro Inversion
- Swaps blue/red colors on the battlefield.
- Requires VisuMZ_3_ActSeqImpact!

  Bizarro?:
  - Enable Bizarro Inversion effect?
---
IMPACT: Color Break
- Breaks the colors on the screen before reassembling.
- Requires VisuMZ_3_ActSeqImpact!

  Intensity:
  - What is the intensity of the color break effect?

  Duration:
  - What is the duration of the color break effect?

  Easing Type:
  - Select which easing type you wish to apply.
---
IMPACT: Desaturation
- Desaturates all colors on the battlefield.
- Requires VisuMZ_3_ActSeqImpact!
- Created by Manu Gaming!

  Desaturate?:
  - Enable Desaturation effect?
---
IMPACT: Motion Blur Screen
- Creates a motion blur on the whole screen.
- Requires VisuMZ_3_ActSeqImpact!

  Angle:
  - Determine what angle to make the motion blur at.

  Intensity Rate:
  - This determines intensity rate of the motion blur.
  - Use a number between 0 and 1.

  Duration:
  - How many frames should the motion blur last?
  - What do you want to be its duration?

  Easing Type:
  - Select which easing type you wish to apply.
--- IMPACT: Motion Blur Target(s) - Creates a motion blur on selected target(s). - Requires VisuMZ_3_ActSeqImpact! Targets: - Select unit(s) to create motion blur effects for. Angle: - Determine what angle to make the motion blur at. Intensity Rate: - This determines intensity rate of the motion blur. - Use a number between 0 and 1. Duration: - How many frames should the motion blur last? - What do you want to be its duration? Easing Type: - Select which easing type you wish to apply. ---
IMPACT: Motion Trail Create
- Creates a motion trail effect for the target(s).
- Requires VisuMZ_3_ActSeqImpact!

  Targets:
  - Select unit(s) to create motion trail effects for.

  Delay:
  - How many frames to delay by when creating a motion trail?
  - The higher the delay, the less motion trails there are.

  Duration:
  - How many frames should the motion trail last?
  - What do you want to be its duration?

  Hue:
  - What do you want to be the hue for the motion trail?

  Starting Opacity:
  - What starting opacity value do you want for the motion trail?
  - Opacity values decrease over time.

  Tone:
  - What tone do you want for the motion trail?
  - Format: [Red, Green, Blue, Gray]
--- IMPACT: Motion Trail Remove - Removes the motion trail effect from the target(s). - Requires VisuMZ_3_ActSeqImpact! Targets: - Select unit(s) to clear motion trail effects for. ---
IMPACT: Negative Inversion
- Inverts all the colors on the battlefield.
- Requires VisuMZ_3_ActSeqImpact!
- Created by Manu Gaming!

  Negative?:
  - Enable Negative Inversion effect?
---
IMPACT: Oversaturation
- Oversaturates colors on the battlefield.
- Requires VisuMZ_3_ActSeqImpact!

  Oversaturate?:
  - Enable Oversaturation effect?
---
IMPACT: Shockwave at Point
- Creates a shockwave at the designated coordinates.
- Requires VisuMZ_3_ActSeqImpact!

  Point: X:
  Point: Y:
  - What x/y coordinate do you want to create a shockwave at?
  - You can use JavaScript code.

  Amplitude:
  - What is the aplitude of the shockwave effect?

  Wavelength:
  - What is the wavelength of the shockwave effect?

  Duration:
  - What is the duration of the shockwave?
--- IMPACT: Shockwave from Each Target(s)
- Creates a shockwave at each of the target(s) location(s).
- Requires VisuMZ_3_ActSeqImpact!
Targets:
- Select unit(s) to start a shockwave from.
Target Location:
- Select which part target group to start a shockwave from.
Offset X:
Offset Y:
- How much to offset the shockwave X/Y point by.
Amplitude:
- What is the aplitude of the shockwave effect?
Wavelength:
- What is the wavelength of the shockwave effect?
Duration:
- What is the duration of the shockwave?
--- IMPACT: Shockwave from Target(s) Center
- Creates a shockwave from the center of the target(s).
- Requires VisuMZ_3_ActSeqImpact!
Targets:
- Select unit(s) to start a shockwave from.
Target Location:
- Select which part target group to start a shockwave from.
Offset X:
Offset Y:
- How much to offset the shockwave X/Y point by.
Amplitude:
- What is the aplitude of the shockwave effect?
Wavelength:
- What is the wavelength of the shockwave effect?
Duration:
- What is the duration of the shockwave?
---
IMPACT: Time Scale
- Adjust time to go faster or slower!
- Requires VisuMZ_3_ActSeqImpact!
- Created by Manu Gaming!

  Scale:
  - Adjusts how fast/slow time goes.
  - 1.00 is normal. Lower is slower. Higher is faster.
---
IMPACT: Time Stop
- Stops time for a set amount of milliseconds.
- Requires VisuMZ_3_ActSeqImpact!
- Created by Manu Gaming!

  Milliseconds:
  - How many milliseconds should time stop for?
  - 1000 milliseconds = 1 second.
---
IMPACT: Zoom Blur at Point
- Creates a zoom blur at the designated coordinates.
- Requires VisuMZ_3_ActSeqImpact!

  Point: X:
  Point: Y:
  - What x/y coordinate do you want to focus the zoom at?
  - You can use JavaScript code.

  Zoom Strength:
  - What is the strength of the zoom effect?
  - Use a number between 0 and 1.

  Visible Radius:
  - How much of a radius should be visible from the center?

  Duration:
  - What is the duration of the zoom blur?

  Easing Type:
  - Select which easing type you wish to apply.
--- IMPACT: Zoom Blur at Target(s) Center
- Creates a zoom blur at the center of targets.
- Requires VisuMZ_3_ActSeqImpact!
Targets:
- Select unit(s) to start a zoom blur from.
Target Location:
- Select which part target group to start a zoom blur from.
Offset X:
Offset Y:
- How much to offset the zoom blur X/Y point by.
Zoom Strength:
- What is the strength of the zoom effect?
- Use a number between 0 and 1.
Visible Radius:
- How much of a radius should be visible from the center?
Duration:
- What is the duration of the zoom blur?
Easing Type:
- Select which easing type you wish to apply.
--- Action Sequences - InjectThese Action Sequences are related to injecting sprite animations. Requires VisuMZ_3_ActSeqImpact! ---
INJECT: Animation Begin
- Injects and plays a whole spritesheet animation.
- The spritesheet animation will play over the battler until it is finished.
- The battler's original sprite will be invisible until finished.
- Requires VisuMZ_3_ActSeqImpact!

  Targets:
  - Select unit(s) to inject the animation on.

  Filename:
  - Select the animation spritesheet file.
  - Located in the /img/sv_actors/ folder.

    Horizontal Cells:
    - How many horizontal cells (or columns) are there?

    Vertical Cells:
    - How many vertical cells (or rows) are there?

    Frame Delay:
    - How many frames are played inbetween cells?

    Smooth Bitmap?:
    - Smooth the spritesheet graphic?

  Offset:

    Offset X:
    - Offsets the X position of the injected animation.
    - Negative: left. Positive: right.

    Offset Y:
    - Offsets the Y position of the injected animation.
    - Negative: up. Positive: down.
--- INJECT: Animation End - Stops and ends any injected animations on target(s). - Any inject animation will be prematurely terminated. - Requires VisuMZ_3_ActSeqImpact! Targets: - Select unit(s) to stop injected animation(s). --- INJECT: Animation Pause/Resume - Pauses/resumes any injected animations on target(s). - Requires VisuMZ_3_ActSeqImpact! Targets: - Select unit(s) to pause/resume injected animation(s). Pause?: - Pause the injected animation? --- INJECT: Wait For Injected Animation - Waits for injected animations to complete before performing next command. - Requires VisuMZ_3_ActSeqImpact! --- Action Sequences - Mechanics
These Action Sequences are related to various mechanics related to the battle system. --- MECH: Action Effect - Causes the unit(s) to take damage/healing from action and incurs any changes made such as buffs and states. Targets: - Select unit(s) to receive the current action's effects. --- MECH: Active Chain Input Disable - Disables input for Active Chain Skills at this time. - Requires VisuMZ_3_ActiveChainSkills! --- MECH: Add Buff/Debuff - Adds buff(s)/debuff(s) to unit(s). - Determine which parameters are affected and their durations. Targets: - Select unit(s) to receive the buff(s) and/or debuff(s). Buff Parameters: - Select which parameter(s) to buff. - Insert a parameter multiple times to raise its stacks. Debuff Parameters: - Select which parameter(s) to debuff. - Insert a parameter multiple times to raise its stacks. Turns: - Number of turns to set the parameter(s) buffs to. - You may use JavaScript code. --- MECH: Add State - Adds state(s) to unit(s). Targets: - Select unit(s) to receive the buff(s). States: - Select which state ID(s) to add to unit(s). - Insert multiple state ID's to add multiple at once. --- MECH: Analyze Weakness - Reveal elemental weakness(es) from target(s). - Requires VisuMZ_3_WeaknessDisplay! Targets: - Select unit(s) to reveal elemental weaknesses for. Reveal: - How many elemental weaknesses do you wish to reveal? - You may use JavaScript code. --- MECH: Armor Penetration
- Adds an extra layer of defensive penetration/reduction.
- You may use JavaScript code for any of these.
Armor/Magic Penetration:
Rate:
- Penetrates an extra multiplier of armor by this value.
Flat:
- Penetrates a flat amount of armor by this value.
Armor/Magic Reduction:
Rate:
- Reduces an extra multiplier of armor by this value.
Flat:
- Reduces a flat amount of armor by this value.
--- MECH: ATB Gauge
- Alters the ATB/TPB Gauges.
- Requires VisuMZ_2_BattleSystemATB!
Targets:
- Select unit(s) to alter the ATB/TPB Gauges for.
Charging:
Charge Rate:
- Changes made to the ATB Gauge if it is currently charging.
Casting:
Cast Rate:
- Changes made to the ATB Gauge if it is currently casting.
Interrupt?:
- Interrupt the ATB Gauge if it is currently casting?
--- MECH: Boost Points Change - Changes Boost Points for target(s). - Requires VisuMZ_3_BoostAction! Targets: - Select unit(s) to alter the Boost Points for. Alter Boost Points By: - Alters the unit(s) Boost Points. - Positive for gaining points. Negative for losing points. --- MECH: Boost Store Data - Stores the number of Boosts used this action inside a variable. - Requires VisuMZ_3_BoostAction! Variable ID: - Which variable do you want to store the data inside? --- MECH: Break Shield Change - Changes Break Shields for target(s) if not Break Stunned. - Requires VisuMZ_4_BreakShields! Targets: - Select unit(s) to alter the Break Shields for. Alter Break Shields By: - Alters the unit(s) Break Shields. - Positive for gaining shields. Negative for losing shields. --- MECH: Break Shield Reset - Resets Break Shields for target(s) if not Break Stunned. - Requires VisuMZ_4_BreakShields! Targets: - Select unit(s) to reset the Break Shields for. --- MECH: BTB Brave Points - Alters the target(s) Brave Points to an exact value. - Requires VisuMZ_2_BattleSystemBTB! Targets: - Select unit(s) to alter the ATB/TPB Gauges for. Alter Brave Points By: - Alters the target(s) Brave Points. - Positive for gaining BP. - Negative for losing BP. --- MECH: Collapse - Causes the unit(s) to perform its collapse animation if the unit(s) has died. Targets: - Select unit(s) to process a death collapse. Force Death: - Force death even if the unit has not reached 0 HP? - This will remove immortality. Wait For Effect?: - Wait for the collapse effect to complete before performing next command? --- MECH: CTB Order - Alters the CTB Turn Order. - Requires VisuMZ_2_BattleSystemCTB! Targets: - Select unit(s) to alter the CTB Turn Order for. Change Order By: - Changes turn order for target(s) by this amount. - Positive increases wait. Negative decreases wait. --- MECH: CTB Speed - Alters the CTB Speed. - Requires VisuMZ_2_BattleSystemCTB! Targets: - Select unit(s) to alter the CTB Speed for. Charge Rate: - Changes made to the CTB Speed if it is currently charging. Cast Rate: - Changes made to the CTB Speed if it is currently casting. --- MECH: Custom Damage Formula - Changes the current action's damage formula to custom. - This will assume the MANUAL damage style. Formula: - Changes the current action's damage formula to custom. - Use 'default' to revert the damage formula. --- MECH: Damage Popup - Causes the unit(s) to display the current state of damage received or healed. Targets: - Select unit(s) to prompt a damage popup. --- MECH: Emulate Attack Effect - Emulate an "Action Effect" but using a the user's attack skill instead of the current action. - Essentially lets you perform the mechanics of another action without having to use another action or needing to pay that action's costs. User(s): - Select unit(s) to perform the action's effects. Targets: - Select unit(s) to receive the current action's effects. --- MECH: Emulate Guard Effect - Emulate an "Action Effect" but using a the user's guard skill instead of the current action. - Essentially lets you perform the mechanics of another action without having to use another action or needing to pay that action's costs. User(s): - Select unit(s) to perform the action's effects. Targets: - Select unit(s) to receive the current action's effects. --- MECH: Emulate Item Effect - Emulate an "Action Effect" but using a specific item instead of the current action. - Essentially lets you perform the mechanics of another action without having to use another action or needing to pay that action's costs. Item ID: - Which item ID will be emulated? User(s): - Select unit(s) to perform the action's effects. Targets: - Select unit(s) to receive the current action's effects. --- MECH: Emulate Skill Cost - Pick a skill for target(s) to emulate paying the cost of. - Lets you cause characters to perform paying the costs of a specific skill without needing to actually use them. - This will include Skill Cooldowns and Limited Skill Uses. Skill ID: - Which skill ID will have its cost paid for? - Use 0 for current action's skill. User(s): - Select unit(s) to perform the action's effects. --- MECH: Emulate Skill Effect - Emulate an "Action Effect" but using a specific skill instead of the current action. - Essentially lets you perform the mechanics of another action without having to use another action or needing to pay that action's costs. Skill ID: - Which skill ID will be emulated? User(s): - Select unit(s) to perform the action's effects. Targets: - Select unit(s) to receive the current action's effects. --- MECH: Enemy Escape - Causes the enemy unit(s) to escape. Targets: - Select unit(s) to escape. --- MECH: Dead Label Jump
- If the active battler is dead, jump to a specific label in the
common event.
Jump To Label:
- If the active battler is dead, jump to this specific label in the
common event.
--- MECH: ETB Energy Count - Alters the subject team's available Energy Count. - Requires VisuMZ_2_BattleSystemETB! Energy Count: - Alters the subject team's available Energy Count. - Positive for gaining energy. Negative for losing energy. --- MECH: FTB Action Count - Alters the subject team's available Action Count. - Requires VisuMZ_2_BattleSystemFTB! Action Count: - Alters the subject team's available Action Count. - Positive for gaining actions. Negative for losing actions. --- MECH: HP, MP, TP
- Alters the HP, MP, and TP values for unit(s).
- Positive values for healing. Negative values for damage.
Targets:
- Select unit(s) to receive the current action's effects.
HP, MP, TP:
Rate:
- Changes made to the parameter based on rate.
- Positive values for healing. Negative values for damage.
Flat:
- Flat changes made to the parameter.
- Positive values for healing. Negative values for damage.
Damage Popup?:
- Display a damage popup after?
--- MECH: Immortal
- Changes the immortal flag of targets. If immortal flag is removed and a
unit would die, collapse that unit.
Targets:
- Alter the immortal flag of these groups. If immortal flag is removed and
a unit would die, collapse that unit.
Immortal:
- Turn immortal flag for unit(s) on/off?
--- MECH: Multipliers
- Changes the multipliers for the current action.
- You may use JavaScript code for any of these.
Critical Hit%:
Rate:
- Affects chance to land a critical hit by this multiplier.
Flat:
- Affects chance to land a critical hit by this flat bonus.
Critical Damage
Rate:
- Affects critical damage by this multiplier.
Flat:
- Affects critical damage by this flat bonus.
Damage/Healing
Rate:
- Sets the damage/healing multiplier for current action.
Flat:
- Sets the damage/healing bonus for current action.
Hit Rate
Rate:
- Affects chance to connect attack by this multiplier.
Flat:
- Affects chance to connect attack by this flat bonus.
--- MECH: Once Parallel - Plays a Common Event parallel to the battle event once without repeating itself when done. Common Event ID: - The ID of the parallel Common Event to play. - Does NOT repeat itself when finished. - When exiting battle scene, all Once Parallels are cleared. - Once Parallels are not retained upon reentering the scene. - Once Parallels are not stored in memory and cannot be saved. --- MECH: OTB Order - Alters the OTB Turn Order. Best used with single targets. - Requires VisuMZ_2_BattleSystemOTB! Targets: - Select unit(s) to alter the OTB Turn Order for. Current Turn By: - Changes turn order for target(s) by this amount. - Positive increases wait. Negative decreases wait. Next Turn By: - Changes turn order for target(s) by this amount. - Positive increases wait. Negative decreases wait. Follow Turn By: - Changes turn order for target(s) by this amount. - Positive increases wait. Negative decreases wait. --- MECH: PTB Alter Cost - Alters the action's cost settings. - Requires VisuMZ_2_BattleSystemPTB! Override?: - Overrides any 'permanent' settings for Changeability? Alter Changeability: - Allow the cost type and value to be changeable? Alter Cost Type: - Change the cost type to this scenario. - Use 'Unchanged' for no changes. Alter Cost Value: - What is the default action cost for this scenario? --- MECH: PTB Conversion - Converts full actions into half actions. - Requires VisuMZ_2_BattleSystemPTB! Conversion Count: - Converts full actions into half actions. - If not enough, consume half actions. --- MECH: PTB Full/Half Action(s) - Alters the subject team's available Full/Half Actions. - Requires VisuMZ_2_BattleSystemPTB! Full Actions: - Alters the subject team's available Full Actions. - Positive for gaining. Negative for losing. Half Actions: - Alters the subject team's available Half Actions. - Positive for gaining. Negative for losing. --- MECH: Remove Buff/Debuff - Removes buff(s)/debuff(s) from unit(s). - Determine which parameters are removed. Targets: - Select unit(s) to have the buff(s) and/or debuff(s) removed. Buff Parameters: - Select which buffed parameter(s) to remove. Debuff Parameters: - Select which debuffed parameter(s) to remove. --- MECH: Remove State - Remove state(s) from unit(s). Targets: - Select unit(s) to have states removed from. States: - Select which state ID(s) to remove from unit(s). - Insert multiple state ID's to remove multiple at once. --- MECH: State Turns Change By - Changes target(s) state turns by an amount. - Requires VisuMZ_1_SkillsStatesCore! Targets: - Select unit(s) to affect state turns for. State ID: - What is the ID of the state you wish to change turns for? - Only works on states that can have turns. Change Turns By: - How many turns should the state be changed to? - You may use JavaScript code. Auto-Add State?: - Automatically adds state if actor(s) does not have it applied? --- MECH: State Turns Change To - Changes target(s) state turns to a specific value. - Requires VisuMZ_1_SkillsStatesCore! Targets: - Select unit(s) to affect state turns for. State ID: - What is the ID of the state you wish to change turns for? - Only works on states that can have turns. Change Turns To: - How many turns should the state be changed to? - You may use JavaScript code. Auto-Add State?: - Automatically adds state if target(s) does not have it applied? --- MECH: STB Exploit Effect
- Utilize the STB Exploitation mechanics!
- Requires VisuMZ_2_BattleSystemSTB!
Target(s) Exploited?:
- Exploit the below targets?
Targets:
- Select unit(s) to become exploited.
Force Exploitation:
- Force the exploited status?
User Exploiter?:
- Allow the user to become the exploiter?
Force Exploitation:
- Force the exploiter status?
--- MECH: STB Extra Action - Adds an extra action for the currently active battler. - Requires VisuMZ_2_BattleSystemSTB! Extra Actions: - How many extra actions should the active battler gain? - You may use JavaScript code. --- MECH: STB Remove Excess Actions - Removes excess actions from the active battler. - Requires VisuMZ_2_BattleSystemSTB! Remove Actions: - How many actions to remove from the active battler? - You may use JavaScript code. --- MECH: Swap Weapon - Causes the unit(s) to swap their weapon for another. - Requires VisuMZ_2_WeaponSwapSystem! Targets: - Select unit(s) to swap weapons for. Weapon Type ID: - Which weapon type to swap to? - This is NOT the weapon's ID. - It's the weapon TYPE. --- MECH: Text Popup
- Causes the unit(s) to display a text popup.
Targets:
- Select unit(s) to prompt a text popup.
Text:
- What text do you wish to display?
Text Color:
- Use #rrggbb for custom colors or regular numbers for text colors from
the Window Skin.
Flash Color:
- Adjust the popup's flash color.
- Format: [red, green, blue, alpha]
Flash Duration:
- What is the frame duration of the flash effect?
--- MECH: Variable Popup
- Causes the unit(s) to display a popup using the data stored inside
a variable.
Targets:
- Select unit(s) to prompt a text popup.
Variable:
- Get data from which variable to display as a popup?
Digit Grouping:
- Use digit grouping to separate numbers?
- Requires VisuMZ_0_CoreEngine!
Text Color:
- Use #rrggbb for custom colors or regular numbers for text colors from
the Window Skin.
Flash Color:
- Adjust the popup's flash color.
- Format: [red, green, blue, alpha]
Flash Duration:
- What is the frame duration of the flash effect?
--- MECH: Wait For Effect - Waits for the effects to complete before performing next command. --- Action Sequences - Motion
These Action Sequences allow you the ability to control the motions of sideview sprites. --- MOTION: Clear Freeze Frame - Clears any freeze frames from the unit(s). Targets: - Select which unit(s) to clear freeze frames for. --- MOTION: Freeze Motion Frame
- Forces a freeze frame instantly at the selected motion.
- Automatically clears with a new motion.
Targets:
- Select which unit(s) to freeze motions for.
Motion Type:
- Freeze this motion for the unit(s).
Frame Index:
- Which frame do you want to freeze the motion on?
- Frame index values start at 0.
Show Weapon?:
- If using 'attack', 'thrust', 'swing', or 'missile', display the
weapon sprite?
--- MOTION: Motion Type
- Causes the unit(s) to play the selected motion.
Targets:
- Select which unit(s) to perform a motion.
Motion Type:
- Play this motion for the unit(s).
Show Weapon?:
- If using 'attack', 'thrust', 'swing', or 'missile', display the
weapon sprite?
--- MOTION: Perform Action - Causes the unit(s) to play the proper motion based on the current action. Targets: - Select which unit(s) to perform a motion. --- MOTION: Refresh Motion - Cancels any set motions unit(s) has to do and use their most natural motion at the moment. Targets: - Select which unit(s) to refresh their motion state. --- MOTION: Wait By Motion Frame
- Creates a wait equal to the number of motion frames passing.
- Time is based on Plugin Parameters => Actors => Motion Speed.
Motion Frames to Wait?:
- Each "frame" is equal to the value found in
Plugin Parameters => Actors => Motion Speed
--- Action Sequences - Movement
These Action Sequences allow you the ability to control the sprites of actors and enemies in battle. --- MOVE: Battle Step - Causes the unit(s) to move forward past their home position to prepare for action. Targets: - Select which unit(s) to move. Wait For Movement?: - Wait for movement to complete before performing next command? --- MOVE: Change Home By Distance
- Change unit(s)'s home position by a distance from their current home
position(s).
- Sideview-only!
Targets:
- Select which unit(s) to change home position(s) for.
Distance Adjustment:
- Makes adjustments to distance values to determine which direction to
change by.
- Normal - No adjustments made
- Horizontal - Actors adjust left, Enemies adjust right
- Vertical - Actors adjust Up, Enemies adjust down
- Both - Applies both Horizontal and Vertical
Distance: X:
- Horizontal distance to move.
- You may use JavaScript code.
Distance: Y:
- Vertical distance to move.
- You may use JavaScript code.
Duration:
- Duration in frames for total change amount.
Face Destination?:
- Turn and face the destination?
Movement Easing:
- Select which easing type you wish to apply.
- Requires VisuMZ_0_CoreEngine.
Movement Motion:
- Play this motion for the unit(s).
Wait For Movement?:
- Wait for movement to complete before performing next command?
--- MOVE: Change Home To JS Coordinates
- Change home position(s) to specified JS Coordinates.
- Sideview-only! Uses JavaScript!
Targets:
- Select which unit(s) to change home position(s) for.
JS: Coordinates:
- Code used to determine the coordinates for the target(s)'s new home
position.
Offset Adjustment:
- Makes adjustments to offset values to determine which direction to
adjust the destination by.
Offset: X:
- Horizontal offset to move.
- You may use JavaScript code.
Offset: Y:
- Vertical offset to move.
- You may use JavaScript code.
Duration:
- Duration in frames for total change amount.
Face Destination?:
- Turn and face the destination?
Movement Easing:
- Select which easing type you wish to apply.
- Requires VisuMZ_0_CoreEngine.
Movement Motion:
- Play this motion for the unit(s).
Wait For Movement?:
- Wait for movement to complete before performing next command?
--- MOVE: Change Home To Point
- Change home position(s) to a target point on the screen.
- Sideview-only! Points based off Graphics.boxWidth/Height.
Targets:
- Select which unit(s) to change home position(s) for.
Destination Point:
- Select which point to face.
- Center
- Point X, Y
- Replace 'x' and 'y' with coordinates
Offset Adjustment:
- Makes adjustments to offset values to determine which direction to
adjust the destination by.
Offset: X:
- Horizontal offset to move.
- You may use JavaScript code.
Offset: Y:
- Vertical offset to move.
- You may use JavaScript code.
Duration:
- Duration in frames for total change amount.
Face Destination?:
- Turn and face the destination?
Movement Easing:
- Select which easing type you wish to apply.
- Requires VisuMZ_0_CoreEngine.
Movement Motion:
- Play this motion for the unit(s).
Wait For Movement?:
- Wait for movement to complete before performing next command?
--- MOVE: Change Home To Target(s)
- Moves unit(s) to another unit(s) on the battle field.
- Sideview-only!
Targets (Moving):
- Select which unit(s) to change home position(s) for.
Targets (Destination):
- Select which unit(s) to change home position to.
Target Location:
- Select which part target group to change home position to.
- front head
- front center
- front base
- middle head
- middle center
- middle base
- back head
- back center
- back base
Melee Distance:
- The melee distance away from the target location in addition to the
battler's width.
Offset Adjustment:
- Makes adjustments to offset values to determine which direction to
adjust the destination by.
Offset: X:
- Horizontal offset to move.
- You may use JavaScript code.
Offset: Y:
- Vertical offset to move.
- You may use JavaScript code.
Duration:
- Duration in frames for total change amount.
Face Destination?:
- Turn and face the destination?
Movement Easing:
- Select which easing type you wish to apply.
- Requires VisuMZ_0_CoreEngine.
Movement Motion:
- Play this motion for the unit(s).
Wait For Movement?:
- Wait for movement to complete before performing next command?
--- MOVE: Face Direction - Causes the unit(s) to face forward or backward. - Sideview-only! Targets: - Select which unit(s) to change direction. Direction: - Select which direction to face. --- MOVE: Face JS Coordinates
- Causes the unit(s) to face specified JS Coordinates.
- Sideview-only! Uses JavaScript!
Targets:
- Select which unit(s) to change direction.
JS: Coordinates:
- Code used to determine the coordinates for the target(s) to face
towards.
Face Away From?:
- Face away from the point instead?
--- MOVE: Face Point
- Causes the unit(s) to face a point on the screen.
- Sideview-only!
Targets:
- Select which unit(s) to change direction.
Point:
- Select which point to face.
- Home
- Center
- Point X, Y
- Replace 'x' and 'y' with coordinates
Face Away From?:
- Face away from the point instead?
--- MOVE: Face Target(s) - Causes the unit(s) to face other targets on the screen. - Sideview-only! Targets (facing): - Select which unit(s) to change direction. Targets (destination): - Select which unit(s) for the turning unit(s) to face. Face Away From?: - Face away from the unit(s) instead? --- MOVE: Float - Causes the unit(s) to float above the ground. - Sideview-only! Targets: - Select which unit(s) to make float. Desired Height: - Vertical distance to float upward. - You may use JavaScript code. Duration: - Duration in frames for total float amount. Float Easing: - Select which easing type you wish to apply. - Requires VisuMZ_0_CoreEngine. Wait For Float?: - Wait for floating to complete before performing next command? --- MOVE: Home Reset - Causes the unit(s) to move back to their home position(s) and face back to their original direction(s). Targets: - Select which unit(s) to move. Wait For Movement?: - Wait for movement to complete before performing next command? --- MOVE: Jump - Causes the unit(s) to jump into the air. - Sideview-only! Targets: - Select which unit(s) to make jump. Desired Height: - Max jump height to go above the ground - You may use JavaScript code. Duration: - Duration in frames for total jump amount. Wait For Jump?: - Wait for jumping to complete before performing next command? --- MOVE: Move Distance
- Moves unit(s) by a distance from their current position(s).
- Sideview-only!
Targets:
- Select which unit(s) to move.
Distance Adjustment:
- Makes adjustments to distance values to determine which direction to
move unit(s).
- Normal - No adjustments made
- Horizontal - Actors adjust left, Enemies adjust right
- Vertical - Actors adjust Up, Enemies adjust down
- Both - Applies both Horizontal and Vertical
Distance: X:
- Horizontal distance to move.
- You may use JavaScript code.
Distance: Y:
- Vertical distance to move.
- You may use JavaScript code.
Duration:
- Duration in frames for total movement amount.
Face Destination?:
- Turn and face the destination?
Movement Easing:
- Select which easing type you wish to apply.
- Requires VisuMZ_0_CoreEngine.
Movement Motion:
- Play this motion for the unit(s).
Wait For Movement?:
- Wait for movement to complete before performing next command?
--- MOVE: Move To JS Coordinates
- Moves unit(s) to specified JS Coordinates.
- Sideview-only! Uses JavaScript!
Targets:
- Select which unit(s) to move.
JS: Coordinates:
- Code used to determine the coordinates for the target(s) to move to.
Offset Adjustment:
- Makes adjustments to offset values to determine which direction to
adjust the destination by.
Offset: X:
- Horizontal offset to move.
- You may use JavaScript code.
Offset: Y:
- Vertical offset to move.
- You may use JavaScript code.
Duration:
- Duration in frames for total movement amount.
Face Destination?:
- Turn and face the destination?
Movement Easing:
- Select which easing type you wish to apply.
- Requires VisuMZ_0_CoreEngine.
Movement Motion:
- Play this motion for the unit(s).
Wait For Movement?:
- Wait for movement to complete before performing next command?
--- MOVE: Move To Point
- Moves unit(s) to a designated point on the screen.
- Sideview-only! Points based off Graphics.boxWidth/Height.
Targets:
- Select which unit(s) to move.
Destination Point:
- Select which point to face.
- Home
- Center
- Point X, Y
- Replace 'x' and 'y' with coordinates
Offset Adjustment:
- Makes adjustments to offset values to determine which direction to
adjust the destination by.
Offset: X:
- Horizontal offset to move.
- You may use JavaScript code.
Offset: Y:
- Vertical offset to move.
- You may use JavaScript code.
Duration:
- Duration in frames for total movement amount.
Face Destination?:
- Turn and face the destination?
Movement Easing:
- Select which easing type you wish to apply.
- Requires VisuMZ_0_CoreEngine.
Movement Motion:
- Play this motion for the unit(s).
Wait For Movement?:
- Wait for movement to complete before performing next command?
--- MOVE: Move To Target(s)
- Moves unit(s) to another unit(s) on the battle field.
- Sideview-only!
Targets (Moving):
- Select which unit(s) to move.
Targets (Destination):
- Select which unit(s) to move to.
Target Location:
- Select which part target group to move to.
- front head
- front center
- front base
- middle head
- middle center
- middle base
- back head
- back center
- back base
Melee Distance:
- The melee distance away from the target location in addition to the
battler's width.
Offset Adjustment:
- Makes adjustments to offset values to determine which direction to
adjust the destination by.
Offset: X:
- Horizontal offset to move.
- You may use JavaScript code.
Offset: Y:
- Vertical offset to move.
- You may use JavaScript code.
Duration:
- Duration in frames for total movement amount.
Face Destination?:
- Turn and face the destination?
Movement Easing:
- Select which easing type you wish to apply.
- Requires VisuMZ_0_CoreEngine.
Movement Motion:
- Play this motion for the unit(s).
Wait For Movement?:
- Wait for movement to complete before performing next command?
--- MOVE: Opacity - Causes the unit(s) to change opacity. - Sideview-only! Targets: - Select which unit(s) to change opacity. Desired Opacity: - Change to this opacity value. - You may use JavaScript code. Duration: - Duration in frames for opacity change. Opacity Easing: - Select which easing type you wish to apply. - Requires VisuMZ_0_CoreEngine. Wait For Opacity?: - Wait for opacity changes to complete before performing next command? ---
MOVE: Scale/Grow/Shrink
- Causes the unit(s) to scale, grow, or shrink?.
- Sideview-only!

  Targets:
  - Select which unit(s) to change the scale of.

  Scale X:
  Scale Y:
  - What target scale value do you want?
  - 1.0 is normal size.

  Duration:
  - Duration in frames to scale for.

  Scale Easing:
  - Select which easing type you wish to apply.
  - Requires VisuMZ_0_CoreEngine.

  Wait For Scale?:
  - Wait for scaling to complete before performing next command?
---
MOVE: Skew/Distort
- Causes the unit(s) to skew.
- Sideview-only!

  Targets:
  - Select which unit(s) to skew.

  Skew X:
  Skew Y:
  - What variance to skew?
  - Use small values for the best results.

  Duration:
  - Duration in frames to skew for.

  Skew Easing:
  - Select which easing type you wish to apply.
  - Requires VisuMZ_0_CoreEngine.

  Wait For Skew?:
  - Wait for skew to complete before performing next command?
---
MOVE: Spin/Rotate
- Causes the unit(s) to spin.
- Sideview-only!

  Targets:
  - Select which unit(s) to spin.

  Angle:
  - How many degrees to spin?

  Duration:
  - Duration in frames to spin for.

  Spin Easing:
  - Select which easing type you wish to apply.
  - Requires VisuMZ_0_CoreEngine.

  Revert Angle on Finish:
  - Upon finishing the spin, revert the angle back to 0.

  Wait For Spin?:
  - Wait for spin to complete before performing next command?
--- MOVE: Wait For Float - Waits for floating to complete before performing next command. --- MOVE: Wait For Jump - Waits for jumping to complete before performing next command. --- MOVE: Wait For Movement - Waits for movement to complete before performing next command. --- MOVE: Wait For Opacity - Waits for opacity changes to complete before performing next command. --- MOVE: Wait For Scale - Waits for scaling to complete before performing next command. --- MOVE: Wait For Skew - Waits for skewing to complete before performing next command. --- MOVE: Wait For Spin - Waits for spinning to complete before performing next command. ---
Action Sequences - ProjectilesCreate projectiles on the screen and fire them off at a target. Requires VisuMZ_3_ActSeqProjectiles! ---
PROJECTILE: Animation
- Create an animation projectile and fire it at a target.
- Requires VisuMZ_3_ActSeqProjectiles!

  Coordinates:

    Start Location:
    - Settings to determine where the projectile(s) start from.

      Type:
      - Select where the projectile should start from.
        - Target - Start from battler target(s)
        - Point - Start from a point on the screen

        Target(s):
        - Select which unit(s) to start the projectile from.

          Centralize:
          - Create one projectile at the center of the targets?
          - Or create a projectile for each target?

          Target Location:
          - Select which part of the target to send the projectile from.
          - front head
          - front center
          - front base
          - middle head
          - middle center
          - middle base
          - back head
          - back center
          - back base

        Point X:
        Point Y:
        - Insert the X/Y coordinate to start the projectile at.
        - You may use JavaScript code.

      Offset X:
      Offset Y:
      - Insert how many pixels to offset the X/Y coordinate by.
      - You may use JavaScript code.

    Goal Location:
    - Settings to determine where the projectile(s) start from.

      Type:
      - Select where the projectile should go to.
        - Target - Goal is battler target(s)
        - Point - Goal is a point on the screen

        Target(s):
        - Select which unit(s) for projectile to go to.

          Centralize:
          - Create one projectile at the center of the targets?
          - Or create a projectile for each target?

          Target Location:
          - Select which part of the target to send the projectile to.
          - front head
          - front center
          - front base
          - middle head
          - middle center
          - middle base
          - back head
          - back center
          - back base

        Point X:
        Point Y:
        - Insert the X/Y coordinate to send the projectile to.
        - You may use JavaScript code.

      Offset X:
      Offset Y:
      - Insert how many pixels to offset the X/Y coordinate by.
      - You may use JavaScript code.

  Settings:

    Animation ID:
    - Determine which animation to use as a projectile.

    Duration:
    - Duration for the projectile(s) to travel.

    Wait For Projectile?:
    - Wait for projectile(s) to reach their destination before going onto
      the next command?

    Wait For Animation?:
    - Wait for animation to finish before going to the next command?

    Extra Settings:
    - Add extra settings to the projectile?

      Auto Angle?:
      - Automatically angle the projectile to tilt the direction
        it's moving?

      Angle Offset:
      - Alter the projectile's tilt by this many degrees.

      Arc Peak:
      - This is the height of the project's trajectory arc in pixels.

      Easing:
      - Select which easing type to apply to the projectile's trajectory.

      Spin Speed:
      - Determine how much angle the projectile spins per frame.
      - Does not work well with "Auto Angle".

    Effect Emulation:

      Action Effect?:
      - Emulate current Action Effect when projectile reaches target?
      - Only works with start and goal targets.

      Item Effect ID?:
      - Emulate an Item Effect when projectile reaches target?
      - Use 0 to not use.
      - Only works with start and goal targets.

      Skill Effect ID?:
      - Emulate a Skill Effect when projectile reaches target?
      - Use 0 to not use.
      - Only works with start and goal targets.

      Common Event ID:
      - Plays a Once Parallel Common Event upon reaching target.
      - Use 0 to not use.
      - Works regardless of start/goal targets.

    End Animation ID:
    - Plays an animation when projectile reaches target.
    - Use 0 to not use.
    - Requires VisuMZ_1_BattleCore v1.86+.
    - Requires VisuMZ_3_ActSeqProjectiles v1.09+.

      Mirror Animation:
      - Mirror the effect animation?
      - Requires VisuMZ_1_BattleCore v1.86+.
      - Requires VisuMZ_3_ActSeqProjectiles version 1.09+.

      Mute Animation:
      - Mute the effect animation?
      - Requires VisuMZ_1_BattleCore v1.86+.
      - Requires VisuMZ_3_ActSeqProjectiles version 1.09+.
---
PROJECTILE: Icon
- Create an icon projectile and fire it at a target.
- Requires VisuMZ_3_ActSeqProjectiles!

  Coordinates:

    Start Location:
    - Settings to determine where the projectile(s) start from.

      Type:
      - Select where the projectile should start from.
        - Target - Start from battler target(s)
        - Point - Start from a point on the screen

        Target(s):
        - Select which unit(s) to start the projectile from.

          Centralize:
          - Create one projectile at the center of the targets?
          - Or create a projectile for each target?

          Target Location:
          - Select which part of the target to send the projectile from.
          - front head
          - front center
          - front base
          - middle head
          - middle center
          - middle base
          - back head
          - back center
          - back base

        Point X:
        Point Y:
        - Insert the X/Y coordinate to start the projectile at.
        - You may use JavaScript code.

      Offset X:
      Offset Y:
      - Insert how many pixels to offset the X/Y coordinate by.
      - You may use JavaScript code.

    Goal Location:
    - Settings to determine where the projectile(s) start from.

      Type:
      - Select where the projectile should go to.
        - Target - Goal is battler target(s)
        - Point - Goal is a point on the screen

        Target(s):
        - Select which unit(s) for projectile to go to.

          Centralize:
          - Create one projectile at the center of the targets?
          - Or create a projectile for each target?

          Target Location:
          - Select which part of the target to send the projectile to.
          - front head
          - front center
          - front base
          - middle head
          - middle center
          - middle base
          - back head
          - back center
          - back base

        Point X:
        Point Y:
        - Insert the X/Y coordinate to send the projectile to.
        - You may use JavaScript code.

      Offset X:
      Offset Y:
      - Insert how many pixels to offset the X/Y coordinate by.
      - You may use JavaScript code.

  Settings:

    Icon:
    - Determine which icon to use as a projectile.
    - You may use JavaScript code.

    Duration:
    - Duration for the projectile(s) to travel.

    Wait For Projectile?:
    - Wait for projectile(s) to reach their destination before going onto
      the next command?

    Extra Settings:
    - Add extra settings to the projectile?

      Auto Angle?:
      - Automatically angle the projectile to tilt the direction
        it's moving?

      Angle Offset:
      - Alter the projectile's tilt by this many degrees.

      Arc Peak:
      - This is the height of the project's trajectory arc in pixels.

      Blend Mode:
      - What kind of blend mode do you wish to apply to the projectile?
        - Normal
        - Additive
        - Multiply
        - Screen

      Easing:
      - Select which easing type to apply to the projectile's trajectory.

      Hue:
      - Adjust the hue of the projectile.
      - Insert a number between 0 and 360.

      Scale:
      - Adjust the size scaling of the projectile.
      - Use decimals for exact control.

      Spin Speed:
      - Determine how much angle the projectile spins per frame.
      - Does not work well with "Auto Angle".

    Effect Emulation:

      Action Effect?:
      - Emulate current Action Effect when projectile reaches target?
      - Only works with start and goal targets.

      Item Effect ID?:
      - Emulate an Item Effect when projectile reaches target?
      - Use 0 to not use.
      - Only works with start and goal targets.

      Skill Effect ID?:
      - Emulate a Skill Effect when projectile reaches target?
      - Use 0 to not use.
      - Only works with start and goal targets.

      Common Event ID:
      - Plays a Once Parallel Common Event upon reaching target.
      - Use 0 to not use.
      - Works regardless of start/goal targets.

    End Animation ID:
    - Plays an animation when projectile reaches target.
    - Use 0 to not use.
    - Requires VisuMZ_1_BattleCore v1.86+.
    - Requires VisuMZ_3_ActSeqProjectiles v1.09+.

      Mirror Animation:
      - Mirror the effect animation?
      - Requires VisuMZ_1_BattleCore v1.86+.
      - Requires VisuMZ_3_ActSeqProjectiles version 1.09+.

      Mute Animation:
      - Mute the effect animation?
      - Requires VisuMZ_1_BattleCore v1.86+.
      - Requires VisuMZ_3_ActSeqProjectiles version 1.09+.
---
PROJECTILE: Picture
- Create a picture projectile and fire it at a target.
- Requires VisuMZ_3_ActSeqProjectiles!

  Coordinates:

    Start Location:
    - Settings to determine where the projectile(s) start from.

      Type:
      - Select where the projectile should start from.
        - Target - Start from battler target(s)
        - Point - Start from a point on the screen

        Target(s):
        - Select which unit(s) to start the projectile from.

          Centralize:
          - Create one projectile at the center of the targets?
          - Or create a projectile for each target?

          Target Location:
          - Select which part of the target to send the projectile from.
          - front head
          - front center
          - front base
          - middle head
          - middle center
          - middle base
          - back head
          - back center
          - back base

        Point X:
        Point Y:
        - Insert the X/Y coordinate to start the projectile at.
        - You may use JavaScript code.

      Offset X:
      Offset Y:
      - Insert how many pixels to offset the X/Y coordinate by.
      - You may use JavaScript code.

    Goal Location:
    - Settings to determine where the projectile(s) start from.

      Type:
      - Select where the projectile should go to.
        - Target - Goal is battler target(s)
        - Point - Goal is a point on the screen

        Target(s):
        - Select which unit(s) for projectile to go to.

          Centralize:
          - Create one projectile at the center of the targets?
          - Or create a projectile for each target?

          Target Location:
          - Select which part of the target to send the projectile to.
          - front head
          - front center
          - front base
          - middle head
          - middle center
          - middle base
          - back head
          - back center
          - back base

        Point X:
        Point Y:
        - Insert the X/Y coordinate to send the projectile to.
        - You may use JavaScript code.

      Offset X:
      Offset Y:
      - Insert how many pixels to offset the X/Y coordinate by.
      - You may use JavaScript code.

  Settings:

    Picture Filename:
    - Determine which picture to use as a projectile.

    Duration:
    - Duration for the projectile(s) to travel.

    Wait For Projectile?:
    - Wait for projectile(s) to reach their destination before going onto
      the next command?

    Extra Settings:
    - Add extra settings to the projectile?

      Auto Angle?:
      - Automatically angle the projectile to tilt the direction
        it's moving?

      Angle Offset:
      - Alter the projectile's tilt by this many degrees.

      Arc Peak:
      - This is the height of the project's trajectory arc in pixels.

      Blend Mode:
      - What kind of blend mode do you wish to apply to the projectile?
        - Normal
        - Additive
        - Multiply
        - Screen

      Easing:
      - Select which easing type to apply to the projectile's trajectory.

      Hue:
      - Adjust the hue of the projectile.
      - Insert a number between 0 and 360.

      Scale:
      - Adjust the size scaling of the projectile.
      - Use decimals for exact control.

      Spin Speed:
      - Determine how much angle the projectile spins per frame.
      - Does not work well with "Auto Angle".

    Effect Emulation:

      Action Effect?:
      - Emulate current Action Effect when projectile reaches target?
      - Only works with start and goal targets.

      Item Effect ID?:
      - Emulate an Item Effect when projectile reaches target?
      - Use 0 to not use.
      - Only works with start and goal targets.

      Skill Effect ID?:
      - Emulate a Skill Effect when projectile reaches target?
      - Use 0 to not use.
      - Only works with start and goal targets.

      Common Event ID:
      - Plays a Once Parallel Common Event upon reaching target.
      - Use 0 to not use.
      - Works regardless of start/goal targets.

    End Animation ID:
    - Plays an animation when projectile reaches target.
    - Use 0 to not use.
    - Requires VisuMZ_1_BattleCore v1.86+.
    - Requires VisuMZ_3_ActSeqProjectiles v1.09+.

      Mirror Animation:
      - Mirror the effect animation?
      - Requires VisuMZ_1_BattleCore v1.86+.
      - Requires VisuMZ_3_ActSeqProjectiles version 1.09+.

      Mute Animation:
      - Mute the effect animation?
      - Requires VisuMZ_1_BattleCore v1.86+.
      - Requires VisuMZ_3_ActSeqProjectiles version 1.09+.
--- Action Sequences - Skew (Camera)
These action sequences allow you to have control over the camera skew. Requires VisuMZ_3_ActSeqCamera! --- SKEW: Change Skew - Changes the camera skew. - Requires VisuMZ_3_ActSeqCamera! Skew X: - Change the camera skew X to this value. Skew Y: - Change the camera skew Y to this value. Duration: - Duration in frames to change camera skew. Skew Easing: - Select which easing type you wish to apply. - Requires VisuMZ_0_CoreEngine. Wait For Skew?: - Wait for skew changes to complete before performing next command? --- SKEW: Reset Skew - Reset any skew settings. - Requires VisuMZ_3_ActSeqCamera! Duration: - Duration in frames to reset camera skew. Skew Easing: - Select which easing type you wish to apply. - Requires VisuMZ_0_CoreEngine. Wait For Skew?: - Wait for skew changes to complete before performing next command? --- SKEW: Wait For Skew - Waits for skew changes to complete before performing next command. - Requires VisuMZ_3_ActSeqCamera! --- Action Sequences - Target
If using a manual target by target Action Sequence, these commands will give you full control over its usage. Refer to the image above for reference on how this works. --- TARGET: Current Index
- Sets the current index to this value.
- Then decide to jump to a label (optional).
Set Index To:
- Sets current targeting index to this value.
- 0 is the starting index of a target group.
Jump To Label:
- If a target is found after the index change, jump to this label in the
Common Event.
--- TARGET: Next Target
- Moves index forward by 1 to select a new current target.
- Then decide to jump to a label (optional).
Jump To Label:
- If a target is found after the index change, jump to this label in the
Common Event.
--- TARGET: Previous Target
- Moves index backward by 1 to select a new current target.
- Then decide to jump to a label (optional).
Jump To Label:
- If a target is found after the index change, jump to this label in the
Common Event.
--- TARGET: Random Target
- Sets index randomly to determine new currernt target.
- Then decide to jump to a label (optional).
Force Random?:
- Index cannot be its previous index amount after random.
Jump To Label:
- If a target is found after the index change, jump to this label in the
Common Event.
--- Action Sequences - Voice
--- VOICE: Common Line - Plays a common voice line from target battler(s). - Requires VisuMZ_3_BattleVoices! Speaker Target(s): - Select unit(s) to play voice lines from. Voice Line: - What voice line do you wish to play? --- VOICE: Play Special Line
- Plays a special voice line from target battler(s).
- Requires VisuMZ_3_BattleVoices!
Speaker Target(s):
- Select unit(s) to play voice lines from.
Voice Line Type:
- What voice line type do you wish to play?
- Action Name
- Chant Line
- Item Name
- Skill Name
- Spell Name
- Unique Lines
Name / Letter:
- What voice letter/name do you want to play?
--- Action Sequences - Weapon
Allows for finer control over Dual/Multi Wielding actors. Only works for Actors. --- WEAPON: Clear Weapon Slot - Clears the active weapon slot (making others valid again). - Only works for Actors. Targets: - Select unit(s) to clear the active weapon slot for. --- WEAPON: Next Weapon Slot - Goes to next active weapon slot (making others invalid). - If next slot is weaponless, don't label jump. Targets: - Select unit(s) to change the next active weapon slot for. --- WEAPON: Set Weapon Slot - Sets the active weapon slot (making others invalid). - Only works for Actors. Targets: - Select unit(s) to change the active weapon slot for. Weapon Slot ID: - Select weapon slot to make active (making others invalid). - Use 0 to clear and normalize. You may use JavaScript code. --- Action Sequences - Zoom (Camera)
These Action Sequences are zoom-related. Requires VisuMZ_3_ActSeqCamera! --- ZOOM: Change Scale - Changes the zoom scale. - Requires VisuMZ_3_ActSeqCamera! Scale: - The zoom scale to change to. Duration: - Duration in frames to reset battle zoom. Zoom Easing: - Select which easing type you wish to apply. - Requires VisuMZ_0_CoreEngine. Wait For Zoom? - Wait for zoom changes to complete before performing next command? --- ZOOM: Reset Zoom - Reset any zoom settings. - Requires VisuMZ_3_ActSeqCamera! Duration: - Duration in frames to reset battle zoom. Zoom Easing: - Select which easing type you wish to apply. - Requires VisuMZ_0_CoreEngine. Wait For Zoom? - Wait for zoom changes to complete before performing next command? --- ZOOM: Wait For Zoom - Waits for zoom changes to complete before performing next command. Requires VisuMZ_3_ActSeqCamera! --- Battle Cursor VisuStella MZThe following are Plugin Commands that come with this plugin. They can be accessed through the Plugin Command event command. --- Battle Cursor Plugin Commands
---
Battle Cursor: Change Actor Cursor
- Change target actor's battle cursor settings.

  Actor ID(s):
  - Select which Actor ID(s) to affect.

  Appearance Type:
  - Select the appearance type for the battle select cursor.

    Icon Index:
    - If "icon" is selected as the appearance type, use this icon as
      the cursor.

    Picture Filename:
    - If "picture" is selected as the appearance type, use this image from
      img/pictures/ as the cursor.

    System Filename:
    - If "system" is selected as the appearance type, use this image from
      img/system/ as the cursor.

    Frame Delay:
    - The frame delay for any animated "picture" or "system" cursors before
      moving onto the next frame.

  Anchor:

    Anchor X:
    Anchor Y:
    - Select the position to determine where the cursor's Anchor
      is located.

  Position:

    Position X:
    Position Y:
    - Select the placement to determine where the cursor's Position
      is located.

  Offset:

    Offset X:
    Offset Y:
    - Select how much to offset the cursor's X/Y position by.

  Wave:

    Wave Type:
    - Determine how the cursor moves while active.

    Speed:
    - Select how fast the cursor oscillates.
    - Lower is slower. Higher is faster.

    Distance:
    - Select how far the cursor sprite will oscillate from its origin.
---
Battle Cursor: Change Party Member Cursor
- Change target party member's battle cursor settings.

  Party Index(es):
  - Select which party member index(es) to affect.

  Appearance Type:
  - Select the appearance type for the battle select cursor.

    Icon Index:
    - If "icon" is selected as the appearance type, use this icon as
      the cursor.

    Picture Filename:
    - If "picture" is selected as the appearance type, use this image from
      img/pictures/ as the cursor.

    System Filename:
    - If "system" is selected as the appearance type, use this image from
      img/system/ as the cursor.

    Frame Delay:
    - The frame delay for any animated "picture" or "system" cursors before
      moving onto the next frame.

  Anchor:

    Anchor X:
    Anchor Y:
    - Select the position to determine where the cursor's Anchor
      is located.

  Position:

    Position X:
    Position Y:
    - Select the placement to determine where the cursor's Position
      is located.

  Offset:

    Offset X:
    Offset Y:
    - Select how much to offset the cursor's X/Y position by.

  Wave:

    Wave Type:
    - Determine how the cursor moves while active.

    Speed:
    - Select how fast the cursor oscillates.
    - Lower is slower. Higher is faster.

    Distance:
    - Select how far the cursor sprite will oscillate from its origin.
---
Battle Cursor: Change Enemy Member Cursor
- Change target enemy's battle cursor settings.

  Enemy Index(es):
  - Select which enemy troop index(es) to affect.

  Appearance Type:
  - Select the appearance type for the battle select cursor.

    Icon Index:
    - If "icon" is selected as the appearance type, use this icon as
      the cursor.

    Picture Filename:
    - If "picture" is selected as the appearance type, use this image from
      img/pictures/ as the cursor.

    System Filename:
    - If "system" is selected as the appearance type, use this image from
      img/system/ as the cursor.

    Frame Delay:
    - The frame delay for any animated "picture" or "system" cursors before
      moving onto the next frame.

  Anchor:

    Anchor X:
    Anchor Y:
    - Select the position to determine where the cursor's Anchor
      is located.

  Position:

    Position X:
    Position Y:
    - Select the placement to determine where the cursor's Position
      is located.

  Offset:

    Offset X:
    Offset Y:
    - Select how much to offset the cursor's X/Y position by.

  Wave:

    Wave Type:
    - Determine how the cursor moves while active.

    Speed:
    - Select how fast the cursor oscillates.
    - Lower is slower. Higher is faster.

    Distance:
    - Select how far the cursor sprite will oscillate from its origin.
--- Battle Grid System VisuStella MZThe following are Plugin Commands that come with this plugin. They can be accessed through the Plugin Command event command. --- Scene Plugin Commands
--- Scene: Open Grid Tactics Scene - Opens the Grid Tactics menu. - Cannot be used in battle. - Requires Grid Tactics usage. --- System Plugin Commands
--- System: Enable Grid Tactics in Menu? - Enables/disables Grid Tactics menu inside the main menu. Enable/Disable?: - Enables/disables Grid Tactics menu inside the main menu. --- System: Show Grid Tactics in Menu? - Shows/hides Grid Tactics menu inside the main menu. Show/Hide?: - Shows/hides Grid Tactics menu inside the main menu. ---
Temporary Tactical Formations Plugin Commands
Temporary formations are very specific formations that will overwrite what settings the player has made. These involve specific rank/flank positions per party member (though some can be automatic). With temporary formations in play, the player cannot change them outside of battle. However, once in battle, the positions can be changed through the movement command and/or action effects. When a temporary formation is present, menu and battle commands involving changing party members will be disabled. Once a temporary formation is disbanded, the player's self-made formation settings will be returned and the player can readjust tactical formations once more. --- Temp: Create Temporary Tactics (Normal)
- Creates a temporary tactical formation.
- Can't be used in battle.
Temporary Tactics:
- Adjust the tactical formation to be used temporarily.
- 0 value = automatic placement.
Starting Positions:
Party Leader:
2nd - 20th Member:
Rank:
- What is the starting rank for this party member?
- Use 0 to let plugin determine starting position.
Flank:
- What is the starting flank for this party member?
- Use 0 to let plugin determine starting position.
--- Temp: Create Temporary Tactics (JS) - Creates a temporary tactical formation with JavaScript. - Can't be used in battle. JS: Tactics: - Use JavaScript to determine tactical formation is used. - 0 value = automatic placement. --- Temp: Disband Temporary Tactics - Clears temporary tactical formations. - Can't be used in battle. --- Battle System - ATB VisuStella MZThe following are Plugin Commands that come with this plugin. They can be accessed through the Plugin Command event command. --- Actor Plugin Commands
---
Actor: Change Field Gauge Icon - Changes the icons used for the specific actor(s) on the ATB Field Gauge. Actor ID(s): - Select which Actor ID(s) to affect. Icon: - Changes the graphic to this icon. ---
Actor: Change Field Gauge Face - Changes the faces used for the specific actor(s) on the ATB Field Gauge. Actor ID(s): - Select which Actor ID(s) to affect. Face Name: - This is the filename for the target face graphic. Face Index: - This is the index for the target face graphic. ---
Actor: Clear Field Gauge Graphic - Clears the ATB Field Gauge graphics for the actor(s). - The settings will revert to the Plugin Parameter settings. Actor ID(s): - Select which Actor ID(s) to affect. --- Enemy Plugin Commands
---
Enemy: Change Field Gauge Icon - Changes the icons used for the specific enemy(ies) on the ATB Field Gauge. Enemy Index(es): - Select which enemy index(es) to affect. Icon: - Changes the graphic to this icon. ---
Enemy: Change Field Gauge Face - Changes the faces used for the specific enemy(ies) on the ATB Field Gauge. Enemy Index(es): - Select which enemy index(es) to affect. Face Name: - This is the filename for the target face graphic. Face Index: - This is the index for the target face graphic. ---
Enemy: Clear Field Gauge Graphic - Clears the ATB Field Gauge graphics for the enemy(ies). - The settings will revert to the Plugin Parameter settings. Enemy Index(es): - Select which enemy index(es) to affect. --- System Plugin Commands---
System: ATB Field Gauge Visibility - Determine the visibility of the ATB Field Gauge. Visibility: - Changes the visibility of the ATB Field Gauge. --- Battle System - BTB VisuStella MZThe following are Plugin Commands that come with this plugin. They can be accessed through the Plugin Command event command. --- Actor Plugin Commands
---
Actor: Change BTB Turn Order Icon - Changes the icons used for the specific actor(s) on the BTB Turn Order. Actor ID(s): - Select which Actor ID(s) to affect. Icon: - Changes the graphic to this icon. ---
Actor: Change BTB Turn Order Face - Changes the faces used for the specific actor(s) on the BTB Turn Order. Actor ID(s): - Select which Actor ID(s) to affect. Face Name: - This is the filename for the target face graphic. Face Index: - This is the index for the target face graphic. ---
Actor: Clear BTB Turn Order Graphic - Clears the BTB Turn Order graphics for the actor(s). - The settings will revert to the Plugin Parameter settings. Actor ID(s): - Select which Actor ID(s) to affect. --- Enemy Plugin Commands
---
Enemy: Change BTB Turn Order Icon - Changes the icons used for the specific enemy(ies) on the BTB Turn Order. Enemy Index(es): - Select which enemy index(es) to affect. Icon: - Changes the graphic to this icon. ---
Enemy: Change BTB Turn Order Face - Changes the faces used for the specific enemy(ies) on the BTB Turn Order. Enemy Index(es): - Select which enemy index(es) to affect. Face Name: - This is the filename for the target face graphic. Face Index: - This is the index for the target face graphic. ---
Enemy: Clear BTB Turn Order Graphic - Clears the BTB Turn Order graphics for the enemy(ies). - The settings will revert to the Plugin Parameter settings. Enemy Index(es): - Select which enemy index(es) to affect. --- System Plugin Commands
---
System: BTB Turn Order Visibility - Determine the visibility of the BTB Turn Order Display. Visibility: - Changes the visibility of the BTB Turn Order Display. --- Battle System - CTB VisuStella MZThe following are Plugin Commands that come with this plugin. They can be accessed through the Plugin Command event command. --- Actor Plugin Commands
---
Actor: Change CTB Turn Order Icon - Changes the icons used for the specific actor(s) on the CTB Turn Order. Actor ID(s): - Select which Actor ID(s) to affect. Icon: - Changes the graphic to this icon. ---
Actor: Change CTB Turn Order Face - Changes the faces used for the specific actor(s) on the CTB Turn Order. Actor ID(s): - Select which Actor ID(s) to affect. Face Name: - This is the filename for the target face graphic. Face Index: - This is the index for the target face graphic. ---
Actor: Clear CTB Turn Order Graphic - Clears the CTB Turn Order graphics for the actor(s). - The settings will revert to the Plugin Parameter settings. Actor ID(s): - Select which Actor ID(s) to affect. --- Enemy Plugin Commands
---
Enemy: Change CTB Turn Order Icon - Changes the icons used for the specific enemy(ies) on the CTB Turn Order. Enemy Index(es): - Select which enemy index(es) to affect. Icon: - Changes the graphic to this icon. ---
Enemy: Change CTB Turn Order Face - Changes the faces used for the specific enemy(ies) on the CTB Turn Order. Enemy Index(es): - Select which enemy index(es) to affect. Face Name: - This is the filename for the target face graphic. Face Index: - This is the index for the target face graphic. ---
Enemy: Clear CTB Turn Order Graphic - Clears the CTB Turn Order graphics for the enemy(ies). - The settings will revert to the Plugin Parameter settings. Enemy Index(es): - Select which enemy index(es) to affect. --- System Plugin Commands---
System: CTB Turn Order Visibility - Determine the visibility of the CTB Turn Order Display. Visibility: - Changes the visibility of the CTB Turn Order Display. --- Battle System - ETB VisuStella MZThe following are Plugin Commands that come with this plugin. They can be accessed through the Plugin Command event command. --- System Plugin Commands
--- System: ETB Energy Count Visibility - Determine the visibility of the ETB Energy Count Display. Visibility: - Changes the visibility of the ETB Energy Count Display. --- Battle System - FTB VisuStella MZThe following are Plugin Commands that come with this plugin. They can be accessed through the Plugin Command event command. --- System Plugin Commands
---
System: FTB Action Count Visibility - Determine the visibility of the FTB Action Count Display. Visibility: - Changes the visibility of the FTB Action Count Display. --- Battle System - OTB VisuStella MZThe following are Plugin Commands that come with this plugin. They can be accessed through the Plugin Command event command. --- Actor Plugin Commands
---
Actor: Change OTB Turn Order Icon - Changes the icons used for the specific actor(s) on the OTB Turn Order. Actor ID(s): - Select which Actor ID(s) to affect. Icon: - Changes the graphic to this icon. ---
Actor: Change OTB Turn Order Face - Changes the faces used for the specific actor(s) on the OTB Turn Order. Actor ID(s): - Select which Actor ID(s) to affect. Face Name: - This is the filename for the target face graphic. Face Index: - This is the index for the target face graphic. ---
Actor: Clear OTB Turn Order Graphic - Clears the OTB Turn Order graphics for the actor(s). - The settings will revert to the Plugin Parameter settings. Actor ID(s): - Select which Actor ID(s) to affect. --- Enemy Plugin Commands
---
Enemy: Change OTB Turn Order Icon - Changes the icons used for the specific enemy(ies) on the OTB Turn Order. Enemy Index(es): - Select which enemy index(es) to affect. Icon: - Changes the graphic to this icon. ---
Enemy: Change OTB Turn Order Face - Changes the faces used for the specific enemy(ies) on the OTB Turn Order. Enemy Index(es): - Select which enemy index(es) to affect. Face Name: - This is the filename for the target face graphic. Face Index: - This is the index for the target face graphic. ---
Enemy: Clear OTB Turn Order Graphic - Clears the OTB Turn Order graphics for the enemy(ies). - The settings will revert to the Plugin Parameter settings. Enemy Index(es): - Select which enemy index(es) to affect. --- System Plugin Commands
---
System: OTB Turn Order Visibility - Determine the visibility of the OTB Turn Order Display. Visibility: - Changes the visibility of the OTB Turn Order Display. --- Battle System - PTB VisuStella MZThe following are Plugin Commands that come with this plugin. They can be accessed through the Plugin Command event command. --- System Plugin Commands
---
System: PTB Press Count Visibility - Determine the visibility of the PTB Press Count Display. Visibility: - Changes the visibility of the PTB Press Count Display. --- Battle System - STB VisuStella MZThe following are Plugin Commands that come with this plugin. They can be accessed through the Plugin Command event command. --- Actor Plugin Commands
Actor: Change STB Turn Order Icon - Changes the icons used for the specific actor(s) on the STB Turn Order. Actor ID(s): - Select which Actor ID(s) to affect. Icon: - Changes the graphic to this icon. ---
Actor: Change STB Turn Order Face - Changes the faces used for the specific actor(s) on the STB Turn Order. Actor ID(s): - Select which Actor ID(s) to affect. Face Name: - This is the filename for the target face graphic. Face Index: - This is the index for the target face graphic. ---
Actor: Clear STB Turn Order Graphic - Clears the STB Turn Order graphics for the actor(s). - The settings will revert to the Plugin Parameter settings. Actor ID(s): - Select which Actor ID(s) to affect. --- Enemy Plugin Commands
---
Enemy: Change STB Turn Order Icon - Changes the icons used for the specific enemy(ies) on the STB Turn Order. Enemy Index(es): - Select which enemy index(es) to affect. Icon: - Changes the graphic to this icon. ---
Enemy: Change STB Turn Order Face - Changes the faces used for the specific enemy(ies) on the STB Turn Order. Enemy Index(es): - Select which enemy index(es) to affect. Face Name: - This is the filename for the target face graphic. Face Index: - This is the index for the target face graphic. ---
Enemy: Clear STB Turn Order Graphic - Clears the STB Turn Order graphics for the enemy(ies). - The settings will revert to the Plugin Parameter settings. Enemy Index(es): - Select which enemy index(es) to affect. --- System Plugin Commands
---
System: STB Turn Order Visibility - Determine the visibility of the STB Turn Order Display. Visibility: - Changes the visibility of the STB Turn Order Display. --- Battle Voices VisuStella MZThe following are Plugin Commands that come with this plugin. They can be accessed through the Plugin Command event command. --- Actor Plugin Command
--- Actor: Change Battle Voice Set (Normal)
- Changes battle voice set data for target actor.
Actor ID:
- Select which Actor ID(s) to alter the voice data for.
Voice Set Name:
- What is the name of the voice set?
Voice Set Volume:
- Change the volume of the voice set sound effects played.
Voice Set Pitch:
- Change the pitch of the voice set sound effects played.
Voice Set Pan:
- Change the pan of the voice set sound effects played.
--- Actor: Change Battle Voice Set (Language)
- Changes battle voice set data for different languages to target actor.
- Requires VisuMZ_2_VoiceActControl and audio switching enabled!
Actor ID:
- Select which Actor ID(s) to alter the voice data for.
Language Sets:
- Determine which line is used based on which voice language the player
has selected.
Default Set Name:
- What is the name of the default voice set?
Voice Set Volume:
- Change the volume of the voice set sound effects played.
Voice Set Pitch:
- Change the pitch of the voice set sound effects played.
Voice Set Pan:
- Change the pan of the voice set sound effects played.
--- Action Sequences - Voice
--- VOICE: Common Line - Plays a common voice line from target battler(s). - Requires VisuMZ_3_BattleVoices! Speaker Target(s): - Select unit(s) to play voice lines from. Voice Line: - What voice line do you wish to play? --- VOICE: Play Special Line
- Plays a special voice line from target battler(s).
- Requires VisuMZ_3_BattleVoices!
Speaker Target(s):
- Select unit(s) to play voice lines from.
Voice Line Type:
- What voice line type do you wish to play?
- Action Name
- Chant Line
- Item Name
- Skill Name
- Spell Name
- Unique Lines
Name / Letter:
- What voice letter/name do you want to play?
--- Mute Plugin Commands---
Mute: All Voices - Mutes/unmutes all battle voices. - For those times you don't want battle voices interrupt important moments. Mute/Unmute?: - Mutes/unmutes all battle voices. --- Bestiary VisuStella MZThe following are Plugin Commands that come with this plugin. They can be accessed through the Plugin Command event command. Bestiary Plugin Commands
---
Bestiary: Reveal Enemies - Reveals bestiary information for target enemies without needing to defeat them. - Must not be forcefully hidden. Enemy ID(s): - Reveals Bestiary information for target enemies. - Must not be forcefully hidden. --- Debug Plugin Commands---
Debug: Full Bestiary? - For playtest only! Allows you to fully view Bestiary. - Resets when the game client is closed. Reveal?: - Fully reveals Bestiary for playtesting. - Resets when the game client is closed. --- Scene Plugin Commands---
Scene: Open Bestiary - Opens the Bestiary scene. - Cannot be used in battle. --- System Plugin Commands---
System: Enable Bestiary in Menu? - Enables/disables Bestiary menu inside the main menu. Enable/Disable?: - Enables/disables Bestiary menu inside the main menu. ---
System: Show Bestiary in Menu? - Shows/hides Bestiary menu inside the main menu. Show/Hide?: - Shows/hides Bestiary menu inside the main menu. --- Bright Effects VisuStella MZThe following are Plugin Commands that come with this plugin. They can be accessed through the Plugin Command event command. --- Bloom Plugin Commands---
Bloom: Change Settings - Change the Bloom filter settings for the screen. Bloom Scale: - Change bloom scale for the screen. Bloom Brightness: - Change bloom brightness for the screen. Bloom Threshold: - Change bloom threshold for the screen. Shift Duration: - The amount of time it takes for the change to occur. --- Bloom: Reset - Reset the Bloom filter settings for the settings found in the Plugin Parameters or map notetags. Shift Duration: - The amount of time it takes for the reset to occur. --- Blur Plugin Commands
---
Blur: Change Settings
- Change the Blur filter settings for the screen.
Blur Strength:
- Change blur strength for the screen.
- For best results, use numbers between 0 and 5 where 0 is no blur and
higher numbers mean higher blur strength.
Blur Duration:
- The amount of time it takes for the change to occur.
---
Blur: Reset - Clears the Blur filter. Blur Duration: - The amount of time it takes for the reset to occur. --- Godray Plugin Commands
---
Godray: Change Settings - Change the Godray filter settings for the screen. Visible?: - Show godrays on the screen? - Visibility changes are immediate. Godray Speed: - Change godray speed for the screen. Godray Gain: - Change godray gain for the screen. Godray Lacunarity: - Change godray lacunarity for the screen. Godray Angle: - Change godray angle for the screen. Shift Duration: - The amount of time it takes for the change to occur. - Visibility changes are immediate. --- Godray: Reset - Reset the Godray filter settings for the settings found in the Plugin Parameters or map notetags. Shift Duration: - The amount of time it takes for the reset to occur. - Visibility changes are immediate. --- Color Adjust Plugin Commands---
Color Adjust: Change Settings - Change the Color Adjustment filter settings for the screen. Adjust Brightness: - Change color adjust brightness for the screen. Adjust Contrast: - Change color adjust contrast for the screen. Adjust Saturation: - Change color adjust saturation for the screen. Shift Duration: - The amount of time it takes for the change to occur. --- Color Adjust: Reset - Reset the Color Adjustment filter settings for the settings found in the Plugin Parameters or map notetags. Shift Duration: - The amount of time it takes for the reset to occur. --- Tilt Shift Plugin Commands
--- Tilt Shift: Change Settings - Change the Tilt Shift filter settings for the screen. Pixel Blur: - What is the default pixel blur amount for tilt shift? - Smaller = less blur. Higher = more blur. Gradient Blur: - What is the default gradient blur amount for tilt shift? - Smaller = less gradient. Higher = more gradient. Shift Duration: - The amount of time it takes for the change to occur. --- Tilt Shift: Reset - Reset the Tilt Shift filter settings for the settings found in the Plugin Parameters or map notetags. Shift Duration: - The amount of time it takes for the change to occur. --- Button Common Events VisuStella MZThe following are Plugin Commands that come with this plugin. They can be accessed through the Plugin Command event command. --- System Plugin Commands---
System: Change Button Common Event - Change the Common Event bound to specific key(s). Keys: - Select which key(s) to change. Common Event ID: - Change the Common Event bound to specific key(s). Button Icon: - What icon do you want to show on this button? ---
System: Change Visibility - Determines whether or not buttons are shown on screen. Visible? - Show or hide the visible Button Common Events on the screen? ---
System: Clear All Button Common Events - Clears Common Events from all keys. ---
System: Clear Button Common Event - Clears any Common Events bound to specific key(s). Keys: - Select which key(s) to clear. ---
System: Clear Common Event ID(s) - Clears any keys with the marked Common Event ID(s). Common Event ID(s): - Clears any keys with the marked Common Event ID(s). ---
System: Run Stored Button Common Event - Run the Common Event stored on a specific key. Target Key: - Run the Common Event stored in this key. --- Button Trigger Events VisuStella MZThe following are Plugin Commands that come with this plugin. They can be accessed through the Plugin Command event command. --- System Plugin Commands
--- System: Enable Button Trigger Events - Enable/disable Button Trigger Events from activating. Enable/Disable?: - Enables Button Trigger Events and allows them to activate. --- CG Gallery VisuStella MZThe following are Plugin Commands that come with this plugin. They can be accessed through the Plugin Command event command. --- CG Plugin Commands
---
CG: Unlock Image(s) - Unlocks specific image(s) for the CG Gallery. Filename(s): - List of filenames for CG's that will become unlocked. Argument: - Description Argument: - Description Argument: - Description Argument: - Description ---
CG: Unlock All Images (Debug) - Unlocks all image(s) for the CG Gallery. - Only for playtesting. Resets upon game closing. ---
CG: Unlock All Images (Permanent) - Unlocks all image(s) for the CG Gallery. - This is a permanent unlock. ---
CG: Reset All Unlocks (Permanent) - Reset all unlocks for the CG Gallery. - This is a permanent reset. Use SPARRINGLY! --- Scene Plugin Commands
---
Scene: Open CG Gallery - Opens CG Gallery. - CANNOT be used inside of battle. --- System Plugin Commands
---
System: Enable CG Gallery in Menu? - Enables/disables CG Gallery menu inside the main menu. Enable/Disable?: - Enables/disables CG Gallery menu inside the main menu. ---
System: Show CG Gallery in Menu? - Shows/hides CG Gallery menu inside the main menu. Show/Hide?: - Shows/hides CG Gallery menu inside the main menu. --- Chain Battles VisuStella MZThe following are Plugin Commands that come with this plugin. They can be accessed through the Plugin Command event command. --- Chain Battle Plugin Commands
---
Chain Battle: Queue Troop ID(s)
- Setup the next Troop ID as a part of a chain battle.
- If there are multiple, one will be randomly picked.
Troop ID(s):
- Select which Troop ID(s) to register as the next potential battle.
Change Battleback?:
- Change the battlebacks for this queued battle?
Battleback 1:
Battleback 2:
- Filename used for the battleback image.
- Leave empty if you don't wish to use one.
---
Chain Battle: Queue Encounter Pool
- Setup the next battle from the random encounter pool.
- If there are multiple, one will be randomly picked.
Change Battleback?:
- Change the battlebacks for this queued battle?
Battleback 1:
Battleback 2:
- Filename used for the battleback image.
- Leave empty if you don't wish to use one.
---
Chain Battle: Queue JavaScript ID
- Use JavaScript to determine which Troop ID to queue up for a chain battle.
JS: Troop ID:
- Use JavaScript code to determine what Troop ID to queue up for a
chain battle.
Change Battleback?:
- Change the battlebacks for this queued battle?
Battleback 1:
Battleback 2:
- Filename used for the battleback image.
- Leave empty if you don't wish to use one.
---
Chain Battle: Clear Chains - Clears any stored Chain Battles, allowing the battle to end after the current one. --- Next Victory Plugin Commands---
Next Victory: Queue Common Event
- Queue a Common Event(s) to run next victory.
- If multiple, Common Events run in queued order.
- The Common Events will run before the next queued chain battle.
Common Event ID(s):
- Select which Common Event(s) to run upon the next victory.
- If multiple, Common Events run in queued order.
- The "Next Victory: Queue Common Event" Plugin Command will always refer
to the immediate next victory sequence.
- Even if you put it after a "Chain Battle: Queue Troop ID(s)", it does
not mean it will occur for that next queued troop's victory.
- Instead, the common event will run for the immediate next victory
sequence regardless.
- If you would like for the queued troop ID's to have a "Next Victory"
effect, run this Plugin Command AFTER the queued troop ID has been
initiated in battle first.
- If enemies revive in the middle of the Common Event queue, the queue is
paused and resumed after the enemies are defeated once again.
- For example:
- Common Events A, B, C, D, E are queued.
- Enemies are set to revive on Common Event B.
- When the player achieves battle victory, Common Events A and B run.
- The enemies will revive.
- The player has to defeat the enemies again.
- Once the enemies are defeated, Common Events C, D, and E then run.
- Afterwards, any chain battles will occur.
---
Next Victory: Clear Common Event Queue - Clear queued Common Event(s) for next victory. --- Challenge System VisuStella MZThe following are Plugin Commands that come with this plugin. They can be accessed through the Plugin Command event command. --- Reset Plugin Commands
--- Reset: Global Challenge Entries - Resets all global challenges and turns off all entries. --- Reset: Local Challenge Entries - Resets target local challenge set and turns off all enetries. Challenge Set Name: - What is the name of the Challenge Set that you want to reset? --- Scene Plugin Commands
---
Scene: Open Challenge Menu - Global - Opens Challenge Menu settings for Global Challenge Set. - CANNOT be used inside of battle. ---
Scene: Open Challenge Menu - Local Set
- Opens Challenge Menu settings for a local Challenge Set.
- CANNOT be used inside of battle.
Challenge Set Name:
- What is the name of the Challenge Set that you want the player to be
able to modify challenges for?
- This is the 'Challenge Set ID' found in the Challenge Set groups in the
Plugin Parameters.
--- Character Creation System VisuStella MZThe following are Plugin Commands that come with this plugin. They can be accessed through the Plugin Command event command. --- Scene Plugin Commands---
Scene: Create Character Process
- Opens the Character Creation Scene.
- Cannot be used in battle.
- Does not affect <Empty> named characters that have joined the party.
Actor ID?:
- Pick a specific actor to create a character onto.
- Use 0 for first available unnamed actor or named <Empty>.
Actor Level:
- What level should the actor be created at?
Default Name:
- Enter the name you want this actor to have as default.
- The name can still be changed.
- Leave empty for random.
Data Gathering:
Fail Switch:
- If searching for first available unnamed actor and is unable to do so
successfully, this Switch turns on.
- This is mainly used for event systems.
Join Switch:
- If an actor is successfully recruited, turn Switch ON.
- Otherwise, it stays OFF.
- This is mainly used for event systems.
Register Variable:
- When searching for first available unnamed actor, register that
actor's ID number to this variable.
- This is mainly used for event systems.
Other Settings:
Cancel -> Exit?:
- Allow cancel button let you exit the scene?
Show Gold Window?:
- Shows/hides the gold window.
- Gold costs still apply.
---
Scene: Dismiss Select Created Character
- Opens the Selected Character Dismissal Scene.
- Cannot be used in battle.
Data Gathering:
Fail Switch:
- If there is no created character to dismiss from the player's party,
this Switch turns on.
- This is mainly used for event systems.
Dismiss Switch:
- If an actor is successfully dismissed, turn Switch ON.
- Otherwise, it stays OFF.
- This is mainly used for event systems.
Register Variable:
- When a character is dismissed from the player party, register that
actor's ID number to this variable.
- This is mainly used for event systems.
---
Scene: Retrain Created Character
- Retrains a created character.
- Cannot be used in battle.
Actor ID?:
- Pick a specific actor to retrain.
- Use 0 if you want the player to select the character.
Change Class?:
- Is the target actor's class changeable?
Preserve Level?:
- If the actor retrains its class, preserve the actor's
previous level?
Change Appearance?:
- Is the target actor's appearance changeable?
Change Traits?:
- Are the target actor's traits changeable?
- Requires VisuMZ_1_ElementStatusCore!
Change Battle Voice?
- Is the target actor's battle voice changeable?
- Requires VisuMZ_3_BattleVoices!
Change Name?:
- Is the target actor's name changeable?
Reset Profile?:
- Reset target actor's profile or keep it the same?
Reset Biography?:
- Reset target actor's biography or keep it the same?
- Requires VisuMZ_1_ElementStatusCore!
Data Gathering:
Fail Switch:
- If there is no actor to retrain, then this switch is turned ON.
- Otherwise, it stays OFF.
- This is mainly used for event systems.
Retrain Switch:
- If an actor is successfully retrained, turn Switch ON.
- Otherwise, it stays OFF.
- This is mainly used for event systems.
Register Variable:
- This variable records the actor ID of the retrained actor if the actor
is successfully retrained.
- This is mainly used for event systems.
Other Settings:
Show Gold Window?:
- Shows/hides the gold window.
- Gold costs still apply.
--- Variable Plugin Commands
---
Variable: Set Created Character Count
- Target variable will have a value equal to the total number of created
characters in the player's party.
Variable ID:
- Target variable will have a value equal to the total number of created
characters in the player's party.
---
Variable: Set Available Empty Character Slots
- Target variable will have a value equal to the total number of empty
character slots left available.
Variable ID:
- Target variable will have a value equal to the total number of empty
character slots left available.
---
Variable: Set Total Empty Character Slots
- Target variable will have a value equal to the total number of empty
character slots in total.
Variable ID:
- Target variable will have a value equal to the total number of empty
character slots in total.
--- Class Change System VisuStella MZThe following are Plugin Commands that come with this plugin. They can be accessed through the Plugin Command event command. --- Unlock Class Plugin Commands
--- Unlock Class: Add For Actor(s) - Unlock class(es) for target actor(s). Actor ID(s): - Select which Actor ID(s) to unlock class(es) for. Class ID(s): - Select which Class ID(s) to be unlocked. ---
Unlock Class: Add For Global - Unlock class(es) for all party members. Class ID(s): - Select which Class ID(s) to be unlocked. ---
Unlock Class: Remove From Actor(s) - Remove unlock class(es) for target actor(s). Actor ID(s): - Select which Actor ID(s) to remove an unlocked class(es) for. Class ID(s): - Select which Class ID(s) to be removed from the unlocked status. ---
Unlock Class: Remove From Global - Remove unlock class(es) for all party members. Class ID(s): - Select which Class ID(s) to be removed from the unlocked status. --- Change Restriction Plugin Commands---
Change Restriction: Add Tier Restriction - Add restrictions to prevent class changing specific tier(s) to target actor(s). Actor ID(s): - Select which Actor ID(s) to restrict class tier(s) for. Tiers(s): - Select which class tier(s) to restrict changing for. ---
Change Restriction: Remove Tier Restriction - Remove restrictions to allow class changing specific tier(s) for target actor(s). Actor ID(s): - Select which Actor ID(s) to remove class tier(s) restrictions for. Tiers(s): - Select which class tier(s) to remove restrictions for. --- Multiclass Plugin Commands---
Multiclass: Change Actor(s) Multiclass - Changes a specific multiclass for target actor(s). Actor ID(s): - Select which Actor ID(s) to change the multiclass limit to. Tier: - Which multiclass tier to change for the target actor(s)? Class ID: - Which class should go into this multiclass tier slot? ---
Multiclass: Raise Limit for Actor(s) - Raise the multiclass limit for target actor(s). Actor ID(s): - Select which Actor ID(s) to change the multiclass limit to. Raise Limit By: - Raise the multiclass limit for target actor(s) by this much. ---
Multiclass: Lower Limit for Actor(s) - Lower the multiclass limit for target actor(s). Actor ID(s): - Select which Actor ID(s) to change the multiclass limit to. Reduce Limit By: - Lower the multiclass limit for target actor(s) by this much. ---
Multiclass: Set Limit for Actor(s) - Set multiclass limit for target actor(s). Actor ID(s): - Select which Actor ID(s) to change the multiclass limit to. Set Limit To: - Set multiclass limit for target actor(s) to this much. --- Class Points Plugin Commands---
Class Points: Gain - The target actor(s) gains Class Points. - Gained amounts are affected by Class Point bonus rates. Actor ID(s): - Select which Actor ID(s) to affect. Class ID(s): - Select which Class ID(s) to gain Class Points for. - Use "0" for the current class. Class Points: - Determine how many Class Points will be gained. - You may use code. ---
Class Points: Add - The target actor(s) receives Class Points. - Received amounts are NOT affected by Class Point bonus rates. Actor ID(s): - Select which Actor ID(s) to affect. Class ID(s): - Select which Class ID(s) to receive Class Points for. - Use "0" for the current class. Class Points: - Determine how many Class Points will be added. - You may use code. ---
Class Points: Lose - The target actor(s) loses Class Points. - Lost amounts are NOT affected by Class Point bonus rates. Actor ID(s): - Select which Actor ID(s) to affect. Class ID(s): - Select which Class ID(s) to lose Class Points for. - Use "0" for the current class. Class Points: - Determine how many Class Points will be lost. - You may use code. ---
Class Points: Set - Changes the exact Class Points for the target actor(s). - Changed amounts are NOT affected by Class Point bonus rates. Actor ID(s): - Select which Actor ID(s) to affect. Class ID(s): - Select which Class ID(s) to change Class Points for. - Use "0" for the current class. Class Points: - Determine how many Class Points will be set exactly to. - You may use code. --- Job Points Plugin Commands---
Job Points: Gain - The target actor(s) gains Job Points. - Gained amounts are affected by Job Point bonus rates. Actor ID(s): - Select which Actor ID(s) to affect. Class ID(s): - Select which Class ID(s) to gain Job Points for. - Use "0" for the current class. Job Points: - Determine how many Job Points will be gained. - You may use code. ---
Job Points: Add - The target actor(s) receives Job Points. - Received amounts are NOT affected by Job Point bonus rates. Actor ID(s): - Select which Actor ID(s) to affect. Class ID(s): - Select which Class ID(s) to receive Job Points for. - Use "0" for the current class. Job Points: - Determine how many Job Points will be added. - You may use code. ---
Job Points: Lose - The target actor(s) loses Job Points. - Lost amounts are NOT affected by Job Point bonus rates. Actor ID(s): - Select which Actor ID(s) to affect. Class ID(s): - Select which Class ID(s) to lose Job Points for. - Use "0" for the current class. Job Points: - Determine how many Job Points will be lost. - You may use code. ---
Job Points: Set - Changes the exact Job Points for the target actor(s). - Changed amounts are NOT affected by Job Point bonus rates. Actor ID(s): - Select which Actor ID(s) to affect. Class ID(s): - Select which Class ID(s) to change Job Points for. - Use "0" for the current class. Job Points: - Determine how many Job Points will be set exactly to. - You may use code. --- System Plugin Commands---
System: Enable Class Change in Menu? - Enables/disables Class Change inside the main menu. Enable/Disable?: - Enables/disables Class Change inside the main menu. ---
System: Show Class Change in Menu? - Shows/hides Class Change inside the main menu. Show/Hide?: - Shows/hides Class Change inside the main menu. --- Combat Log VisuStella MZThe following are Plugin Commands that come with this plugin. They can be accessed through the Plugin Command event command. --- Combat Log Plugin Commands
---
Combat Log: Add Text - Adds custom text to the current Combat Log. Text: - What text would you like to add to the Combat Log? Icon: - What icon would you like to bind to this entry? ---
Combat Log: Add Horizontal Line - Adds a horizontal line to the current Combat Log. ---
Combat Log: Bypass Text? - Temporarily bypass adding any new text to the Combat Log until this is turned off? Bypass?: - Bypass text from being added to the Combat Log temporarily? ---
Combat Log: Hot Key Enable? - Enables/disables the Combat Log hot key in battle? Enable?: - Enables/disables the Combat Log hot key in battle. --- System Plugin Commands---
System: Show in Main Menu?
- Shows/hides CombatLog menu inside the Main Menu.
Show/Hide?:
- Shows/hides Combat Log command inside the Main Menu.
- Note! This command will be disabled if the player does not have any
Combat Logs recorded.
---
System: Show in Party Command? - Shows/hides CombatLog menu inside the Window_PartyCommand. Show/Hide?: - Shows/hides Combat Log command inside Window_PartyCommand. ---
System: Show in Actor Command? - Shows/hides CombatLog menu inside the Window_ActorCommand. Show/Hide?: - Shows/hides Combat Log command inside Window_ActorCommand. --- Common Event Menu VisuStella MZThe following are Plugin Commands that come with this plugin. They can be accessed through the Plugin Command event command. --- Common Event Menu Plugin Command
This is the Plugin Command that lets you create the Common Event Menu. The Common Event Menu is inaccessible from any other way. --- Common Event Menu: Start
- Start a Common Event Menu with the below settings.
Common Events:
- Select the Common Events you want shown in the menu.
Cancel Event:
- Runs this Common Event when Cancel is pressed.
- Insert 0 to disable Cancel.
Layout:
- Pick a layout to use for the Common Event Menu.
- Select "Custom" to position windows via JavaScript.
- Picking '-' will not create any Common Event Menus.
- Look on Yanfly.moe for a visual list of all the layouts.
Custom Layout:
- Modify the settings for a Custom layout.
- Requires the above parameter to be "Custom".
Optional Settings:
- Optional settings for the Common Event Menu.
!! WARNING !! Not all pre-made layouts work with all screen resolutions as this is very much so the case if you plan on using a smaller-than-normal screen resolution. If a specific layout does not work with a resolution you want, pick another layout that works. These layouts are made under the industry standard of a 16:9, 1280x720 screen resolution. ---
Common Events (Sub Settings)
- Select the Common Events you want shown in the menu.
Specific ID's:
ID(s):
- Select the Common Events you want displayed in the menu based on their
exact ID's.
ID Range:
Range Start:
- Select the Common Event ID range to start from.
- This will select all the ID's up to the end range.
Range End:
- Select the Common Event ID range to end with.
- This will select all the ID's from the start range.
JS:
Custom JS:
- Create a list of Common Event ID's with JavaScript.
Filters:
Empty Name:
- Apply filter for Common Events without a name?
----- Name:
- Apply filter for Common Events with ----- in their name?
---
Custom Layout (Sub Settings)
- Modify the settings for a Custom layout.
- Requires the above parameter to be "Custom".
Main Windows:
JS: List Window:
JS: Picture Window:
JS: Help Window:
JS: Sub Window:
- Determine how this Window is positioned.
- Only applies with Custom layouts.
Extra Windows:
JS: Extra Window 1:
JS: Extra Window 2:
JS: Extra Window 3:
JS: Extra Window 4:
JS: Extra Window 5:
JS: Extra Window 6:
JS: Extra Window 7:
JS: Extra Window 8:
JS: Extra Window 9:
JS: Extra Window 10:
- Determine how this Extra Window is positioned.
- Only applies with Custom layouts.
!! WARNING !! These settings do NOT apply to Custom Layouts in order to reduce confusion for the game dev. If the game dev wishes to implement them in, then utilize Scene_Base's "isBottomHelpMode" and "isRightInputMode" functions when inserting the JavaScript code needed. ---
Optional Settings (Sub Settings)
- Optional settings for the Common Event Menu.
All Windows:
Background Type:
- Select the background type for all of the Common Event Menu windows.
- 0 - Window
- 1 - Dim
- 2 - Transparent
Boundary Size:
- Pick the boundary size for the layout.
- Does NOT apply to Custom Layouts.
- Full (Game Screen)
- UI Size (UI Resolution)
- Padded (16 px Border)
- Huge (32 px Border)
- Large (48 px Border)
- Medium (64 px Border)
- Small (96 px Border)
- Tiny (128 px Border)
- Micro (160 px Border)
- Wut (192 px Border)
List Window:
List Columns:
- The number of columns the List Window has.
- Use 'auto' to determine it automatically.
- You may use JavaScript.
Auto Select:
- Which Common Event should be selected at the start?
- Use 'last' for last picked ID.
- You may use JavaScript.
Auto-Sort ID's:
- Automatically sort the Common Event's inserted into the Plugin Command
by their database ID's?
- This only applies to the "Specific" and "Custom JS" list where the
order of the ID's inserted can be controlled. "ID Range" settings are
always going to be sorted by ID.
- This can be disabled for those who wish to manually switch around the
order of their displayed Common Event ID's.
Text Alignment:
- How do you want the text to be aligned for the List Window?
Cancel Button:
Show Cancel Button:
- Show the Cancel Button?
- Requires a Cancel Common Event.
Button Scale:
- Scale the button size by this much.
Button Position:
- Select where the button appears.
Button Offset X:
- Offset the Cancel Button X position by this much.
Button Offset Y:
- Offset the Cancel Button Y position by this much.
Picture Window:
Auto-Fit Image:
- Automatically fit the picture to the size of the Picture Window if the
picture is larger than the window?
Image Anchor X:
- Pick how the picture is anchored horizontally in the Picture Window.
Image Anchor Y:
- Pick how the picture is anchored vertically in the Picture Window.
--- Core Engine VisuStella MZThe following are Plugin Commands that come with this plugin. They can be accessed through the Plugin Command event command. --- Animation Commands
Animation: Play at Coordinate
- Plays an animation on the screen at a specific x, y coordinate even if
there is no sprite attached.
Animation ID:
- Plays this animation.
Coordinates:
X:
Y:
- X/Y coordinate used for the animation.
You may use JavaScript code.
Mirror Animation?:
- Mirror the animation?
Mute Animation?:
- Mute the animation?
--- Audio Plugin Commands---
Audio: Change Current BGM Volume - Changes the current BGM volume without changing any of the current BGM's other properties and without restarting the BGM. Volume: - Change the current BGM's volume to what amount? - You may use JavaScript code. - Use numbers from 0 to 100. ---
Audio: Change Current BGM Pitch - Changes the current BGM pitch without changing any of the current BGM's other properties and without restarting the BGM. Pitch: - Change the current BGM's pitch to what amount? - You may use JavaScript code. - Use numbers from 50 to 150. ---
Audio: Change Current BGM Pan - Changes the current BGM pan without changing any of the current BGM's other properties and without restarting the BGM. Pan: - Change the current BGM's pan to what amount? - You may use JavaScript code. - Use numbers from -100 to 100. ---
Audio: Change Current BGS Volume - Changes the current BGS volume without changing any of the current BGS's other properties and without restarting the BGS. Volume: - Change the current BGS's volume to what amount? - You may use JavaScript code. - Use numbers from 0 to 100. ---
Audio: Change Current BGS Pitch - Changes the current BGS pitch without changing any of the current BGS's other properties and without restarting the BGS. Pitch: - Change the current BGS's pitch to what amount? - You may use JavaScript code. - Use numbers from 50 to 150. ---
Audio: Change Current BGS Pan - Changes the current BGS pan without changing any of the current BGS's other properties and without restarting the BGS. Pan: - Change the current BGS's pan to what amount? - You may use JavaScript code. - Use numbers from -100 to 100. --- Debug Plugin Commands---
Debug: Current Controller ID - PLAY TEST ONLY. - Shows current controller ID in debug console. - If you press a key on the keyboard, this data will be erased. - Also copies to computer clipboard if possible. ---
Export Plugin Commands
--- Export: All Maps Text - PLAY TEST ONLY. Exports all of the text from all maps, their events, event pages, and any associated Common Events. - Exports 'Show Text' event commands. - Exports 'Show Choices' event commands. - Exports 'Show Scrolling Text' event commands. - Exports 'Comments' event commands. - Only the raw text will be exported. - Only usable during Play Test. --- Export: All Troops Text - PLAY TEST ONLY. Exports all of the text from all troops, their event pages, and any associated Common Events. - Exports 'Show Text' event commands. - Exports 'Show Choices' event commands. - Exports 'Show Scrolling Text' event commands. - Exports 'Comments' event commands. - Only the raw text will be exported. - Only usable during Play Test. --- Export: Current Map Text - PLAY TEST ONLY. Exports all of the text on the current map, its events, the event pages, and any associated Common Events. - Exports 'Show Text' event commands. - Exports 'Show Choices' event commands. - Exports 'Show Scrolling Text' event commands. - Exports 'Comments' event commands. - Only the raw text will be exported. - Only usable during Play Test. - If not in battle, this Plugin Command will not work. --- Export: Current Troop Text - PLAY TEST ONLY. Exports all of the text on the current troop, the troop's event pages, and any associated Common Events. - Exports 'Show Text' event commands. - Exports 'Show Choices' event commands. - Exports 'Show Scrolling Text' event commands. - Exports 'Comments' event commands. - Only the raw text will be exported. - Only usable during Play Test. - If not in battle, this Plugin Command will not work. --- Game Plugin Commands---
Game: Open URL - Opens a website URL from the game. URL: - Where do you want to take the player? --- Gold Plugin Commands---
Gold: Gain/Lose - Allows you to give/take more gold than the event editor limit. Value: - How much gold should the player gain/lose? - Use negative values to remove gold. --- Map Plugin Commands--- Map: Once Parallel - Plays a Common Event parallel to the event once without repeating itself when done. - Map only! Common Event ID: - The ID of the parallel Common Event to play. - Does NOT repeat itself when finished. - When exiting map scene or changing maps, all Once Parallels are cleared. - Once Parallels are not retained upon reentering the scene or map. - Once Parallels are not stored in memory and cannot be saved. --- Picture Plugin Commands---
Picture: Coordinates Mode - Play Test Mode only! Gets the coordinates of a specific picture as you move it across the screen. Picture ID: - The ID of the pictures to track the coordinates of. ---
Picture: Easing Type - Changes the easing type to a number of options. Picture ID: - Which picture do you wish to apply this easing to? Easing Type: - Select which easing type you wish to apply. Instructions: - Insert this Plugin Command after a "Move Picture" event command. - Turn off "Wait for Completion" in the "Move Picture" event. - You may have to add in your own "Wait" event command after. ---
Picture: Erase All - Erases all pictures on the screen because it's extremely tedious to do it one by one. ---
Picture: Erase Range - Erases all pictures within a range of numbers because it's extremely tedious to do it one by one. Starting ID: - The starting ID of the pictures to erase. Ending ID: - The ending ID of the pictures to erase. ---
Picture: Rotate by Angle - Rotates target picture by a amount angle over a set duration instead of continuously. Picture ID Number: - What is the ID of the picture you wish to rotate? - Use a number between 1 and 100. - You may use JavaScript code. Adjust Angle: - What is the angle you wish to rotate the picture by? - Use degrees (360 degrees per full rotation). - You may use JavaScript code. Easing Type: - Select which easing type you wish to apply. Duration: - Duration of rotation effect in frames. - 60 frames = 1 second. - You may use JavaScript code. Wait for Completion: - Wait until completion before moving onto the next event? ---
Picture: Rotate to Angle
- Rotates target picture to a certain angle over a set duration
instead of continuously.
Picture ID Number:
- What is the ID of the picture you wish to rotate?
- Use a number between 1 and 100.
- You may use JavaScript code.
Target Angle:
- What is the target angle you wish to rotate the picture?
- Use degrees (360 degrees per full rotation).
- You may use JavaScript code.
Easing Type:
- Select which easing type you wish to apply.
Duration:
- Duration of rotation effect in frames.
- 60 frames = 1 second.
- You may use JavaScript code.
Wait for Completion:
- Wait until completion before moving onto the next event?
<pre>
---
[[File:CoreEngine_Update43_Command1.png]]
[[File:CoreEngine_Update43_Command1_Ani2.gif]]
<pre>
Picture: Show Icon
- Shows an icon instead of a picture image.
- The picture icon can be controlled like any other picture.
General:
Picture ID Number:
- What is the ID of the picture you wish to show at?
- Use a number between 1 and 100.
- You may use JavaScript code.
Icon Index:
- Select the icon index to use for this picture.
- You may use JavaScript code.
Smooth Icon?:
- This will make the icon smoothed out or pixelated.
Picture Settings:
Position:
Origin:
- What is the origin of this picture icon?
- Upper Left
- Center
Position X:
- X coordinate of the picture.
- You may use JavaScript code.
Position Y:
- Y coordinate of the picture.
- You may use JavaScript code.
Scale:
Width %:
- Horizontal scale of the picture.
- You may use JavaScript code.
- 100 is 100%
Height %:
- Vertical scale of the picture.
- You may use JavaScript code.
- 100 is 100%
Blend:
Opacity:
- Insert a number to determine opacity level.
- Use a number between 0 and 255.
- You may use JavaScript code.
Blend Mode:
- What kind of blend mode do you wish to apply to the picture?
--- Screen Shake Plugin Commands---
Screen Shake: Custom: - Creates a custom screen shake effect and also sets the following uses of screen shake to this style. Shake Style: - Select shake style type. - Original - Random - Horizontal - Vertical Power: - Power level for screen shake. Speed: - Speed level for screen shake. Duration: - Duration of screenshake. - You can use code as well. Wait for Completion: - Wait until completion before moving onto the next event? --- Switch Plugin Commands--- Switches: Randomize ID(s) - Select specific Switch ID's to randomize ON/OFF. Switch ID(s): - Select which Switch ID(s) to toggle. Chance for ON: - Chance out of 100 that determines the switches to be ON. --- Switches: Randomize Range - Select specific Switch ID Range to randomize ON/OFF. - The ratio determines the ON/OFF distribution. Starting ID: - The starting ID of the Switch to toggle. Ending ID: - The ending ID of the Switch to toggle. Chance for ON: - Chance out of 100 that determines the switches to be ON. --- Switches: Toggle ID(s) - Select specific Switch ID's to toggle ON/OFF. - ON becomes OFF. OFF becomes ON. Switch ID(s): - Select which Switch ID(s) to toggle. --- Switches: Toggle Range - Select specific Switch ID Range to toggle ON/OFF. - ON becomes OFF. OFF becomes ON. Starting ID: - The starting ID of the Switch to toggle. Ending ID: - The ending ID of the Switch to toggle. --- System Plugin Commands---
System: Battle System Change
- Switch to a different battle system in-game.
Change To:
- Choose which battle system to switch to.
- Database Default (Use game database setting)
- -
- DTB: Default Turn Battle
- TPB Active: Time Progress Battle (Active)
- TPB Wait: Time Progress Battle (Wait)
- -
- BTB: Brave Turn Battle (Req VisuMZ_2_BattleSystemBTB)
- CTB: Charge Turn Battle (Req VisuMZ_2_BattleSystemCTB)
- OTB: Order Turn Battle (Req VisuMZ_2_BattleSystemOTB)
- STB: Standard Turn Battle (Req VisuMZ_2_BattleSystemSTB)
---
System: Load Images - Allows you to (pre) load up images ahead of time. img/animations/: img/battlebacks1/: img/battlebacks2/: img/enemies/: img/faces/: img/parallaxes/: img/pictures/: img/sv_actors/: img/sv_enemies/: img/system/: img/tilesets/: img/titles1/: img/titles2/: - Which files do you wish to load from this directory? ---
System: Main Font Size - Set the game's main font size. Change To: - Change the font size to this number. ---
System: Side View Battle - Switch between Front View or Side View for battle. Change To: - Choose which view type to switch to. ---
System: Window Padding - Change the game's window padding amount. Change To: - Change the game's standard window padding to this value. --- Text Popup Command
---
Text Popup: Show Text - Adds text to a text popup window to briefly appear. - Multiple text popups will be queued. - Does not halt the game and works parallel to game activity. Text: - Write the text that you want to appear here. - You may use text codes. --- Variable Plugin Commands---
Variable: JS Eval - Pick a variable ID and value to alter through JS. - Allows one line of code for variable ID and operand. - Functions like RM2k3's Variable Pointers. Variable ID: - This is the target variable to alter. - You may use JavaScript. - ie: $gameVariables.value(1) Operation Type: - What operation do you wish to use for this Plugin Command? Operand Modifier: - Value to be used in calculating the target variable. - You may use JavaScript. - ie: $gameVariables.value(1) ---
Variable: JS Block - Pick a variable ID and value to alter through JS. - Allows JS block code for variable ID and operand. - Functions like RM2k3's Variable Pointers. Variable ID: - This is the target variable to alter. - You may use JavaScript. - ie: $gameVariables.value(1) Operation Type: - What operation do you wish to use for this Plugin Command? Operand Modifier: - Value to be used in calculating the target variable. - You may use JavaScript. - ie: $gameVariables.value(1) --- Credits Page VisuStella MZThe following are Plugin Commands that come with this plugin. They can be accessed through the Plugin Command event command. --- Scene Plugin Commands
--- Scene: Open Credits Page - Opens Credits Page. - CANNOT be used inside of battle. --- System Plugin Commands
--- System: Enable Credits Page in Menu? - Enables/disables Credits Page inside the main menu. Enable/Disable?: - Enables/disables Credits Page inside the main menu. --- System: Show Credits Page in Menu? - Shows/hides Credits Page inside the main menu. Show/Hide?: - Shows/hides Credits Page inside the main menu. --- Date and Time System VisuStella MZThe following are Plugin Commands that come with this plugin. They can be accessed through the Plugin Command event command. --- Game Time Plugin Commands
---
Game Time: Change Date To
- Changes the Game Time's date to a specific date.
- Does not affect time. Does NOT affect time.
Year:
- Changes Game Time's year to this.
- You may use JavaScript code.
Month:
- Changes Game Time's month to this.
- You may use JavaScript code.
Allow Overflow?:
- If allow overflow, excess months increase year count.
- If not, excess months are clamped to what's allowed.
Date:
- Changes Game Time's date to this.
- You may use JavaScript code. Overflow is calculated.
Allow Overflow?:
- If allow overflow, excess days increase month count.
- If not, excess days are clamped to what's allowed.
---
Game Time: Change Time To
- Changes the Game Time's time to a specific time.
- Does not affect time. CAN affect date and weekday.
Hour:
- Changes Game Time's hour to this.
- You may use JavaScript code. Excess hours changes date.
Allow Overflow?:
- If allow overflow, excess hours increase date count.
- If not, excess hours are clamped to what's allowed.
Minute:
- Changes Game Time's minute to this.
- You may use JavaScript code. Overflow is calculated.
Allow Overflow?:
- If allow overflow, excess minutes increase hour count.
- If not, excess minutes are clamped to what's allowed.
---
Game Time: Pause Time Start - Pauses time from going forward while in Game Time. - This only pauses Game Time. Events and Timers can still move. ---
Game Time: Pause Time End - Allows Game Time to resume moving. ---
Game Time: Record to Variable(s)
- Records game Time data to select variable(s).
- This only records the data for this moment.
- Does NOT overwrite automatic variables used in Plugin Parameters
Calendar:
Year Variable:
- Select a variable to record the year.
- Leave at 0 to not use.
Month Variable:
- Select a variable to record the month.
- Leave at 0 to not use.
Date Variable:
- Select a variable to record the date.
- Leave at 0 to not use.
Full Date Variable:
- Select a variable to record the full date.
- Leave at 0 to not use.
- Result is year + month (2 digits) + date (2 digits)
- For example, Year 2, Month 4, Date 12 will yield 20412
Weekday:
Weekday Variable:
- Select a variable to record the weekday.
- Leave at 0 to not use.
Time:
Hour Variable:
- Select a variable to record the hour.
- Leave at 0 to not use.
Minute Variable:
- Select a variable to record the minute.
- Leave at 0 to not use.
Full Time Variable:
- Select a variable to record the full time.
- Leave at 0 to not use.
- Result is hour + minutes (2 digits) + seconds (2 digits)
- For example, Hour 16, Minute 8, Seconds 0 will yield 160800
---
Game Time: Time Dilation Change - Changes how fast it takes for a minute to pass in Game Time. MS Per Game Minute: - How many milliseconds will count as a game minute? - 1000 milliseconds = 1 real life second. ---
Game Time: Time Dilation Clear - Clears the time dilation and changes it back to default settings based on Plugin Parameters. --- Real Time Plugin Commands
---
Real Time: Record to Variable(s)
- Records Real Time data to select variable(s).
- This only records the data for this moment.
- Does NOT overwrite automatic variables used in Plugin Parameters
Calendar:
Year Variable:
- Select a variable to record the year.
- Leave at 0 to not use.
Month Variable:
- Select a variable to record the month.
- Leave at 0 to not use.
Date Variable:
- Select a variable to record the date.
- Leave at 0 to not use.
Full Date Variable:
- Select a variable to record the full date.
- Leave at 0 to not use.
- Result is year + month (2 digits) + date (2 digits)
- For example, Year 2, Month 4, Date 12 will yield 20412
Weekday:
Weekday Variable:
- Select a variable to record the weekday.
- Leave at 0 to not use.
Time:
Hour Variable:
- Select a variable to record the hour.
- Leave at 0 to not use.
Minute Variable:
- Select a variable to record the minute.
- Leave at 0 to not use.
Second Variable:
- Select a variable to record the second.
- Leave at 0 to not use.
Full Time Variable:
- Select a variable to record the full time.
- Leave at 0 to not use.
- Result is hour + minutes (2 digits) + seconds (2 digits)
- For example, Hour 16, Minute 8, Seconds 0 will yield 160800
--- HUD Plugin Commands
---
HUD: Show/Hide - Makes the Date & Time HUD visible or hidden. - Does not affect maps with forced hidden notetags. Show/Hide?: - Shows/hides Date & Time HUD on the map scene. --- Dragonbones Union VisuStella MZThe following are Plugin Commands that come with this plugin. They can be accessed through the Plugin Command event command. --- Battler Plugin Commands---
Battler: Actor Change Settings
- Change target actor's Dragonbones armature settings for battle.
Actor ID:
- Select which Actor ID to affect.
Filename:
- Change the armature's filename.
Offset X:
- Change the armature's Offset X value.
Offset Y:
- Change the armature's Offset Y value.
Scale X:
- Change the armature's Scale X value.
Scale Y:
- Change the armature's Scale Y value.
Time Scale:
- Change the armature's Time Scale value.
Width:
- Change the battler width size.
Height:
- Change the battler height size.
Motion Settings:
Walk:
Wait:
Chant:
Guard:
Damage:
Evade:
Thrust:
Swing:
Missile:
Skill:
Spell:
Item:
Escape:
Victory:
Dying:
Abnormal:
Sleep:
Dead:
- Change the animation used for this motion.
--- Map Sprite Plugin Commands---
Map Sprite: Actor Change Settings
- Change target actor's Dragonbones armature settings for map sprites.
Actor ID:
- Select which Actor ID to affect.
Filename:
- Change the armature's filename.
Offset X:
- Change the armature's Offset X value.
Offset Y:
- Change the armature's Offset Y value.
Scale X:
- Change the armature's Scale X value.
Scale Y:
- Change the armature's Scale Y value.
Time Scale:
- Change the armature's Time Scale value.
Walk Rate:
- Change the armature's walk animation rate.
Dash Rate:
- Change the armature's dash animation rate.
Width:
- Change the battler width size.
Height:
- Change the battler height size.
Flip Settings:
Flip Left?:
Flip Right:
- Flip the scale x value when facing left/right-ward directions?
Motion Settings:
Idle:
Walk:
Dash:
Jump:
Ladder (Idle):
Ladder (Climb):
Rope (Idle):
Rope (Climb):
- Base rope climbing animation name used.
---
Map Sprite: Actor Play Animation
- Target actor plays a custom Dragonbones animation.
Actor ID:
- Select which Actor ID to affect.
Play Animation:
- Play this animation.
NOTE: An alternative to this is to put the following code inside of a
Movement Route's script call:
this.dragonbonesAnimation = "AnimationName";
Replace 'AnimationName' (keep the quotes) with the name of the
Dragonbones animation.
---
Map Sprite: Actor Stop Animation - Stops a target actor's custom Dragonbones animation. Actor ID: - Select which Actor ID to affect. ---
Map Sprite: Event Play Animation - Target event plays a custom Dragonbones animation. Event ID: - Select which Event ID to affect. Play Animation: - Play this animation. ---
Map Sprite: Event Stop Animation - Stops a target event's custom Dragonbones animation. Event ID: - Select which Event ID to affect. ---
Map Sprite: Follower Play Animation - Target follower plays a custom Dragonbones animation. Follower Index: - Select which Follower Index to affect. Play Animation: - Play this animation. ---
Map Sprite: Follower Stop Animation - Stops a target follower's custom Dragonbones animation. Follower ID: - Select which Follower Index to affect. ---
Map Sprite: Player Play Animation - Player plays a custom Dragonbones animation. Play Animation: - Play this animation. ---
Map Sprite: Player Stop Animation - Stops player's custom Dragonbones animation. --- Picture Plugin Commands---
Picture: Dragonbones Setup - Setup a Dragonbones armature for a picture. Picture ID: - Select which Picture ID(s) to give a Dragonbones armature. Armature Filename: - What is the armature's filename? Play Animation: - Play this animation once it starts. Offset: X: - Default X offset value for this Dragonbones armature. Offset: Y: - Default Y offset value for this Dragonbones armature. Scale: X: - Default X scaling for this Dragonbones armature. - This will be amplified by the picture's scaling value. Scale: Y: - Default Y scaling for this Dragonbones armature. - This will be amplified by the picture's scaling value. Time Scale: - Default time scale for this Dragonbones armature. - Higher values play faster. Lower values play slower. ---
Picture: Play Dragonbones Animation - Make an existing Dragonbones armature attached to a picture play an animation. Picture ID: - Select which Picture ID to modify. Play Animation: - Play this animation. Finish: Revert Idle: - Revert animation to 'idle' animation after finishing? ---
Picture: Offset Dragonbones - Offset the X, Y attachment point of the Dragonbones armature. Picture ID: - Select which Picture ID to modify. Offset: X: - X offset value for this Dragonbones armature. Offset: Y: - Y offset value for this Dragonbones armature. ---
Picture: Scale Dragonbones - Change the scaling values of the Dragonbones armature. Picture ID: - Select which Picture ID to modify. Scale: X: - X scaling for this Dragonbones armature. - This will be amplified by the picture's scaling value. Scale: Y: - Y scaling for this Dragonbones armature. - This will be amplified by the picture's scaling value. ---
Picture: Time Scale Dragonbones - Change the speed at which Dragonbones animations play. Picture ID: - Select which Picture ID to modify. Time Scale: - Time scale for this Dragonbones armature. - Higher values play faster. Lower values play slower. --- Dice Rolls and RNG Seeds VisuStella MZThe following are Plugin Commands that come with this plugin. They can be accessed through the Plugin Command event command. --- Dice Plugin Commands
---
Dice: Roll Value
- Rolls a dice for any value and stores the result to a variable.
Dice Sides:
- How many sides does this dice have?
Total Dice Rolls:
- How many Dice Rolls do you want out of this?
- You may use code.
- Dice Rolls have a cap.
Variable ID:
- Insert the ID of the Variable to save the Dice Roll results to.
- Use 0 to not use.
- Results are after modifiers.
Result Type:
- What type of result do you want recorded to the variable?
Title Text:
- What is the title of this Dice Roll?
- Text codes allowed.
- Leave empty to not use.
Appearance & Seed:
- What are the dice appearance & seed settings used for this Dice Roll?
Auto Dice Effects:
- Adjust the modifier settings that automatically apply to the Dice Roll.
Bonus Dice Effects:
- Adjust the modifier settings are optionally applied to the Dice Roll
selected by the player.
---
Dice: Target Value
- Rolls a dice for a target value and stores the result to a variable.
Dice Sides:
- How many sides does this dice have?
Switch ID:
- Insert the ID of the Switch to save the Dice Roll results to.
- Use 0 to not use.
Allow Natural Rolls?:
- Allow natural rolls which bypass modifiers?
- Natural 1 or Max = auto-fail or auto-success
Result Type:
- What type of result do you want recorded to the switch?
Target Roll Value:
- What should the target value be equal to?
- You may use code.
Variable ID:
- Insert the ID of the Variable to save the Dice Roll value to.
- Use 0 to not use.
- Results are after modifiers.
Title Text:
- What is the title of this Dice Roll?
- Text codes allowed. Leave empty to not use.
Appearance & Seed:
- What are the dice appearance & seed settings used for this Dice Roll?
Auto Dice Effects:
- Adjust the modifier settings that automatically apply to the Dice Roll.
Bonus Dice Effects:
- Adjust the modifier settings are optionally applied to the Dice Roll
selected by the player.
---
Dice Appearance & Seed Settings
Appearance Overrides:
D4 Image Filename(s):
D6 Image Filename(s):
D8 Image Filename(s):
D10 Image Filename(s):
D12 Image Filename(s):
D20 Image Filename(s):
- Use custom images for this dice?
- Priority over colors.
- Overrides default parameters.
- Location: img/pictures/
Dice Colors(s):
- Use #rrggbb for custom colors or regular numbers for text colors from
the Window Skin.
- Overrides default parameters.
Seed:
- What is the Random Number Seed used for this Dice Roll?
- Use numbers or text.
- Use "none" to not use a seed.
Daily Marker:
- Apply daily marker to Random Number results?
Save-Unique Marker:
- Apply save-unique marker to Random Number results?
---
Auto Dice Effects
General Auto-Effects:
- These auto-effects will be automatically activated as long its
conditions are met at the start of the dice-roll.
Variable Requirements:
- These auto-effects require a variable(s) to be at least a certain value
to automatically activate.
Item Requirements:
- These auto-effects require an item(s) to have a certain quantity to
automatically activate.
Weapon Requirements:
- These auto-effects require a weapon(s) to be in party possession or is
equipped to automatically activate.
Armor Requirements:
- These auto-effects require an armor(s) to be in party possession or is
equipped to automatically activate.
Skill Requirements:
- These auto-effects require a skill(s) to be available within the party
to automatically activate.
---
Auto-Effects
- This section is a consolidation of the various Auto Dice Effects.
Auto Effect Name:
- What is the name of this effect?
- Text codes allowed.
Auto Effect Icon:
- The icon used for this effect.
Reference Data:
Required Variable ID:
- This variable is to be checked from.
- Changes don't affect effect mid-roll.
Required Value:
- Variable requires at least this much in value.
- You may use code.
- Changes don't affect effect mid-roll.
Required Item ID:
- This is the item whose quantity is checked.
- Changes don't affect effect mid-roll.
Required Value:
- Quantity requires at least this much in value.
- You may use code.
- Changes don't affect effect mid-roll.
Required Weapon ID:
- This is the weapon whose presence is checked.
- Changes don't affect effect mid-roll.
Include Equipped?:
- Allow equipped weapons to be included in the count.
Required Armor ID:
- This is the armor whose presence is checked.
- Changes don't affect effect mid-roll.
Include Equipped?:
- Allow equipped armors to be included in the count.
Required Skill ID:
- This is the skill whose presence is checked.
- Changes don't affect effect mid-roll.
Skill Learned Only?:
- Require the skill to be learned only or allow temporary skills?
Skill User(s):
- Select which actor(s) to check for the required skill.
- Party Leader
- Any Party Member
- Every Party Member
- Any Battle Member
- Every Battle Member
- Any Specific Actor(s)
- Every Specific Actor(s)
Specific Actor ID(s):
- Determine which "Specific Actor(s)" to pick from.
- Specific actor(s) must be in the party, main or reserve.
Show User Name?:
- Shows the skill user's name next to the skill name?
Require User Alive?:
- Requires the skill user to be alive?
- Or can they be dead or alive?
Dice Effects:
Count/Advantage:
- Change dice count (roll value) or advantage/disadvantage
(target value).
- You may use code.
Rank/Type:
- Raises/lowers dice rank: D4, D6, D8, D10, D12, D20.
- You may use code.
- Higher rank = more sides.
Modifier (Static):
- Alters the finalized rolled dice value.
- You may use code.
Modifier (Random):
- Adds a random element to the dice value.
- You may use code.
Additional Text:
Pre-Effect Text:
- What text is added before the dice effects text?
- Text codes allowed.
Post-Effect Text:
- What text is added after the dice effects text?
- Text codes allowed.
Effect Conditions:
Switch ID:
- This Switch is required to be ON to meet conditions.
- Use 0 to not use.
- Does not reveal mid-Dice Roll.
JS: Condition:
- JavaScript code used to determine the conditions for this dice effect
to be automatically activated.
- Does not reveal mid-Dice Roll.
---
Bonus Dice Effects
General Bonus Effects:
- Add general bonus dice effects here that the player can select to use
the effect.
Variable Cost Effects:
- Variable Bonus Effects require deducting from variable(s) as a cost to
use the effect.
Item Cost Effects:
- Item Bonus Effects require consuming the target item(s) as a cost to use
the effect.
Weapon Cost Effects:
- Weapon Bonus Effects require consuming the target weapon(s) as a cost to
use the effect.
Armor Cost Effects:
- Armor Bonus Effects require consuming target the armor(s) as a cost to
use the effect.
Skill Cost Effects:
- Skill Bonus Effects require paying skill costs to activate and use the
effect.
---
Bonus Effects
- This section is a consolidation of the various Bonus Dice Effects.
Bonus Effect Name:
- What is the name of this effect?
- Text codes allowed.
Bonus Effect Icon:
- The icon used for this effect.
Animation ID:
- Play this animation when the effect activates.
- Animation will play on the player character.
Effect Costs:
Variable Cost ID:
- This variable is to be deducted from.
- Changes do not reveal effect mid-Dice Roll.
Cost Value:
- Deduct this much from the target variable.
- You may use code.
Show Variable Cost?:
- Show variable cost?
Item Cost ID:
- This item is to be deducted from.
- Changes do not reveal effect mid-Dice Roll.
Cost Value:
- Deduct this much from the target item.
- You may use code.
Show Item Cost?:
- Show item cost?
Weapon Cost ID:
- This weapon is to be deducted from.
- Changes do not reveal effect mid-Dice Roll.
Cost Value:
- Deduct this much from the target weapon.
- You may use code.
Show Weapon Cost?:
- Show weapon cost?
Armor Cost ID:
- This armor is to be deducted from.
- Changes do not reveal effect mid-Dice Roll.
Cost Value:
- Deduct this much from the target armor.
- You may use code.
Show Armor Cost?:
- Show armor cost?
Skill Cost ID:
- This skill's cost is to be paid by an actor.
- Changes do not reveal effect mid-Dice Roll.
Skill Learned Only?:
- Require the skill to be learned only or allow temporary skills?
Skill User(s):
- Select which actor(s) to check for the required skill.
- Party Leader
- Any Party Member
- Every Party Member
- Any Battle Member
- Every Battle Member
- Any Specific Actor(s)
- Every Specific Actor(s)
Specific Actor ID(s):
- Determine which "Specific Actor(s)" to pick from.
- Specific actor(s) must be in the party, main or reserve.
Show User Name?:
- Shows the skill user's name next to the skill name?
Require User Alive?:
- Requires the skill user to be alive? Or can they be dead or alive?
Show Skill Cost?:
- Show skill cost?
Maximum Uses:
- How many times can this effect be used?
- You may use code.
- Over 1000000 for unlimited.
Show Uses Left?:
- Show how many uses are left?
Dice Effects:
Count/Advantage:
- Change dice count (roll value) or advantage/disadvantage
(target value).
- You may use code.
Rank/Type:
- Raises/lowers dice rank: D4, D6, D8, D10, D12, D20.
- You may use code.
- Higher rank = more sides.
Modifier (Static):
- Alters the finalized rolled dice value.
- You may use code.
Modifier (Random):
- Adds a random element to the dice value.
- You may use code.
Additional Text:
Pre-Cost Text:
- What text is added before the dice cost text?
- Text codes allowed.
Post-Cost Text:
- What text is added after the dice cost text?
- Text codes allowed.
Pre-Effect Text:
- What text is added before the dice effects text?
- Text codes allowed.
Post-Effect Text:
- What text is added after the dice effects text?
- Text codes allowed.
Effect Conditions:
Show Switch ID:
- This Switch is required to be ON to show effect.
- Use 0 to not use.
- Does not reveal mid-Dice Roll.
Enable Switch ID:
- This Switch is required to be ON to enable effect.
- Use 0 to not use.
JS: Show:
- JavaScript code used to determine show conditions for this dice
effect to become available for use.
- Does not reveal mid-Dice Roll.
JS: Enable:
- JavaScript code used to determine enable conditions for this dice
effect to become usable.
JS: On Select:
- JavaScript code used to determine what happens when this dice effect
is selected and activated.
--- RNG Plugin Commands
---
RNG: Random Number Between X and Y - Uses a seed to determine a random number between X and Y. Variable ID: - Insert the ID of the Variable to save this value to. Minimum: - Minimum value the random number can be. - You may use JavaScript code. Maximum: - Maximum value the random number can be. - You may use JavaScript code. Seed: - What is the Random Number Seed? - Use numbers or text. Daily Marker: - Apply daily marker to Random Number results? Save-Unique Marker: - Apply save-unique marker to Random Number results? ---
RNG: Reset Random Seed - Resets the random state for the target Random Number Seed. Seed: - What is the Random Number Seed? - Use numbers or text. Daily Marker: - Apply daily marker to Random Number Seed? Save-Unique Marker: - Apply save-unique marker to Random Number Seed? --- Elements and Status Menu Core VisuStella MZThe following are Plugin Commands that come with this plugin. They can be accessed through the Plugin Command event command. --- Actor Plugin Commands---
Actor: Change Biography (Group) Actor: Change Biography (Range) Actor: Change Biography (JS) - Changes the biography of the selected actor(s). - Each version has a different means of selecting Actor ID's. Step 1: Target ID - Select which Actor ID(s) to affect. Step 2: Biography - Change the biography for target actor(s) to this. - Text codes allowed. - %1 - Actor's name. ---
Actor: Change Trait Sets (Group)
Actor: Change Trait Sets (Range)
Actor: Change Trait Sets (JS)
- Changes the Trait Set(s) of the selected actor(s).
- Each version has a different means of selecting Actor ID's.
Step 1: Target ID
- Select which Actor ID(s) to affect.
Step 2: Change Trait Set
- Element
- SubElement
- Gender
- Race
- Nature
- Alignment
- Blessing
- Curse
- Zodiac
- Variant
- Change to the name of the Trait Set to switch actor(s) to.
- "Unchanged" to leave alone.
- "Random" to randomize.
- Random will use the random pool dictated by the Plugin Parameters
and the Trait Set weights determined there as well.
--- Enemy Plugin Commands---
Enemy: Change Trait Sets (Group)
Enemy: Change Trait Sets (Range)
Enemy: Change Trait Sets (JS)
- Changes the Trait Set(s) of the selected enemy(ies).
- Each version has a different means of selecting Enemy Indexes.
Step 1: Target ID
- Select which Enemy Index(es) to affect.
Step 2: Change Trait Set
- Element
- SubElement
- Gender
- Race
- Nature
- Alignment
- Blessing
- Curse
- Zodiac
- Variant
- Change to the name of the Trait Set to switch target(s) to.
- "Unchanged" to leave alone.
- "Random" to randomize.
- Random will use the random pool dictated by the Plugin Parameters
and the Trait Set weights determined there as well.
--- Encounter Effects VisuStella MZThe following are Plugin Commands that come with this plugin. They can be accessed through the Plugin Command event command. --- Advantage Plugin Commands---
Advantage: Add to Queue
- Add (at the end) to the existing advantage queue the following encounter
advantages for the upcoming battles.
Queue:
- Add to the queue the following advantage options for the
upcoming battles.
- Preemptive (Player gains turn advantage)
- Surprise (Enemies gain turn advantage)
- No Advantage (Neither party has advantage)
- Chance (Random encounter advantage chance)
---
Advantage: Set Queue
- Declare the exact advantage queue for the upcoming battles.
Queue:
- Add to the queue the following advantage options for the
upcoming battles.
- Preemptive (Player gains turn advantage)
- Surprise (Enemies gain turn advantage)
- No Advantage (Neither party has advantage)
- Chance (Random encounter advantage chance)
---
Advantage: Reset Queue - Resets the advantage queue for battles. --- Alert Plugin Commands
--- Alert: Stealth Mode - Changes the stealth mode setting for the player. Stealth Mode: - If Stealth Mode is on, bypass unnoticed alerts. - Already alerted events will stay alert. ---
Battle Transition Plugin Commands
--- Battle Transition: Change Type
- Changes the battle transition type.
Transition Type:
- Pick a battle transition type to change to.
- Random - Picks a random effect from list
- Aberration - Chromatic Aberration (Requires PIXI JS Filters)
- Block - Blocks Out Screen
- Blur - Blur Bright Spread Out
- Glitch - Glitchy Screen (Requires PIXI JS Filters)
- Hue - Hue Shift Zoom
- Pixel - Pixelates Screen (Requires PIXI JS Filters)
- Spiral - Screen Spirals Out (Requires PIXI JS Filters)
- Static - Static Noise Fade (Requires PIXI JS Filters)
- Twirl - Twirls Screen (Requires PIXI JS Filters)
- Warp - Warp Speed Spread (Requires PIXI JS Filters)
- Zoom - RPG Maker MZ Default Transition
- Some of these require PIXI JS Filters. If it is not installed, then no
special transition will be played if that transition is selected.
---
Battle Transition: Duration - Changes the battle transition duration. Duration: - What is the duration of every battle transition in frames? - 60 frames = 1 second. --- Enemy Levels VisuStella MZThe following are Plugin Commands that come with this plugin. They can be accessed through the Plugin Command event command. --- Enemy-Related Plugin Commands---
Enemy: Change Level - Change target enemy(ies) level by a value. Enemy Index(es): - Select which enemy(ies) to affect. Level: - Changes level by this value. - You may use JavaScript code. Bypass Resist?: - Bypasses <Resist Level Change> effect? ---
Enemy: Reset Level - Reset target enemy(ies) level to its original level. Enemy Index(es): - Select which enemy(ies) to affect. Bypass Resist?: - Bypasses <Resist Level Change> effect? ---
Enemy: Set Level - Set target enemy(ies) level to a specific value. Enemy Index(es): - Select which enemy(ies) to affect. Level: - Sets level to this value. - You may use JavaScript code. Bypass Resist?: - Bypasses <Resist Level Change> effect? --- Debug-Related Plugin Commands
---
DEBUG: View Level Stats - View the stats of specific enemies for each level. - This will appear in the Debug Console. Enemy Index(es): - Select which enemy(ies) to view. --- Enhanced TP System VisuStella MZThe following are Plugin Commands that come with this plugin. They can be accessed through the Plugin Command event command. --- Actor Plugin Commands
---
Actor: Change TP Mode - Changes target actor(s) TP Mode. Actor ID(s): - Select which actor(s) to affect. TP Mode Name: - Change to this TP Mode for selected actor(s). ---
Actor: Unlock TP Mode - Unlocks TP Modes for target actor(s). Actor ID(s): - Select which actor(s) to affect. TP Modes: - Change to this TP Mode for selected actor(s). ---
Actor: Unlock All TP Modes - Unlocks all TP Modes for target actor(s). Actor ID(s): - Select which actor(s) to affect. --- Enemy Plugin Commands
--- Enemy: Change TP Mode - Changes target enemy(ies) TP Mode. Enemy Index(es): - Select which enemy(ies) to affect. TP Mode Name: - Change to this TP Mode for selected enemy(ies). --- System Plugin Commands
--- System: Show/Hide TP Mode - Shows/Hides TP Mode from Scene_Skill. Show TP Mode?: - Shows/Hides TP Mode in Scene_Skill. --- Equip Battle Skills VisuStella MZThe following are Plugin Commands that come with this plugin. They can be accessed through the Plugin Command event command. --- Actor Plugin Commands
---
Actor: Change Max Skill Slots - Changes maximum skill slots for target actor(s). - Cannot be used in battle. Actor ID(s): - Select which Actor ID(s) to affect. Change Amount: - Changes the maximum skill slots by this amount. - Max slots cannot go below 1 or above hard cap. ---
Actor: Change Skill Tier Slots - Changes skill tier slots for target actor(s). - Cannot be used in battle. Actor ID(s): - Select which Actor ID(s) to affect. Tiers(s): - Enter in the Tier ID Key to alter the skill slots for. Change Amount: - Changes the maximum skill slots by this amount. - Max slots cannot go below 1 or above hard cap. --- Party Plugin Commands
---
Party: Change Max Skill Slots - Changes maximum skill slots for target party member(s). - Cannot be used in battle. Party Index(es): - Select which party member(s) to affect. - Index values start at 0. Change Amount: - Changes the maximum skill slots by this amount. - Max slots cannot go below 1 or above hard cap. ---
Party: Change Skill Tier Slots - Changes skill tier slots for target party member(s). - Cannot be used in battle. Party Index(es): - Select which party member(s) to affect. - Index values start at 0. Tiers(s): - Enter in the Tier ID Key to alter the skill slots for. Change Amount: - Changes the maximum skill slots by this amount. - Max slots cannot go below 1 or above hard cap. --- Equip Medal System VisuStella MZThe following are Plugin Commands that come with this plugin. They can be accessed through the Plugin Command event command. --- Actor Plugin Commands
--- Actor: Gain Medal EXP - Target actor(s) gains equippable Medal EXP for all currently - equipped medals. Applies any Medal EXP bonus rates. Actor ID(s): - Select which Actor ID(s) to affect. Medal EXP: - Determine how much Medal EXP target actor(s) gains. Show Text Popup?: - Shows text popup of actor(s) learning the medal if any? --- Actor: Add Medal EXP - Target actor(s) gains equippable Medal EXP for all currently - equipped medals. Does not apply any Medal EXP bonus rates. Actor ID(s): - Select which Actor ID(s) to affect. Medal EXP: - Determine how much Medal EXP target actor(s) receives. Show Text Popup?: - Shows text popup of actor(s) learning the medal if any? --- Actor: Learn Equippable Medal - Target actor(s) learns equippable medal(s). - Actor ID(s): - Select which Actor ID(s) to affect. Medal ID(s): - Select which Armor ID(s) to add as an equippable medal. Show Text Popup?: - Shows text popup of actor(s) learning the medal? --- Actor: Forgets Equippable Medal - Target actor(s) forgets equippable medal(s). - Actor ID(s): - Select which Actor ID(s) to affect. Medal ID(s): - Select which Armor ID(s) to forget as an equippable medal. --- Actor: Add Unlearned Equippable Medal - Gives target actor(s) the ability to learn target medal(s). - Actor ID(s): - Select which Actor ID(s) to affect. Medal ID(s): - Select which Armor ID(s) to add as an unlearned equippable medal. --- Actor: Remove Unlearned Equippable Medal - Removes target actor(s) the ability to learn target medal(s). - Actor ID(s): - Select which Actor ID(s) to affect. Medal ID(s): - Select which Armor ID(s) to remove unlearned equippable medal. --- Global Plugin Commands
--- Global: Learn Equippable Medal - All actors learns equippable medal(s). - Medal ID(s): - Select which Armor ID(s) to add as an equippable medal. Show Text Popup?: - Shows text popup of party learning the medal? --- Global: Forgets Equippable Medal - All actors forgets equippable medal(s). - Medal ID(s): - Select which Armor ID(s) to forget as an equippable medal. --- Global: Add Unlearned Equippable Medal - Gives all actors the ability to learn target medal(s). - Medal ID(s): - Select which Armor ID(s) to add as an unlearned equippable medal. --- Global: Remove Unlearned Equippable Medal - Removes from all actors the ability to learn target medal(s). - Medal ID(s): - Select which Armor ID(s) to remove unlearned equippable medal. --- System Plugin Commands
--- System: Show Medal in Equip Scene? - Shows/hides Medal command inside the equip scene. - Show/Hide?: - Shows/hides Medal command inside the equip scene. --- Equip Passive System VisuStella MZThe following are Plugin Commands that come with this plugin. They can be accessed through the Plugin Command event command. --- Actor Plugin Commands
--- Actor: Learn Equippable Passive - Target actor(s) learns equippable passive state(s). Actor ID(s): - Select which Actor ID(s) to affect. Passive State ID(s): - Select which State ID(s) to add as an equippable passive state. Show Text Popup?: - Shows text popup of actor(s) learning the passive state? --- Actor: Forget Equippable Passive - Target actor(s) forgets equippable passive state(s). Actor ID(s): - Select which Actor ID(s) to affect. Passive State ID(s): - Select which State ID(s) to forget as an equippable passive state. --- Actor: Add Unlearned Equippable Passive
- Gives target actor(s) the ability to learn target passive state(s).
Actor ID(s):
- Select which Actor ID(s) to affect.
Passive State ID(s):
- Select which State ID(s) to add as an unlearned equippable passive
state.
--- Actor: Remove Unlearned Equippable Passive - Removes target actor(s) the ability to learn target passive state(s). - Actor ID(s): - Select which Actor ID(s) to affect. Passive State ID(s): - Select which State ID(s) to remove unlearned equippable passive state. --- Global Plugin Commands
--- Global: Learn Equippable Passive - All actors learn equippable passive state(s). Passive State ID(s): - Select which State ID(s) to add as an equippable passive state. Show Text Popup?: - Shows text popup of party learning the passive state? --- Global: Forget Equippable Passive - All actors forget equippable passive state(s). Passive State ID(s): - Select which State ID(s) to forget as an equippable passive state. --- Global: Add Unlearned Equippable Passive
- Gives all actors the ability to learn target passive state(s).
Passive State ID(s):
- Select which State ID(s) to add as an unlearned equippable passive
state.
--- Global: Remove Unlearned Equippable Passive - Removes from all actors the ability to learn target passive state(s). Passive State ID(s): - Select which State ID(s) to remove unlearned equippable passive state. --- System Plugin Commands
--- System: Show Passives in Skill Scene? - Shows/hides Passives command inside the skill scene. - Show/Hide?: - Shows/hides Passives command inside the skill scene. --- Event Chain Reactions VisuStella MZThe following are Plugin Commands that come with this plugin. They can be accessed through the Plugin Command event command. --- Catalyst Plugin Commands
---
Catalyst: Create Catalyst at Event Location - Creates a catalyst for a spreadable event chain reaction at a target event's relative coordinates. Event ID: - The ID of the event to start catalyst from. - Use 0 for current event. - You may use JavaScript code. Reaction Type: - What is the reaction type's string? - Case does not matter. Relative Location: - What is the location of the reaction relative to the event? ---
Catalyst: Create Catalyst at Player Location - Creates a catalyst for a spreadable event chain reaction at the player's relative coordinates. Reaction Type: - What is the reaction type's string? - Case does not matter. Relative Location: - What is the location of the reaction relative to the player? ---
Catalyst: Create Catalyst at X, Y - Creates a catalyst for a spreadable event chain reaction at X, Y coordinates. Reaction Type: - What is the reaction type's string? - Case does not matter. X Coordinate: Y Coordinate: - Target X/Y coordinate to create catalyst at. - You may use JavaScript code. --- Positioning Plugin Commands
---
Positioning: Pull Player Front - If an event in front the player can be pulled, do so. - Event requires <Pull> or <Pull Push> notetag. Check Touch Triggers?: - Check triggers after moving and pulling? Sound Effect: - Play this sound effect if the event can be pulled. ---
Positioning: Pull This Event - Pulls this event backward by one tile if possible. - Requires the player to align up adjacently. Check Touch Triggers?: - Check triggers after moving and pulling? Sound Effect: - Play this sound effect if the event can be pulled. ---
Positioning: Push Player Front
- If an event in front the player can be pushed, do so.
- Event requires <Push> or <Push Pull> notetag.
Move Player Forward?:
- Move player forward while pushing the event?
Check Touch Triggers?:
- Check triggers after moving and pushing?
Sound Effect:
- Play this sound effect if the event can be pushed.
---
Positioning: Push This Event
- Pushes this event forward by one tile if possible.
- Requires the player to align up adjacently.
Move Player Forward?:
- Move player forward while pushing the event?
Check Touch Triggers?:
- Check triggers after moving and pushing?
Sound Effect:
- Play this sound effect if the event can be pushed.
--- Event Signals VisuStella MZThe following are Plugin Commands that come with this plugin. They can be accessed through the Plugin Command event command. --- Emit Signal Plugin Commands
---
Emit Signal: From Coordinate
- Emit Signal(s) from target coordinate as the central location.
- Must be used on the map scene!
Coordinate X:
- The x coordinate for the signal emmission center.
- You may use JavaScript code.
Coordinate Y:
- The y coordinate for the signal emmission center.
- You may use JavaScript code.
Signal(s):
- What signal do you wish to emit to the surroundings?
Range Type:
- What is the range type to emit the signal to?
- Square: A square-shaped range with the event at the center.
- Circle: A circle-shaped range with the event at the center.
- Delta: A diamond-shaped range with the event at the center.
- Row: Spans horizontally across the map. 'x' expands up and down.
- Column: Spans vertically across the map. 'x' expands left and right.
- Exact: Ignores range distance. Picks only coordinates.
Range Distance:
- What is the range distance to emit the signal to?
Response Switch ID:
- Turns ON this Switch if an event responds to the signal.
- Use 0 to ignore.
Animation ID:
- Play this animation at target tile location.
- Leave at 0 to not play an animation.
- Requires VisuMZ_0_CoreEngine!
Mirror Animation?:
- Mirror the animation?
Mute Animation?:
- Mute the animation?
---
Emit Signal: From Event
- Emit Signal(s) from target event as the central location.
- Must be used on the map scene!
Event ID:
- The ID of the target event. Use 0 for current event.
- You may use JavaScript code.
Signal(s):
- What signal do you wish to emit to the surroundings?
Range Type:
- What is the range type to emit the signal to?
- Square: A square-shaped range with the event at the center.
- Circle: A circle-shaped range with the event at the center.
- Delta: A diamond-shaped range with the event at the center.
- Row: Spans horizontally across the map. 'x' expands up and down.
- Column: Spans vertically across the map. 'x' expands left and right.
- Exact: Ignores range distance. Picks only coordinates.
Range Distance:
- What is the range distance to emit the signal to?
Response Switch ID:
- Turns ON this Switch if an event responds to the signal.
- Use 0 to ignore.
Animation ID:
- Play this animation at target tile location.
- Leave at 0 to not play an animation.
- Requires VisuMZ_0_CoreEngine!
Mirror Animation?:
- Mirror the animation?
Mute Animation?:
- Mute the animation?
---
Emit Signal: From Player
- Emit Signal(s) from player as the central location.
- Must be used on the map scene!
Signal(s):
- What signal do you wish to emit to the surroundings?
Range Type:
- What is the range type to emit the signal to?
- Square: A square-shaped range with the event at the center.
- Circle: A circle-shaped range with the event at the center.
- Delta: A diamond-shaped range with the event at the center.
- Row: Spans horizontally across the map. 'x' expands up and down.
- Column: Spans vertically across the map. 'x' expands left and right.
- Exact: Ignores range distance. Picks only coordinates.
Range Distance:
- What is the range distance to emit the signal to?
Response Switch ID:
- Turns ON this Switch if an event responds to the signal.
- Use 0 to ignore.
Animation ID:
- Play this animation at target tile location.
- Leave at 0 to not play an animation.
- Requires VisuMZ_0_CoreEngine!
Mirror Animation?:
- Mirror the animation?
Mute Animation?:
- Mute the animation?
--- Event Title Scene VisuStella MZThe following are Plugin Commands that come with this plugin. They can be accessed through the Plugin Command event command. --- System-Type Plugin Commands
---
System: Start New Game - Leaves the current scene and starts a new game. Slow Fade Out?: - Use a slow fade out transition to the next scene? ---
System: Open Load Scene - Leaves the current scene and opens the load game scene. Slow Fade Out?: - Use a slow fade out transition to the next scene? ---
System: Open Options Scene - Leaves the current scene and opens the options scene. Slow Fade Out?: - Use a slow fade out transition to the next scene? --- Events and Movement Core VisuStella MZThe following are Plugin Commands that come with this plugin. They can be accessed through the Plugin Command event command. --- Auto Movement Plugin Commands---
Auto Movement: Events - Allow/stop events from auto movement. Value: - Allow events to move automatically? --- Call Event Plugin Commands---
Call Event: Remote Read - Runs the page of a different event remotely. - This will run the page of the target event on the CURRENT event. - This means that any "This Event" commands will be applied to the event using this Plugin Command and NOT the target event that page data is being retrieved from. - Think of it as the current event using the target called event as a Common Event ala how RPG Maker 2003 works (for those familiar with it). Map ID: - Target event's map. Use 0 for current map. - You may use JavaScript code. Event ID: - The ID of the event to remotely run. - Use 0 for current event. - You may use JavaScript code. Page ID: - The page of the remote event to run. - You may use JavaScript code. --- Dash Plugin Commands---
Dash Enable: Toggle - Enable/Disable Dashing on maps. Value: - What do you wish to change dashing to? --- Event Icon Plugin Commands---
Event Icon: Change (Temporary) - Change the icon that appears on an event. - This change is temporary and resets upon new events. Map ID: - The map the target map. Use 0 for current map. - You may use JavaScript code. Event ID: - The ID of the target event. - Use 0 for current event. - You may use JavaScript code. Icon Index: - Icon index used for the icon. - You may use JavaScript code. Buffer X: - How much to shift the X position by? - You may use JavaScript code. Buffer Y: - How much to shift the Y position by? - You may use JavaScript code. Blend Mode: - What kind of blend mode do you wish to apply to the icon sprite? --- Event Icon: Change (Forced) - Change the icon that appears on an event. - This change is forced and needs to be restored. Map ID: - The map the target map. Use 0 for current map. - You may use JavaScript code. Event ID: - The ID of the target event. - Use 0 for current event. - You may use JavaScript code. Icon Index: - Icon index used for the icon. - You may use JavaScript code. Buffer X: - How much to shift the X position by? - You may use JavaScript code. Buffer Y: - How much to shift the Y position by? - You may use JavaScript code. Blend Mode: - What kind of blend mode do you wish to apply to the icon sprite? ---
Event Icon: Delete - Delete the icon that appears on an event. - This will remain deleted and invisible for events. Map ID: - The map the target map. Use 0 for current map. - You may use JavaScript code. Event ID: - The ID of the target event. - Use 0 for current event. - You may use JavaScript code. --- Event Icon: Restore - Restores a deleted or forced icon that appears on an event. Map ID: - The map the target map. Use 0 for current map. - You may use JavaScript code. Event ID: - The ID of the target event. - Use 0 for current event. - You may use JavaScript code. --- Event Label Plugin Commands---
Event Label: Refresh - Refresh all Event Labels on screen. - This is used to refresh page conditions for map changes that don't force a refresh. ---
Event Label: Visible - Change the visibility of Event Labels. Visibility: - What do you wish to change visibility to? --- Event Location Plugin Commands---
Event Location: Save - Memorize an event's map location so it reappears there the next time the map is loaded. Event ID: - The ID of the target event. - You may use JavaScript code. ---
Event Location: Delete - Deletes an event's saved map location. - The event will reappear at its default location. Map ID: - The map the target map. Use 0 for current map. - You may use JavaScript code. Event ID: - The ID of the target event. - Use 0 for current event. - You may use JavaScript code. ---
Event Location: Create
- Creates a custom spawn location for a specific map's event so it appears
there the next time the map is loaded.
Map ID:
- The map the target map. Use 0 for current map.
- You may use JavaScript code.
Event ID:
- The ID of the target event.
- Use 0 for current event.
- You may use JavaScript code.
X Coordinate:
- The X coordinate of the event.
- You may use JavaScript code.
Y Coordinate:
- The Y coordinate of the event.
- You may use JavaScript code.
Direction:
- The direction the event will be facing.
Optional:
Page ID:
- The page of the event to set the move route to.
- You may use JavaScript code.
Move Route Index:
- The point in the move route for this event to be at if the page ID
matches the rest of the page conditions.
--- Event Popup Plugin Commands
 2023 December 15 Since the version 1.55 update of Events and Movement Core, you can use the new Plugin Command called "Event Popup", which creates text above specific targets like the player character or an event, and move it. This feature is made by none other than yours truly, Arisu! There's many applications in which this can be used, but only if you change the way it's used. Let's take a look at them! This article will show you how to use popups to display Quick Messages, indicate Obtained Items, giving gifts to NPC's, and throwing items across the map.
--- Event Popup: Player - Makes a centered event popup on the player sprite. - Requires VisuMZ_1_MessageCore! - Cannot be used in battle! Message Text: - Insert the text to be displayed. - Text codes can be used. Message Duration: - What is the frame duration of the event popup? - 60 frames = 1 second. You may use code. Popup Settings: - These settings let you adjust how the popup animates. - See "Popup Settings" section below. --- Event Popup: Follower - Makes a centered event popup on target follower sprite. - Requires VisuMZ_1_MessageCore! - Cannot be used in battle! Follower Index: - Which follower index to play popup? - Index starts at 0. - You may use JavaScript code. Message Text: - Insert the text to be displayed. - Text codes can be used. Message Duration: - What is the frame duration of the event popup? - 60 frames = 1 second. - You may use code. Popup Settings: - These settings let you adjust how the popup animates. - See "Popup Settings" section below. --- Event Popup: Event - Makes a centered event popup on target event sprite. - Requires VisuMZ_1_MessageCore! - Cannot be used in battle! Event ID: - The ID of the event to play popup on. - Use 0 for current event. - You may use JavaScript code. Message Text: - Insert the text to be displayed. - Text codes can be used. Message Duration: - What is the frame duration of the event popup? - 60 frames = 1 second. You may use code. Popup Settings: - These settings let you adjust how the popup animates. - See "Popup Settings" section below. --- Event Popup: Target Tile - Makes a centered event popup on target tile. - Requires VisuMZ_1_MessageCore! - Cannot be used in battle! Map Tile X: Map Tile Y: - The x/y coordinate of the map tile. - You may use JavaScript code. Message Text: - Insert the text to be displayed. - Text codes can be used. Message Duration: - What is the frame duration of the event popup? - 60 frames = 1 second. You may use code. Popup Settings: - These settings let you adjust how the popup animates. - See "Popup Settings" section below. --- Popup Settings
Fade Settings:
Fade In Duration:
- How many frames does it take to fade in?
- 60 frames = 1 second.
Fade Out Duration:
- How many frames does it take to fade out?
- 60 frames = 1 second.
Offset Settings:
Starting Offset X:
- Offsets the starting x position.
- Negative: left. Positive: right.
- You may use code.
Starting Offset Y:
- Offsets the starting y position.
- Negative: up. Positive: down.
- You may use code.
Ending Offset X:
- Offsets the ending x position.
- Negative: left. Positive: right.
- You may use code.
Ending Offset Y:
- Offsets the ending y position.
- Negative: up. Positive: down.
- You may use code.
Scaling Settings:
Starting Scale X:
- What is the starting scale x?
- 0.0 = 0%, 0.5 = 50%, 1.0 = 100%
- You may use code.
Starting Scale Y:
- What is the starting scale y?
- 0.0 = 0%, 0.5 = 50%, 1.0 = 100%
- You may use code.
Ending Scale X:
- What is the ending scale x?
- 0.0 = 0%, 0.5 = 50%, 1.0 = 100%
- You may use code.
Ending Scale Y:
- What is the ending scale y?
- 0.0 = 0%, 0.5 = 50%, 1.0 = 100%
- You may use code.
Angle Settings:
Starting Offset Angle:
- What is the starting angle offset?
- Use numbers between 0 and 360.
- You may use code.
Ending Offset Angle:
- What is the ending angle offset?
- Use numbers between 0 and 360.
- You may use code.
Misc Settings:
Arc Peak:
- This is the height of the popup's trajectory arc in pixels.
- Positive: up. Negative: down.
- You may use code.
--- Event Timer Plugin Commands---
Event Timer: Change Speed - Changes the timer frame decrease (or increase) speed. Speed: - How many 1/60ths of a second does each frame increase or decrease by? - Negative decreases. - Positive increases. - JavaScript allowed. ---
Event Timer: Expire Event Assign - Sets a Common Event to run upon expiration. - Bypasses the default code if one is set. Common Event ID: - Select the Common Event to run upon the timer's expiration. ---
Event Timer: Expire Event Clear - Clears any set to expire Common Event and instead, run the default Game_Timer expiration code. ---
Event Timer: Frames Gain - Chooses how many frames, seconds, minutes, or hours are gained or lost for the event timer. Frames: - How many 1/60ths of a second are gained/lost? - Positive for gain. - Negative for lost. - JavaScript allowed. Seconds: - How many seconds are gained/lost? - Positive for gain. - Negative for lost. - JavaScript allowed. Minutes: - How many minutes are gained/lost? - Positive for gain. - Negative for lost. - JavaScript allowed. Hours: - How many hours are gained/lost? - Positive for gain. - Negative for lost. - JavaScript allowed. ---
Event Timer: Frames Set - Chooses how many frames, seconds, minutes, or hours are set for the event timer. Frames: - Set frame count to this value. - Each frame is 1/60th of a second. - JavaScript allowed. Seconds: - Set seconds to this value. - JavaScript allowed. Minutes: - Set minutes to this value. - Each minute is 60 seconds. - JavaScript allowed. Hours: - Set hours to this value. - Each hour is 60 minutes. - JavaScript allowed. ---
Event Timer: Pause - Pauses the current event timer, but does not stop it. ---
Event Timer: Resume - Resumes the current event timer from the paused state. --- Follower Control Plugin Commands---
Follower: Set Global Chase - Disables all followers from chasing the player or reenables it. Chase: - Sets all followers to chase the player or not. ---
Follower: Set Target Chase - Disables target follower from chasing the player or reenables it. Follower ID: - Select which follower ID to disable/reenable chasing for. Chase: - Sets target follower to chase its target or not. ---
Follower: Set Control - Sets the event commands to target a follower when "Player" is selected as the target. Follower ID: - Select which follower ID to control. - 0 is the player. ---
Follower: Reset - Resets all follower controls. Event Commands that target the "Player" return to normal and followers chase again. --- Global Switch Plugin Commands---
Global Switch: Get Self Switch A B C D - Gets the current ON/OFF value from a Self Switch and stores it onto a Global Switch. Map ID: - The map the source map. Use 0 for current map. - You may use JavaScript code. Event ID: - The ID of the source event. - Use 0 for current event. - You may use JavaScript code. Letter: - Letter of the target event's Self Switch to obtain data from. - Target Switch ID: - The ID of the target switch. ---
Global Switch: Get Self Switch ID - Gets the current ON/OFF value from a Self Switch and stores it onto a Global Switch. Map ID: - The map the source map. Use 0 for current map. - You may use JavaScript code. Event ID: - The ID of the source event. - Use 0 for current event. - You may use JavaScript code. Switch ID: - The ID of the source switch. - Target Switch ID: - The ID of the target switch. --- Global Variable Plugin Commands---
Global Variable: Get Self Variable ID - Gets the current stored value from a Self Variable and stores it onto a Global Variable. Map ID: - The map the source map. Use 0 for current map. - You may use JavaScript code. Event ID: - The ID of the source event. - Use 0 for current event. - You may use JavaScript code. Variable ID: - The ID of the source variable. - Target Variable ID: - The ID of the target variable. --- Morph Event Plugin Commands---
Morph Event: Change
- Runs the page of a different event remotely.
Step 1:
Map ID:
- Target event's map. Use 0 for current map.
- You may use JavaScript code.
Event ID:
- The ID of the target event.
- Use 0 for current event.
- You may use JavaScript code.
Step 2:
Template Name:
- Name of the target event template to morph into.
- Ignored if this is called "Untitled".
Map ID:
- Target event's map. Use 0 for current map.
- You may use JavaScript code.
Event ID:
- The ID of the target event.
- Use 0 for current event.
- You may use JavaScript code.
Preserve Morph:
- Is the morph effect preserved?
- Or does it expire upon leaving the map?
---
Morph Event: Remove - Remove the morph status of an event. Map ID: - Target event's map. Use 0 for current map. - You may use JavaScript code. Event ID: - The ID of the event to remotely run. - Use 0 for current event. - You may use JavaScript code. Remove Preservation: - Also remove the preservation effect? --- Player Icon Plugin Commands---
Player Icon: Change - Change the icon that appears on on the player. Icon Index: - Icon index used for the icon. - You may use JavaScript code. Buffer X: - How much to shift the X position by? - You may use JavaScript code. Buffer Y: - How much to shift the Y position by? - You may use JavaScript code. Blend Mode: - What kind of blend mode do you wish to apply to the icon sprite? ---
Player Icon: Delete - Delete the icon that appears on the player. --- Self Data Plugin Commands---
Self Data: Reset All - Reset the Self Switch and Self Variable data of all events within the specified map. Map ID: - The map the target map. Use 0 for current map. - You may use JavaScript code. --- Self Switch Plugin Commands---
Self Switch: A B C D - Change the Self Switch of a different event. Map ID: - The map the target map. Use 0 for current map. - You may use JavaScript code. Event ID: - The ID of the target event. - Use 0 for current event. - You may use JavaScript code. Letter: - Letter of the target event's Self Switch to change. Value: - What value do you want to set the Self Switch to? ---
Self Switch: Switch ID - Change the Self Switch of a different event. Map ID: - The map the target map. Use 0 for current map. - You may use JavaScript code. Event ID: - The ID of the target event. - Use 0 for current event. - You may use JavaScript code. Switch ID: - The ID of the target switch. Value: - What value do you want to set the Self Switch to? --- Self Variable Plugin Commands---
Self Variable: Variable ID - Change the Self Variable of a different event. Map ID: - The map the target map. Use 0 for current map. - You may use JavaScript code. Event ID: - The ID of the target event. - Use 0 for current event. - You may use JavaScript code. Variable ID: - The ID of the target variable. Value: - What value do you want to set the Self Switch to? --- Spawn Event Plugin Commands---
Spawn Event: Spawn At X, Y
- Spawns desired event at X, Y location on the current map.
Step 1:
Template Name:
- Name of the target event template to spawn as.
- Ignored if this is called "Untitled".
Map ID:
- Target event's map to be used as reference.
- You may use JavaScript code.
Event ID:
- The ID of the target event to be used as reference.
- You may use JavaScript code.
Step 2:
X Coordinate:
- Target Location to spawn at.
- You may use JavaScript code.
Y Coordinate:
- Target Location to spawn at.
- You may use JavaScript code.
Check Event Collision:
- Check collision with any other events and player?
Check Passability:
- Check passability of the target location.
Preserve Spawn:
- Is the spawned event preserved?
- Or does it expire upon leaving the map?
Step 3:
Success Switch ID:
- Target switch ID to record spawning success.
- Ignore if ID is 0. OFF means failed. ON means success.
---
Spawn Event: Spawn At Region
- Spawns desired event at a random region-marked location on the
current map.
Step 1:
Template Name:
- Name of the target event template to spawn as.
- Ignored if this is called "Untitled".
Map ID:
- Target event's map to be used as reference.
- You may use JavaScript code.
Event ID:
- The ID of the target event to be used as reference.
- You may use JavaScript code.
Step 2:
Region ID(s):
- Pick region(s) to spawn this event at.
Check Event Collision:
- Check collision with any other events and player?
Check Passability:
- Check passability of the target location.
Preserve Spawn:
- Is the spawned event preserved?
- Or does it expire upon leaving the map?
Step 3:
Success Switch ID:
- Target switch ID to record spawning success.
- Ignore if ID is 0. OFF means failed. ON means success.
---
Spawn Event: Spawn At Terrain Tag
- Spawns desired event at a random terrain tag-marked location on the
current map.
Step 1:
Template Name:
- Name of the target event template to spawn as.
- Ignored if this is called "Untitled".
Map ID:
- Target event's map to be used as reference.
- You may use JavaScript code.
Event ID:
- The ID of the target event to be used as reference.
- You may use JavaScript code.
Step 2:
Terrain Tag(s):
- Pick terrain tag(s) to spawn this event at.
- Insert numbers between 0 and 7.
Check Event Collision:
- Check collision with any other events and player?
Check Passability:
- Check passability of the target location.
Preserve Spawn:
- Is the spawned event preserved?
- Or does it expire upon leaving the map?
Step 3:
Success Switch ID:
- Target switch ID to record spawning success.
- Ignore if ID is 0. OFF means failed. ON means success.
---
Spawn Event: Despawn Event ID - Despawns the selected Event ID on the current map. Event ID - The ID of the target event. - You may use JavaScript code. ---
Spawn Event: Despawn At X, Y - Despawns any spawned event(s) at X, Y location on the current map. X Coordinate: - Target Location to despawn at. - You may use JavaScript code. Y Coordinate: - Target Location to despawn at. - You may use JavaScript code. ---
Spawn Event: Despawn Region(s) - Despawns the selected Region(s). Region ID(s) - Pick region(s) and despawn everything inside it. ---
Spawn Event: Despawn Terrain Tag(s) - Despawns the selected Terrain Tags(s) on the current map. Terrain Tag(s): - Pick terrain tag(s) and despawn everything inside it. - Insert numbers between 0 and 7. ---
Spawn Event: Despawn Everything - Despawns all spawned events on the current map. --- Extra Enemy Drops VisuStella MZThe following are Plugin Commands that come with this plugin. They can be accessed through the Plugin Command event command. --- Bonus Reward Plugin Commands---
Bonus Rewards: Clear - Clears all bonus drops. ---
Bonus Rewards: Set EXP - Determines additional EXP the player will get in battle by this value. EXP: - Determines additional EXP the player will get in battle by this value. ---
Bonus Rewards: Set Gold - Determines additional Gold the player will get in battle by this value. Gold: - Determines additional Gold the player will get in battle by this value. ---
Bonus Rewards: Add Item - Adds the bonus drop the player earns from this battle to have the following item given at a specific quantity. Item ID: - Which item do you wish to give the player? Quantity: - How many copies of the bonus drop to give the player. ---
Bonus Rewards: Add Weapon - Adds the bonus drop the player earns from this battle to have the following weapon given at a specific quantity. Weapon ID: - Which weapon do you wish to give the player? Quantity: - How many copies of the bonus drop to give the player. ---
Bonus Rewards: Add Armor - Adds the bonus drop the player earns from this battle to have the following armor given at a specific quantity. Armor ID: - Which armor do you wish to give the player? Quantity: - How many copies of the bonus drop to give the player. --- Forced Reward Plugin Commands---
Forced Rewards: Clear - Clears all forced drops. ---
Forced Rewards: Set EXP - Change the amount of EXP the player will get in battle to this value. EXP: - Change the amount of EXP the player will get in battle to this value. ---
Forced Rewards: Set Gold - Change the amount of Gold the player will get in battle to this value. Gold: - Change the amount of Gold the player will get in battle to this value. ---
Forced Rewards: Add Item - Adds the forced drop the player earns from this battle to have the following item given at a specific quantity. Item ID: - Which item do you wish to give the player? Quantity: - How many copies of the forced drop to give the player. ---
Forced Rewards: Add Weapon - Adds the forced drop the player earns from this battle to have the following weapon given at a specific quantity. Weapon ID: - Which weapon do you wish to give the player? Quantity: - How many copies of the forced drop to give the player. ---
Forced Rewards: Add Armor - Adds the forced drop the player earns from this battle to have the following armor given at a specific quantity. Armor ID: - Which armor do you wish to give the player? Quantity: - How many copies of the forced drop to give the player. --- Visual Drop Plugin Commands---
Visual Drops: Visibility - Sets the visibility of visual drops during battle. Visible: - Show visual drops during battle? - This will be reset at the start of next battle. --- Field Skills VisuStella MZThe following are Plugin Commands that come with this plugin. They can be accessed through the Plugin Command event command. --- Map Plugin Commands
--- Map: Open Field Skills List - Open Field Skills list without shortcut key. - Field Skills List Window Accessibility required. --- System Plugin Commands
--- System: Enable Field Skills? - Enable/disable Field Skills from being accessible? - Does NOT bypass <Disable Field Skills> map notetag. Enable/Disable?: - Enables/disables Field Skills on map scene? - Does NOT bypass <Disable Field Skills> map notetag. --- Frontview Battle UI VisuStella MZThe following are Plugin Commands that come with this plugin. They can be accessed through the Plugin Command event command. --- Map UI Plugin Commands
--- Map UI: Text Popup (Actor)
- Creates a custom text popup on the Frontview UI on map scene.
- Targets specific actors.
Actor ID(s):
- Select the ID(s) of the actor(s) you want to target.
Text:
- What text do you wish to display?
Text Color:
- Use #rrggbb for custom colors or regular numbers for text colors from
the Window Skin.
Flash Color:
- Adjust the popup's flash color.
- Format: [red, green, blue, alpha]
Flash Duration:
- What is the frame duration of the flash effect?
---
Map UI: Text Popup (Party)
- Creates a custom text popup on the Frontview UI on map scene.
- Targets party index. Index values start at 0.
Party Index(es):
- Which party index to target?
- Index values start at 0.
Text:
- What text do you wish to display?
Text Color:
- Use #rrggbb for custom colors or regular numbers for text colors from
the Window Skin.
Flash Color:
- Adjust the popup's flash color.
- Format: [red, green, blue, alpha]
Flash Duration:
- What is the frame duration of the flash effect?
---
Map UI: Variable Popup (Actor)
- Creates a custom text popup on the Frontview UI on map scene.
- Targets specific actors.
Actor ID(s):
- Select the ID(s) of the actor(s) you want to target.
Variable ID:
- Get data from which variable to display as a popup?
Text Color:
- Use #rrggbb for custom colors or regular numbers for text colors from
the Window Skin.
Flash Color:
- Adjust the popup's flash color.
- Format: [red, green, blue, alpha]
Flash Duration:
- What is the frame duration of the flash effect?
---
Map UI: Variable Popup (Party)
- Creates a variable data popup on the Frontview UI on map scene.
- Targets party index. Index values start at 0.
Party Index(es):
- Which party index to target?
- Index values start at 0.
Variable ID:
- Get data from which variable to display as a popup?
Text Color:
- Use #rrggbb for custom colors or regular numbers for text colors from
the Window Skin.
Flash Color:
- Adjust the popup's flash color.
- Format: [red, green, blue, alpha]
Flash Duration:
- What is the frame duration of the flash effect?
--- System Plugin Commands---
System: Map Frontview UI Visibility - Sets the visibility of the Frontview UI on the map scene. - Requires the battle layout to be Frontview UI. Visible?: - Sets visibility of the Frontview UI on current map scene. - Requires the battle layout to be Frontview UI. --- Full Field Recovery VisuStella MZThe following are Plugin Commands that come with this plugin. They can be accessed through the Plugin Command event command. --- Map Plugin Commands
--- Map: Open Full Field Recovery Message - Open Full Field Recovery Message without shortcut key. - Full Field Recovery Accessibility required. --- System Plugin Commands
--- System: Enable Full Field Recovery? - Enable/disable Full Field Recovery from being accessible? - Does NOT bypass <Disable Full Field Recovery> map notetag. Enable/Disable?: - Enables/disables Full Field Recovery on map scene? - Does NOT bypass <Disable Full Field Recovery> map notetag. --- Furniture System VisuStella MZThe following are Plugin Commands that come with this plugin. They can be accessed through the Plugin Command event command. --- Furniture Plugin Commands
--- Furniture: Add Player Placement
- Start furniture placement mode for a specific template type.
- Player determines the actual position.
- Cannot use this Plugin Command during Furniture Mode.
Furniture Item:
- Which furniture item is used to be placed?
- Non-furniture items won't work.
Generate Item?:
- Generate an item for the player?
- If the player does not have the furniture item in stock, this will not
work.
--- Furniture: Spawn At X, Y
- Spawns desired furniture at X, Y location on the current map.
- Cannot use this Plugin Command during Furniture Mode.
Furniture Item:
- Which furniture item is used to be placed?
- Non-furniture items won't work.
Template Index:
- Which template index do you wish to use for the spawned furniture item?
- Index starts at 0.
Location:
X Coordinate:
Y Coordinate:
- Target X/Y coordinate to spawn at.
- You may use JavaScript code.
Success Switch ID:
- Target switch ID to record spawning success.
- Ignore if ID is 0. OFF means failed. ON means success.
--- Event At X/Y Plugin Commands
--- Event At X/Y: Despawn Furniture - Completely remove the furniture event at X/Y. - Can use on either furniture or non-furniture. X Coordinate: Y Coordinate: - Target X/Y coordinate to search for Furniture Event. - You may use JavaScript code. --- Event At X/Y: Move Furniture - Move the furniture item event at X/Y. - Use on a template event that can be spawned and moved. - Cannot use this Plugin Command during Furniture Mode. X Coordinate: Y Coordinate: - Target X/Y coordinate to search for Furniture Event. - You may use JavaScript code. --- Event At X/Y: Retrieve Furniture - Retrieve the furniture at X/Y to Player's inventory. - Use on a template event that can be spawned and moved. X Coordinate: Y Coordinate: - Target X/Y coordinate to search for Furniture Event. - You may use JavaScript code. --- This Event Plugin Commands
--- This Event: Despawn Furniture - Completely remove this current furniture event. - Can use on either furniture or non-furniture. --- This Event: Move Furniture - Move this current furniture item. - Use on a template event that can be spawned and moved. --- This Event: Retrieve Furniture - Retrieve this current furniture to Player's inventory. - Use on a template event that can be spawned and moved. --- Gab Window VisuStella MZThe following are Plugin Commands that come with this plugin. They can be accessed through the Plugin Command event command. Gab Plugin Commands---
Gab: Text Only
- Show a Gab Window with the specified settings.
Text:
- The text to be shown in the Gab Window.
Force Gab?:
- Forced gabs will clear other gabs and display immediately.
Optional Settings:
- Change the settings you want to override with this gab.
Blank settings will use default Plugin Parameter settings.
---
Gab: Gab: Text + Face (Any)
- Show a Gab Window with the specified settings.
- Any face graphic can be displayed next to text.
Text:
- The text to be shown in the Gab Window.
Filename:
- The filename of the face graphic to use.
Index:
- This is the index of the face graphic.
- Index values start at 0.
Force Gab?:
- Forced gabs will clear other gabs and display immediately.
Optional Settings:
- Change the settings you want to override with this gab.
Blank settings will use default Plugin Parameter settings.
---
Gab: Text + Face (Actor)
- Show a Gab Window with the specified settings.
- Pick an actor's face graphic to show with it.
Text:
- The text to be shown in the Gab Window.
Actor ID:
- This is the ID of the actor you want the face graphic of.
Force Gab?:
- Forced gabs will clear other gabs and display immediately.
Optional Settings:
- Change the settings you want to override with this gab.
Blank settings will use default Plugin Parameter settings.
---
Gab: Text + Face (Party)
- Show a Gab Window with the specified settings.
- Pick a party member's face graphic to show with it.
Text:
- The text to be shown in the Gab Window.
Party Member Index:
- This is the index of the party member you want the face graphic of.
- Index values start at 0.
Force Gab?:
- Forced gabs will clear other gabs and display immediately.
Optional Settings:
- Change the settings you want to override with this gab.
Blank settings will use default Plugin Parameter settings.
---
Gab: Text + Map Sprite (Any)
- Show a Gab Window with the specified settings.
- Any map sprite can be displayed next to text.
Text:
- The text to be shown in the Gab Window.
Filename:
- The filename of the sprite graphic to use.
Index:
- This is the index of the sprite graphic.
- Index values start at 0.
Force Gab?:
- Forced gabs will clear other gabs and display immediately.
Optional Settings:
- Change the settings you want to override with this gab.
Blank settings will use default Plugin Parameter settings.
---
Gab: Text + Map Sprite (Actor)
- Show a Gab Window with the specified settings.
- Pick an actor's sprite graphic to show with it.
Text:
- The text to be shown in the Gab Window.
Actor ID:
- This is the ID of the actor you want the map sprite of.
Force Gab?:
- Forced gabs will clear other gabs and display immediately.
Optional Settings:
- Change the settings you want to override with this gab.
Blank settings will use default Plugin Parameter settings.
---
Gab: Text + Map Sprite (Party)
- Show a Gab Window with the specified settings.
- Pick a party member's sprite graphic to show with it.
Text:
- The text to be shown in the Gab Window.
Party Member Index:
- This is the index of the party member you want the map sprite of.
- Index values start at 0.
Force Gab?:
- Forced gabs will clear other gabs and display immediately.
Optional Settings:
- Change the settings you want to override with this gab.
Blank settings will use default Plugin Parameter settings.
---
Gab: Text + Sideview Actor (Any)
- Show a Gab Window with the specified settings.
- Any Sideview Actor can be displayed next to text.
Text:
- The text to be shown in the Gab Window.
Filename:
- The filename of the Sideview Actor graphic to use.
Force Gab?:
- Forced gabs will clear other gabs and display immediately.
Optional Settings:
- Change the settings you want to override with this gab.
Blank settings will use default Plugin Parameter settings.
---
Gab: Text + Sideview Actor (Actor)
- Show a Gab Window with the specified settings.
- Pick an actor's sideview graphic to show with it.
Text:
- The text to be shown in the Gab Window.
Actor ID:
- This is the ID of the actor you want the sideview graphic of.
Force Gab?:
- Forced gabs will clear other gabs and display immediately.
Optional Settings:
- Change the settings you want to override with this gab.
Blank settings will use default Plugin Parameter settings.
---
Gab: Text + Sideview Actor (Party)
- Show a Gab Window with the specified settings.
- Pick a party member's sideview graphic to show with it.
Text:
- The text to be shown in the Gab Window.
Party Member Index:
- This is the index of the party member you want the sideview graphic of.
- Index values start at 0.
Force Gab?:
- Forced gabs will clear other gabs and display immediately.
Optional Settings:
- Change the settings you want to override with this gab.
Blank settings will use default Plugin Parameter settings.
---
Gab: Text + Picture
- Show a Gab Window with the specified settings.
- Any picture graphic can be displayed next to text.
Text:
- The text to be shown in the Gab Window.
Filename:
- The filename of the face graphic to use.
Stretch Picture:
- Stretch the picture to fit the window?
Force Gab?:
- Forced gabs will clear other gabs and display immediately.
Optional Settings:
- Change the settings you want to override with this gab.
Blank settings will use default Plugin Parameter settings.
--- Optional Settings
These settings appear in the above Gab Plugin Commands. Opening up the Optional Settings will yield the following: --- DimColor Dim Color 1: Dim Color 2: - The dim colors to use for this Gab Window. - Format: rgba(red, green, blue, alpha) --- Fade Fade Rate: - How fast this Gab Window fades away. Fade Direction: - The direction this Gab Window fades out in. --- Font Font Name: - The font name to use for this Gab Window. Font Size: - The font size to use for this Gab Window. --- Position Y Location: - The Y coordinate this Gab Window will appear in. - Ignore if you are using a locked sprite position. Actor ID: - The ID of the actor to display this Gab Window above. - For Map/Battle. Party Index: - Index of the party member to display Gab Window above. - For Map/Battle. Index values start at 0. Ignore under 0. Enemy Index: - Index of an enemy battler to display Gab Window above. - Battle only. Index values start at 0. Ignore under 0. Event ID: - The ID of the event to display this Gab Window above. - Map only. --- On Display
Bypass Anti-Repeat:
- Allows this gab to bypass the Anti-Repeat settings.
Sound Filename:
- The filename of the SE to play when the Gab Window shows.
Volume:
- Volume of the sound effect played.
Pitch:
- Pitch of the sound effect played.
Pan:
- Pan of the sound effect played.
JS: On Display:
- Runs this code once this Gab Window shows up.
--- On Finish Gab Switch: - The specified switch will be turned ON when the Gab Window finishes. JS: On Finish: - Runs this code once this Gab Window finishes. --- Waiting Wait Time: - The number of frames this Gab Window stays visible. Time Per Character: - Frames added per Text Character in this Gab Window. --- System Plugin Commands---
System: Clear Gabs - Clears out the current Gab and any which are queued. ---
System: Wait For Gab Completion - Causes the game to wait until all gabs are finished playing. --- Horror Effects VisuStella MZThe following are Plugin Commands that come with this plugin. They can be accessed through the Plugin Command event command. --- Battle Plugin Commands
--- Battle: Clear All Filters - Clear all Horror Effects filters on the main battle screen. --- Battle: Color Effect Create
- Creates the color effect on the main battle screen.
Type:
- Select the Color Effect type.
- Normal, Bizarro, BlackAndWhite, Browni, Desaturate, Greyscale,
Kodachrome, LSD, Negative, Polaroid, Predator, Sepia, Technicolor,
and Vintage
--- Battle: Color Effect Remove - Removes the color effect on the main battle screen. --- Battle: Glitch Create - Creates the glitch effect on the main battle screen. Glitch Slices: - Glitch slices to be used with the target. Glitch Offset: - Default offset value. Glitch Animated?: - Animate the glitch effect? Glitch Frequency: - If animated, how frequent to make the glitch effect? - Lower = often Higher = rarer Glitch Strength: - If animated, how strong is the glitch effect? - Lower = weaker Higher = stronger --- Battle: Glitch Remove - Removes the glitch effect on the main battle screen. --- Battle: Noise Create - Creates the noise effect on the main battle screen. Noise Rate: - Noise rate to be used with the target. Noise Animated: - Animate the noise for the target? --- Battle: Noise Remove - Removes the noise effect on the main battle screen. --- Battle: TV Create - Creates the TV effect on the main battle screen. TV Line Thickness: - Default TV line thickness - Lower = thinner Higher = thicker TV Corner Size: - Default TV line corner size - Lower = smaller Higher = bigger TV Animated: - Animate the TV? TV Speed: - Speed used to animate the TV if animated - Lower = slower Higher = faster --- Battle: TV Remove - Removes the TV effect on the main battle screen. --- Map Plugin Commands
--- Map: Clear All Filters - Clear all Horror Effects filters on the main map screen. --- Map: Color Effect Create
- Creates the color effect on the main map screen.
Type:
- Select the Color Effect type.
- Normal, Bizarro, BlackAndWhite, Browni, Desaturate, Greyscale,
Kodachrome, LSD, Negative, Polaroid, Predator, Sepia, Technicolor,
and Vintage
--- Map: Color Effect Remove - Removes the color effect on the main map screen. --- Map: Glitch Create - Creates the glitch effect on the main map screen. Glitch Slices: - Glitch slices to be used with the target. Glitch Offset: - Default offset value. Glitch Animated?: - Animate the glitch effect? Glitch Frequency: - If animated, how frequent to make the glitch effect? - Lower = often Higher = rarer Glitch Strength: - If animated, how strong is the glitch effect? - Lower = weaker Higher = stronger --- Map: Glitch Remove - Removes the glitch effect on the main map screen. --- Map: Noise Create - Creates the noise effect on the main battle screen. Noise Rate: - Noise rate to be used with the target. Noise Animated: - Animate the noise for the target? --- Map: Noise Remove - Removes the noise effect on the main map screen. --- Map: TV Create - Creates the TV effect on the main map screen. TV Line Thickness: - Default TV line thickness - Lower = thinner Higher = thicker TV Corner Size: - Default TV line corner size - Lower = smaller Higher = bigger TV Animated: - Animate the TV? TV Speed: - Speed used to animate the TV if animated - Lower = slower Higher = faster --- Map: TV Remove - Removes the TV effect on the main map screen. --- Event Plugin Commands
--- Event: Clear All Filters - Clear all Horror Effects filters on the target event(s). Event ID(s): - The ID of the event to clear horror effects from. - Use "0" for "this" event. --- Event: Color Effect Create
- Creates the color effect on the target event(s).
Event ID(s):
- The ID of the event to create the horror effects for.
- Use "0" for "this" event.
Type:
- Select the Color Effect type.
- Normal, Bizarro, BlackAndWhite, Browni, Desaturate, Greyscale,
Kodachrome, LSD, Negative, Polaroid, Predator, Sepia, Technicolor,
and Vintage
--- Event: Color Effect Remove - Removes the color effect on the target event(s). Event ID(s): - The ID of the event to the horror effect from. - Use "0" for "this" event. --- Event: Glitch Create - Creates the glitch effect on the target event(s). Event ID(s): - The ID of the event to create the horror effects for. - Use "0" for "this" event. Glitch Slices: - Glitch slices to be used with the target. Glitch Offset: - Default offset value. Glitch Animated?: - Animate the glitch effect? Glitch Frequency: - If animated, how frequent to make the glitch effect? - Lower = often Higher = rarer Glitch Strength: - If animated, how strong is the glitch effect? - Lower = weaker Higher = stronger --- Event: Glitch Remove - Removes the glitch effect on the target event(s). Event ID(s): - The ID of the event to the horror effect from. - Use "0" for "this" event. --- Event: Noise Create - Creates the noise effect on the target event(s). Event ID(s): - The ID of the event to create the horror effects for. - Use "0" for "this" event. Noise Rate: - Noise rate to be used with the target. Noise Animated: - Animate the noise for the target? --- Event: Noise Remove - Removes the noise effect on the target event(s). Event ID(s): - The ID of the event to the horror effect from. - Use "0" for "this" event. --- Event: TV Create - Creates the TV effect on the target event(s). Event ID(s): - The ID of the event to create the horror effects for. - Use "0" for "this" event. TV Line Thickness: - Default TV line thickness - Lower = thinner Higher = thicker TV Corner Size: - Default TV line corner size - Lower = smaller Higher = bigger TV Animated: - Animate the TV? TV Speed: - Speed used to animate the TV if animated - Lower = slower Higher = faster --- Event: TV Remove - Removes the TV effect on the target event(s). Event ID(s): - The ID of the event to the horror effect from. - Use "0" for "this" event. --- Picture Plugin Commands
--- Picture: Clear All Filters - Clear all Horror Effects filters on the target picture(s). Picture ID(s): - The ID of the picture to clear horror effects from. - The ID is a number from 1 to 100. --- Picture: Color Effect Create
- Creates the color effect on the target picture(s).
Picture ID(s):
- The ID of the picture to create the horror effects for.
- The ID is a number from 1 to 100.
Type:
- Select the Color Effect type.
- Normal, Bizarro, BlackAndWhite, Browni, Desaturate, Greyscale,
Kodachrome, LSD, Negative, Polaroid, Predator, Sepia, Technicolor,
and Vintage
--- Picture: Color Effect Remove - Removes the color effect on the target picture(s). Picture ID(s): - The ID of the picture to the horror effect from. - The ID is a number from 1 to 100. --- Picture: Glitch Create - Creates the glitch effect on the target picture(s). Picture ID(s): - The ID of the picture to create the horror effects for. - The ID is a number from 1 to 100. Glitch Slices: - Glitch slices to be used with the target. Glitch Offset: - Default offset value. Glitch Animated?: - Animate the glitch effect? Glitch Frequency: - If animated, how frequent to make the glitch effect? - Lower = often Higher = rarer Glitch Strength: - If animated, how strong is the glitch effect? - Lower = weaker Higher = stronger --- Picture: Glitch Remove - Removes the glitch effect on the target picture(s). Picture ID(s): - The ID of the picture to the horror effect from. - The ID is a number from 1 to 100. --- Picture: Noise Create - Creates the noise effect on the target picture(s). Picture ID(s): - The ID of the picture to create the horror effects for. - The ID is a number from 1 to 100. Noise Rate: - Noise rate to be used with the target. Noise Animated: - Animate the noise for the target? --- Picture: Noise Remove - Removes the noise effect on the target picture(s). Picture ID(s): - The ID of the picture to the horror effect from. - The ID is a number from 1 to 100. --- Picture: TV Create - Creates the TV effect on the target picture(s). Picture ID(s): - The ID of the picture to create the horror effects for. - The ID is a number from 1 to 100. TV Line Thickness: - Default TV line thickness - Lower = thinner Higher = thicker TV Corner Size: - Default TV line corner size - Lower = smaller Higher = bigger TV Animated: - Animate the TV? TV Speed: - Speed used to animate the TV if animated - Lower = slower Higher = faster --- Picture: TV Remove - Removes the TV effect on the target picture(s). Picture ID(s): - The ID of the picture to the horror effect from. - The ID is a number from 1 to 100. --- Actor Plugin Commands
--- Actor: Clear All Filters - Clear all Horror Effects filters on the target actor(s). Actor ID(s): - The ID of the actor to clear horror effects from. --- Actor: Color Effect Create
- Creates the color effect on the target actor(s).
Actor ID(s):
- The ID of the actor to create the horror effects for.
Type:
- Select the Color Effect type.
- Normal, Bizarro, BlackAndWhite, Browni, Desaturate, Greyscale,
Kodachrome, LSD, Negative, Polaroid, Predator, Sepia, Technicolor,
and Vintage
--- Actor: Color Effect Remove - Removes the color effect on the target actor(s). Actor ID(s): - The ID of the actor to the horror effect from. --- Actor: Glitch Create - Creates the glitch effect on the target actor(s). Actor ID(s): - The ID of the actor to create the horror effects for. Glitch Slices: - Glitch slices to be used with the target. Glitch Offset: - Default offset value. Glitch Animated?: - Animate the glitch effect? Glitch Frequency: - If animated, how frequent to make the glitch effect? - Lower = often Higher = rarer Glitch Strength: - If animated, how strong is the glitch effect? - Lower = weaker Higher = stronger --- Actor: Glitch Remove - Removes the glitch effect on the target actor(s). Actor ID(s): - The ID of the actor to the horror effect from. --- Actor: Noise Create - Creates the noise effect on the target actor(s). Actor ID(s): - The ID of the actor to create the horror effects for. Noise Rate: - Noise rate to be used with the target. Noise Animated: - Animate the noise for the target? --- Actor: Noise Remove - Removes the noise effect on the target actor(s). Actor ID(s): - The ID of the actor to the horror effect from. --- Actor: TV Create - Creates the TV effect on the target actor(s). Actor ID(s): - The ID of the actor to create the horror effects for. TV Line Thickness: - Default TV line thickness - Lower = thinner Higher = thicker TV Corner Size: - Default TV line corner size - Lower = smaller Higher = bigger TV Animated: - Animate the TV? TV Speed: - Speed used to animate the TV if animated - Lower = slower Higher = faster --- Actor: TV Remove - Removes the TV effect on the target actor(s). Actor ID(s): - The ID of the actor to the horror effect from. --- Party Plugin Commands
--- Party: Clear All Filters - Clear all Horror Effects filters on the target party member(s). Party ID(s): - The index of the party member to clear horror effects from. - Index values start at 0. --- Party: Color Effect Create
- Creates the color effect on the target party member(s).
Party ID(s):
- The index of the party member to create the horror effects for.
- Index values start at 0.
Type:
- Select the Color Effect type.
- Normal, Bizarro, BlackAndWhite, Browni, Desaturate, Greyscale,
Kodachrome, LSD, Negative, Polaroid, Predator, Sepia, Technicolor,
and Vintage
--- Party: Color Effect Remove - Removes the color effect on the target party member(s). Party ID(s): - The index of the party member to the horror effect from. - Index values start at 0. --- Party: Glitch Create - Creates the glitch effect on the target party member(s). Party ID(s): - The index of the party member to create the horror effects for. - Index values start at 0. Glitch Slices: - Glitch slices to be used with the target. Glitch Offset: - Default offset value. Glitch Animated?: - Animate the glitch effect? Glitch Frequency: - If animated, how frequent to make the glitch effect? - Lower = often Higher = rarer Glitch Strength: - If animated, how strong is the glitch effect? - Lower = weaker Higher = stronger --- Party: Glitch Remove - Removes the glitch effect on the target party member(s). Party ID(s): - The index of the party member to the horror effect from. - Index values start at 0. --- Party: Noise Create - Creates the noise effect on the target party member(s). Party ID(s): - The index of the party member to create the horror effects for. - Index values start at 0. Noise Rate: - Noise rate to be used with the target. Noise Animated: - Animate the noise for the target? --- Party: Noise Remove - Removes the noise effect on the target party member(s). Party ID(s): - The index of the party member to the horror effect from. - Index values start at 0. --- Party: TV Create - Creates the TV effect on the target party member(s). Party ID(s): - The index of the party member to create the horror effects for. - Index values start at 0. TV Line Thickness: - Default TV line thickness - Lower = thinner Higher = thicker TV Corner Size: - Default TV line corner size - Lower = smaller Higher = bigger TV Animated: - Animate the TV? TV Speed: - Speed used to animate the TV if animated - Lower = slower Higher = faster --- Party: TV Remove - Removes the TV effect on the target party member(s). Party ID(s): - The index of the party member to the horror effect from. - Index values start at 0. --- Enemy Plugin Commands
--- Enemy: Clear All Filters - Clear all Horror Effects filters on the target enemy(ies). Enemy ID(s): - The index of the enemy to clear horror effects from. - Index values start at 0. --- Enemy: Color Effect Create
- Creates the color effect on the target enemy(ies).
Party ID(s):
- The index of the party member to create the horror effects for.
- Index values start at 0.
Type:
- Select the Color Effect type.
- Normal, Bizarro, BlackAndWhite, Browni, Desaturate, Greyscale,
Kodachrome, LSD, Negative, Polaroid, Predator, Sepia, Technicolor,
and Vintage
--- Enemy: Color Effect Remove - Removes the color effect on the target enemy(ies). Enemy ID(s): - The index of the enemy to the horror effect from. - Index values start at 0. --- Enemy: Glitch Create - Creates the glitch effect on the target enemy(ies). Enemy ID(s): - The index of the enemy to create the horror effects for. - Index values start at 0. Glitch Slices: - Glitch slices to be used with the target. Glitch Offset: - Default offset value. Glitch Animated?: - Animate the glitch effect? Glitch Frequency: - If animated, how frequent to make the glitch effect? - Lower = often Higher = rarer Glitch Strength: - If animated, how strong is the glitch effect? - Lower = weaker Higher = stronger --- Enemy: Glitch Remove - Removes the glitch effect on the target enemy(ies). Enemy ID(s): - The index of the enemy to the horror effect from. - Index values start at 0. --- Enemy: Noise Create - Creates the noise effect on the target enemy(ies). Enemy ID(s): - The index of the enemy to create the horror effects for. - Index values start at 0. Noise Rate: - Noise rate to be used with the target. Noise Animated: - Animate the noise for the target? --- Enemy: Noise Remove - Removes the noise effect on the target enemy(ies). Enemy ID(s): - The index of the enemy to the horror effect from. - Index values start at 0. --- Enemy: TV Create - Creates the TV effect on the target enemy(ies). Enemy ID(s): - The index of the enemy to create the horror effects for. - Index values start at 0. TV Line Thickness: - Default TV line thickness - Lower = thinner Higher = thicker TV Corner Size: - Default TV line corner size - Lower = smaller Higher = bigger TV Animated: - Animate the TV? TV Speed: - Speed used to animate the TV if animated - Lower = slower Higher = faster --- Enemy: TV Remove - Removes the TV effect on the target enemy(ies). Enemy ID(s): - The index of the enemy to the horror effect from. - Index values start at 0. --- Hospital Shop VisuStella MZThe following are Plugin Commands that come with this plugin. They can be accessed through the Plugin Command event command. Scene Plugin Commands
--- Scene: Open Hospital Shop - Opens the hospital shop. - Cannot be used in battle. Discount Rate: - Determine the discount rate used for party heal. - You may use JavaScript code. --- Icon Balloons VisuStella MZThe following are Plugin Commands that come with this plugin. They can be accessed through the Plugin Command event command. --- Balloon Plugin Commands---
Balloon: Event with Single Icon Balloon - Plays a single icon balloon animation on target event. - Can only be used on the map scene. Event ID: - Insert the ID of the target event. - Use 0 for the current event. Icon Index: - Insert the ID of the icon to show. - Tip: Right click > Insert Icon Index Wait for Completion: - Wait for balloon animation completion before continuing? ---
Balloon: Event with Icon Range Balloon - Plays an icon range balloon animation on target event. - Can only be used on the map scene. Event ID: - Insert the ID of the target event. - Use 0 for the current event. Starting Icon Index: - Insert the ID of the icon to show. - Tip: Right click > Insert Icon Index Ending Icon Index: - Insert the ID of the icon to show. - Tip: Right click > Insert Icon Index Wait for Completion: - Wait for balloon animation completion before continuing? ---
Balloon: Event with Specific Icons Balloon - Plays specific icons balloon animation on target event. - Can only be used on the map scene. Event ID: - Insert the ID of the target event. - Use 0 for the current event. Icons: - Insert the ID(s) of the icon to show. - Tip: Right click > Insert Icon Index Wait for Completion: - Wait for balloon animation completion before continuing? ---
Balloon: Follower with Single Icon Balloon - Plays a single icon balloon animation on target follower. - Can only be used on the map scene. Follower ID: - Select which follower ID to show a balloon on. - Follower ID's start at 1. Icon Index: - Insert the ID of the icon to show. - Tip: Right click > Insert Icon Index Wait for Completion: - Wait for balloon animation completion before continuing? ---
Balloon: Follower with Icon Range Balloon - Plays an icon range balloon animation on target follower. - Can only be used on the map scene. Follower ID: - Select which follower ID to show a balloon on. - Follower ID's start at 1. Starting Icon Index: - Insert the ID of the icon to show. - Tip: Right click > Insert Icon Index Ending Icon Index: - Insert the ID of the icon to show. - Tip: Right click > Insert Icon Index Wait for Completion: - Wait for balloon animation completion before continuing? ---
Balloon: Follower with Specific Icons Balloon - Plays specific icons balloon animation on target follower. - Can only be used on the map scene. Follower ID: - Select which follower ID to show a balloon on. - Follower ID's start at 1. Icons: - Insert the ID(s) of the icon to show. - Tip: Right click > Insert Icon Index Wait for Completion: - Wait for balloon animation completion before continuing? ---
Balloon: Player with Single Icon Balloon - Plays a single icon balloon animation on the player. - Can only be used on the map scene. Icon Index: - Insert the ID of the icon to show. - Tip: Right click > Insert Icon Index Wait for Completion: - Wait for balloon animation completion before continuing? ---
Balloon: Player with Icon Range Balloon - Plays an icon range balloon animation on the player. - Can only be used on the map scene. Starting Icon Index: - Insert the ID of the icon to show. - Tip: Right click > Insert Icon Index Ending Icon Index: - Insert the ID of the icon to show. - Tip: Right click > Insert Icon Index Wait for Completion: - Wait for balloon animation completion before continuing? ---
Balloon: Player with Specific Icons Balloon - Plays specific icons balloon animation on the player. - Can only be used on the map scene. Icons: - Insert the ID(s) of the icon to show. - Tip: Right click > Insert Icon Index Wait for Completion: - Wait for balloon animation completion before continuing? --- Items and Equips Core VisuStella MZThe following are Plugin Commands that come with this plugin. They can be accessed through the Plugin Command event command. --- Actor Plugin Commands--
Actor: Change Equip Slots - Forcefully change the actor(s) equip slots. - These will persist through class changes. Actor ID(s): - Select which Actor ID(s) to affect. Equip Slots: - Insert the equip slots you want the actor(s) to have. - These entries are case-sensitive. --
Actor: Reset Equip Slots - Reset any forced equip slots for the actor(s). - Equip slots will then be based on class. Actor ID(s): - Select which Actor ID(s) to affect. --- Purify Plugin Commands---
Purify: Target Actor(s) - Purifies target actor(s) of any cursed weapons or armors. - Cannot be used in battle. Actor ID(s): - Select which Actor ID(s) to affect. ---
Purify: Whole Party - Purifies whole party of any cursed weapons or armors. - Cannot be used in battle. --- Shop Plugin Commands---
Shop: Advanced
- Make it easier to put together inventories for a shop.
- WARNING: Does not allow for event-specific prices.
Step 1: Item ID's
- Select which Item ID ranges to add.
Step 2: Weapon ID's
- Select which Weapon ID ranges to add.
Step 3: Armor ID's
- Select which Armor ID ranges to add.
Step 4: Purchase Only?
- Make the shop purchase-only?
Optional:
Blacklist
- A list of categories to blacklist from the shop.
- Not used if empty. Mark categories with <Category: x>
Whitelist
- A list of categories to whitelist for the shop.
- Not used if empty. Mark categories with <Category: x>
This Plugin Command primarily functions as an alternative to the editor's
"Shop Processing" event command as that one requires you to add items one at
a time, making it extremely tedious to add large amounts of items. This
Plugin Command will mitigate that by allowing ID ranges to determine which
items to make available.
--- Item Crafting System VisuStella MZThe following are Plugin Commands that come with this plugin. They can be accessed through the Plugin Command event command.
--- Scene---
Scene: Item Crafting (All) - Go to the Item Crafting scene. - All enabled recipes will be available. ---
Scene: Item Crafting (Custom) - Go to the Item Crafting scene. - Select specific items to craft here. - Some items can only appear through custom lists like this by using the <Custom Crafting Only> notetag. Items: - Select which Item ID(s) to become craftable. Weapons: - Select which Weapon ID(s) to become craftable. Armors: - Select which armor ID(s) to become craftable. Bypass Switches?: - Bypass any of the requirement switches? Bypass Masks?: - Bypass name masking for uncrafted items? --- Requires:
Scene: Common Event Return - Return to the last shop if coming from a Crafting Common Event. - Requires VisuMZ_2_ShopCommonEvents! --- System---
System: Enable Crafting in Menu? - Enables/disables Crafting menu inside the main menu. Enable/Disable?: - Enables/disables Crafting menu inside the main menu. ---
System: Show Crafting in Menu? - Shows/hides Crafting menu inside the main menu. Show/Hide?: - Shows/hides Crafting menu inside the main menu. --- Lighting Effects VisuStella MZThe following are Plugin Commands that come with this plugin. They can be accessed through the Plugin Command event command. --- Overlay Plugin Commands
--- OVERLAY: Change to Preset Color - Change current darkness overlay to a preset color and opacity level. Color: - Pick a preset color. - This will also come with predetermined opacity values. Duration: - What is the duration of the color change? --- OVERLAY: Change to Custom Color - Change current darkness overlay to a custom color. Color: - Custom color. - This uses #rrggbb format. - Check your color here: https://htmlcolorcodes.com/ Opacity: - Opacity level of the color. - Value between 0-255. - Transparent: 0. Opaque: 255. Duration: - What is the duration of the color change? --- Battle Light Plugin Commands
--- BATTLE LIGHT: Change Actor(s) Settings - Change the battle-radial light settings for target(s). Actor ID(s): - Target actor(s) you want to change light settings for. - You may use JavaScript code. Settings: - Change the radial light settings for the target(s). Behavior: - Change the behaviors for this radial light. Auto-Calc Radius: - Automatically calculates the radius size based on sprite's width/height. --- BATTLE LIGHT: Change Enemy(s) Settings - Change the battle-radial light settings for target(s). Enemy Index(es): - Select enemy troop index(es) to change light settings for. - You may use JavaScript code. Settings: - Change the radial light settings for the target(s). Behavior: - Change the behaviors for this radial light. Auto-Calc Radius: - Automatically calculates the radius size based on sprite's width/height. --- Radial Light Plugin Commands
--- RADIAL LIGHT: Change Player Settings - Change the radial light settings for the player. Settings: - Change the radial light settings for the player. - See "Radial Light Settings" section below. Behavior: - Change the behaviors for this radial light. - See "Behavior" section below. --- RADIAL LIGHT: Change Follower Settings - Change the radial light settings for followers. Settings: - Change the radial light settings for all followers. - See "Radial Light Settings" section below. Behavior: - Change the behaviors for this radial light. - See "Behavior" section below. --- RADIAL LIGHT: Change Event(s) Settings - Change the radial light settings for target event(s). Event ID(s): - Target event(s) to have their light settings changed. - Use 0 for "this event". - You may use JavaScript code. Settings: - Change the radial light settings for target event(s). - See "Radial Light Settings" section below. Behavior: - Change the behaviors for this radial light. - See "Behavior" section below. --- RADIAL LIGHT: Change Boat Settings
- Change the radial light settings for the boat vehicle.
Boarded:
Radial Light:
- Changed radial light settings for this vehicle.
Changed Behavior:
- What are the changed behavioral settings for these radial lights?
Unboarded:
Radial Light:
- Changed radial light settings for this vehicle.
Changed Behavior:
- What are the changed behavioral settings for these radial lights?
--- RADIAL LIGHT: Change Ship Settings
- Change the radial light settings for the ship vehicle.
Boarded:
Radial Light:
- Changed radial light settings for this vehicle.
Changed Behavior:
- What are the changed behavioral settings for these radial lights?
Unboarded:
Radial Light:
- Changed radial light settings for this vehicle.
Changed Behavior:
- What are the changed behavioral settings for these radial lights?
--- RADIAL LIGHT: Change Airship Settings
- Change the radial light settings for the airship vehicle.
Boarded:
Radial Light:
- Changed radial light settings for this vehicle.
Changed Behavior:
- What are the changed behavioral settings for these radial lights?
Unboarded:
Radial Light:
- Changed radial light settings for this vehicle.
Changed Behavior:
- What are the changed behavioral settings for these radial lights?
--- Conical Light Plugin Commands
--- CONICAL LIGHT: Change Player Settings - Change the conical light settings for the player. Settings: - Change the conical light settings for the player. - See "Conical Light Settings" section below. Behavior: - Change the behaviors for this conical light. - See "Behavior" section below. --- CONICAL LIGHT: Change Follower Settings - Change the conical light settings for followers. Settings: - Change the conical light settings for all followers. - See "Conical Light Settings" section below. Behavior: - Change the behaviors for this conical light. - See "Behavior" section below. --- CONICAL LIGHT: Change Event(s) Settings - Change the conical light settings for target event(s). Event ID(s): - Target event(s) to have their light settings changed. - Use 0 for "this event". - You may use JavaScript code. Settings: - Change the conical light settings for target event(s). - See "Conical Light Settings" section below. Behavior: - Change the behaviors for this conical light. - See "Behavior" section below. --- CONICAL LIGHT: Change Boat Settings
- Change the conical light settings for the boat vehicle.
Boarded:
Conical Light:
- Changed conical light settings for this vehicle.
Changed Behavior:
- What are the changed behavioral settings for these conical lights?
Unboarded:
Conical Light:
- Changed conical light settings for this vehicle.
Changed Behavior:
- What are the changed behavioral settings for these conical lights?
--- CONICAL LIGHT: Change Ship Settings
- Change the conical light settings for the ship vehicle.
Boarded:
Conical Light:
- Changed conical light settings for this vehicle.
Changed Behavior:
- What are the changed behavioral settings for these conical lights?
Unboarded:
Conical Light:
- Changed conical light settings for this vehicle.
Changed Behavior:
- What are the changed behavioral settings for these conical lights?
--- CONICAL LIGHT: Change Airship Settings
- Change the conical light settings for the airship vehicle.
Boarded:
Conical Light:
- Changed conical light settings for this vehicle.
Changed Behavior:
- What are the changed behavioral settings for these conical lights?
Unboarded:
Conical Light:
- Changed conical light settings for this vehicle.
Changed Behavior:
- What are the changed behavioral settings for these radial lights?
--- Conical Offset Plugin Commands
--- CONICAL OFFSET: Change Actor(s) Settings
- Change the conical light hand offset for target actor(s).
Actor ID(s):
- Target actor(s) you want to change offset settings for.
- You may use JavaScript code.
Enable:
- Change the offset settings for the target(s).
Hand Position Offsets:
- Change target(s)'s offsets used for hand positions.
VS8 Dash Offsets:
- Change target(s)'s offsets used for hand positions for VS8 sprites
while dashing.
VS8 Jump Offsets:
- Change target(s)'s offsets used for hand positions for VS8 sprites
while jumping.
--- CONICAL OFFSET: Change Event(s) Settings
- Change the conical light hand offset for target event(s).
Event ID(s):
- Target event(s) you want to change offset settings for.
- Use 0 for "this event".
- You may use JavaScript code.
Enable:
- Change the offset settings for the target(s).
Hand Position Offsets:
- Change target(s)'s offsets used for hand positions.
VS8 Dash Offsets:
- Change target(s)'s offsets used for hand positions for VS8 sprites
while dashing.
VS8 Jump Offsets:
- Change target(s)'s offsets used for hand positions for VS8 sprites
while jumping.
--- CONICAL LIGHT: Change Ship Settings
- Change the conical light hand offset for the Ship vehicle.
Boarded:
Changed Offsets:
- Changed offsets used for the "hand" positions of this vehicle.
Unboarded:
Changed Offsets:
- Changed offsets used for the "hand" positions of this vehicle.
--- CONICAL LIGHT: Change Airship Settings
- Change the conical light hand offset for the airship vehicle.
Boarded:
Changed Offsets:
- Changed offsets used for the "hand" positions of this vehicle.
Unboarded:
Changed Offsets:
- Changed offsets used for the "hand" positions of this vehicle.
--- CONICAL LIGHT: Change Boat Settings
- Change the conical light hand offset for the boat vehicle.
Boarded:
Changed Offsets:
- Changed offsets used for the "hand" positions of this vehicle.
Unboarded:
Changed Offsets:
- Changed offsets used for the "hand" positions of this vehicle.
--- Spawn Light Plugin Commands
--- SPAWN LIGHT: Create Light(s) at Map X/Y
- Map only!
- Create new light spawn(s) locked to the map.
- Use tile coordinates for X and Y.
Light Settings:
Settings:
- Change the radial light settings for the light spawn(s).
Bheavior:
- Change the behaviors for the light spawn(s).
Coordinates X/Y:
Origin X:
Origin Y:
- What is the origin X/Y position?
- You may use JavaScript code.
Spawn Settings:
JS: Trajectory:
- Code used to determine the trajectory of these lights.
- These will revolve around the origin X/Y position.
Initial Time:
- What is the initial time value for this light spawn(s)?
- You may use JavaScript code.
Total Spawns:
- How many light spawns should there be?
- Minimum value: 1.
- You may use JavaScript code.
Time Increment:
- What is the time increment between spawns?
Expiration Timer:
- After how many frames will light spawn(s) expire?
- Use 0 for no expiration.
- You may use JavaScript code.
--- SPAWN LIGHT: Create Light(s) at Screen X/Y
- Map only!
- Create new light spawn(s) locked to the screen.
- The light spawn(s) is unaffected by map scrolling.
Light Settings:
Settings:
- Change the radial light settings for the light spawn(s).
Bheavior:
- Change the behaviors for the light spawn(s).
Coordinates X/Y:
Origin X:
Origin Y:
- What is the origin X/Y position?
- You may use JavaScript code.
Spawn Settings:
JS: Trajectory:
- Code used to determine the trajectory of these lights.
- These will revolve around the origin X/Y position.
Initial Time:
- What is the initial time value for this light spawn(s)?
- You may use JavaScript code.
Total Spawns:
- How many light spawns should there be?
- Minimum value: 1.
- You may use JavaScript code.
Time Increment:
- What is the time increment between spawns?
Expiration Timer:
- After how many frames will light spawn(s) expire?
- Use 0 for no expiration.
- You may use JavaScript code.
--- SPAWN LIGHT: Create Light(s) on Player
- Map only!
- Create new light spawn(s) following the player.
- The light spawn(s) is unaffected by map scrolling.
Light Settings:
Settings:
- Change the radial light settings for the light spawn(s).
Bheavior:
- Change the behaviors for the light spawn(s).
Spawn Settings:
JS: Trajectory:
- Code used to determine the trajectory of these lights.
- These will revolve around the origin X/Y position.
Initial Time:
- What is the initial time value for this light spawn(s)?
- You may use JavaScript code.
Total Spawns:
- How many light spawns should there be?
- Minimum value: 1.
- You may use JavaScript code.
Time Increment:
- What is the time increment between spawns?
Expiration Timer:
- After how many frames will light spawn(s) expire?
- Use 0 for no expiration.
- You may use JavaScript code.
--- SPAWN LIGHT: Create Light(s) on Follower
- Map only!
- Create new light spawn(s) following the player.
- The light spawn(s) is unaffected by map scrolling.
Light Settings:
Settings:
- Change the radial light settings for the light spawn(s).
Bheavior:
- Change the behaviors for the light spawn(s).
Target:
Follower Index:
- Which follower index should the light(s) follow?
- Index starts at 0.
- You may use JavaScript code.
Spawn Settings:
JS: Trajectory:
- Code used to determine the trajectory of these lights.
- These will revolve around the origin X/Y position.
Initial Time:
- What is the initial time value for this light spawn(s)?
- You may use JavaScript code.
Total Spawns:
- How many light spawns should there be?
- Minimum value: 1.
- You may use JavaScript code.
Time Increment:
- What is the time increment between spawns?
Expiration Timer:
- After how many frames will light spawn(s) expire?
- Use 0 for no expiration.
- You may use JavaScript code.
--- SPAWN LIGHT: Create Light(s) on Event
- Map only!
- Create new light spawn(s) following the player.
- The light spawn(s) is unaffected by map scrolling.
Light Settings:
Settings:
- Change the radial light settings for the light spawn(s).
Bheavior:
- Change the behaviors for the light spawn(s).
Target:
Event ID:
- Which map event should the light(s) follow?
- Use 0 for "this event".
- You may use JavaScript code.
Spawn Settings:
JS: Trajectory:
- Code used to determine the trajectory of these lights.
- These will revolve around the origin X/Y position.
Initial Time:
- What is the initial time value for this light spawn(s)?
- You may use JavaScript code.
Total Spawns:
- How many light spawns should there be?
- Minimum value: 1.
- You may use JavaScript code.
Time Increment:
- What is the time increment between spawns?
Expiration Timer:
- After how many frames will light spawn(s) expire?
- Use 0 for no expiration.
- You may use JavaScript code.
--- Light-Related Sub Settings---
Radial Light Settings
General:
Enabled?:
- Is this radial light enabled?
Properties:
Filename:
- Filename used for the light effect image.
- If used, ignore Color, Radius, and Intensity.
- Image will be centered on the target where the center of the image is
the anchor point and will be rotated.
Color:
- Color of the radial light in #rrggbb format.
- For generated lights only.
- Ignore if using image.
Radius:
- What is the radius of this radial light?
- For generated lights only.
- Ignore if using image.
Intensity:
- Radial light intensity. Use value between 0 & 1.
- For generated lights only.
- Ignore if using image.
Optional:
Angle:
- What is the angle of this radial light?
- Only noticeable with using images.
Rotate Speed:
- The rotation speed of this light?
- Lower: slower. Higher: faster. Negative: reverse.
Blend Mode:
- What kind of blend mode do you wish to apply to the radial light?
Opacity:
- What is the opacity (0 to 255)?
- Lower: dimmer. Higher: Brighter.
Offsets:
Offset X:
- Offset the X position of this light.
- Negative: left. Positive: right.
Offset Y:
- Offset the Y position of this light.
- Negative: up. Positive: down.
---
Conical Light Settings
General:
Enabled?:
- Is this conical light enabled?
Properties:
Filename:
- Filename used for the light effect image.
- If used, ignore Radius, Color, and Intensity.
Angle Offset:
- Offset the image angle by this many degrees.
- Only applies to images.
File Anchor X:
File Anchor Y:
- Anchor X/Y used for images.
- For X - Left: 0.0; Center: 0.5; Right: 1.0
- For Y - Top: 0.0; Middle: 0.5; Bottom: 1.0
Color:
- What is the radius of this conical light?
- For generated lights only.
- Ignore if using image.
Radius:
- What is the radius of this conical light?
- For generated lights only.
- Ignore if using image.
Source Radius:
- What is the radius of this light source?
- For generated lights only.
- Ignore if using image.
Intensity:
- Conical light intensity. Use value between 0 & 1.
- For generated lights only.
- Ignore if using image.
Optional:
Blend Mode:
- What kind of blend mode do you wish to apply to the conical light?
Opacity:
- What is the opacity (0 to 255)?
- Lower: dimmer. Higher: Brighter.
Angle:
Arc Angle:
- What is the angle of this conical light's arc?
Angle Sway:
- How many degrees should this light sway?
- Use 0 for no sway.
Sway Speed:
- How fast should this light sway?
- Lower: Slower; Higher: Faster
Randomize Sway?:
- Change the sway to offset at different starting points?
Direction:
Forced Direction?:
- Force the conical light to face a certain direction?
Follow Cursor?
- Follow the mouse cursor?
Offsets:
Use Hand Offset?:
- Put the light source on the target's "hand" position?
- Disables the two settings below if on.
Offset X (Non-Hand):
- Offset the X position of this light.
- Negative: left. Positive: right.
Offset Y (Non-Hand):
- Offset the Y position of this light.
- Negative: up. Positive: down.
---
Behavior
Blink:
Blink Rate:
- What is the rate of occurance for this effect?
- Use a decimal number between 0 and 1.
Blink Modifier:
- Static multiplicative opacity modifier. Before additive.
- Use a decimal number between -1 and 1. Negatives allowed.
Flicker:
Flicker Rate:
- What is the rate of occurance for this effect?
- Use a decimal number between 0 and 1.
Flicker Modifier:
- Random multiplicative opacity modifier. Before additive.
- Use a decimal number between -1 and 1. Negatives allowed.
Flash:
Flash Rate:
- What is the rate of occurance for this effect?
- Use a decimal number between 0 and 1.
Flash Modifier:
- Static additive opacity modifier. Before multiplicative.
- Use a decimal number between -1 and 1. Negatives allowed.
Flare:
Flare Rate:
- What is the rate of occurance for this effect?
- Use a decimal number between 0 and 1.
Flare Modifier:
- Random additive opacity modifier. Before multiplicative.
- Use a decimal number between -1 and 1. Negatives allowed.
Glow:
Glow Rate:
- What is the glow change for this light?
- Use a decimal number between 0 and 1.
Glow Speed:
- What is the speed at which glow oscillates at?
- Use a decimal number between 0 and 1.
Randomize Glow?:
- Offset the glow to oscillate at different starting points?
Pulse:
Pulse Rate:
- What is the pulse change for this light?
- Use a decimal number between 0 and 1.
Pulse Speed:
- What is the speed at which pulse oscillates at?
- Use a decimal number between 0 and 1.
Randomize Pulse?:
- Offset the pulse to oscillate at different starting points?
Pattern:
Pattern Name:
- Select the pattern name for this light.
- Ignore if using any Custom Pattern.
Custom Pattern:
- Create a custom pattern with letters from a to z.
- Where 'a' is transparent and 'z' is opaque.
Frame Delay:
- What is the frame delay between pattern updates?
--- Main Menu Core VisuStella MZThe following are Plugin Commands that come with this plugin. They can be accessed through the Plugin Command event command. --- Actor Plugin Commands---
Actor: Change Menu Image (Group) Actor: Change Menu Image (Range) Actor: Change Menu Image (JS) (Legacy) - Changes the actor's Menu Image. - Each version has a different means of selecting Actor ID's. Actor ID: - Select which ID(s) to affect. Filename: - Selected actor(s) will have their menu images changed to this. --- Actor: Change Menu Image (JS) (v1.24) - Changes an actor's Menu Image using JavaScript. - Allows more control with more text entry. JS: Actor ID: - Enter which Actor ID to affect. - Uses JavaScript code. JS: Filename: - Enter the filename you wish to use. - Uses JavaScript code. --- Menu Command Plugin Commands--- Menu Command: Clear Forced Settings
- Clear any forced settings for the menu command symbols.
Symbol(s):
- Insert the symbols of the menu commands here.
- The symbols are case sensitive.
- VisuStella is NOT responsible for any errors produced by menus that
become accessible outside of their intended usage.
--- Menu Command: Force Disable
- Forcefully disable specific menu commands via their symbols.
- Matching forced enabled symbols will be overwritten.
Symbol(s):
- Insert the symbols of the menu commands here.
- The symbols are case sensitive.
- VisuStella is NOT responsible for any errors produced by menus that
become accessible outside of their intended usage.
--- Menu Command: Force Enable
- Forcefully enable specific menu commands via their symbols.
- Matching forced disabled symbols will be overwritten.
Symbol(s):
- Insert the symbols of the menu commands here.
- The symbols are case sensitive.
- VisuStella is NOT responsible for any errors produced by menus that
become accessible outside of their intended usage.
--- Menu Command: Force Hide
- Forcefully hide specific menu commands via their symbols.
- Matching forced shown symbols will be overwritten.
Symbol(s):
- Insert the symbols of the menu commands here.
- The symbols are case sensitive.
- VisuStella is NOT responsible for any errors produced by menus that
become accessible outside of their intended usage.
--- Menu Command: Force Show
- Forcefully show specific menu commands via their symbols.
- Matching forced hidden symbols will be overwritten.
Symbol(s):
- Insert the symbols of the menu commands here.
- The symbols are case sensitive.
- VisuStella is NOT responsible for any errors produced by menus that
become accessible outside of their intended usage.
--- Map Camera Zoom VisuStella MZThe following are Plugin Commands that come with this plugin. They can be accessed through the Plugin Command event command. --- Camera Plugin Commands
--- Camera: Focus Player - Puts the camera focus on the player character. Duration: - How many frames should it take to finish focus? - 60 frames = 1 second. Easing Type: - Select which easing type you wish to apply. - Requires VisuMZ_0_CoreEngine! --- Camera: Focus Target Event - Puts the camera focus on target event. Event ID: - Insert the ID of the event to focus on. - Use 0 for this event. - You may use JavaScript code. Duration: - How many frames should it take to finish focus? - 60 frames = 1 second. Easing Type: - Select which easing type you wish to apply. - Requires VisuMZ_0_CoreEngine! --- Camera: Focus Target Tile - Puts the camera focus on target map tile. Map Tile X: - What is the X coordinate of the target map tile? - You may use JavaScript code. Map Tile Y: - What is the Y coordinate of the target map tile? - You may use JavaScript code. Duration: - How many frames should it take to finish focus? - 60 frames = 1 second. Easing Type: - Select which easing type you wish to apply. - Requires VisuMZ_0_CoreEngine! --- Camera: Wait for Focus - Waits for camera focus to finish changing before continuing. --- Zoom Plugin Commands
--- Zoom: Change Zoom - Change the current zoom amount. Target Zoom Scale: - What is the target zoom scale? - 1.0 = 100%; 1.5 = 150%; 2.0 = 200%; - Cannot go under 1.0! Duration: - How many frames should it take to finish zooming? - 60 frames = 1 second. Easing Type: - Select which easing type you wish to apply. - Requires VisuMZ_0_CoreEngine! --- Zoom: Wait for Zoom - Waits for zoom to finish changing before continuing. --- Map Damage Effect VisuStella MZThe following are Plugin Commands that come with this plugin. They can be accessed through the Plugin Command event command. --- Visual Plugin Commands--- Visual: Map Damage Effect
- Produces the visual Map Damage Effect without any damage tied to it.
Damage Appearance:
Hex Color:
- Use #rrggbb for custom colors.
Gradient Length:
- What is the length of the gradient effect?
Image Filename:
- Filename of the map damage effect.
- Using this will ignore "Hex Color" and "Gradient Length".
Damage Animation
Opacity:
- What is the starting opacity before fading?
Total Duration:
- How many frames should the animation be played?
Blend Mode:
- The blend mode used for map damage effect.
Once Parallel:
- Plays this Common Event as a "Once Parallel" upon trigger.
- Requires VisuMZ_0_CoreEngine!
--- Map Event Effects VisuStella MZThe following are Plugin Commands that come with this plugin. They can be accessed through the Plugin Command event command. --- Breathing-Related Plugin Commands
--- Breathing: Change for Event - Changes target event's character's breathing. Event ID: - Insert the ID of the target event. - Use 0 for the current event. Breathing Rate X: - What is the breathing rate X in pixels? - For best results, use a number between 0 and 1. Breathing Rate Y: - What is the breathing rate Y in pixels? - For best results, use a number between 0 and 1. Breathing Speed X: - What is the speed X used for breathing? - For best results, use a number between 0 and 1. Breathing Speed Y: - What is the speed Y used for breathing? - For best results, use a number between 0 and 1. Duration: - The duration in frames for which this change takes place. --- Breathing: Change for Follower - Changes target follower's character's breathing. Follower ID: - Select which follower ID to change for. - Follower ID's start at 1. Breathing Rate X: - What is the breathing rate X in pixels? - For best results, use a number between 0 and 1. Breathing Rate Y: - What is the breathing rate Y in pixels? - For best results, use a number between 0 and 1. Breathing Speed X: - What is the speed X used for breathing? - For best results, use a number between 0 and 1. Breathing Speed Y: - What is the speed Y used for breathing? - For best results, use a number between 0 and 1. Duration: - The duration in frames for which this change takes place. --- Breathing: Change for Player - Changes player character's breathing. Breathing Rate X: - What is the breathing rate X in pixels? - For best results, use a number between 0 and 1. Breathing Rate Y: - What is the breathing rate Y in pixels? - For best results, use a number between 0 and 1. Breathing Speed X: - What is the speed X used for breathing? - For best results, use a number between 0 and 1. Breathing Speed Y: - What is the speed Y used for breathing? - For best results, use a number between 0 and 1. Duration: - The duration in frames for which this change takes place. --- Flash-Related Plugin Commands
--- Flash: Change for Event
- Changes target event's character's flash color.
Event ID:
- Insert the ID of the target event.
- Use 0 for the current event.
Flash Color:
Red:
Green:
Blue:
Alpha:
- What is the flash value?
- Use a number between 0 and 5.
Duration:
- The duration in frames for which this change takes place.
--- Flash: Change for Follower
- Changes target follower's character's flash color.
Follower ID:
- Select which follower ID to change for.
- Follower ID's start at 1.
Flash Color:
Red:
Green:
Blue:
Alpha:
- What is the flash value?
- Use a number between 0 and 5.
Duration:
- The duration in frames for which this change takes place.
--- Flash: Change for Player
- Changes player character's flash color.
Flash Color:
Red:
Green:
Blue:
Alpha:
- What is the flash value?
- Use a number between 0 and 5.
Duration:
- The duration in frames for which this change takes place.
--- Float-Related Plugin Commands
--- Float: Change for Event - Changes target event's character's float height. Event ID: - Insert the ID of the target event. - Use 0 for the current event. Minimum Float Height: - What is the minimum float height in pixels? Maximum Float Height: - What is the maximum float height in pixels? Float Speed: - What is the speed used for floating? - For best results, use a number between 0 and 1. Duration: - The duration in frames for which this change takes place. --- Float: Change for Follower - Changes target follower's character's float height. Follower ID: - Select which follower ID to change for. - Follower ID's start at 1. Minimum Float Height: - What is the minimum float height in pixels? Maximum Float Height: - What is the maximum float height in pixels? Float Speed: - What is the speed used for floating? - For best results, use a number between 0 and 1. Duration: - The duration in frames for which this change takes place. --- Float: Change for Player - Changes player character's float height. Minimum Float Height: - What is the minimum float height in pixels? Maximum Float Height: - What is the maximum float height in pixels? Float Speed: - What is the speed used for floating? - For best results, use a number between 0 and 1. Duration: - The duration in frames for which this change takes place. --- Hue-Related Plugin Commands
--- Hue: Change for Event - Changes target event's character's hue. Hue: - Changes the sprite to use this hue. - Use a number between 0 and 360. --- Hue: Change for Follower - Changes target follower's character's hue. Hue: - Changes the sprite to use this hue. - Use a number between 0 and 360. --- Hue: Change for Player - Changes player character's hue. Hue: - Changes the sprite to use this hue. - Use a number between 0 and 360. --- Scale-Related Plugin Commands
--- Scale: Change for Event - Changes target event's character's scale factor. Event ID: - Insert the ID of the target event. - Use 0 for the current event. Scale X: Scale Y: - What is the target scale X/Y? - 0.00 - 0%, 0.50 - 50%, 1.00 - 100%, 1.50 - 150% Duration: - The duration in frames for which this change takes place. --- Scale: Change for Follower - Changes target follower's character's scale factor. Follower ID: - Select which follower ID to change for. - Follower ID's start at 1. Scale X: Scale Y: - What is the target scale X/Y? - 0.00 - 0%, 0.50 - 50%, 1.00 - 100%, 1.50 - 150% Duration: - The duration in frames for which this change takes place. --- Scale: Change for Player - Changes player character's scale factor. Scale X: Scale Y: - What is the target scale X/Y? - 0.00 - 0%, 0.50 - 50%, 1.00 - 100%, 1.50 - 150% Duration: - The duration in frames for which this change takes place. --- Shake-Related Plugin Commands
--- Shake: Change for Event - Changes target event's character's shaking. Event ID: - Insert the ID of the target event. - Use 0 for the current event. Shake Power X: Shake Power Y: - Input the horizontal/vertical shaking power. --- Shake: Change for Follower - Changes target follower's character's shaking. Follower ID: - Select which follower ID to change for. - Follower ID's start at 1. Shake Power X: Shake Power Y: - Input the horizontal/vertical shaking power. --- Shake: Change for Player - Changes player character's shaking. Shake Power X: Shake Power Y: - Input the horizontal/vertical shaking power. --- Sidestep-Related Plugin Commands
--- Sidestep: Change for Event - Changes target event's character's sidestep distance. Event ID: - Insert the ID of the target event. - Use 0 for the current event. Minimum Sidestep: - What is the minimum Sidestep distance in pixels? - Negative: Left; Positive: Right. Maximum Sidestep: - What is the maximum Sidestep distance in pixels? - Negative: Left; Positive: Right. Sidestep Speed: - What is the speed used for Sidesteping? - For best results, use a number between 0 and 1. Duration: - The duration in frames for which this change takes place. --- Sidestep: Change for Follower - Changes target follower's character's sidestep distance. Follower ID: - Select which follower ID to change for. - Follower ID's start at 1. Minimum Sidestep: - What is the minimum Sidestep distance in pixels? - Negative: Left; Positive: Right. Maximum Sidestep: - What is the maximum Sidestep distance in pixels? - Negative: Left; Positive: Right. Sidestep Speed: - What is the speed used for Sidesteping? - For best results, use a number between 0 and 1. Duration: - The duration in frames for which this change takes place. --- Sidestep: Change for Player - Changes player character's sidestep distance. Minimum Sidestep: - What is the minimum Sidestep distance in pixels? - Negative: Left; Positive: Right. Maximum Sidestep: - What is the maximum Sidestep distance in pixels? - Negative: Left; Positive: Right. Sidestep Speed: - What is the speed used for Sidesteping? - For best results, use a number between 0 and 1. Duration: - The duration in frames for which this change takes place. --- Tint-Related Plugin Commands
--- Tint: Change for Event
- Changes target event's character's tint color.
Event ID:
- Insert the ID of the target event.
- Use 0 for the current event.
Color:
Red:
Green:
Blue:
Gray:
- What is the tint color value?
- For red, green, blue, use a number between -255 and 255.
- For gray, use a number between 0 and 255.
Duration:
- The duration in frames for which this change takes place.
--- Tint: Change for Follower
- Changes target follower's character's tint color.
Follower ID:
- Select which follower ID to change for.
- Follower ID's start at 1.
Color:
Red:
Green:
Blue:
Gray:
- What is the tint color value?
- For red, green, blue, use a number between -255 and 255.
- For gray, use a number between 0 and 255.
Duration:
- The duration in frames for which this change takes place.
--- Tint: Change for Player
- Changes player character's tint color.
Color:
Red:
Green:
Blue:
Gray:
- What is the tint color value?
- For red, green, blue, use a number between -255 and 255.
- For gray, use a number between 0 and 255.
Duration:
- The duration in frames for which this change takes place.
--- Menu Cursor VisuStella MZThe following are Plugin Commands that come with this plugin. They can be accessed through the Plugin Command event command. --- Menu Cursor Plugin Commands---
Menu Cursor: Change Settings
- Changes the settings for the menu cursor's appearance.
Appearance Type:
- Select the appearance type for the menu cursor.
Icon Index:
- If "icon" is selected as the appearance type, use this icon as
the cursor.
Picture Filename:
- If "picture" is selected as the appearance type, use this image from
img/pictures/ as the cursor.
System Filename:
- If "system" is selected as the appearance type, use this image from
img/system/ as the cursor.
Frame Delay:
- The frame delay for any animated "picture" or "system" cursors before
moving onto the next frame.
Anchor:
Anchor X:
Anchor Y:
- Select the position to determine where the cursor's Anchor
is located.
Position:
Position X:
Position Y:
- Select the placement to determine where the cursor's Position
is located.
Offset:
Offset X:
Offset Y:
- Select how much to offset the cursor's X/Y position by.
Wave:
Wave Type:
- Determine how the cursor moves while active.
Speed:
- Select how fast the cursor oscillates.
- Lower is slower. Higher is faster.
Distance:
- Select how far the cursor sprite will oscillate from its origin.
--- Message Core VisuStella MZThe following are Plugin Commands that come with this plugin. They can be accessed through the Plugin Command event command. --- Message Plugin Commands---
Message: Properties Change the various properties of the Message Window. Rows: - Change the number of Message Window rows. - Leave at 0 to keep it unchanged. Width: - Change the Message Window width in pixels. - Leave at 0 to keep it unchanged. Word Wrap: - Enable or disable Word Wrap for the Message Window? ---
Message: X/Y Offsets - Change the X and Y Offsets of the Message Window. - The offset value(s) will be saved and stored. Offset X: - Offset Message Window horizontally. - Negative: Left; Positive: Right - Message Window coordinates are still restricted via clamping. Offset Y: - Offset Message Window vertically. - Negative: Up; Positive: Down - Message Window coordinates are still restricted via clamping. --- Choice Plugin Commands---
---
Choices: Distance - Change the distance from choice window to the message window. Distance: - Change distance between the choice and message windows. - Default distance is 0. - Use negative to center align with remaining space. ---
Choice: Properties Change the properties found in the Show Choices event command. Choice Line Height: - Change the line height for the show choices. - Leave at 0 to keep this unchanged. Minimum Choice Width: - What is the minimum width size for each choice? - 96 is the default width. Max Rows: - Maximum number of choice rows to be displayed. - Leave at 0 to keep this unchanged. Max Columns: - Maximum number of choice columns to be displayed. - Leave at 0 to keep this unchanged. Text Alignment: - Text alignment for Show Choice window. --- Picture Plugin Commands---
Picture: Change Text
- Change text for target picture(s) to show.
- You may use text codes.
- Text will adapt to picture's properties.
- Settings will be erased if picture is erased.
Picture ID(s):
- The ID(s) of the picture(s) to set text to.
Padding:
- How much padding from the sides should there be?
Text:
Upper Left:
Upper Center:
Upper Right:
Middle Left:
Middle Center:
Middle Right:
Lower Left:
Lower Center:
Lower Right:
- The text that's aligned to this picture's side.
- You may use text codes.
---
Picture: Erase Text - Erase all text for target picture(s). Picture ID(s): - The ID(s) of the picture(s) to erase text for. ---
Picture: Refresh Text - Refreshes the text used for all on-screen pictures. - To be used if any dynamic text codes are updated like \n[x]. --- Select Plugin Commands---
Select: Weapon - Opens the Event Select Item Window to let the player pick a weapon to choose from. - Can be opened while the Message Window is open. Variable ID: - This variable will be used to record the ID of the selected weapon. - It will result in 0 otherwise. Weapon Type ID: - Reduce all the weapons to a specific weapon type. - Leave at 0 to not use filters. ---
Select: Armor - Opens the Event Select Item Window to let the player pick an armor to choose from. - Can be opened while the Message Window is open. Variable ID: - This variable will be used to record the ID of the selected armor. - It will result in 0 otherwise. Armor Type ID: - Reduce all the armors to a specific armor type. - Leave at 0 to not use filters. Equip Type ID: - Reduce all the armors to a specific equip type. - Leave at 0 to not use filters. ---
Select: Skill - Opens the Event Select Item Window to let the player pick a skill to choose from. - Requires VisuMZ_1_SkillsStatesCore! - Can be opened while the Message Window is open. - Skills will not be listed if they are hidden by the actor. - Skills will not be listed if the actor lacks access to their Skill Type. Variable ID: - This variable will be used to record the ID of the selected skill. - It will result in 0 otherwise. Actor ID: - Select an actor to get the skill list from. - Use 0 to select from the party leader. Skill Type ID: - Reduce all the skills to a specific skill type. - Leave at 0 to not use filters. --- Message Letter Sounds VisuStella MZThe following are Plugin Commands that come with this plugin. They can be accessed through the Plugin Command event command. --- Message Sound Plugin Commands
---
Message Sound: Change
- Change the settings to the Message Sound settings below.
Filename:
- Filename of the sound effect played.
Interval:
- Interval the sound effect from being played between how many characters?
Volume:
- Volume of the sound effect played.
Variance:
- When playing the sound effect, vary the volume by how much?
Pitch:
- Pitch of the sound effect played.
Variance:
- When playing the sound effect, vary the pitch by how much?
Pan:
- Pan of the sound effect played.
Variance:
- When playing the sound effect, vary the pan by how much?
---
Message Sound: Reset - Resets the settings to the Plugin Parameters settings. --- System Plugin Commands---
System: Enable/Disable Letter Sounds - Enables/disables Message Letter Sounds for the game. Enable/Disable?: - Enables/disables Message Letter Sounds for the game. --- Message Log VisuStella MZThe following are Plugin Commands that come with this plugin. They can be accessed through the Plugin Command event command. --- Bypass Plugin Commands
--- Bypass: Message Logging? - Bypass message logging until turned off. Bypass?: - Bypasses Message Logging until turned off. --- System Plugin Commands---
System: Enable Message Log in Menu? - Enables/disables Message Log menu inside the main menu. Enable/Disable?: - Enables/disables Message Log menu inside the main menu. ---
System: Show Message Log in Menu? - Shows/hides Message Log menu inside the main menu. Show/Hide?: - Shows/hides Message Log menu inside the main menu. --- Movement Effects VisuStella MZThe following are Plugin Commands that come with this plugin. They can be accessed through the Plugin Command event command. --- Dust Clouds Plugin Commands
--- DUST CLOUDS: Enable/Disable - Enable or Disable the Dust Clouds from spawning when dashing. Enable/Disable?: - Enables or Disables Dust Clouds. --- DUST CLOUDS: Change Settings
- Alter the existing Dust Clouds settings.
Appearance:
Filename:
- Filename of the Dust Cloud. Leave empty if using none.
Color:
- Color of the dust cloud in #rrggbb format.
- For generated dust clouds only.
- Ignore if using image.
Radius:
- What is the max radius of this dust cloud?
- For generated dust clouds only.
- Ignore if using image.
Fullness:
- What is the fullness level (0.0 to 1.0)?
- For generated dust clouds only.
- Ignore if using image.
Animation:
Duration:
- How many frames will a dust cloud remain on screen?
Starting Opacity:
- What is the starting opacity (0-255)?
- Dust cloud opacity will gradually go to 0.
Starting Scale:
- What is the starting scale (0.0 to 1.0)?
- Dust cloud scale will gradually go to 1.0.
--- Footprints and Footsteps Plugin Commands
--- FOOTPRINTS: Enable/Disable - Enable or Disable footprint marks from being made. Enable/Disable?: - Enables or Disables footprint marks. --- FOOTSTEPS: Enable/Disable - Enable or Disable footstep sounds from being played. Enable/Disable?: - Enables or Disables footstep sounds. --- Motion Blur Plugin Commands
--- MOTION BLUR: Player - Plays a Motion Blur on the player sprite. - Requires Pixi JS Filters! Apply to Followers?: - Apply this motion blur effect to followers, too? Duration: - Play the Motion Blur effect for how many frames? - You may use JavaScript code. Angle Offset: - Offset the motion blur angle by this many degrees. - Original angle is based on facing direction. --- MOTION BLUR: Follower(s) - Plays a Motion Blur on the follower sprite(s). - Requires Pixi JS Filters! Follower Index(es): - Select which follower index(es) to affect. - Index values start at 0. Duration: - Play the Motion Blur effect for how many frames? - You may use JavaScript code. Angle Offset: - Offset the motion blur angle by this many degrees. - Original angle is based on facing direction. --- MOTION BLUR: Event(s) - Plays a Motion Blur on event sprite(s). - Requires Pixi JS Filters! Event ID(s): - Select which event(s) to affect. - Index values start at 0. Duration: - Play the Motion Blur effect for how many frames? - You may use JavaScript code. Angle Offset: - Offset the motion blur angle by this many degrees. - Original angle is based on facing direction. --- Motion Trail Plugin Commands
--- MOTION TRAIL: Change Settings For Player? - Change Motion Trail settings for the player. - This does NOT enable them. You must do that separately. Apply to Followers?: - Apply this change to followers, too? Delay: - How many frames to delay by when creating a motion trail? - The higher the delay, the less after images there are. Duration: - How many frames should the motion trail last? - What do you want to be its duration? Hue: - What do you want to be the hue for the motion trail? Starting Opacity: - What starting opacity value do you want for the motion trail? - Opacity values decrease over time. Tone: - What tone do you want for the motion trail? - Format: [Red, Green, Blue, Gray] --- MOTION TRAIL: Change Settings For Follower(s)? - Change Motion Trail settings for the follower(s). - This does NOT enable them. You must do that separately. Follower Index(es): - Select which follower index(es) to affect. - Index values start at 0. Delay: - How many frames to delay by when creating a motion trail? - The higher the delay, the less after images there are. Duration: - How many frames should the motion trail last? - What do you want to be its duration? Hue: - What do you want to be the hue for the motion trail? Starting Opacity: - What starting opacity value do you want for the motion trail? - Opacity values decrease over time. Tone: - What tone do you want for the motion trail? - Format: [Red, Green, Blue, Gray] --- MOTION TRAIL: Change Settings For Event(s)? - Change Motion Trail settings for the event(s). - This does NOT enable them. You must do that separately. Event ID(s): - Select which event(s) to affect. - Use "0" for "this event". Delay: - How many frames to delay by when creating a motion trail? - The higher the delay, the less after images there are. Duration: - How many frames should the motion trail last? - What do you want to be its duration? Hue: - What do you want to be the hue for the motion trail? Starting Opacity: - What starting opacity value do you want for the motion trail? - Opacity values decrease over time. Tone: - What tone do you want for the motion trail? - Format: [Red, Green, Blue, Gray] --- MOTION TRAIL: Create For Player - Immediately create a motion trail sprite for the player in the player's current position. Apply to Followers?: - Apply this effect to followers, too? --- MOTION TRAIL: Create For Follower(s) - Immediately create a motion trail sprite for the follower(s) in the follower(s)'s current position. Follower Index(es): - Select which follower index(es) to affect. - Index values start at 0. --- MOTION TRAIL: Create For Event(s) - Immediately create a motion trail sprite for the event(s) in the event(s)'s current position. Event ID(s): - Select which event(s) to affect. - Use "0" for "this event". --- MOTION TRAIL: Enable For Player? - Enables/disables Motion Trails for player sprite. Apply to Followers?: - Apply this change to followers, too? Enable/Disable? - Enables or Disables Motion Trails. Immediately Create? - Immediately create a motion trail? - Requires "Enabled" setting to also be true. --- MOTION TRAIL: Enable For Follower(s)? - Enables/disables Motion Trails for follower sprite(s). Follower Index(es): - Select which follower index(es) to affect. - Index values start at 0. Enable/Disable? - Enables or Disables Motion Trails. Immediately Create? - Immediately create a motion trail? - Requires "Enabled" setting to also be true. --- MOTION TRAIL: Enable For Event(s)? - Enables/disables Motion Trails for event sprite(s). Event ID(s): - Select which event(s) to affect. - Use "0" for "this event". Enable/Disable? - Enables or Disables Motion Trails. Immediately Create? - Immediately create a motion trail? - Requires "Enabled" setting to also be true. --- Smart Movement Plugin Commands--- SMART: Directional Move Speed Modifier
- Global!
- These settings allow you to adjust the movement speed modifiers when
characters are facing certain directions.
- This can be used to help give a better illusion that in a storm (or such),
it is harder to move against the wind than with.
Standard Directions:
Down Speed:
Left Speed:
Right Speed:
Up Speed:
- What is the movement speed modifier for this direction?
- These affect all characters, from players to followers to events.
- Moving slower goes down 1 speed level.
- Moving faster goes up 1 speed level.
Diagonal Directions:
Lower Left:
Lower Right:
Upper Left:
Upper Right:
- What is the movement speed modifier for this direction?
- These affect all characters, from players to followers to events.
- Moving slower goes down 1 speed level.
- Moving faster goes up 1 speed level.
---
SMART: Smart Blink X Tiles
- Player uses "Smart Blink" to teleport forward a distance.
- If this is last listed command, this can collide with events.
Mechanics:
Distance:
- How many tiles will the player teleport forward?
- You may use JavaScript code.
Cooldown:
- How many frames must the player wait before reuse?
- You may use JavaScript code.
Common Event ID:
- If the Smash Blink is successful, play this Common Event as a
Once Parallel.
- Use 0 for none.
- This will NOT play if the player cannot Smart Blink.
Restrictions:
Non-Land Regions:
- Which regions forbid Smart Blink from landing on it?
- Adds to map, tileset, and Plugin Parameter settings.
Non-Land Terrain Tags:
- Which tags forbid Smart Blink from landing on it?
- Adds to map, tileset, and Plugin Parameter settings.
Non-Pass Regions:
- Which regions will block Smart Blink from going further?
- Adds to map, tileset, and Plugin Parameter settings.
Non-Pass Terrain Tags:
- Which tags will block Smart Blink from going further?
- Adds to map, tileset, and Plugin Parameter settings.
Visuals:
Animation ID:
- What animation do you wish to play on the player if the player can
Smart Blink?
- This will NOT play if the player cannot Smart Blink.
Motion Trail Settings:
- Adjust the motion trail settings for this Smart Movement.
- For more details, look in the sub section below.
Sound Effect:
Filename:
- Filename of the sound effect played for a successful Smart Blink.
- This will NOT play if the player cannot Smart Blink.
Volume:
- Volume of the sound effect played for a successful Smart Blink.
- This will NOT play if the player cannot Smart Blink.
Pitch:
- Pitch of the sound effect played for a successful Smart Blink.
- This will NOT play if the player cannot Smart Blink.
Pan:
- Pan of the sound effect played for a successful Smart Blink.
- This will NOT play if the player cannot Smart Blink.
---
SMART: Smart Jump X Tiles
- Player uses "Smart Jump" to leap forward a distance.
- If this is last listed command, this can collide with events.
Mechanics:
Distance:
- How many tiles will the player jump forward?
- You may use JavaScript code.
Cooldown:
- How many frames must the player wait before reuse?
- You may use JavaScript code.
Common Event ID:
- If the Smash Jump is successful, play this Common Event as a
Once Parallel.
- Use 0 for none.
- This will NOT play if the player cannot Smart Jump.
Restrictions:
Non-Land Regions:
- Which regions forbid Smart Jump from landing on it?
- Adds to map, tileset, and Plugin Parameter settings.
Non-Land Terrain Tags:
- Which tags forbid Smart Jump from landing on it?
- Adds to map, tileset, and Plugin Parameter settings.
Non-Pass Regions:
- Which regions will block Smart Jump from going further?
- Adds to map, tileset, and Plugin Parameter settings.
Non-Pass Terrain Tags:
- Which tags will block Smart Jump from going further?
- Adds to map, tileset, and Plugin Parameter settings.
Visuals:
Animation ID:
- What animation do you wish to play on the player if the player can
Smart Jump?
- This will NOT play if the player cannot Smart Jump.
Motion Trail Settings:
- Adjust the motion trail settings for this Smart Movement.
- For more details, look in the sub section below.
Sound Effect:
Filename:
- Filename of the sound effect played for a successful Smart Jump.
- This will NOT play if the player cannot Smart Jump.
Volume:
- Volume of the sound effect played for a successful Smart Jump.
- This will NOT play if the player cannot Smart Jump.
Pitch:
- Pitch of the sound effect played for a successful Smart Jump.
- This will NOT play if the player cannot Smart Jump.
Pan:
- Pan of the sound effect played for a successful Smart Jump.
- This will NOT play if the player cannot Smart Jump.
---
SMART: Smart Rush X Tiles
- Player uses "Smart Rush" to rush forward a distance.
- If this is last listed command, this can collide with events.
Mechanics:
Distance:
- How many tiles will player charge forward?
- You may use JavaScript code.
Cooldown:
- How many frames must the player wait before reuse?
- You may use JavaScript code.
Common Event ID:
- If the Smash Rush is successful, play this Common Event as a
Once Parallel.
- Use 0 for none.
- This will NOT play if the player cannot Smart Rush.
Switch(es):
- Which Switch(es) will turn ON during Smart Rush?
- This Switch(es) will also turn OFF after.
Visuals:
Animation ID:
- What animation do you wish to play on the player if the player can
Smart Rush?
- This will NOT play if the player cannot Smart Rush.
Motion Trail Settings:
- Adjust the motion trail settings for this Smart Movement.
- For more details, look in the sub section below.
Speed Rate:
- How much faster is "Smart Rush" compared to Dashing?
- You may use JavaScript code.
Sound Effect:
Filename:
- Filename of the sound effect played for a successful Smart Rush.
- This will NOT play if the player cannot Smart Rush.
Volume:
- Volume of the sound effect played for a successful Smart Rush.
- This will NOT play if the player cannot Smart Rush.
Pitch:
- Pitch of the sound effect played for a successful Smart Rush.
- This will NOT play if the player cannot Smart Rush.
Pan:
- Pan of the sound effect played for a successful Smart Rush.
- This will NOT play if the player cannot Smart Rush.
--- Motion Trail Settings
- These are sub-settings found for Smart Blink, Smart Jump, and Smart Rush.
General:
Override?:
- Override Motion Trail settings temporarily?
- Otherwise, use current player Motion Trail settings.
Settings:
Delay:
- How many frames to delay by when creating a motion trail?
- The higher the delay, the less after images there are.
Duration:
- How many frames should the motion trail last?
- What do you want to be its duration?
Hue:
- What do you want to be the hue for the motion trail?
Starting Opacity:
- What starting opacity value do you want for the motion trail?
- Opacity values decrease over time.
Tone:
- What tone do you want for the motion trail?
- Format: [Red, Green, Blue, Gray]
--- SMART: Wait for Smart Blink - Waits for player to finish Smart Blinking before continuing. --- SMART: Wait for Smart Jump - Waits for player to finish Smart Jumping before continuing. --- SMART: Wait for Smart Rush - Waits for player to finish Smart Rushing before continuing. --- Smooth Camera Plugin Commands
--- SMOOTH CAMERA: Enable/Disable - Enable or Disable the Smooth Camera. Enable/Disable?: - Enables or Disables Smooth Camera. --- SMOOTH CAMERA: Speed Change
- Change the scrolling speed for the Smooth Camera.
Walk Speed:
Horizontal Rate:
- Horizontal walking scroll rate adjustment.
- Lower: faster; Higher: slower
Vertical Rate:
- Vertical walking scroll rate adjustment.
- Lower: faster; Higher: slower
Dash Speed:
Horizontal Rate:
- Horizontal dashing scroll rate adjustment.
- Lower: faster; Higher: slower
Vertical Rate:
- Vertical dashing scroll rate adjustment.
- Lower: faster; Higher: slower
--- New Game Plus VisuStella MZThe following are Plugin Commands that come with this plugin. They can be accessed through the Plugin Command event command. --- Save Plugin Commands---
Save: New Game+ - Opens up the Save menu for the player to save a New Game+ file. - Only works from map scene. --- Transition Plugin Commands---
Transition: New Game+ - Transitions the current game directly into a New Game+. - Only works from map scene. --- One Time Purchase VisuStella MZThe following are Plugin Commands that come with this plugin. They can be accessed through the Plugin Command event command. --- Mode Plugin Commands
---
Mode: Enable One Time Purchase Mode?
- Enables/disables One Time Purchase mode for shops.
Enable/Disable?:
- Enables/disables One Time Purchase mode for shops.
- One Time Purchase
- Unlimited Purchase
--- Remote Event Plugin Commands---
Remote Event: Open Last Shop
- Reopens the last shop for remote event, retaining any and all sold items
in their main shop settings.
- One Time Purchase settings are not saved and have to be manually reenabled.
Remote:
Map ID:
- ID of map, remote event is on. Use 0 for this map.
- You may use JavaScript code.
Event ID:
- ID of remote event.
- You may use JavaScript code.
--- This Event Plugin Commands
---
This Event: Open Last Shop - Reopens the last shop for this event, retaining any and all sold items in their main shop settings. - One Time Purchase settings are not saved and have to be manually reenabled. --- Party System VisuStella MZThe following are Plugin Commands that come with this plugin. They can be accessed through the Plugin Command event command. --- Party Plugin Commands---
Party: Call Party Scene - Calls the party changing scene. ---
Party: Change Max Battle Members - Changes the number of max battle members possible. - Cannot be use mid-battle. Max Members: - Changes the number of max battle members possible. - Use 0 for the game's default number. ---
Party: Lock/Unlock Member(s) - Allows you to lock/unlock a party member. - Locked actors cannot change their party position. Actor ID(s): - Select which actor(s) to lock/unlock. - Locked actors cannot change their party position. Lock?: - Lock the selected actor(s)? ---
Party: Move Actor(s) to Active - Map Only. - Moves an actor to the active party if there is room. - The actor needs to have joined the party. Actor ID(s): - Select which actor(s) to move to the active party if there is room. ---
Party: Move Actor(s) to Reserve - Map Only. - Moves an actor to the reserve party. - Must be 1 actor left. - The actor needs to have joined the party. Actor ID(s): - Select which actor(s) to move to the reserve party. ---
Party: Move Party Index to Reserve - Map only. - Moves an actor in a specific party index to reserve. - Must be 1 actor left. Index: - Type in which index to move. - Index values start at 0. - You may use JavaScript code. ---
Party: Move Random Reserve to Active - Map only. - Moves a random actor from the reserve party to active. - Must be enough space in active party. ---
Party: Require Member(s) - Allows you to require/free a party member. - Required actors must be in the party to exit the scene. Actor ID(s): - Select which actor(s) to require/free. - Required actors must be in the party to exit the scene. Require?: - Make the selected actor(s) required? ---
Temporary Parties Plugin CommandsTemporary parties are very specific parties that will overwrite whatever the player has set as a party. These can include current party members or even actors that haven't joined. The temporary party cannot be changed nor can the positions of said party members can be changed. When a temporary party is present, menu and battle commands involving changing party members will be disabled. Once the temporary party is disbanded, the player's selected party will be available once again as well as all of the functions to change party members and their positions. --- Temp: Create Temporary Party (Normal)
- Creates a temporary party with specific actors.
- Can't be used in battle.
Actor ID(s):
- Select which actor(s) to be added to the temporary party until the
temporary party is disbanded.
--- Temp: Create Temporary Party (JS)
- Creates a temporary party selected with JavaScript.
- Can't be used in battle.
JS: Actor ID(s):
- Use JavaScript to determine which actor(s) are added to the temporary
party until disbanded.
--- Temp: Disband Temporary Party - Clears temporary party. - Can't be used in battle. --- Picture Choices VisuStella MZThe following are Plugin Commands that come with this plugin. They can be accessed through the Plugin Command event command. --- Clear Plugin Commands---
Clear: All Selection Settings - Clears all selection settings for all pictures 1 through 100. ---
Clear: Picture ID(s) Selection Settings - Clears all selection settings for the ID'd pictures. Picture ID(s): - Select which Picture ID(s) to clear. ---
Clear: Picture Range Selection Settings - Clears all selection settings for the picture ID's in range. Starting ID: - The starting ID of the picture binds to clear. Ending ID: - The ending ID of the picture binds to clear. --- Picture Settings Plugin Commands
---
Picture Settings: Change ID(s)
- Changes select and deselect settings for the picture ID(s).
Step 1:
Picture ID(s):
- Select which Picture ID(s) to change settings for.
Step 2:
On Select Settings:
- Picture settings when selecting that choice.
On Deselect Settings:
- Picture settings when deselecting that choice.
---
Picture Settings: Change ID(s)
- Changes select and deselect settings for the picture ID(s).
Step 1:
Starting ID:
- The starting ID of the picture binds to clear.
Ending ID:
- The ending ID of the picture binds to clear.
Step 2:
On Select Settings:
- Picture settings when selecting that choice.
On Deselect Settings:
- Picture settings when deselecting that choice.
---
Picture Settings
- These are the settings used for "On Select" and "On Deselect" settings.
Easing:
Duration:
- Insert a number to determine duration of the changed settings when
applied.
Easing Type:
- Select which easing type you wish to apply.
- Many of these choices require VisuMZ_0_CoreEngine.
Position:
Target X:
Target Y:
- Insert a number to determine new X/Y position.
- Use 'Unchanged' to not change the X/Y position.
Target Width %:
Target Height %:
- Insert a number to determine new width/height.
- 'Unchanged' for no changes.
- For 100%, use 100.
Blend:
Target Opacity:
- Insert a number to determine new opacity level.
- 'Unchanged' for no changes.
- Use a number between 0 and 255.
Blend Mode:
- What kind of blend mode do you wish to apply to the picture?
Tone:
Target Tone Red:
Target Tone Green:
Target Tone Blue:
- Insert a number to determine new red/green/blue tone tint.
- 'Unchanged' for no changes.
- Use a number between -255 and 255.
Target Tone Gray:
- Insert a number to determine new red/green/blue tone tint.
- 'Unchanged' for no changes.
- Use a number between 0 and 255.
--- Picture Common Events VisuStella MZThe following are Plugin Commands that come with this plugin. They can be accessed through the Plugin Command event command. --- System Plugin Commands---
System: Change Picture Common Event
- Change the Common Event bound to specific picture(s).
Picture ID(s):
- Select which Picture ID(s) to change.
Common Event ID:
- Change the Common Event bound to specific picture(s).
Custom
Opaque Only?
- Ignore clicks on transparent pixels and accept only opaque pixels for
this specific picture.
Error Margin:
- Error margin when clicking for opaque pixels.
- This value determines the radius.
Change Tone on Hover?
- Change the tone of the picture on hover?
Hover Tone:
- Tone settings upon hovering.
- Format: [Red, Green, Blue, Gray]
Blend Mode on Hover:
- The blend mode used when this picture is hovered over.
---
System: Clear All Picture Common Events - Clears all Common Event bound to specific picture(s). ---
System: Clear Picture Common Event - Clears any Common Event bound to specific picture(s). Picture ID(s): - Select which Picture ID(s) to clear. ---
System: Erase & Clear All Pictures - Erases all pictures on the screen and clears their Common Events. ---
System: Erase & Clear Picture - Erases and clears any Common Events attached to specific picture(s). Picture ID(s): - Select which Picture ID(s) to erase and clear. --- Picture Effects VisuStella MZThe following are Plugin Commands that come with this plugin. They can be accessed through the Plugin Command event command.
--- Effects - A - Plugin Commands---
EFFECT: Angry - Picture(s) gets angry and turns red while shaking. Picture ID(s): - Select which picture ID(s) to play this effect with. Color Tone: - What tone do you want for the effect? - Format: [Red, Green, Blue, Gray] Distance X: - How far should the max horizontal distance be? Distance Y: - How far should the max vertical distance be? Duration: - How long is this effect's duration? - 60 frames = 1 second. Minimum: 10. Wait for Completion?: - Wait until effect is complete before moving onto next event command? ---
EFFECT: Arrange By Column - Picture(s) gets arranged by columns across the screen. - Works best with multiple pictures. Picture ID(s): - Select which picture ID(s) to play this effect with. Max Column Size: - What is the max column size before creating a new one? - You may use JavaScript. Anchor: Anchor X: - X anchor for pictures to adjust to. - 0.0 - left; 0.5 - center; 1.0 - right Anchor Y: - Y anchor for pictures to adjust to. - 0.0 - top; 0.5 - middle; 1.0 - bottom Duration: - How long is this effect's duration? - 60 frames = 1 second. Minimum: 10. Wait for Completion?: - Wait until effect is complete before moving onto next event command? ---
EFFECT: Arrange By Row - Picture(s) gets arranged by rows across the screen. - Works best with multiple pictures. Picture ID(s): - Select which picture ID(s) to play this effect with. Max Row Size: - What is the max row size before creating a new one? - You may use JavaScript. Anchor: Anchor X: - X anchor for pictures to adjust to. - 0.0 - left; 0.5 - center; 1.0 - right Anchor Y: - Y anchor for pictures to adjust to. - 0.0 - top; 0.5 - middle; 1.0 - bottom Duration: - How long is this effect's duration? - 60 frames = 1 second. Minimum: 10. Wait for Completion?: - Wait until effect is complete before moving onto next event command? ---
EFFECT: Arrange Horizontally - Picture(s) gets spread horizontally on the screen. - Works best with multiple pictures. Picture ID(s): - Select which picture ID(s) to play this effect with. Target Y: - What Y coordinate do you want pictures arranged at? - You may use JavaScript. Anchor: Anchor X: - X anchor for pictures to adjust to. - 0.0 - left; 0.5 - center; 1.0 - right Anchor Y: - Y anchor for pictures to adjust to. - 0.0 - top; 0.5 - middle; 1.0 - bottom Duration: - How long is this effect's duration? - 60 frames = 1 second. Minimum: 10. Wait for Completion?: - Wait until effect is complete before moving onto next event command? ---
EFFECT: Arrange Vertically - Picture(s) gets spread vertically on the screen. - Works best with multiple pictures. Picture ID(s): - Select which picture ID(s) to play this effect with. Target X: - What X coordinate do you want pictures arranged at? - You may use JavaScript. Anchor: Anchor X: - X anchor for pictures to adjust to. - 0.0 - left; 0.5 - center; 1.0 - right Anchor Y: - Y anchor for pictures to adjust to. - 0.0 - top; 0.5 - middle; 1.0 - bottom Duration: - How long is this effect's duration? - 60 frames = 1 second. Minimum: 10. Wait for Completion?: - Wait until effect is complete before moving onto next event command? --- Effects - B - Plugin Commands---
EFFECT: Banner In/Out - Picture(s) slides in from the side to the center, and then slides out to the side. Picture ID(s): - Select which picture ID(s) to play this effect with. Effect In/Out?: - What effect type is this? From Direction: - Select which direction the effect starts from. Wait for Completion?: - Wait until effect is complete before moving onto next event command? ---
EFFECT: Berserk - Picture(s) breathes heavily and turns into a reddish tone. Picture ID(s): - Select which picture ID(s) to play this effect with. Color Tone: - What tone do you want for the effect? - Format: [Red, Green, Blue, Gray] Duration: - How long is this effect's duration? - 60 frames = 1 second. Minimum: 10. Wait for Completion?: - Wait until effect is complete before moving onto next event command? ---
EFFECT: Blur - Picture(s) gets blurry (or not). Picture ID(s): - Select which picture ID(s) to play this effect with. Blur Strength: - Change blur strength for the picture(s). - For best results, use numbers between 0 and 10. Blur Duration: - The amount of time it takes for the change to occur. Wait for Completion?: - Wait until effect is complete before moving onto next event command? ---
EFFECT: Breathing - Picture(s) breathes in and out continuously. Picture ID(s): - Select which picture ID(s) to play this effect with. Scale Range X: Scale Range Y: - What is the horizontal/vertical breathing scale range? Speed Rate X: Speed Rate Y: - How fast or slow should the effect be? - Smaller numbers are slower. Larger numbers are faster. Random Seed: - What is the random seed used for this effect? - You may use JavaScript code. Duration: - How long is this effect's duration? - 60 frames = 1 second. 0 for instant change. --- Effects - C - Plugin Commands---
EFFECT: Capsule Burst - Picture(s) wobbles back and forth and transforms into a new image. Picture ID(s): - Select which picture ID(s) to play this effect with. Transform Image: - Filename used for the transform image. Color Tone: - What tone do you want for the effect? - Format: [Red, Green, Blue, Gray] Scale Change: - How does the scale change over time? - 0.0 = 0%; 0.5 = 50%; 1.0 = 100%; 2.0 = 200% Spazz Distance: - Potential spazz distance for this effect. Wobble Angle: - How many degrees does this wobble? Duration: - How long is this effect's duration? - 60 frames = 1 second. Minimum: 20. Wait for Completion?: - Wait until effect is complete before moving onto next event command? ---
EFFECT: Card Flip - Picture(s) flips like a card and shows its back. Picture ID(s): - Select which picture ID(s) to play this effect with. Back Image: - Filename used for the card back image. - Leave empty if you don't wish to use one. Mirror Back?: - Mirror the back image? - If no back image is used, effect is always mirrored. Duration: - How long is this effect's duration? - 60 frames = 1 second. Minimum: 10. Wait for Completion?: - Wait until effect is complete before moving onto next event command? ---
EFFECT: Charm - Picture(s) subject becomes charmed and enamored. Picture ID(s): - Select which picture ID(s) to play this effect with. Scale Change: - How does the scale change over time? - 0.0 = 0%; 0.5 = 50%; 1.0 = 100%; 2.0 = 200% Color Tone: - What tone do you want for the effect? - Format: [Red, Green, Blue, Gray] Duration: - How long is this effect's duration? - 60 frames = 1 second. Minimum: 20. Wait for Completion?: - Wait until effect is complete before moving onto next event command? ---
EFFECT: Chilly - Picture(s) spazzes and wobbles and turns light blue-ish. Picture ID(s): - Select which picture ID(s) to play this effect with. Effect Times: - How many times to extend this effect? Color Tone: - What tone do you want for the effect? - Format: [Red, Green, Blue, Gray] Spazz Distance: - Potential distance for this effect. Wobble Angle: - Potential angle for this effect. Wait for Completion?: - Wait until effect is complete before moving onto next event command? ---
EFFECT: Confused - Picture(s) acts as if it's confused and moves in random directions. Picture ID(s): - Select which picture ID(s) to play this effect with. Effect Times: - How many times to extend this effect? Degrees: - How many degrees does this sway back and forth? Distance X: - How far should the max horizontal distance be? Distance Y: - How far should the max vertical distance be? Wait for Completion?: - Wait until effect is complete before moving onto next event command? --- Effects - D - Plugin Commands---
EFFECT: Damage - Picture(s) gets damaged and turns red while violently shaking. Picture ID(s): - Select which picture ID(s) to play this effect with. Color Tone: - What tone do you want for the effect? - Format: [Red, Green, Blue, Gray] Distance X: - How far should the max horizontal distance be? Distance Y: - How far should the max vertical distance be? Duration: - How long is this effect's duration? - 60 frames = 1 second. Minimum: 10. Wait for Completion?: - Wait until effect is complete before moving onto next event command? ---
EFFECT: Depth of Field - Picture(s) is given an image depth of field and will change based off the mouse cursor position continuously. Picture ID(s): - Select which picture ID(s) to play this effect with. Distance X: - How far should the max horizontal distance be? - Use negative numbers to go opposite directions. Distance Y: - How far should the max vertical distance be? - Use negative numbers to go opposite directions. Duration: - How long is this effect's duration? - 60 frames = 1 second. - 0 for instant change. Wait for Completion?: - Wait until effect is complete before moving onto next event command? ---
EFFECT: Dizzy - Picture(s) acts as if it's dizzy and moves in a circle. Picture ID(s): - Select which picture ID(s) to play this effect with. Effect Times: - How many times to extend this effect? Degrees: - How many degrees does this sway back and forth? Distance X: - How far should the max horizontal distance be? Distance Y: - How far should the max vertical distance be? Wait for Completion?: - Wait until effect is complete before moving onto next event command? ---
EFFECT: Drop In/Out - Picture(s) drops downward in, and sinks further downward out. Picture ID(s): - Select which picture ID(s) to play this effect with. Effect In/Out?: - What effect type is this? Distance: - What is this effect's drop distance? Duration: - How long is this effect's duration? - 60 frames = 1 second. Wait for Completion?: - Wait until effect is complete before moving onto next event command? --- Effects - E - Plugin Commands---
EFFECT: Electrocuted - Picture(s) gets electrocuted and flashes two different colors while spazzing. - WARNING! Flashing lights! Picture ID(s): - Select which picture ID(s) to play this effect with. Color Tone 1: - What tone do you want for the effect? - Format: [Red, Green, Blue, Gray] Color Tone 2: - What tone do you want for the effect? - Format: [Red, Green, Blue, Gray] Spazz Distance: - Potential distance for this effect. Duration: - How long is this effect's duration? - 60 frames = 1 second. Minimum: 10. Wait for Completion?: - Wait until effect is complete before moving onto next event command? ---
EFFECT: Expand In/Out - Picture(s) expands as it enters and further as it exits. Picture ID(s): - Select which picture ID(s) to play this effect with. Effect In/Out?: - What effect type is this? Duration: - How long is this effect's duration? - 60 frames = 1 second. Wait for Completion?: - Wait until effect is complete before moving onto next event command? --- Effects - F - Plugin Commands---
EFFECT: Fade Change - Picture(s) fades in and out while transforming in the middle. Picture ID(s): - Select which picture ID(s) to play this effect with. Transform Image: - Filename used for the transform image. Duration: - How long is this effect's duration? - 60 frames = 1 second. Minimum: 10 Wait for Completion?: - Wait until effect is complete before moving onto next event command? ---
EFFECT: Fade In/Out - Picture(s) fade in from nothing and fade out to nothing. Picture ID(s): - Select which picture ID(s) to play this effect with. Effect In/Out?: - What effect type is this? Duration: - How long is this effect's duration? - 60 frames = 1 second. Wait for Completion?: - Wait until effect is complete before moving onto next event command? ---
EFFECT: Fade Layer Switch - Picture(s) fade in and out while switching layers in between. Picture ID(s): - Select which picture ID(s) to play this effect with. Target Z: - What Z Layer do you wish to assign this picture(s)? - You may use JavaScript. Duration: - How long is this effect's duration? - 60 frames = 1 second. Minimum 10. Wait for Completion?: - Wait until effect is complete before moving onto next event command? ---
EFFECT: Fear - Picture(s) goes pale and slowly regains color. Picture ID(s): - Select which picture ID(s) to play this effect with. Color Tone: - What tone do you want for the effect? - Format: [Red, Green, Blue, Gray] Duration: - How long is this effect's duration? - 60 frames = 1 second. Minimum: 10. Wait for Completion?: - Wait until effect is complete before moving onto next event command? ---
EFFECT: Flash Change - Picture(s) flashes a few times before changing into a different graphic. Picture ID(s): - Select which picture ID(s) to play this effect with. Transform Image: - Filename used for the transform image. Color Tone: - What tone do you want for the effect? - Format: [Red, Green, Blue, Gray] Flash Times: - How many times to flash the tone without changing? Duration: - How long is this effect's duration? - 60 frames = 1 second. Minimum: 20 Wait for Completion?: - Wait until effect is complete before moving onto next event command? ---
EFFECT: Flying Card - Picture(s) flies out from current position to front of the screen and ends up in the center. Picture ID(s): - Select which picture ID(s) to play this effect with. To Direction: - Select which side of the screen the effect flies towards. Angle: - What is the angle at which the picture(s) stops at the front? Front Scale: - What is the scale of the picture(s) at the front? - 0.0 = 0%; 0.5 = 50%; 1.0 = 100%; 2.0 = 200% Spin Times: - How many times does the picture(s) spin? Wait for Completion?: - Wait until effect is complete before moving onto next event command? ---
EFFECT: Focus In/Out - Picture(s) focuses into view and clarity and out of. Picture ID(s): - Select which picture ID(s) to play this effect with. Effect In/Out?: - What effect type is this? Duration: - How long is this effect's duration? - 60 frames = 1 second. Wait for Completion?: - Wait until effect is complete before moving onto next event command? --- Effects - G - Plugin Commands---
EFFECT: Ghost In/Out - Picture(s) changes into or out of an etheral form. Picture ID(s): - Select which picture ID(s) to play this effect with. Effect In/Out?: - What effect type is this? Blur Strength: - Change blur strength for the picture(s). - For best results, use numbers between 0 and 10. Flash Tone: - What tone do you want for the effect? - Format: [Red, Green, Blue, Gray] Ghost Tone: - What tone do you want for the effect? - Format: [Red, Green, Blue, Gray] Duration: - How long is this effect's duration? - 60 frames = 1 second. Minimum: 10. Wait for Completion?: - Wait until effect is complete before moving onto next event command? ---
EFFECT: Glow - Picture(s) glows for a duration. Picture ID(s): - Select which picture ID(s) to play this effect with. Blur Strength: - Change blur strength for the picture(s). - For best results, use numbers between 0 and 10. Tone: - What tone do you want for the effect? - Format: [Red, Green, Blue, Gray] Duration: - How long is this effect's duration? - 60 frames = 1 second. Minimum: 10. Wait for Completion?: - Wait until effect is complete before moving onto next event command? --- Effects - H - Plugin Commands---
EFFECT: Heal - Picture(s) glows and blurs a bit for a healing effect. Picture ID(s): - Select which picture ID(s) to play this effect with. Blur Strength: - Change blur strength for the picture(s). - For best results, use numbers between 0 and 10. Color Tone: - What tone do you want for the effect? - Format: [Red, Green, Blue, Gray] Duration: - How long is this effect's duration? - 60 frames = 1 second. Minimum: 10. Wait for Completion?: - Wait until effect is complete before moving onto next event command? ---
EFFECT: Hoppity - Picture(s) jumps up in place and back down. Picture ID(s): - Select which picture ID(s) to play this effect with. Height: - How high do you want the picture(s) to hop. Duration: - How long is this effect's duration? - 60 frames = 1 second. Minimum: 10. Wait for Completion?: - Wait until effect is complete before moving onto next event command? ---
EFFECT: Hover - Picture(s) gains hover effect, floating up and down visually continuously. Picture ID(s): - Select which picture ID(s) to play this effect with. Distance Y: - How far should the max vertical distance be? Speed Rate: - How fast or slow should the effect be? - Smaller numbers are slower. Larger numbers are faster. Random Seed: - What is the random seed used for this effect? - You may use JavaScript code. Duration: - How long is this effect's duration? - 60 frames = 1 second. - 0 for instant change. ---
EFFECT: Hue Shift By - Picture(s) shifts by a relative hue value. Picture ID(s): - Select which picture ID(s) to play this effect with. Hue Shift: - Insert a hue value here. (0 - 360) - You may use JavaScript. Duration: - How long is this effect's duration? - 60 frames = 1 second. Wait for Completion?: - Wait until effect is complete before moving onto next event command? ---
EFFECT: Hue Shift To - Picture(s) shifts to a specific hue value. Picture ID(s): - Select which picture ID(s) to play this effect with. Target Hue: - Insert a hue value here. (0 - 360) - You may use JavaScript. Duration: - How long is this effect's duration? - 60 frames = 1 second. Wait for Completion?: - Wait until effect is complete before moving onto next event command? --- Effects - I - Plugin Commands---
EFFECT: Illusion - Picture(s) appears on random parts of the screen before landing in place. Picture ID(s): - Select which picture ID(s) to play this effect with. Effect Times: - How many times to extend this effect? Duration: - How long each extension's effect? - 60 frames = 1 second. Minimum: 10. Wait for Completion?: - Wait until effect is complete before moving onto next event command? --- Effects - J - Plugin Commands---
EFFECT: Jiggle - Picture(s) jiggles from top to bottom, side to side. Picture ID(s): - Select which picture ID(s) to play this effect with. Effect Times: - How many times to extend this effect? Wait for Completion?: - Wait until effect is complete before moving onto next event command? ---
EFFECT: Jump By X/Y - Picture(s) jumps by relative X/Y values. Picture ID(s): - Select which picture ID(s) to play this effect with. Height: - How high do you want the picture(s) to hop.0 Distance X: - How far should picture(s) jump horizontally? - You may use JavaScript. Negative: left. Positive: right. Distance Y: - How far should picture(s) jump vertically? - You may use JavaScript. Negative: up. Positive: down. Duration: - How long is this effect's duration? - 60 frames = 1 second. Minimum: 10. Wait for Completion?: - Wait until effect is complete before moving onto next event command? ---
EFFECT: Jump To X/Y - Picture(s) jumps to X/Y coordinate. Picture ID(s): - Select which picture ID(s) to play this effect with. Height: - How high do you want the picture(s) to hop.0 Target X: - What is the target X destination? - You may use JavaScript. Target Y: - What is the target Y destination? - You may use JavaScript. Duration: - How long is this effect's duration? - 60 frames = 1 second. Minimum: 10. Wait for Completion?: - Wait until effect is complete before moving onto next event command? --- Effects - L - Plugin Commands---
EFFECT: Levitate In/Out - Picture(s) floats upward in, and floats upward out. Picture ID(s): - Select which picture ID(s) to play this effect with. Effect In/Out?: - What effect type is this? Distance: - What is this effect's levitation distance? Duration: - How long is this effect's duration? - 60 frames = 1 second. Wait for Completion?: - Wait until effect is complete before moving onto next event command? --- Effects - M - Plugin Commands---
EFFECT: Mana Restore - Picture(s) glows, hue shifts, and blurs a bit for a restoration effect. Picture ID(s): - Select which picture ID(s) to play this effect with. Blur Strength: - Change blur strength for the picture(s). - For best results, use numbers between 0 and 10. Color Tone: - What tone do you want for the effect? - Format: [Red, Green, Blue, Gray] Duration: - How long is this effect's duration? - 60 frames = 1 second. Minimum: 10. Wait for Completion?: - Wait until effect is complete before moving onto next event command? ---
EFFECT: Merge & Change - Picture(s) merge together to transform into a new graphic. - Works best with multiple pictures. Picture ID(s): - Select which picture ID(s) to play this effect with. Transform Image: - Filename used for the transform image. - First image is transformed. Others have 0 opacity. Blur Strength: - Change blur strength for the picture(s). - For best results, use numbers between 0 and 10. Target X: - What is the target X destination? - You may use JavaScript. Target Y: - What is the target Y destination? - You may use JavaScript. Color Tone: - What tone do you want for the effect? - Format: [Red, Green, Blue, Gray] Duration: - How long is this effect's duration? - 60 frames = 1 second. Minimum: 20. Wait for Completion?: - Wait until effect is complete before moving onto next event command? --- Effects - O - Plugin Commands---
EFFECT: Open & Close - Picture(s) opens and closes like an in-game window. Picture ID(s): - Select which picture ID(s) to play this effect with. Effect In/Out?: - What effect type is this? Duration: - How long is this effect's duration? - 60 frames = 1 second. Wait for Completion?: - Wait until effect is complete before moving onto next event command? --- Effects - P - Plugin Commands---
EFFECT: Petrify - Picture(s) struggles as it becomes petrified.. Picture ID(s): - Select which picture ID(s) to play this effect with. Color Tone: - What tone do you want for the effect? - Format: [Red, Green, Blue, Gray] Petrify Tone: - What tone do you want for the effect? - Format: [Red, Green, Blue, Gray] Scale Maximum: - How does the scale change over time? - 0.0 = 0%; 0.5 = 50%; 1.0 = 100%; 2.0 = 200% Scale Minimum: - How does the scale change over time? - 0.0 = 0%; 0.5 = 50%; 1.0 = 100%; 2.0 = 200% Duration: - How long is this effect's duration? - 60 frames = 1 second. Minimum: 20. Wait for Completion?: - Wait until effect is complete before moving onto next event command? ---
EFFECT: Phase In/Out - Picture(s) phases into view and out of view. Picture ID(s): - Select which picture ID(s) to play this effect with. Effect In/Out?: - What effect type is this? Duration: - How long is this effect's duration? - 60 frames = 1 second. Wait for Completion?: - Wait until effect is complete before moving onto next event command? ---
EFFECT: Piece In/Out - Picture(s) flies in and out from a random screen border area. - Works best with multiple pictures. Picture ID(s): - Select which picture ID(s) to play this effect with. Effect In/Out?: - What effect type is this? Border Scale: - What is the scale of the picture(s) at the border? - 0.0 = 0%; 0.5 = 50%; 1.0 = 100%; 2.0 = 200% Duration: - How long is this effect's duration? - 60 frames = 1 second. Wait for Completion?: - Wait until effect is complete before moving onto next event command? ---
EFFECT: Poison - Picture(s) subject receives poison and becomes sickly. Picture ID(s): - Select which picture ID(s) to play this effect with. Distance: - How far should the max horizontal distance be? Color Tone: - What tone do you want for the effect? - Format: [Red, Green, Blue, Gray] Duration: - How long is this effect's duration? - 60 frames = 1 second. Minimum: 20. Wait for Completion?: - Wait until effect is complete before moving onto next event command? ---
EFFECT: Power Up Change - Picture(s) switches between two images before changing completely. Transform Image: - Filename used for the transform image. Effect Times: - How many times to switch images? Duration: - How long is each switch's duration? - 60 frames = 1 second. Wait for Completion?: - Wait until effect is complete before moving onto next event command? ---
EFFECT: Psychedelic - Picture(s) shifts hue all the way around. Picture ID(s): - Select which picture ID(s) to play this effect with. Duration: - How long is this effect's duration? - 60 frames = 1 second. Wait for Completion?: - Wait until effect is complete before moving onto next event command? ---
EFFECT: Pulse - Picture(s) pulses towards its new scale. Picture ID(s): - Select which picture ID(s) to play this effect with. Target Scale: - What is the target scale of the picture(s)? - 0.0 = 0%; 0.5 = 50%; 1.0 = 100%; 2.0 = 200% Duration: - How long is this effect's duration? - 60 frames = 1 second. Wait for Completion?: - Wait until effect is complete before moving onto next event command? --- Effects - Q - Plugin Commands---
EFFECT: Quick Press - Picture(s) is quickly pressed and rebounds back into place. Picture ID(s): - Select which picture ID(s) to play this effect with. Distance X: - What is this effect's X distance? Distance 16: - What is this effect's Y distance? Duration: - How long is this effect's duration? - 60 frames = 1 second. Wait for Completion?: - Wait until effect is complete before moving onto next event command? --- Effects - R - Plugin Commands---
EFFECT: Random In/Out - Picture(s) fades in and out in random positions. Picture ID(s): - Select which picture ID(s) to play this effect with. Effect In/Out?: - What effect type is this? Distance: - What is this effect's max randomized distance? Duration: - How long is this effect's duration? - 60 frames = 1 second. Minimum: 10. Wait for Completion?: - Wait until effect is complete before moving onto next event command? ---
EFFECT: Roll In/Out - Picture(s) rolls in from the side and out to the other. Picture ID(s): - Select which picture ID(s) to play this effect with. Effect In/Out?: - What effect type is this? Distance: - What is this effect's roll distance? From Direction: - Select which direction the effect starts from. Spin Times: - How many times does the picture(s) spin while rolling? Duration: - How long is this effect's duration? - 60 frames = 1 second. Wait for Completion?: - Wait until effect is complete before moving onto next event command? ---
EFFECT: Rotate - Picture(s) rotates clockwise or counter clockwise. - Apply opposite if the picture(s) is mirrored. Picture ID(s): - Select which picture ID(s) to play this effect with. From Direction: - Select which direction the effect rotates. - Apply opposite if the picture(s) is mirrored. Spin Times: - How many times does the picture(s) spin while rolling? Duration: - How long is this effect's duration? - 60 frames = 1 second. Wait for Completion?: - Wait until effect is complete before moving onto next event command? --- Effects - S - Plugin Commands---
EFFECT: Shakey - Picture(s) shakes back and forth from side to side. Picture ID(s): - Select which picture ID(s) to play this effect with. Effect Times: - How many times to extend this effect? Distance: - What is this effect's shake distance? Wait for Completion?: - Wait until effect is complete before moving onto next event command? ---
EFFECT: Shrink In/Out - Picture(s) shrinks in and shrinks further inward. Picture ID(s): - Select which picture ID(s) to play this effect with. Effect In/Out?: - What effect type is this? Duration: - How long is this effect's duration? - 60 frames = 1 second. Wait for Completion?: - Wait until effect is complete before moving onto next event command? ---
EFFECT: Sidestep - Picture(s) gains sidestep effect, moving left and right visually continuously. Picture ID(s): - Select which picture ID(s) to play this effect with. Distance X: - How far should the max horizontal distance be? Speed Rate: - How fast or slow should the effect be? - Smaller numbers are slower. Larger numbers are faster. Random Seed: - What is the random seed used for this effect? - You may use JavaScript code. Duration: - How long is this effect's duration? - 60 frames = 1 second. - 0 for instant change. ---
EFFECT: Spazz - Picture(s) spazzes up, down, left, right at random. Picture ID(s): - Select which picture ID(s) to play this effect with. Effect Times: - How many times to extend this effect? Distance: - What is this effect's spazz distance? Wait for Completion?: - Wait until effect is complete before moving onto next event command? ---
EFFECT: Spin Change - Picture(s) spins and changes into a different graphic. Picture ID(s): - Select which picture ID(s) to play this effect with. Transform Image: - Filename used for the transform image. Scale Change: - How does the scale change over time? - 0.0 = 0%; 0.5 = 50%; 1.0 = 100%; 2.0 = 200% Spin Times: - How many times does the picture(s) spin before transforming? Duration: - How long is this effect's duration? - 60 frames = 1 second. Minimum: 20 Wait for Completion?: - Wait until effect is complete before moving onto next event command? ---
EFFECT: Spin In/Out - Picture(s) spins into view and out of view. Picture ID(s): - Select which picture ID(s) to play this effect with. Effect In/Out?: - What effect type is this? Spin Times: - How many times does the picture(s) spin while rolling? Vanish Scale: - What is the scale of the picture(s) when null? - 0.0 = 0%; 0.5 = 50%; 1.0 = 100%; 2.0 = 200% Duration: - How long is this effect's duration? - 60 frames = 1 second. Wait for Completion?: - Wait until effect is complete before moving onto next event command? ---
EFFECT: Squish In/Out - Picture(s) squishes as it enters and further as it exits. Picture ID(s): - Select which picture ID(s) to play this effect with. Effect In/Out?: - What effect type is this? Duration: - How long is this effect's duration? - 60 frames = 1 second. Wait for Completion?: - Wait until effect is complete before moving onto next event command? ---
EFFECT: Stretch In/Out - Picture(s) stretches as it enters and further as it exits. Picture ID(s): - Select which picture ID(s) to play this effect with. Effect In/Out?: - What effect type is this? Duration: - How long is this effect's duration? - 60 frames = 1 second. Wait for Completion?: - Wait until effect is complete before moving onto next event command? ---
EFFECT: Submerge In/Out - Picture(s) enters and exits the bottom of the screen. Picture ID(s): - Select which picture ID(s) to play this effect with. Effect In/Out?: - What effect type is this? Color Tone: - What tone do you want for the effect? - Format: [Red, Green, Blue, Gray] Duration: - How long is this effect's duration? - 60 frames = 1 second. Minimum: 10. Wait for Completion?: - Wait until effect is complete before moving onto next event command? ---
EFFECT: Swaying - Picture(s) angles back and forth from side to side continuously. Picture ID(s): - Select which picture ID(s) to play this effect with. Angle Range: - How many degrees should the picture sway? Speed Rate: - How fast or slow should the effect be? - Smaller numbers are slower. Larger numbers are faster. Random Seed: - What is the random seed used for this effect? - You may use JavaScript code. Duration: - How long is this effect's duration? - 60 frames = 1 second. - 0 for instant change. --- Effects - T - Plugin Commands---
EFFECT: Teleport In/Out - Picture(s) teleports into view and out of view. Picture ID(s): - Select which picture ID(s) to play this effect with. Effect In/Out?: - What effect type is this? Color Tone: - What tone do you want for the effect? - Format: [Red, Green, Blue, Gray] Duration: - How long is this effect's duration? - 60 frames = 1 second. Wait for Completion?: - Wait until effect is complete before moving onto next event command? ---
EFFECT: Television In/Out - Picture(s) snaps in and out like a television screen. Picture ID(s): - Select which picture ID(s) to play this effect with. Effect In/Out?: - What effect type is this? Duration: - How long is this effect's duration? - 60 frames = 1 second. Wait for Completion?: - Wait until effect is complete before moving onto next event command? ---
EFFECT: Tint Shift By - Picture(s) changes tone and its own Z Layer relatively. Picture ID(s): - Select which picture ID(s) to play this effect with. Adjust Z: - Adjust the Z value of target picture(s) by this. - You may use JavaScript. + Move Front. - Move Back. Color Tone: - What tone do you want for the effect? - Format: [Red, Green, Blue, Gray] Duration: - How long is this effect's duration? - 60 frames = 1 second. Wait for Completion?: - Wait until effect is complete before moving onto next event command? ---
EFFECT: Tint Shift To - Picture(s) changes tone and its Z Layer to a specific value. Picture ID(s): - Select which picture ID(s) to play this effect with. Target Z: - What Z Layer do you wish to assign this picture(s)? - You may use JavaScript. Color Tone: - What tone do you want for the effect? - Format: [Red, Green, Blue, Gray] Duration: - How long is this effect's duration? - 60 frames = 1 second. Wait for Completion?: - Wait until effect is complete before moving onto next event command? ---
EFFECT: Transform - Picture(s) transforms into another image with no other effects. Picture ID(s): - Select which picture ID(s) to play this effect with. Transform Image: - Filename used for the transform image. --- Effects - U - Plugin Commands---
EFFECT: UFO In/Out - Picture(s) enters and exits the top of the screen. Picture ID(s): - Select which picture ID(s) to play this effect with. Effect In/Out?: - What effect type is this? Color Tone: - What tone do you want for the effect? - Format: [Red, Green, Blue, Gray] Duration: - How long is this effect's duration? - 60 frames = 1 second. Minimum: 10. Wait for Completion?: - Wait until effect is complete before moving onto next event command? --- Effects - V - Plugin Commands---
EFFECT: Vibrate - Picture(s) vibrates a certain distance from start to end. Picture ID(s): - Select which picture ID(s) to play this effect with. Effect Times: - How many times to extend this effect? Distance X: - How far should the max horizontal distance be? Distance Y: - How far should the max vertical distance be? Wait for Completion?: - Wait until effect is complete before moving onto next event command? --- Effects - W - Plugin Commands---
EFFECT: Wobble - Picture(s) wobbles its angle from side to side. Picture ID(s): - Select which picture ID(s) to play this effect with. Effect Times: - How many times to extend this effect? Degrees: - How many degrees does this wobble? Wait for Completion?: - Wait until effect is complete before moving onto next event command? --- Effects - Z - Plugin Commands---
EFFECT: Z Layer Change By - Picture(s) changes its Z layer to a relative value. Picture ID(s): - Select which picture ID(s) to play this effect with. Adjust Z: - Adjust the Z value of target picture(s) by this. - You may use JavaScript. + Move Front. - Move Back. ---
EFFECT: Z Layer Set To - Picture(s) changes its Z layer to a specific value. Picture ID(s): - Select which picture ID(s) to play this effect with. Target Z: - What Z Layer do you wish to assign this picture(s)? - You may use JavaScript. ---
EFFECT: Zoom In/Out - Picture(s) zooms into view and out of. Picture ID(s): - Select which picture ID(s) to play this effect with. Effect In/Out?: - What effect type is this? Duration: - How long is this effect's duration? - 60 frames = 1 second. Wait for Completion?: - Wait until effect is complete before moving onto next event command? --- Proximity Compass VisuStella MZThe following are Plugin Commands that come with this plugin. They can be accessed through the Plugin Command event command. --- Compass Plugin Commands
---
Compass: Show/Hide Proximity Compass - Show or hide the Proximity Compass. - Does not bypass user settings. Setting: - Show or hide the Proximity Compass. - Does not bypass user settings. ---
Compass: Change Player Icon - Change the player icon to a different icon. Icon Index: - This is the icon you wish to change the player icon to. --- Minimap Plugin Commands---
Minimap: Clear Explored Minimap - Clears target map's exploration progress for the large minimap. - Does not work on maps with <Already Explored> notetag. Map ID: - ID of the map you wish to clear exploration progress for. - Use '0' for current map. - You may use JavaScript. ---
Minimap: Fully Reveal Minimap - Fully reveals the minimap for target map. Map ID: - ID of the map you wish to reveal map for. - Use '0' for current map. - You may use JavaScript. ---
Minimap: Toggle Large Minimap - Show, hide, or toggle the large minimap. - Requires Minimaps to be enabled. Show/Hide?: - Show, hide, or toggle the large minimap. --- Proximity Messages VisuStella MZThe following are Plugin Commands that come with this plugin. They can be accessed through the Plugin Command event command. --- Event Plugin Commands
--- Event: Clear Proximity Message - Clears target event's Proximity Message. - Must be used on the map scene. Event ID: - Insert the ID of the target event. - Use 0 for the current event. --- Event: Set Proximity Message Text - Sets target event's Proximity Message text. - Must be used on the map scene. Event ID: - Insert the ID of the target event. - Use 0 for the current event. Text: - The text displayed by the event. - Text codes allowed. --- Global Plugin Commands
--- Global: Show/Hide All Proximity Messages - Turns on/off all Proximity Messages. - When turned off, all Proximity Messages become hidden. Show/Hide?: - Shows/hides all Proximity Messages. --- Quest Journal System VisuStella MZThe following are Plugin Commands that come with this plugin. They can be accessed through the Plugin Command event command. --- Quest Plugin Commands---
Quest: Add/Complete/Fail/Remove
- Adds quest(s) to be known/completed/failed.
- Or removes them.
Quest Keys:
- Insert the quest key(s) here.
- Each quest key must be unique.
Status:
- Change the status to this.
- Add to Known
- Add to Completed
- Add to Failed
- Remove from All
---
Quest: Description Change - Changes the description of the quest(s) to a ID. Quest Keys: - Insert the quest key(s) here. - Each quest key must be unique. Description ID: - Change the description of the quest(s) to a different ID. - You may use JavaScript code. ---
Quest: Objectives Change
- Changes the objective(s) status of the quest(s).
Quest Keys:
- Insert the quest key(s) here.
- Each quest key must be unique.
Objective ID(s):
- Select the objective ID(s) to change.
- You may use JavaScript code.
Status:
- Change the status of the objective(s) to this.
- Show Objective(s)
- Complete Objective(s)
- Fail Objective(s)
- Remove Objective(s)
---
Quest: Quote Quote - Changes the quote of the quest(s) to a ID. Quest Keys: - Insert the quest key(s) here. - Each quest key must be unique. Subtext ID: - Change the quote of the quest(s) to a different ID. - You may use JavaScript code. ---
Quest: Rewards Change
- Changes the reward(s) status of the quest(s).
Quest Keys:
- Insert the quest key(s) here.
- Each quest key must be unique.
Reward ID(s):
- Select the reward ID(s) to change.
- You may use JavaScript code.
Status:
- Change the status of the reward(s) to this.
- Show Reward(s)
- Claim Reward(s)
- Deny Reward(s)
- Remove Reward(s)
---
Quest: Subtext Change - Changes the subtext of the quest(s) to a ID. Quest Keys: - Insert the quest key(s) here. - Each quest key must be unique. Subtext ID: - Change the subtext of the quest(s) to a different ID. - You may use JavaScript code. --- Label Plugin Commands
---
Label: Add Quest Label - Add Quest Labels to target items, weapons, and armors. Item ID(s): Weapon ID(s): Armor ID(s): - Select which Item, Weapon, or Armor ID(s) to add Quest Labels to. ---
Label: Clear Quest Label - Clear Quest Labels from target items, weapons, and armors. Item ID(s): Weapon ID(s): Armor ID(s): - Select which Item, Weapon, or Armor ID(s) to clear Quest Labels from. --- Tracker Plugin Commands---
Tracker: Change Quest - Changes the tracked quest. Quest Key: - Insert the quest key here. ---
Tracker: Refresh Window - Refreshes the quest tracker window. ---
Tracker: Show/Hide Window - Can forcefully hide window. - Showing will depend on the player's Options setting. Show/Hide?: - Shows/hides the tracker window on the map. --- System Plugin Commands---
System: Call Scene_Quest - Opens Scene_Quest for the player. - Does not work in battle. ---
System: Enable Quests in Menu? - Enables/disables quest menu inside the main menu. Enable/Disable?: - Enables/disables quest menu inside the main menu. ---
System: Show Quests in Menu? - Shows/hides quest menu inside the main menu. Show/Hide?: - Shows/hides quest menu inside the main menu. --- QTE and Trigger System VisuStella MZThe following are Plugin Commands that come with this plugin. They can be accessed through the Plugin Command event command. --- Game Over Plugin Commands
---
Game Over: Setup Common Event - Sets up a Common Event that will run upon receiving the next Game Over. Common Event ID: - Setup the Common Event to run when the next Game Over occurs. ---
Game Over: Clear Common Event - Clears any Common Events designated to run for the next Game Over. --- Promise Plugin Commands
---
Promise: Switch State Trigger - Creates a one-time trigger for specified Switch to run the specified Common Events when Switch state changes. Switch ID: - What is the ID of the Switch to promise a trigger to? Common Event ID(s): - Select which Common Event(s) to run upon trigger. ---
Promise: Variable Value Trigger - Creates a one-time trigger for specified Variable to run the specified Common Events when Variable value changes. Variable ID: - What is the ID of the Variable to promise a trigger to? Common Event ID(s): - Select which Common Event(s) to run upon trigger. ---
Promise: Item Quantity Trigger - Creates a one-time trigger for specified Item to run the specified Common Events when Item quantity changes. Item ID: - What is the ID of the Item to promise a trigger to? Common Event ID(s): - Select which Common Event(s) to run upon trigger. ---
Promise: Weapon Quantity Trigger - Creates a one-time trigger for specified Weapon to run the specified Common Events when Weapon quantity changes. Weapon ID: - What is the ID of the Weapon to promise a trigger to? Common Event ID(s): - Select which Common Event(s) to run upon trigger. ---
Promise: Armor Quantity Trigger - Creates a one-time trigger for specified Armor to run the specified Common Events when armor quantity changes. Armor ID: - What is the ID of the Armor to promise a trigger to? Common Event ID(s): - Select which Common Event(s) to run upon trigger. --- QTE Plugin Commands 2024 January 25 Here's how you can create Timed Hits using the VisuStella MZ Battle Core and QTE and Trigger System plugins through Action Sequences! Includes ways for both the player to attack enemies with and to defend from enemies with.
--- QTE: Clear Current QTE - Clears the currently existing QTE. Added in version 1.01. ---
QTE: Button Mash (OK)
- Starts a Button Mash QTE session.
- Only one QTE can occur at a time.
Trigger Variable ID:
- Select which Variable ID to keep track of how many times the OK button
has been pressed.
- Use 0 to not track.
Trigger Common Event:
- Select a Common Event to play each time OK is pressed.
- Use 0 to not play a Common Event.
Trigger Sound:
- Adjust the sound effect played when a button is pressed.
Input Start Delay:
- How many frames (60 frames = 1 sec) delay before inputs are accepted to
not take the player by surprise?
QTE Duration:
- The duration in frames (60 frames = 1 sec).
- You may use code.
Wait for QTE?:
- Wait until QTE Session is done?
---
QTE: Button Sequence (Normal)
- Starts a Button Sequence QTE session.
- Only one QTE can occur at a time.
- No touch support.
Input Sequence:
- What button sequence is needed to be pressed?
Shuffle Sequence?:
- Randomize the button sequence order?
Success Switch ID:
- Select which Switch ID to turn ON if all of the sequence buttons have
been inputted.
Remaining Variable ID:
- Select which Variable ID to record how much time is remaining when the
QTE session finishes.
Correct Common Event:
- Select a Common Event to play each time a correct button input is
pressed.
- Use 0 to not play a Common Event.
Button Press Sound:
- Adjust the sound effect played when a button is pressed.
Input Start Delay:
- How many frames (60 frames = 1 sec) delay before inputs are accepted to
not take the player by surprise?
QTE Duration:
- The duration in frames (60 frames = 1 sec).
- You may use code.
- Over 1000000 for infinite time.
Wait for QTE?:
- Wait until QTE Session is done?
---
QTE: Button Sequence (Random)
- Starts a randomized Button Sequence QTE session.
- Only one QTE can occur at a time.
- No touch support.
Allowed Buttons:
- What buttons can appear in the randomized sequence?
Sequence Length?:
- How many buttons will be made for the sequence?
- You may use code.
Success Switch ID:
- Select which Switch ID to turn ON if all of the sequence buttons have
been inputted.
Remaining Variable ID:
- Select which Variable ID to record how much time is remaining when the
QTE session finishes.
Correct Common Event:
- Select a Common Event to play each time a correct button input is
pressed.
- Use 0 to not play a Common Event.
Button Press Sound:
- Adjust the sound effect played when a button is pressed.
Input Start Delay:
- How many frames (60 frames = 1 sec) delay before inputs are accepted to
not take the player by surprise?
QTE Duration:
- The duration in frames (60 frames = 1 sec).
- You may use code.
- Over 1000000 for infinite time.
Wait for QTE?:
- Wait until QTE Session is done?
---
QTE: Direction Struggle (✥)
- Starts a Direction Struggle QTE session.
- Only one QTE can occur at a time.
- No touch support.
Struggle Requirement:
- How many times must the player struggle in different directions to
succeed this QTE?
Success Switch ID:
- Select which Switch ID to turn ON if all of the struggle goal has been
met.
- Use 0 to not use.
Remaining Variable ID:
- Select which Variable ID to record how much time is remaining when the
QTE session finishes.
Struggle Common Event:
- Select a Common Event to play each struggle.
- Use 0 to not play a Common Event.
Button Press Sound:
- Adjust the sound effect played when a button is pressed.
Input Start Delay:
- How many frames (60 frames = 1 sec) delay before inputs are accepted to
not take the player by surprise?
QTE Duration:
- The duration in frames (60 frames = 1 sec).
- You may use code.
- Over 1000000 for infinite time.
Wait for QTE?:
- Wait until QTE Session is done?
---
QTE: Fill Gauge (OK)
- Starts a Fill Gauge QTE session.
- Only one QTE can occur at a time.
Fill Requirement:
- How many times must the player press OK to fill the gauge for this QTE
Session??
Success Switch ID:
- Select which Switch ID to turn ON if all of the fill goal has been met.
- Use 0 to not use.
Remaining Variable ID:
- Select which Variable ID to record how much time is remaining when the
QTE session finishes.
Fill Common Event:
- Select a Common Event to play each fill.
- Use 0 to not play a Common Event.
Button Press Sound:
- Adjust the sound effect played when a button is pressed.
Input Start Delay:
- How many frames (60 frames = 1 sec) delay before inputs are accepted to
not take the player by surprise?
QTE Duration:
- The duration in frames (60 frames = 1 sec).
- You may use code.
- Over 1000000 for infinite time.
Wait for QTE?:
- Wait until QTE Session is done?
---
QTE: Hold & Release (OK)
- Starts a Hold & Release QTE session.
- Only one QTE can occur at a time.
Max Duration:
- The duration in frames (60 frames = 1 sec).
- You may use code.
Not Overload Switch ID:
- Select which Switch ID to turn ON if the OK button was released before
overloading.
- Use 0 to not track.
Held Timed Variable ID:
- Select which Variable ID to keep track of how long the the OK button has
been held.
- Use 0 to not track.
Hold Common Event:
- Select a Common Event to play when the button is held.
- Use 0 to not play a Common Event.
Release Sound:
- Adjust the sound effect played when released.
Release Common Event:
- Select a Common Event to play when the button is released.
- Use 0 to not play a Common Event.
Overload Sound:
- Adjust the sound effect played when overloaded.
Overload Common Event:
- Select a Common Event to play when the QTE is overloaded.
- Use 0 to not play a Common Event.
Input Start Delay:
- How many frames (60 frames = 1 sec) delay before inputs are accepted to
not take the player by surprise?
Wait for QTE?:
- Wait until QTE Session is done?
---
QTE: Marcher (Page Up/Page Down)
- Starts a Marcher QTE session.
- Only one QTE can occur at a time.
- No touch support.
Marcher Requirement:
- How many times must the player march between different buttons to
succeed this QTE?
Success Switch ID:
- Select which Switch ID to turn ON if all of the marcher goal has been
met.
- Use 0 to not use.
Remaining Variable ID:
- Select which Variable ID to record how much time is remaining when the
QTE session finishes.
Page Up Common Event:
- Select a Common Event to play when pressing Page Up.
- Use 0 to not play a Common Event.
Page Down Common Event:
- Select a Common Event to play when pressing Page Down.
- Use 0 to not play a Common Event.
Button Press Sound:
- Adjust the sound effect played when a button is pressed.
Input Start Delay:
- How many frames (60 frames = 1 sec) delay before inputs are accepted to
not take the player by surprise?
QTE Duration:
- The duration in frames (60 frames = 1 sec).
- You may use code.
- Over 1000000 for infinite time.
Wait for QTE?:
- Wait until QTE Session is done?
---
QTE: Swapper (OK/Cancel)
- Starts a Switcher QTE session.
- Only one QTE can occur at a time.
- No touch support.
Swap Requirement:
- How many times must the player swap between different buttons to succeed
this QTE?
Success Switch ID:
- Select which Switch ID to turn ON if all of the swapper goal has been
met.
- Use 0 to not use.
Remaining Variable ID:
- Select which Variable ID to record how much time is remaining when the
QTE session finishes.
OK Common Event:
- Select a Common Event to play when pressing OK.
- Use 0 to not play a Common Event.
Cancel Common Event:
- Select a Common Event to play when pressing Cancel.
- Use 0 to not play a Common Event.
Button Press Sound:
- Adjust the sound effect played when a button is pressed.
Input Start Delay:
- How many frames (60 frames = 1 sec) delay before inputs are accepted to
not take the player by surprise?
QTE Duration:
- The duration in frames (60 frames = 1 sec).
- You may use code.
- Over 1000000 for infinite time.
Wait for QTE?:
- Wait until QTE Session is done?
---
QTE: Timed Hit (OK)
- Starts a Timed Hit QTE session.
- Only one QTE can occur at a time.
Timed Hit Picture:
- The picture used for the Timed Hit indicator.
- Leave empty to not display.
Coordinate X:
- X coordinate used for the Timed Hit picture.
- You may use JavaScript code.
Coordinate Y:
- Y coordinate used for the Timed Hit picture.
- You may use JavaScript code.
Press in X Frames:
- Press the OK button by these frames (60 frames = 1 sec) with some
leeway.
- You may use code.
Success Switch ID:
- Select which Switch ID to turn ON if the player lands the Timed Hit.
Timing Variable ID:
- Select which Variable ID to record how close the player is to the
Timed Hit timing.
Success Common Event:
- Select a Common Event to play if the player lands.
- Use 0 to not play a Common Event.
Success Sound:
- Adjust the sound effect played when landing on a hit zone.
Miss Common Event:
- Select a Common Event to play if the player misses.
- Use 0 to not play a Common Event.
Miss Sound:
- Adjust the sound effect played when NOT landing a hit zone.
Input Start Delay:
- How many frames (60 frames = 1 sec) delay before inputs are accepted to
not take the player by surprise?
Wait for QTE?:
- Wait until QTE Session is done?
---
QTE: Timed Sequence (Buttons)
- Starts a Timed Sequence QTE session.
- Only one QTE can occur at a time.
- No touch support.
Sequence:
- Set up Button Sequence where the player to press at certain timings.
Button:
- What button is needed to be pressed?
Press in X Frames:
- Press the button by these frames (60 frames = 1 sec) with some
leeway.
- You may use code.
Mechanic Settings:
Success Switch ID:
- Select which Switch ID to turn ON if the button is successfully hit.
- Use 0 to not change a switch.
Hit Common Event:
- Select a Common Event to play when this button is hit.
- Use 0 to not play a Common Event.
Button Press Sound:
- Adjust the sound effect played when a button is pressed.
Landing Icon:
- The icon used for the landing icon.
Direction:
- Which way do you want the buttons to move towards?
Hit Times Variable ID:
- Select which Variable ID to record how correct button inputs the player
has landed.
Miss Common Event:
- Select a Common Event to play if the player misses.
- Use 0 to not play a Common Event.
Miss Sound:
- Adjust the sound effect played when the player misses.
Input Start Delay:
- How many frames (60 frames = 1 sec) delay before inputs are accepted to
not take the player by surprise?
Wait for QTE?:
- Wait until QTE Session is done?
---
QTE: Timing Bar (OK)
- Starts a Timing Bar QTE session.
- Only one QTE can occur at a time.
Hit Zones:
- Set up Hit Zones where the player will gain points for landing on.
Hit Area:
Start:
- This is the starting location of the hit area.
- Use numbers between 0 and 100.
- You may use code.
End:
- This is the ending location of the hit area.
- Use numbers between 0 and 100.
- You may use code.
Label:
- Text displayed for this hit area (centered).
- Text codes are supported.
- Leave empty to not use.
Mechanic Settings:
Variable Points:
- If the cursor lands in this zone, then assign this many points to
- the results variable. You may use code.
Hit Common Event:
- Select a Common Event to play when this zone is hit.
- Use 0 to not play a Common Event.
Color Settings:
Area Color 1:
Area Color 2:
- Use #rrggbb for custom colors or regular numbers for text colors
from the Window Skin.
Cursor Icon:
- The icon used for the player icon.
Cursor Speed:
- The speed at which the cursor moves.
Success Switch ID:
- Select which Switch ID to turn ON if all of the player lands the cursor
on a Hit Zone.
Points Variable ID:
- Select which Variable ID to record how many points is earned from the
Hit Zone the player landed on.
Hit Sound:
- Adjust the sound effect played when landing on a hit zone.
Miss Sound:
- Adjust the sound effect played when NOT landing a hit zone.
Miss Common Event:
- Select a Common Event to play when NOT landing a hit zone.
- Use 0 to not play a Common Event.
Input Start Delay:
- How many frames (60 frames = 1 sec) delay before inputs are accepted to
not take the player by surprise?
QTE Duration:
- The duration in frames (60 frames = 1 sec).
- You may use code.
- Over 1000000 for infinite time.
Wait for QTE?:
- Wait until QTE Session is done?
--- Random Dungeon Maps VisuStella MZThe following are Plugin Commands that come with this plugin. They can be accessed through the Plugin Command event command. --- Random Map Plugin Commands
--- Random Map: Create & Go (Arrival Point)
- Generates a quick random map that will NOT be stored.
- Transfers player to a designated arrival point.
Cell Container Map ID:
- What is the Map ID of the Cell Container that has all the
map cell information?
Horizontal Cells:
- How many horizontal map cells are used?
- Minumum: 3.
- You may use JavaScript.
Vertical Cells:
- How many vertical map cells are used?
- Minumum: 3.
- You may use JavaScript.
Other Options:
Optional Settings:
- Additional options available for the random generation of
this dungeon's map.
- See Optional Settings section below for indepth descriptions.
---
Random Map: Create & Go (Coordinates)
- Generates a quick random map that will NOT be stored.
- Transfers to marked coordinates instead of Arrival Point.
Cell Container Map ID:
- What is the Map ID of the Cell Container that has all the
map cell information?
Horizontal Cells:
- How many horizontal map cells are used?
- Minumum: 3.
- You may use JavaScript.
Vertical Cells:
- How many vertical map cells are used?
- Minumum: 3.
- You may use JavaScript.
Coordinates:
X:
- Transfer the player to this X coordinate.
- You may use JavaScript.
Y:
- Transfer the player to this Y coordinate.
- You may use JavaScript.
Other Options:
Optional Settings:
- Additional options available for the random generation of
this dungeon's map.
- See Optional Settings section below for indepth descriptions.
---
Random Map: Create & Go (Event Position)
- Generates a quick random map that will NOT be stored.
- Transfers to named Event instead of Arrival Point.
Cell Container Map ID:
- What is the Map ID of the Cell Container that has all the
map cell information?
Horizontal Cells:
- How many horizontal map cells are used?
- Minumum: 3.
- You may use JavaScript.
Vertical Cells:
- How many vertical map cells are used?
- Minumum: 3.
- You may use JavaScript.
Event Name(s):
- Transfer the player to this event's position.
- If multiple names, pick one at random.
Offset X:
- Offset the transfer X position by this many tiles.
- Negative: left. Positive: right.
- You may use JavaScript.
Offset Y:
- Offset the transfer Y position by this many tiles.
- Negative: up. Positive: down.
- You may use JavaScript.
Other Options:
Optional Settings:
- Additional options available for the random generation of
this dungeon's map.
- See Optional Settings section below for indepth descriptions.
--- Named Map Plugin Commands
--- Named Map: Create & Go / Load (Arrival Point)
- Load an existing randomized key map or create and go to one.
- Transfers player to a designated arrival point.
Dungeon Name:
- What is the dungeon name for the map?
- This is used to store the Map ID information.
- This is NOT case sensitive.
Floor ID:
- Load/Create a map for which floor of this dungeon?
- Special cases: "next" and "prev".
- "Next" will increase the floor ID by 1.
- "Prev" will decrease the floor ID by 1.
- Floor 0 will be skipped.
- You may use JavaScript.
Load Key Map Data?:
- True: Load existing map data? If none, create new.
- False: Forcefully create new data regardless.
- If data is to be created, use the settings below.
Cell Container Map ID:
- True: Load existing map data? If none, create new.
- False: Forcefully create new data regardless.
- If data is to be created, then apply Cell Container Map ID settings
and Optional Settings.
Horizontal Cells:
- How many horizontal map cells are used?
- Minumum: 3.
- You may use JavaScript.
Vertical Cells:
- How many vertical map cells are used?
- Minumum: 3.
- You may use JavaScript.
Other Options:
Optional Settings:
- Additional options available for the random generation of
this dungeon's map.
- See Optional Settings section below for indepth descriptions.
---
Named Map: Create & Go / Load (Coordinates)
- Load an existing randomized key map or create and go to one.
- Transfers to marked coordinates instead of Arrival Point.
Dungeon Name:
- What is the dungeon name for the map?
- This is used to store the Map ID information.
- This is NOT case sensitive.
Floor ID:
- Load/Create a map for which floor of this dungeon?
- Special cases: "next" and "prev".
- "Next" will increase the floor ID by 1.
- "Prev" will decrease the floor ID by 1.
- Floor 0 will be skipped.
- You may use JavaScript.
Load Key Map Data?:
- True: Load existing map data? If none, create new.
- False: Forcefully create new data regardless.
- If data is to be created, then apply Cell Container Map ID settings
and Optional Settings.
Coordinates:
X:
- Transfer the player to this X coordinate.
- You may use JavaScript.
Y:
- Transfer the player to this Y coordinate.
- You may use JavaScript.
Cell Container Map ID:
- What is the Map ID of the Cell Container that has all the
map cell information?
Horizontal Cells:
- How many horizontal map cells are used?
- Minumum: 3.
- You may use JavaScript.
Vertical Cells:
- How many vertical map cells are used?
- Minumum: 3.
- You may use JavaScript.
Other Options:
Optional Settings:
- Additional options available for the random generation of
this dungeon's map.
- See Optional Settings section below for indepth descriptions.
---
Named Map: Create & Go / Load (Event Position)
- Load an existing randomized key map or create and go to one.
- Transfers to named Event instead of Arrival Point.
Dungeon Name:
- What is the dungeon name for the map?
- This is used to store the Map ID information.
- This is NOT case sensitive.
Floor ID:
- Load/Create a map for which floor of this dungeon?
- Special cases: "next" and "prev".
- "Next" will increase the floor ID by 1.
- "Prev" will decrease the floor ID by 1.
- Floor 0 will be skipped.
- You may use JavaScript.
Load Key Map Data?:
- True: Load existing map data? If none, create new.
- False: Forcefully create new data regardless.
- If data is to be created, then apply Cell Container Map ID settings
and Optional Settings.
Event Name(s):
- Transfer the player to this event's position.
- If multiple names, pick one at random.
Offset X:
- Offset the transfer X position by this many tiles.
- Negative: left. Positive: right.
- You may use JavaScript.
Offset Y:
- Offset the transfer Y position by this many tiles.
- Negative: up. Positive: down.
- You may use JavaScript.
Cell Container Map ID:
- What is the Map ID of the Cell Container that has all the
map cell information?
Horizontal Cells:
- How many horizontal map cells are used?
- Minumum: 3.
- You may use JavaScript.
Vertical Cells:
- How many vertical map cells are used?
- Minumum: 3.
- You may use JavaScript.
Other Options:
Optional Settings:
- Additional options available for the random generation of
this dungeon's map.
- See Optional Settings section below for indepth descriptions.
--- Variable Plugin Commands
--- Variable: Get Current Floor - Get the current floor number (or string) if the player is in a Random Dungeon Map. Variable ID: - Select a variable to store the current floor ID/string into. ---
Variable: Get Map ID, X, Y - Get the Map ID, Player X, Player Y if the player is in a Random Dungeon Map. Map Variable ID: - Select a variable to store the current map ID. Player X Variable ID: - Select a variable to store the player's X coordinate. Player Y Variable ID: - Select a variable to store the player's Y coordinate. --- Optional SettingsThese settings are the same for the "Random Map" and "Named Map" Plugin Commands and their effects behave the same way. --- Algorithm Empty Cell Modifier: - Low - Less Empty; High - More Empty - Low - More Full; High - Less Full Linear Modifier: - Low - Less Linear; High - More Linear - Low - More Turns; High - Less Turns Loop Modifier: - Low - Less Looping; High - More Looping - Low - More Dead Ends; High - Less Dead Ends Remove Padding: - If the dungeon map has padding, make a border of empty cells around it. --- Player
Arrival Direction:
- Which direction do you want the player to face when arriving?
Arrival Region(s):
- These regions determine initial arrival spawn point tiles.
- Overrides Plugin Parameters > General Settings' version.
- If a genenrated map does not have a tile marked with an Arrival Region,
it is considered an illegal map.
Arrival Spawn Cell X:
- Determines which cells are valid when the player first arrives on
the map.
- Anywhere - Any column is valid
-
- Left - Any cell in the left-most column of the map
- Center - Any cell in the center column of the map
- Right - Any cell in the right-most column of the map
-
- Left Half - Any cell in the left-half of the map
- Right Half - Any cell in the right-half of the map
-
- Inner - Any cell not the left-most or right-most column of the map
- Outer - Any cell in the left-most or right-most column of the map
Arrival Spawn Cell Y:
- Determines which cells are valid when the player first arrives on
the map.
- Anywhere - Any row is valid
-
- Top - Any cell in the top-most row of the map
- Middle - Any cell in the middle row of the map
- Bottom - Any cell in the bottom-most row of the map
-
- Top Half - Any cell in the top-half of the map
- Bottom Half - Any cell in the bottom-half of the map
-
- Inner - Any cell not the top-most or bottom-most row of the map
- Outer - Any cell in the top-most or bottom-most row of the map
Transfer Fade Style:
- What fade style do you want when transferring the player to the
generated random map?
--- Randomize Shop VisuStella MZThe following are Plugin Commands that come with this plugin. They can be accessed through the Plugin Command event command. --- Remote Event Plugin Commands
--- Remote Event: Create New Randomized Shop
- Creates a new shop instance registered for remote event with
randomized items.
Remote:
Map ID:
- ID of map, remote event is on.
- Use 0 for this map.
- You may use JavaScript code.
Event ID:
- ID of remote event.
- You may use JavaScript code.
Shop:
Item ID(s)
- Select which items can appear in the random pool.
Total #:
- How many items will appear from the list?
- You may use JavaScript code.
Weapon ID(s)
- Select which weapons can appear in the random pool.
Total #:
- How many weapons will appear from the list?
- You may use JavaScript code.
Armor ID(s)
- Select which armors can appear in the random pool.
Total #:
- How many armors will appear from the list?
- You may use JavaScript code.
Settings:
Open After?:
- Open the shop after creating data?
Absolute Maximum:
- Absolute maximum number of items in shop.
- If there are more, trim at random.
Allow Duplicates?:
- Allow duplicate entries of items, weapons, and armors?
- This is primarily used for other plugins.
- Prices for duplicate items will be equal to the price of the first
instance of that item type.
- This is how it is, even in vanilla RPG Maker MZ.
Purchase Only?:
- Make the shop purchase-only?
Price Variance?:
- Allow the shop to have variance in prices from their base values?
Variance Rate:
- What variance rate do you wish to use?
- 0.0 = 0%, 0.1 = 10%; 1.0 = 100%
Price Rate:
- Final price rate (applied after everything else).
- 0.0 = 0%, 0.1 = 10%; 1.0 = 100%
---
Remote Event: Create New JS Shop
- Creates a new shop instance registered for remote event
with items determined through JavaScript.
Remote:
Map ID:
- ID of map, remote event is on.
- Use 0 for this map.
- You may use JavaScript code.
Event ID:
- ID of remote event.
- You may use JavaScript code.
Shop:
JS: Goods:
- Code used to determine the goods that appear in remote shop.
Settings:
Open After?:
- Open the shop after creating data?
Purchase Only?:
- Make the shop purchase-only?
Price Variance?:
- Allow the shop to have variance in prices from their base values?
Variance Rate:
- What variance rate do you wish to use?
- 0.0 = 0%, 0.1 = 10%; 1.0 = 100%
Price Rate:
- Final price rate (applied after everything else).
- 0.0 = 0%, 0.1 = 10%; 1.0 = 100%
---
Remote Event: Open Last Shop
- Reopens the last shop for remote event, retaining any and all randomized
items in their order and main shop settings.
- One Time Purchase settings are not saved and have to be manually reenabled.
Remote:
Map ID:
- ID of map, remote event is on.
- Use 0 for this map.
- You may use JavaScript code.
Event ID:
- ID of remote event.
- You may use JavaScript code.
--- This Event Plugin Commands
--- This Event: Create New Randomized Shop
- Creates a new shop instance registered for this event
with randomized items.
Shop:
Item ID(s)
- Select which items can appear in the random pool.
Total #:
- How many items will appear from the list?
- You may use JavaScript code.
Weapon ID(s)
- Select which weapons can appear in the random pool.
Total #:
- How many weapons will appear from the list?
- You may use JavaScript code.
Armor ID(s)
- Select which armors can appear in the random pool.
Total #:
- How many armors will appear from the list?
- You may use JavaScript code.
Settings:
Open After?:
- Open the shop after creating data?
Absolute Maximum:
- Absolute maximum number of items in shop.
- If there are more, trim at random.
Allow Duplicates?:
- Allow duplicate entries of items, weapons, and armors?
- This is primarily used for other plugins.
- Prices for duplicate items will be equal to the price of the first
instance of that item type.
- This is how it is, even in vanilla RPG Maker MZ.
Purchase Only?:
- Make the shop purchase-only?
Price Variance?:
- Allow the shop to have variance in prices from their base values?
Variance Rate:
- What variance rate do you wish to use?
- 0.0 = 0%, 0.1 = 10%; 1.0 = 100%
Price Rate:
- Final price rate (applied after everything else).
- 0.0 = 0%, 0.1 = 10%; 1.0 = 100%
---
This Event: Create New JS Shop
- Creates a new shop instance registered for this event
with items determined through JavaScript.
Shop:
JS: Goods:
- Code used to determine the goods that appear in this shop.
Settings:
Open After?:
- Open the shop after creating data?
Purchase Only?:
- Make the shop purchase-only?
Price Variance?:
- Allow the shop to have variance in prices from their base values?
Variance Rate:
- What variance rate do you wish to use?
- 0.0 = 0%, 0.1 = 10%; 1.0 = 100%
Price Rate:
- Final price rate (applied after everything else).
- 0.0 = 0%, 0.1 = 10%; 1.0 = 100%
---
This Event: Open Last Shop - Reopens the last shop for this event, retaining any and all randomized items in their order and main shop settings. - One Time Purchase settings are not saved and have to be manually reenabled. --- Recruiting Board VisuStella MZThe following are Plugin Commands that come with this plugin. They can be accessed through the Plugin Command event command. --- Scene Plugin Commands
--- Scene: Open Recruiting Boarding - Opens the recruiting board to hire new actors. - Cannot be used in battle. Actor ID(s): - Select which Actor ID(s) to be able to recruit. Discount Rate: - Determine the discount rate used for this shop. - You may use JavaScript code. --- Save Core VisuStella MZThe following are Plugin Commands that come with this plugin. They can be accessed through the Plugin Command event command. --- Autosave Plugin Commands---
Autosave: Enable/Disable - Enable or Disable Autosave - Requires Database => System 1 => [x] Enable Autosave - This does NOT mean it will change autosaving for other loaded game saves or new game sessions. - This ONLY applies to the local session for the dev to control whether or not autosaving will occur at its usual conditions and scenarios. Enable or Disable?: - Enable or disable autosave? ---
Autosave: (Stage 1) Request - Autosaves the game at current point if enabled. - Requires Database => System 1 => [x] Enable Autosave - Autosave does not go through if it is neither enabled in the database or in-game through the "Autosave: Enable/Disable" plugin command. - This Plugin Command will not autosave if the player turned off "Autosave" in the Options Menu. ---
Autosave: (Stage 2) Execute - Executes autosaves the game at the current point. - Requires Database => System 1 => [x] Enable Autosave - This will require autosave to be enabled through the database, but it will ignore the "Autosave: Enable/Disable" plugin command state. - This Plugin Command will not autosave if the player turned off "Autosave" in the Options Menu. ---
Autosave: (Stage 3) Force - Forces autosaves the game at the current point. - Requires Database => System 1 => [x] Enable Autosave - This will require autosave to be enabled through the database, but it will ignore the "Autosave: Enable/Disable" plugin command state. --- Save Plugin Commands---
Save: Current Slot - Process the game's current save at the current point. - Must be outside of battle and on the map. ---
Save: Set Description - Set the description text that will appear in the save files. Text: - Insert desired save description text here. - Text codes supported. - \V[x], \N[x], \P[x] are save local. - Other text codes will draw data from the currently active game. ---
Save: Set Picture - Set the picture that would appear in the save file. Filename: - Input the filename here of the desired picture. --- Shop Common Events VisuStella MZThe following are Plugin Commands that come with this plugin. They can be accessed through the Plugin Command event command. --- Return Plugin Commands
---
Return: To Last Shop - Return to the last shop if coming from a Shop Common Event. --- Shop Bust Style UI VisuStella MZThe following are Plugin Commands that come with this plugin. They can be accessed through the Plugin Command event command. --- General Shop Plugin Commands
--- General Shop: Clear UI Settings - Clear Bust Style UI settings for general shops. --- General Shop: Setup UI Settings
- Setup Bust Style UI settings for general shops.
- Use this before a "Shop Processing" event command.
Background Graphic:
- What background image do you wish to use?
Bust Graphic:
- What character bust image do you wish to use?
Bust Settings:
- These settings adjust the bust settings and how they visually appear
in-game for the general shop.
- Look in the Plugin Parameters for the identical settings.
- If this is left empty or at {}, then use the defaults found in the
Plugin Parameters.
Messages:
- What messages would you like to use for this shop?
- Look in the Plugin Parameters for the identical settings.
- If this is left empty or at {}, then use the defaults found in the
Plugin Parameters.
--- Hospital Shop Plugin Commands
--- Hospital: Clear UI Settings - Clear Bust Style UI settings for Scene_Hospital. - Requires VisuMZ_4_HospitalShop! --- Hospital: Setup UI Settings
- Setup Bust Style UI settings for Scene_Hospital.
- Requires VisuMZ_4_HospitalShop!
Background Graphic:
- What background image do you wish to use?
Bust Graphic:
- What character bust image do you wish to use?
Bust Settings:
- These settings adjust the bust settings and how they visually appear
in-game for the hospital.
- Look in the Plugin Parameters for the identical settings.
- If this is left empty or at {}, then use the defaults found in the
Plugin Parameters.
Messages:
- What messages would you like to use for this hospital?
- Look in the Plugin Parameters for the identical settings.
- If this is left empty or at {}, then use the defaults found in the
Plugin Parameters.
--- Recruiting Board Plugin Commands
--- Recruiting Board: Clear UI Settings - Clear Bust Style UI settings for Scene_RecruitBoard. - Requires VisuMZ_4_RecruitingBoard! --- Recruiting Board: Setup UI Settings
- Setup Bust Style UI settings for Scene_RecruitBoard.
- Requires VisuMZ_4_RecruitingBoard!
Background Graphic:
- What background image do you wish to use?
Bust Graphic:
- What character bust image do you wish to use?
Bust Settings:
- These settings adjust the bust settings and how they visually appear
in-game for the recruiting board.
- Look in the Plugin Parameters for the identical settings.
- If this is left empty or at {}, then use the defaults found in the
Plugin Parameters.
Messages:
- What messages would you like to use for this recruiting board?
- Look in the Plugin Parameters for the identical settings.
- If this is left empty or at {}, then use the defaults found in the
Plugin Parameters.
--- Skill Shop Plugin Commands
--- Skill Shop: Clear UI Settings - Clear Bust Style UI settings for Scene_SkillShop. - Requires VisuMZ_4_SkillShop! --- Skill Shop: Setup UI Settings
- Setup Bust Style UI settings for Scene_SkillShop.
- Requires VisuMZ_4_SkillShop!
Background Graphic:
- What background image do you wish to use?
Bust Graphic:
- What character bust image do you wish to use?
Bust Settings:
- These settings adjust the bust settings and how they visually appear
in-game for the skill shop.
- Look in the Plugin Parameters for the identical settings.
- If this is left empty or at {}, then use the defaults found in the
Plugin Parameters.
Messages:
- What messages would you like to use for the skill shop?
- Look in the Plugin Parameters for the identical settings.
- If this is left empty or at {}, then use the defaults found in the
Plugin Parameters.
--- Side Chatter VisuStella MZThe following are Plugin Commands that come with this plugin. They can be accessed through the Plugin Command event command. --- Side Chatter Plugin Commands
--- Side Chatter: Add Entry
- Adds a side chatter entry.
Text:
- What text do you wish to add to the side chatter?
- Text codes are allowed.
Face Filename:
- What face graphic do you wish to display in the side chatter?
- Leave empty to not use.
Face Index:
- What is the index of the face graphic you wish to display?
- Index values start at 0.
Sound Effect:
- Filename of the sound effect played.
- Leave empty for no sound effect.
Volume:
- Volume of the sound effect played.
Pitch:
- Pitch of the sound effect played.
Pan:
- Pan of the sound effect played.
Delay:
- Delay this side chatter from appearing in this many frames.
- 60 frames = 1 second.
- 0 for instant.
Screen Side:
- Which side of the screen do you wish to add the Side Chatter to?
- If Plugin Command is using "default" as its value, refer to whatever
the setting is found in the Plugin Parameters.
---
Side Chatter: Clear - Clears Side Chatter. Screen Side: - Which side of the screen do you wish to clear the Side Chatter from? --- Side Chatter: Wait - Causes the game to wait until there is no more side chatter. Screen Side: - Which side of the screen do you wish to wait for? --- Skill Cooldowns VisuStella MZThe following are Plugin Commands that come with this plugin. They can be accessed through the Plugin Command event command. --- Actor Plugin Commands---
Actor: Skill Cooldown - Change cooldowns for a specific skill(s). Step 1: Actor ID(s): - Select which Actor Target ID(s) to affect. Step 2: Skill ID(s): - Select which Skill ID(s) to affect. Step 3: Operation: - Set the operation used. =, +, -, *, /, % Step 4: Value - Select the modifying value. - You may use JavaScript code. ---
Actor: SType Cooldown - Change cooldowns for all skills of a skill type(s). Step 1: Actor ID(s): - Select which Actor Target ID(s) to affect. Step 2: Skill Type ID(s): - Select which Skill Type ID(s) to affect. Step 3: Operation: - Set the operation used. =, +, -, *, /, % Step 4: Value - Select the modifying value. - You may use JavaScript code. ---
Actor: Global Cooldown - Change cooldowns for all skills for target(s). Step 1: Actor ID(s): - Select which Actor Target ID(s) to affect. Step 2: Operation: - Set the operation used. =, +, -, *, /, % Step 3: Value - Select the modifying value. - You may use JavaScript code. --- Enemy Plugin Commands---
Enemy: Skill Cooldown - Change cooldowns for a specific skill(s). Step 1: Enemy Index(es): - Select which Enemy Index(es) to affect. Step 2: Skill ID(s): - Select which Skill ID(s) to affect. Step 3: Operation: - Set the operation used. =, +, -, *, /, % Step 4: Value - Select the modifying value. - You may use JavaScript code. ---
Enemy: SType Cooldown - Change cooldowns for all skills of a skill type(s). Step 1: Enemy Index(es): - Select which Enemy Index(es) to affect. Step 2: Skill Type ID(s): - Select which Skill Type ID(s) to affect. Step 3: Operation: - Set the operation used. =, +, -, *, /, % Step 4: Value - Select the modifying value. - You may use JavaScript code. ---
Enemy: Global Cooldown - Change cooldowns for all skills for target(s). Step 1: Enemy Index(es): - Select which Enemy Index(es) to affect. Step 2: Operation: - Set the operation used. =, +, -, *, /, % Step 3: Value - Select the modifying value. - You may use JavaScript code. --- Skill Learn System VisuStella MZThe following are Plugin Commands that come with this plugin. They can be accessed through the Plugin Command event command. --- Ability Points Plugin Commands
---
Ability Points: Gain - The target actor(s) gains Ability Points. - Gained amounts are affected by Ability Point bonus rates. Actor ID(s): - Select which Actor ID(s) to affect. Class ID(s): - Select which Class ID(s) to gain Ability Points for. - Use "0" for the current class. Ability Points: - Determine how many Ability Points will be gained. - You may use code. ---
Ability Points: Add - The target actor(s) receives Ability Points. - Received amounts are NOT affected by Ability Point bonus rates. Actor ID(s): - Select which Actor ID(s) to affect. Class ID(s): - Select which Class ID(s) to receive Ability Points for. - Use "0" for the current class. Ability Points: - Determine how many Ability Points will be added. - You may use code. ---
Ability Points: Lose - The target actor(s) loses Ability Points. - Lost amounts are NOT affected by Ability Point bonus rates. Actor ID(s): - Select which Actor ID(s) to affect. Class ID(s): - Select which Class ID(s) to lose Ability Points for. - Use "0" for the current class. Ability Points: - Determine how many Ability Points will be lost. - You may use code. ---
Ability Points: Set - Changes the exact Ability Points for the target actor(s). - Changed amounts are NOT affected by Ability Point bonus rates. Actor ID(s): - Select which Actor ID(s) to affect. Class ID(s): - Select which Class ID(s) to change Ability Points for. - Use "0" for the current class. Ability Points: - Determine how many Ability Points will be set exactly to. - You may use code. --- Skill Points Plugin Commands
---
Skill Points: Gain - The target actor(s) gains Skill Points. - Gained amounts are affected by Skill Point bonus rates. Actor ID(s): - Select which Actor ID(s) to affect. Class ID(s): - Select which Class ID(s) to gain Skill Points for. - Use "0" for the current class. Skill Points: - Determine how many Skill Points will be gained. - You may use code. ---
Skill Points: Add - The target actor(s) receives Skill Points. - Received amounts are NOT affected by Skill Point bonus rates. Actor ID(s): - Select which Actor ID(s) to affect. Class ID(s): - Select which Class ID(s) to receive Skill Points for. - Use "0" for the current class. Skill Points: - Determine how many Skill Points will be added. - You may use code. ---
Skill Points: Lose - The target actor(s) loses Skill Points. - Lost amounts are NOT affected by Skill Point bonus rates. Actor ID(s): - Select which Actor ID(s) to affect. Class ID(s): - Select which Class ID(s) to lose Skill Points for. - Use "0" for the current class. Skill Points: - Determine how many Skill Points will be lost. - You may use code. ---
Skill Points: Set - Changes the exact Skill Points for the target actor(s). - Changed amounts are NOT affected by Skill Point bonus rates. Actor ID(s): - Select which Actor ID(s) to affect. Class ID(s): - Select which Class ID(s) to change Skill Points for. - Use "0" for the current class. Skill Points: - Determine how many Skill Points will be set exactly to. - You may use code. --- System Plugin Commands---
System: Show Skill Learn in Skill Menu? - Shows/hides Skill Learn inside the skill menu. Show/Hide?: - Shows/hides Skill Learn inside the skill menu. --- Skill Mastery VisuStella MZThe following are Plugin Commands that come with this plugin. They can be accessed through the Plugin Command event command. --- Actor Plugin Commands
---
Actor: Gain Skill Mastery / EXP
- Target actor(s) gain Skill Mastery and/or EXP.
Actor ID(s):
- Select which Actor ID(s) to affect.
Skill ID:
- What is the ID of the skill to adjust?
Level:
- Gains this many mastery levels for the skill.
EXP:
- Gains this much exp of the mastery level.
---
Actor: Set Skill Mastery / EXP
- Sets the Skill Mastery level and EXP for target actor(s).
Actor ID(s):
- Select which Actor ID(s) to affect.
Skill ID:
- What is the ID of the skill to adjust?
Level:
- Sets the mastery level of the skill.
EXP:
- Sets the exp of the current mastery level.
--- Enemy Plugin Commands
---
Enemy: Gain Skill Mastery / EXP
- Target enemy(ies) gain Skill Mastery and/or EXP.
Enemy Index(es):
- Select which Enemy Index(es) to affect.
- Index values start at 0.
Skill ID:
- What is the ID of the skill to adjust?
Level:
- Gains this many mastery levels for the skill.
EXP:
- Gains this much exp of the mastery level.
---
Enemy: Set Skill Mastery / EXP
- Sets the Skill Mastery level and EXP for target enemy(ies).
Enemy Index(es):
- Select which Enemy Index(es) to affect.
- Index values start at 0.
Skill ID:
- What is the ID of the skill to adjust?
Level:
- Sets the mastery level of the skill.
EXP:
- Sets the exp of the current mastery level.
--- Skill Shop VisuStella MZThe following are Plugin Commands that come with this plugin. They can be accessed through the Plugin Command event command. --- Scene Plugin Commands
--- Scene: Open Skill Shop - Opens a skill shop with the below skills for sale. - Cannot be used in battle. Skill ID(s): - Select which Skill ID(s) to include in the shop. Discount Rate: - Determine the discount rate used for this shop. - You may use JavaScript code. --- Skills and States Core VisuStella MZThe following are Plugin Commands that come with this plugin. They can be accessed through the Plugin Command event command. --- Skill Cost Plugin Commands---
Skill Cost: Emulate Actor Pay - Target actor(s) emulates paying for skill cost. - Actor ID(s): - Select which Actor ID(s) will pay skill cost. Skill ID: - What is the ID of the skill to emulate paying the skill cost for? ---
Skill Cost: Emulate Enemy Pay - Target enemy(s) emulates paying for skill cost. - Enemy Index(es): - Select which enemy index(es) will pay skill cost. Skill ID: - What is the ID of the skill to emulate paying the skill cost for? --- State Turns Plugin Commands---
State Turns: Actor State Turns Change By - Changes actor(s) state turns by an amount. - Only works on states that can have turns. Actor ID(s): - Select which Actor ID(s) to affect. State ID: - What is the ID of the state you wish to change turns for? - Only works on states that can have turns. Change Turns By: - How many turns should the state be changed to? - You may use JavaScript code. Auto-Add State?: - Automatically adds state if actor(s) does not have it applied? ---
State Turns: Actor State Turns Change To - Changes actor(s) state turns to a specific value. - Only works on states that can have turns. Actor ID(s): - Select which Actor ID(s) to affect. State ID: - What is the ID of the state you wish to change turns for? - Only works on states that can have turns. Change Turns To: - How many turns should the state be changed to? - You may use JavaScript code. Auto-Add State?: - Automatically adds state if actor(s) does not have it applied? ---
State Turns: Enemy State Turns Change By - Changes enemy(s) state turns by an amount. - Only works on states that can have turns. Enemy Index(es): - Select which enemy index(es) to affect. State ID: - What is the ID of the state you wish to change turns for? - Only works on states that can have turns. Change Turns By: - How many turns should the state be changed to? - You may use JavaScript code. Auto-Add State?: - Automatically adds state if actor(s) does not have it applied? ---
State Turns: Enemy State Turns Change To - Changes enemy(s) state turns to a specific value. - Only works on states that can have turns. Enemy Index(es): - Select which enemy index(es) to affect. State ID: - What is the ID of the state you wish to change turns for? - Only works on states that can have turns. Change Turns To: - How many turns should the state be changed to? - You may use JavaScript code. Auto-Add State?: - Automatically adds state if actor(s) does not have it applied? --- Tile Grafter System VisuStella MZThe following are Plugin Commands that come with this plugin. They can be accessed through the Plugin Command event command. --- Graft Plugin Commands
---
Graft: Import Tiles Exactly
- Import and graft exact tiles from source map to current map.
- Must be used on the map scene!
Source Map ID:
- Insert the number of the map. Use 0 for current map.
- You can use JavaScript code.
Source X:
- Insert source map's X location to start importing from.
- You can use JavaScript code.
Source Y:
- Insert source map's Y location to start importing from.
- You can use JavaScript code.
Current Map:
Target X:
- Insert current map's X location to import to.
- You can use JavaScript code.
Target Y:
- Insert current map's Y location to import to.
- You can use JavaScript code.
Width:
- What is the width of the area to import?
- You can use JavaScript code.
Height:
- What is the height of the area to import?
- You can use JavaScript code.
Import Layers:
L1: Ground:
- Utilize this layer? This is the ground layer.
L2: Lower:
- Utilize this layer? This is the lower layer.
L3: Middle:
- Utilize this layer? This is the middle layer.
L4: Upper:
- Utilize this layer? This is the upper layer.
L5: Shadow:
- Utilize this layer? This is the shadow layer.
L6: Region:
- Utilize this layer? This is the region layer.
L7: Events:
- Utilize this layer? This is the events layer.
- Existing spawned events will be cleared before grafting.
---
Graft: Import Tiles with Autotile
- Import and graft with autotiles from source map to current map.
- Must be used on the map scene!
Source Map ID:
- Insert the number of the map. Use 0 for current map.
- You can use JavaScript code.
Source X:
- Insert source map's X location to start importing from.
- You can use JavaScript code.
Source Y:
- Insert source map's Y location to start importing from.
- You can use JavaScript code.
Current Map:
Target X:
- Insert current map's X location to import to.
- You can use JavaScript code.
Target Y:
- Insert current map's Y location to import to.
- You can use JavaScript code.
Width:
- What is the width of the area to import?
- You can use JavaScript code.
Height:
- What is the height of the area to import?
- You can use JavaScript code.
Import Layers:
L1: Ground:
- Utilize this layer? This is the ground layer.
L2: Lower:
- Utilize this layer? This is the lower layer.
L3: Middle:
- Utilize this layer? This is the middle layer.
L4: Upper:
- Utilize this layer? This is the upper layer.
L5: Shadow:
- Utilize this layer? This is the shadow layer.
L6: Region:
- Utilize this layer? This is the region layer.
L7: Events:
- Utilize this layer? This is the events layer.
- Existing spawned events will be cleared before grafting.
--- Preload Plugin Commands
---
Preload: Preload Source Map - Preload a source map to use for grafting. - Must be used on the map scene! Source Map ID: - Insert the number of the map. - You can use JavaScript code. --- Restore Plugin Commands
---
Restore: Clear Tiles for Map
- Clears tiles on current map to empty tiles.
- Must be used on the map scene!
Current Map:
Target X:
- Insert current map's X location to start clearing.
- You can use JavaScript code.
Target Y:
- Insert current map's Y location to start clearing.
- You can use JavaScript code.
Width:
- What is the width of the area to clear?
- You can use JavaScript code.
Height:
- What is the height of the area to clear?
- You can use JavaScript code.
Clear Layers:
L1: Ground:
- Utilize this layer? This is the ground layer.
L2: Lower:
- Utilize this layer? This is the lower layer.
L3: Middle:
- Utilize this layer? This is the middle layer.
L4: Upper:
- Utilize this layer? This is the upper layer.
L5: Shadow:
- Utilize this layer? This is the shadow layer.
L6: Region:
- Utilize this layer? This is the region layer.
L7: Events:
- Utilize this layer? This is the events layer.
- Existing spawned events will be cleared.
---
Restore: Revert Tiles for Map
- Revert tiles on current map to their original tiles.
- Must be used on the map scene!
Current Map:
Target X:
- Insert current map's X location to start reverting.
- You can use JavaScript code.
Target Y:
- Insert current map's Y location to start reverting.
- You can use JavaScript code.
Width:
- What is the width of the area to revert?
- You can use JavaScript code.
Height:
- What is the height of the area to revert?
- You can use JavaScript code.
Revert Layers:
L1: Ground:
- Utilize this layer? This is the ground layer.
L2: Lower:
- Utilize this layer? This is the lower layer.
L3: Middle:
- Utilize this layer? This is the middle layer.
L4: Upper:
- Utilize this layer? This is the upper layer.
L5: Shadow:
- Utilize this layer? This is the shadow layer.
L6: Region:
- Utilize this layer? This is the region layer.
L7: Events:
- Utilize this layer? This is the events layer.
- Existing spawned events will be cleared.
--- Switch Plugin Commands
---
Switches: Check for Events in Area
- Checks area for any events of various types.
- Must be used on the map scene!
Switches
ID for Normal Events:
- This switch will turn ON if any normal events are found within the
target area vicinity.
- OFF otherwise.
ID for Non-Graft Spawns:
- This switch will turn ON if any non-grafted spawned events are found
within the target area vicinity.
- OFF otherwise.
ID for Grafted Spawns:
- This switch will turn ON if any grafted spawned events are found
within the target area vicinity.
- OFF otherwise.
Target Checked Area
Target X:
- Insert current map's X location to check.
- You can use JavaScript code.
Target Y:
- Insert current map's Y location to check.
- You can use JavaScript code.
Width:
- What is the width of the area to check?
- You can use JavaScript code.
Height:
- What is the height of the area to check?
- You can use JavaScript code.
--- Tutorial Panel System VisuStella MZThe following are Plugin Commands that come with this plugin. They can be accessed through the Plugin Command event command. --- Tutorial Plugin Commands---
Tutorial: Call
- Call forth a tutorial of the designated Tutorial ID Key.
- Use on the map or battle scenes.
Tutorial ID Key:
- What is the tutorial identification key?
Force View?:
- Forcefully opens the tutorial regardless of the Options settings or if
"Bypass if Registered?" is enabled.
Bypass if Registered?:
- Ignores opening the tutorial if the tutorial has already been
viewed once.
Register Tutorial?:
- Registers the tutorial to the Tutorial List that the player can revisit.
---
Tutorial: Register ID Key(s) - Register specific Tutorial ID Key(s) without opening the tutorial. Tutorial ID Key(s): - Add which tutorial identification key(s)? --- Debug Plugin Commands---
Debug: Full Tutorial List? - For playtest only! Allows you to fully view Tutorial. - Resets when the game client is closed. Reveal?: - Fully reveals Tutorial list for playtesting. - Resets when the game client is closed. --- System Plugin Commands---
System: Enable Tutorial List in Menu? - Enables/disables "Tutorial List" menu inside the main menu. Enable/Disable?: - Enables/disables "Tutorial List" menu inside the main menu. ---
System: Show Tutorial List in Menu? - Shows/hides "Tutorial List" inside the main menu. Show/Hide?: - Shows/hides "Tutorial List" inside the main menu. --- Unique Tile Effects VisuStella MZThe following are Plugin Commands that come with this plugin. They can be accessed through the Plugin Command event command. --- Player Plugin Commands---
Player: Set Bounce Status - Changes the player character's ability to navigate on Bounce Tiles. Immune?: - Changes the player character's ability to navigate on Bounce Tiles. ---
Player: Set Force Move Status - Changes the player character's ability to navigate on Force Move Tiles. Immune?: - Changes the player character's ability to navigate on Force Move Tiles. ---
Player: Set Lava Status - Changes the player character's ability to navigate on Lava Tiles. Immune?: - Changes the player character's ability to navigate on Lava Tiles. ---
Player: Set Quicksand Status - Changes the player character's ability to navigate on Quicksand Tiles. Immune?: - Changes the player character's ability to navigate on Quicksand Tiles. ---
Player: Set Shock Status - Changes the player character's ability to navigate on Shock Tiles. Immune?: - Changes the player character's ability to navigate on Shock Tiles. ---
Player: Set Slippery Status - Changes the player character's ability to navigate on Slippery Tiles. Immune?: - Changes the player character's ability to navigate on Slippery Tiles. ---
Player: Set Swimming Status - Changes the player character's ability to navigate on water tiles. Allow?: - Changes the player character's ability to navigate on water tiles. --- Variable Gauges VisuStella MZThe following are Plugin Commands that come with this plugin. They can be accessed through the Plugin Command event command. --- Battle Plugin Commands
--- Battle: Add Variable Gauge(s) - Adds Variable Gauge(s) to be visible in battle. Key(s): - List the key(s) of the Variable Gauge(s) you want visible in battle. --- Battle: Remove Variable Gauge(s) - Remove Variable Gauge(s) from view in battle. Key(s): - List the key(s) of the Variable Gauge(s) you want removed from battle. --- Battle: Remove All Gauge(s) - Remove All Variable Gauge(s) from view in battle. --- Map Plugin Commands
--- Map: Add Variable Gauge(s) - Adds Variable Gauge(s) to be visible on the map. Key(s): - List the key(s) of the Variable Gauge(s) you want visible on the map. --- Map: Remove Variable Gauge(s)
- Remove Variable Gauge(s) from view in battle.
Key(s):
- List the key(s) of the Variable Gauge(s) you want removed from the
map scene.
--- Map: Remove All Gauge(s) - Remove All Variable Gauge(s) from view on the map. --- Refresh Plugin Commands
--- Refresh: All Variable Gauge(s) - Refresh all Variable Gauges currently visible. --- Refresh: Target Variable Gauge(s) - Refresh Target Variable Gauges currently visible. Key(s): - List the key(s) of the Variable Gauge(s) you want refreshed. --- System Plugin Commands
--- System: Variable Gauge Visibility - Shows/hides all variable gauges on the screen. Visibility: - Shows/hides all Variable Gauges on the screen. --- Victory Aftermath VisuStella MZThe following are Plugin Commands that come with this plugin. They can be accessed through the Plugin Command event command. --- Actor Plugin Commands---
Actor: Add Level Up Quotes - Add new entries target actor's level up quotes. Actor ID: - Select ID of target actor to add quotes for. New Quotes: - Add new entries to actor's level up quotes. - Text codes allowed. %1 - Actor's Name ---
Actor: Add New Skill Quotes - Add new entries target actor's new skill quotes. Actor ID: - Select ID of target actor to add quotes for. New Quotes: - Add new entries to actor's new skill quotes. - Text codes allowed. %1 - Actor's Name ---
Actor: Clear Level Up Quotes - Clear target actor's level up quotes. Actor ID: - Select ID of target actor to clear quotes for. ---
Actor: Clear New Skill Quotes - Clear target actor's new skill quotes. Actor ID: - Select ID of target actor to clear quotes for. --- Post-Battle Plugin Commands--- Post-Battle: Set Post-Battle BGM - This determines what BGM to play after battle. - Use only in battle! - For clarification, this affects the BGM that is played upon returning to the map scene. Filename: - Filename of the BGM played. Volume: - Volume of the BGM played. Pitch: - Pitch of the BGM played. Pan: - Pan of the BGM played. --- Post-Battle: Set Post-Battle BGS - This determines what BGS to play after battle. - Use only in battle! - For clarification, this affects the BGS that is played upon returning to the map scene. Filename: - Filename of the BGS played. Volume: - Volume of the BGS played. Pitch: - Pitch of the BGS played. Pan: - Pan of the BGS played. --- System Plugin Commands---
System: Bypass Victory Motion - Bypass actors performing their victory motion? Bypass?: - Bypass actors performing their victory motion? ---
System: Bypass Victory Music - Bypass playing the victory music? Bypass?: - Bypass playing the victory music? ---
System: Bypass Victory Phase - Bypass the entire victory phase and all aspects about it? Bypass?: - Bypass the entire victory phase and all aspects about it? --- System: Change Victory BGM - Changes victory BGM. Filename: - Filename of the BGM to change to. Volume: - Volume of the BGM to change to. Pitch: - Pitch of the BGM to change to. Pan: - Pan of the BGM to change to. --- Visual Battle Environment VisuStella MZThe following are Plugin Commands that come with this plugin. They can be accessed through the Plugin Command event command. --- Back Environment-Type Plugin Commands
---
Back Environment: Add/Change
- Adds/changes the target back environment.
Settings:
ID:
- Select the target environment ID to add/change.
- Lower ID's appear below. Higher ID's appear above.
Folder and Filename:
- What is the folder and filename?
Extra Settings:
- Extra settings that can be altered for the environment object.
- For details, refer to section below.
Duration:
- How many frames would it take to alter settings?
---
Back Environment: Fade Opacity - Fades the target back environment(s) opacity to a different value. ID(s): - Target which back environment(s)? - Cannot target the default battlebacks. Target Opacity: - What opacity level to this value (0-255). - You may use JavaScript code to determine the value. Duration: - How many frames should this change take? - You may use JavaScript code to determine the value. ---
Back Environment: Remove - Removes target back environment(s). ID(s): - Remove which back environment(s)? - Cannot remove the default battlebacks. --- Front Environment-Type Plugin Commands
---
Front Environment: Add/Change
- Adds/changes the target front environment.
Settings:
ID:
- Select the target environment ID to add/change.
- Lower ID's appear below. Higher ID's appear above.
Folder and Filename:
- What is the folder and filename?
Extra Settings:
- Extra settings that can be altered for the environment object.
- For details, refer to section below.
Duration:
- How many frames would it take to alter settings?
---
Front Environment: Fade Opacity - Fades the target front environment(s) opacity to a different value. ID(s): - Target which front environment(s)? - Cannot target the default battlebacks. Target Opacity: - What opacity level to this value (0-255). - You may use JavaScript code to determine the value. Duration: - How many frames should this change take? - You may use JavaScript code to determine the value. ---
Front Environment: Remove - Removes target front environment(s). ID(s): - Remove which front environment(s)? - Cannot remove the default battlebacks. --- Extra-Settings---
Extra Settings
- These settings are used for both the "Back Environment: Add/Change" and
"Front Environment: Add/Change" Plugin Commands.
Appearance:
Scale Style:
- The scaling style used for this environment image.
- Battle Core Setting
- MZ (MZ's default style)
- 1:1 (No Scaling)
- Scale To Fit (Scale to screen size)
- Scale Down (Scale Downward if Larger than Screen)
- Scale Up (Scale Upward if Smaller than Screen)
Opacity:
- What is the opacity level for this image?
- You may use JavaScript code.
Blend Mode:
- What kind of blend mode do you wish to apply to the image?
- You may use JavaScript code.
- Normal
- Additive
- Multiply
- Screen
Hue:
- Do you wish to adjust this image's hue?
- You may use JavaScript code.
Hue Shift:
- How much do you want the hue to shift each frame?
- You may use JavaScript code.
Color Tone:
- What tone do you want for the graphic?
- Format: [Red, Green, Blue, Gray]
Scrolling:
Horizontal Scroll:
- What is the horizontal scroll speed?
- Use a negative value to invert the direction.
Vertical Scroll:
- What is the vertical scroll speed?
- Use a negative value to invert the direction.
--- Visual Cutin Effect VisuStella MZThe following are Plugin Commands that come with this plugin. They can be accessed through the Plugin Command event command. --- Cutin Add - Plugin Commands
--- Cutin Add: Add Visual Cutin Effect
- Adds the Visual Cutin Effect using these desired settings.
- Only one of each cutin-style type can be present at a time.
Basic Settings:
Cutin Style Type:
- What Visual Cutin Effect style type do you wish to use?
- Refer to VisuMZ wiki for visuals on styles.
Portrait Filename:
- Pick a portrait to use for the Visual Cutin Effect.
- Pick (None) to not use a portrait.
Parallax Filename:
- Pick a parallax to use for the Visual Cutin Effect.
- Pick (None) to not use a parallax.
Background Color:
- Use #rrggbb for custom colors or regular numbers for text colors
from the Window Skin.
Extra Settings:
- Extra Plugin Command settings pertaining to this Visual Cutin Effect.
- These settings will be displayed in a later section.
Wait for Entrance:
- Wait until cutin entrance is finished before performing the next
event command?
--- Cutin Change - Plugin Commands
---
Cutin Change: Portrait Swap
- Changes target cutin-type's portrait with a different image.
Basic Settings:
Cutin Style Type:
- What Visual Cutin Effect style type to update?
- This determines which existing cutin-type to change.
Portrait Filename:
- Pick a portrait to swap for the Visual Cutin Effect.
- Pick (None) to not use a portrait.
Extra Settings:
- Extra Plugin Command settings pertaining to this Visual Cutin Effect's
portrait only.
- These settings will be displayed in a later section.
- This Plugin Command will only have the Portrait-related settings.
---
Cutin Change: Parallax Swap
- Changes target cutin-type's parallax with a different image.
Basic Settings:
Cutin Style Type:
- What Visual Cutin Effect style type to update?
- This determines which existing cutin-type to change.
Parallax Filename:
- Pick a parallax to swap for the Visual Cutin Effect.
- Pick (None) to not use a parallax.
Extra Settings:
- Extra Plugin Command settings pertaining to this Visual Cutin Effect's
parallax only.
- These settings will be displayed in a later section.
- This Plugin Command will only have the Parallax-related settings.
--- Cutin End - Plugin Commands
---
Cutin End: End Visual Cutin Effect (All)
- Ends all Visual Cutin Effects currently present.
Wait for Exit:
- Wait until cutin exit is finished before performing the next
event command?
---
Cutin End: End Visual Cutin Effect (Type)
- Ends the Visual Cutin Effect with the matching type.
Cutin Style Type:
- What Visual Cutin Effect style type do you wish to end?
Wait for Exit:
- Wait until cutin exit is finished before performing the next
event command?
--- Cutin Wait - Plugin Commands
---
Cutin Wait: Wait for Entrance - Wait until all cutin entrances are finished before performing the next event command. ---
Cutin Wait: Wait for Exit - Wait until all cutin exits are finished before performing the next event command. --- Extra Settings
--- These are the settings found in the "Extra Settings" for various cutin Plugin Commands. --- Transition Entrance Duration: - How many frames does it take to fully enter? - Used when a Visual Cutin Effect starts. Exit Duration: - How many frames does it take to fully exit? - Used when a Visual Cutin Effect ends. --- Cutin Settings Show BG Color?: - Add a background color for this cutin? - Background colors appear behind the parallax. Show Outline?: - Show the cutin outline? --- Portrait Settings > Base Properties Anchor X: - Determines the sprite anchor X alignment. - 0.0: Left, 0.5: Center, 1.0: Right. Anchor Y: - Determines the sprite anchor Y alignment. - 0.0: Top, 0.5: Middle, 1.0: Bottom. Hue: - Do you wish to adjust this cutin's portrait hue? Opacity: - What is the opacity level of this cutin's portrait? Offset X: - Offsets the cutin portrait's X location. - Negative: left. Positive: right. Offset Y: - Offsets the cutin portrait's Y location. - Negative: up. Positive: down. --- Portrait Settings > Entrance Properties Entrance X: - Sets the cutin portrait's X entrance. - Negative: from left. Positive: from right. Entrance Y: - Sets the cutin portrait's Y entrance. - Negative: from up. Positive: from down. Entrance Easing: - Select which easing type you wish to apply. --- Portrait Settings > Exit Properties Exit X: - Sets the cutin portrait's X exit. - Negative: to left. Positive: to right. Exit Y: - Sets the cutin portrait's Y exit. - Negative: to up. Positive: to down. Exit Easing: - Select which easing type you wish to apply. --- Portrait Settings > Flip Properties Flip Horizontally?: - Flip the cutin portrait horizontally? Flip Vertically?: - Flip the cutin portrait vertically? --- Portrait Settings > Scaling Properties Forced Scaling: - Do you want to force a scaling ratio? - Leave as 0 for none. - Disables "Fit to Scale?". - There is NO one size fits all setting for this. Different cutin sizes will look better with different settings for this parameter. Fit to Scale?: - Scale the cutin portrait to fit the cutin style? - Cannot be used with "Forced Scaling". - There is NO one size fits all setting for this. Different cutin sizes will look better with different settings for this parameter. Scale Max?:
- Scale the cutin portrait to the maximum fit or scale the cutin
portrait to the minimum fit.
- There is NO one size fits all setting for this. Different cutin sizes
will look better with different settings for this parameter.
--- Portrait Settings > Animated Portraits Loop?: - Will loop back to beginning once ended. - Requires VisuMZ_4_AnimatedPictures! Wait Frames: - Frames to wait before moving to next cell. - Requires VisuMZ_4_AnimatedPictures! --- Parallax Settings > Base Settings Blend Mode: - What kind of blend mode do you wish to apply to the cutin? Hue: - Do you wish to adjust this cutin's parallax hue? Opacity: - What is the opacity level of this cutin's parallax? --- Parallax Settings > Scrolling Settings Offset X: - Offsets the cutin parallax's X location. - Negative: left. Positive: right. Offset Y: - Offsets the cutin parallax's Y location. - Negative: up. Positive: down. Scroll X: - How many pixels does the parallax scroll horizontally? - Negative: Scroll to right. Positive: Scroll to left. Scroll Y: - How many pixels does the parallax scroll vertically? - Negative: Scroll to down. Positive: Scroll to up. --- Visual Fogs VisuStella MZThe following are Plugin Commands that come with this plugin. They can be accessed through the Plugin Command event command. --- Fog Plugin Commands---
Fog: Add/Change Settings
- Add/Change settings for target fog.
- Does not alter the map editor's fog.
Required:
ID:
- What is the ID of this fog to be added/changed?
Filename:
- What is the filename of the fog?
Optional Settings:
Scrolling:
Map Lock?:
- Lock the fog to the map's scrolling?
- Automatically enable if the filename starts with "!"
Loop Horizontally?:
- Loop the fog horizontally?
- Does not work with Map Lock enabled.
Scroll:
- What is the horizontal scroll speed?
- Use a negative value to invert the direction.
Loop Vertically?:
- Loop the fog vertically?
- Does not work with Map Lock enabled.
Scroll:
- What is the vertical scroll speed?
- Use a negative value to invert the direction.
Appearance:
Opacity:
- What is the opacity level for this fog?
- You may use JavaScript code.
Blend Mode:
- What kind of blend mode do you wish to apply to the fog?
- You may use JavaScript code.
- Normal
- Additive
- Multiply
- Screen
Hue:
- Do you wish to adjust this fog's hue?
- You may use JavaScript code.
Hue Shift:
- How much do you want the hue to shift each frame?
- You may use JavaScript code.
Color Tone:
- What tone do you want for the fog?
- Format: [Red, Green, Blue, Gray]
Location:
Regions:
- Which regions will show this fog?
- Does not work with 0. Leave empty to ignore.
Terrain Tags:
- Which terrain tags will show this fog?
- Does not work with 0. Leave empty to ignore.
Tile Blur:
- What's the blur level you wish to use for tiles?
- You may use JavaScript code.
Tile Spill:
- What's the spill amount you wish to use for tiles?
- You may use JavaScript code.
Vignette:
Type:
- What vignette do you want to use for this fog?
- This will override location settings.
Custom:
- Do you wish to use a custom vignette instead?
- Automatically changes the type to "Custom".
---
Fog: Fade Opacity - Fades the target fog(s) opacity to a different value. ID(s): - Target which fog(s)? - Cannot target the map editor's fog. Target Opacity: - What opacity level to this value (0-255). - You may use JavaScript code to determine the value. Duration: - How many frames should this change take? - You may use JavaScript code to determine the value. ---
Fog: Remove - Removes target fog(s). ID(s): - Remove which fog(s)? - Cannot remove the map editor's fog. --- Visual Novel Picture Busts VisuStella MZThe following are Plugin Commands that come with this plugin. They can be accessed through the Plugin Command event command. --- Basic-Bust Plugin Commands
---
BASIC: Enter Bust
- Generic entrance for ONE picture bust.
- Walks in from a little behind and fades in.
Picture ID:
- What is the Picture ID to associate with this bust?
- You may use JavaScript code.
Picture File:
- What picture file do you wish to use?
Origin:
- What kind of origin setting do you wish to use for this bust?
- Upper Left
- Center
- Bust
Screen Position:
- Insert a screen position value from 0 to 10.
- Coordinates are determined by Plugin Parameters.
- Refer to "Quick Understanding on How Busts Work" to understand how
"Predetermined Positioning" positioning works by default.
Start Offset X:
- What starting position to enter the bust from?
- Negative: behind; Positive: front.
- You may use JavaScript.
Start Offset Y:
- What starting position to enter the bust from?
- Negative: up; Positive: down.
- You may use JavaScript.
Entrance Easing:
- Select which easing type you wish to apply.
Horizontal Mirror:
- Apply horizontal mirroring for this bust?
- None
- Mirror
- Auto
- Auto-Reverse
Duration:
- Duration in frames for the bust entrance.
---
BASIC: Exit Bust(s)
- Generic exit for picture bust(s).
- Walks back and fades out.
Picture ID(s):
- What Picture ID(s) to associate with this command?
- You may use JavaScript code.
End Offset X:
- What end position to exit the bust to?
- Negative: behind; Positive: front.
- You may use JavaScript.
End Offset Y:
- What end position to exit the bust to?
- Negative: up; Positive: down.
- You may use JavaScript.
Exit Easing:
- Select which easing type you wish to apply.
Flip Direction:
- Flip direction when exiting?
Duration:
- Duration in frames for the bust exit.
Auto-Erase?:
- Automatically erase the bust(s) after fading out completely?
---
BASIC: Graphic Change - Changes ONE bust's graphic without changing any of its other properties. - Useful for quickly changing facial expressions or poses. Picture ID: - What is the Picture ID to associate with this bust? - You may use JavaScript code. Picture File: - What picture file do you wish to use? ---
BASIC: Mirror Bust(s)
- Change the facing direction the bust(s).
- This alters the horizontal scaling of the bust(s).
Picture ID(s):
- What Picture ID(s) to associate with this command?
- You may use JavaScript code.
Horizontal Mirror:
- How do you wish to affect the mirroring for the bust(s)?
- None
- Mirror
- Auto
- Auto-Reverse
- Toggle
---
BASIC: Origin Change Bust(s)
- Change the origin/anchor for bust(s).
Picture ID(s):
- What Picture ID(s) to associate with this command?
- You may use JavaScript code.
Origin:
- Pick what kind of origin setting to use for this bust?
- "Bust" value is based on Plugin Parameters.
- Upper Left
- Center
- Bust
Duration:
- Duration in frames for the origin change.
---
BASIC: Play Animation on Bust(s)
- Plays a specific battle animation on bust(s).
Picture ID(s):
- What Picture ID(s) to associate with this command?
- You may use JavaScript code.
Battle Animation ID:
- Select which battle animation to play on bust.
Mirror Animation?:
- Mirror the animation effect?
Wait For Animation?:
- Wait until the animation is finished before continuing?
--- Breathing Plugin Commands
---
BREATHING: Start
- Starts breathing aspect for selected bust(s).
- Makes it look like the bust graphic is more alive.
Picture ID(s):
- What Picture ID(s) to associate with this command?
- You may use JavaScript code.
Speed:
Speed X:
Speed Y:
- Speed used for the horizontal/vertical breathing cycle.
- Higher is slower.
- You may use JavaScript.
Rate:
Rate X:
Rate Y:
- Rate used for the horizontal/vertical breathing cycle.
- Determines change amount.
- You may use JavaScript.
---
BREATHING: Stop - Stops breathing aspect for selected bust(s). - The bust graphic becomes static. Picture ID(s): - What Picture ID(s) to associate with this command? - You may use JavaScript code. --- Fade-Bust Plugin Commands
---
FADE: Fade In Bust(s) - Brings selected picture bust(s) opacity levels to 255. Picture ID(s): - What Picture ID(s) to associate with this command? - You may use JavaScript code. Duration: - Duration in frames for the bust fade in. ---
FADE: Fade Out Bust(s)
- Brings selected picture bust(s) opacity levels to 0.
Picture ID(s):
- What Picture ID(s) to associate with this command?
- You may use JavaScript code.
Duration:
- Duration in frames for the bust fade out.
Auto-Erase?:
- Automatically erase the bust(s) after fading out completely?
---
FADE: Opacity By X, Bust(s) - Adjusts selected picture bust(s) opacity levels relatively. Picture ID(s): - What Picture ID(s) to associate with this command? - You may use JavaScript code. Adjust Opacity: - Adjust opacity value of pictures by this amount. - Negative: Lower, Positive: Higher. - You may use JavaScript. Duration: - Duration in frames for the bust fading. ---
FADE: Opacity To X, Bust(s) - Brings selected picture bust(s) opacity levels to a custom value. Picture ID(s): - What Picture ID(s) to associate with this command? - You may use JavaScript code. Target Opacity: - What opacity value do you wish to adjust the bust to? - Use a value between 0 and 255. Duration: - Duration in frames for the bust fading. --- Fidgeting Plugin Commands
---
FIDGETING: Start
- Starts fidgeting aspect for selected bust(s).
- Bust graphic moves back and forth.
Picture ID(s):
- What Picture ID(s) to associate with this command?
- You may use JavaScript code.
Speed:
Speed X:
Speed Y:
- Speed used for the horizontal/vertical fidgeting cycle.
- Higher is slower.
- You may use JavaScript.
Distance:
Distance X:
Distance Y:
- Max distance used for the horizontal/vertical fidgeting cycle.
- Determines change amount.
- You may use JavaScript.
---
FIDGETING: Stop - Stops fidgeting aspect for selected bust(s). - The bust graphic becomes stationary. Picture ID(s): - What Picture ID(s) to associate with this command? - You may use JavaScript code. --- Movement-Bust Plugin Commands
---
MOVE: Move Bust(s) By Coordinates
- Move bust(s) relative to current coordinates(s).
Picture ID(s):
- What Picture ID(s) to associate with this command?
- You may use JavaScript code.
Move By X:
- Negative: left; Positive: right; "Unchanged" for none.
- You may use JavaScript.
Move By Y:
- Negative: up; Positive: down; "Unchanged" for none.
- You may use JavaScript.
Move Easing:
- Select which easing type you wish to apply.
Flip Direction:
- Flip direction when moving?
Duration:
- Duration in frames for the bust movement.
---
MOVE: Move Bust(s) By Position
- Move bust(s) relative to current position(s).
Picture ID(s):
- What Picture ID(s) to associate with this command?
- You may use JavaScript code.
Move By Position:
- Negative: left; Positive: right; "Unchanged" for none.
- You may use JavaScript.
- Results between 0 and 10.
Move Easing:
- Select which easing type you wish to apply.
Flip Direction:
- Flip direction when moving?
Duration:
- Duration in frames for the bust movement.
---
MOVE: Move Bust(s) to Coordinates
- Move bust(s) to exact coordinates(s).
Picture ID(s):
- What Picture ID(s) to associate with this command?
- You may use JavaScript code.
Target X:
- Target X coordinate.
- "Unchanged" for no changes.
- You may use JavaScript.
Target Y:
- Target Y coordinate.
- "Unchanged" for no changes.
- You may use JavaScript.
Move Easing:
- Select which easing type you wish to apply.
Flip Direction:
- Flip direction when moving?
Duration:
- Duration in frames for the bust movement.
---
MOVE: Move Bust(s) to Position
- Move bust(s) to the predetermined position.
Picture ID(s):
- What Picture ID(s) to associate with this command?
- You may use JavaScript code.
Target Position:
- Target predetermined position from 0 to 10.
- You may use JavaScript.
Move Easing:
- Select which easing type you wish to apply.
Flip Direction:
- Flip direction when moving?
Duration:
- Duration in frames for the bust movement.
---
MOVE: Reset Bust(s) to Position
- Reset bust(s) to the current position(s).
Picture ID(s):
- What Picture ID(s) to associate with this command?
- You may use JavaScript code.
Move Easing:
- Select which easing type you wish to apply.
Flip Direction:
- Flip direction when moving?
Duration:
- Duration in frames for the bust movement.
--- Scaling-Bust Plugin Commands
---
SCALE: Scale Bust(s) By
- Scale bust(s) by specific amounts.
- Value scale: 100 = 100% = 1.0
Picture ID(s):
- What Picture ID(s) to associate with this command?
- You may use JavaScript code.
Scale X By:
- Alter (additively) the X scaling value by this.
- You may use JavaScript.
Scale Y By:
- Alter (additively) the Y scaling value by this.
- You may use JavaScript.
Duration:
- Duration in frames for the bust scaling.
---
SCALE: Scale Bust(s) To
- Scale bust(s) to specific values.
- Value scale: 100 = 100% = 1.0
Picture ID(s):
- What Picture ID(s) to associate with this command?
- You may use JavaScript code.
Scale X By:
- Set X scaling value to this.
- You may use JavaScript.
- "Unchanged" for no changes.
Scale Y By:
- Set Y scaling value to this.
- You may use JavaScript.
- "Unchanged" for no changes.
Duration:
- Duration in frames for the bust scaling.
---
SCALE: Scale Reset Bust(s) - Resets the scale for bust(s) to the default settings in the Plugin Parameters. Picture ID(s): - What Picture ID(s) to associate with this command? - You may use JavaScript code. Duration: - Duration in frames for the bust scaling. --- Swaying Plugin Commands
---
SWAYING: Start
- Starts swaying aspect for selected bust(s).
- Bust graphic moves back and forth.
Picture ID(s):
- What Picture ID(s) to associate with this command?
- You may use JavaScript code.
Speed:
Angle Speed:
- Speed used for the swaying cycle.
- Higher is slower.
- You may use JavaScript.
Angle:
Angle Sway:
- Max angle used for the swaying cycle.
- Determines change amount.
- You may use JavaScript.
---
SWAYING: Stop - Stops swaying aspect for selected bust(s). - The bust graphic becomes stationary. Picture ID(s): - What Picture ID(s) to associate with this command? - You may use JavaScript code. --- Tone/Tint-Bust Plugin Commands
---
TONE: Bright Bust(s) - Brighten bust(s) to use the Tone settings found in the Plugin Parameters. Picture ID(s): - What Picture ID(s) to associate with this command? - You may use JavaScript code. Duration: - Duration in frames for the tone change. ---
TONE: Dim Bust(s) - Dims bust(s) to use the Tone settings found in the Plugin Parameters. Picture ID(s): - What Picture ID(s) to associate with this command? - You may use JavaScript code. Duration: - Duration in frames for the tone change. ---
TONE: Normal Bust(s) - Normalize bust(s) to no tone at all. Picture ID(s): - What Picture ID(s) to associate with this command? - You may use JavaScript code. Duration: - Duration in frames for the tone change. ---
TONE: Preset Tone for Bust(s)
- Use RPG Maker MZ's present tones/tints for bust(s).
Picture ID(s):
- What Picture ID(s) to associate with this command?
- You may use JavaScript code.
Preset Name:
- What tone preset do you wish to apply?
- Normal
- Dark
- Sepia
- Sunset
- Night
Duration:
- Duration in frames for the tone change.
---
TONE: Target Tone for Bust(s)
- Use a custom target tone for the bust(s).
Picture ID(s):
- What Picture ID(s) to associate with this command?
- You may use JavaScript code.
Custom Tone:
- What tone do you want for the bust(s)?
- Format: [Red, Green, Blue, Gray]
Duration:
- Duration in frames for the tone change.
--- Visual Text Window VisuStella MZThe following are Plugin Commands that come with this plugin. They can be accessed through the Plugin Command event command. --- Text Window Plugin Commands
---
Text Window: Add/Change Settings
- Adds a newly created visual text window to the scene.
- Or changes an existing one with new settings.
Required:
ID:
- What is the ID of this Visual Text Window to be added/changed?
Text:
- What text would you like to display here?
- Text codes can be used.
Customized Settings:
Coordinates:
X:
Y:
- What is the X/Y coordinates of this window?
- You may use JavaScript code.
Width:
Height:
- What is the width/height of this window?
- You may use JavaScript code. Type 'auto' to auto-size it.
Alignment:
Horizontal:
- Window alignment based on the X coordinate?
- This is NOT text alignment.
- left
- center
- right
Vertical:
- Window alignment based on the Y coordinate?
- This is NOT text alignment.
- top
- middle
- bottom
Appear:
Auto-Color?
- Enable Auto-Color for this Visual Text Window?
Type:
- How does this window appear on the screen if it was closed before?
- Instant - Window appears instantly
- Open - Window opens up
Background:
Type:
- Select background type for this window.
- Window
- Dim
- Transparent
Opacity:
- What is this window's background opacity level?
- You may use JavaScript code.
---
Text Window: Refresh - Refreshes target Visual Text Window(s) on the screen. ID(s): - Refresh which Visual Text Window(s)? ---
Text Window: Remove
- Remove target Visual Text Window(s) and its settings.
ID(s):
- Remove which Visual Text Window(s)?
Removal Type:
- How does this window disappear from the screen upon removal?
- Instant - Window disappears instantly
- Close - Window closes, then removes itself
--- Visual Parallaxes VisuStella MZThe following are Plugin Commands that come with this plugin. They can be accessed through the Plugin Command event command. --- Parallax Plugin Commands
--- Parallax: Add/Change Settings
- Add/Change settings for target parallax.
- Does not alter the map editor's parallax.
Required:
ID:
- What is the ID of this parallax to be added/changed?
Filename:
- What is the filename of the parallax?
Type:
- What kind of parallax is this going to be?
- Normal
- Water
- Solid
Optional Settings:
Scrolling:
Map Lock?:
- Lock the parallax to the map's scrolling?
- Automatically enable if the filename starts with "!"
Loop Horizontally?:
- Loop the parallax horizontally?
- Does not work with Map Lock enabled.
Scroll:
- What is the horizontal scroll speed?
- Use a negative value to invert the direction.
Loop Vertically?:
- Loop the parallax vertically?
- Does not work with Map Lock enabled.
Scroll:
- What is the vertical scroll speed?
- Use a negative value to invert the direction.
Appearance:
Opacity:
- What is the opacity level for this parallax?
- You may use JavaScript code.
Blend Mode:
- What kind of blend mode do you wish to apply to the parallax?
- You may use JavaScript code.
- Normal
- Additive
- Multiply
- Screen
Hue:
- Do you wish to adjust this parallax's hue?
- You may use JavaScript code.
Hue Shift:
- How much do you want the hue to shift each frame?
- You may use JavaScript code.
Color Tone:
- What tone do you want for the parallax?
- Format: [Red, Green, Blue, Gray]
Location:
Regions:
- Which regions will show this parallax?
- Does not work with 0. Leave empty to ignore.
Terrain Tags:
- Which terrain tags will show this parallax?
- Does not work with 0. Leave empty to ignore.
---
Parallax: Fade Opacity - Fades the target parallax(es) opacity to a different value. ID(s): - Target which parallax(es)? - Cannot target the map editor's parallax. Target Opacity: - What opacity level to this value (0-255). - You may use JavaScript code to determine the value. Duration: - How many frames should this change take? - You may use JavaScript code to determine the value. ---
Parallax: Remove - Removes target parallax(es). ID(s): - Remove which parallax(es)? - Cannot remove the map editor's parallax. --- Voice Acting Control VisuStella MZThe following are Plugin Commands that come with this plugin. They can be accessed through the Plugin Command event command. --- Sound Plugin Commands
---
Sound: Play As Voice Line - Plays target SE as a Voice Line using the Voice Line volume channel. This is unaffected by SE volume channel. Filename: - Filename of the sound effect played. Volume: - Volume of the sound effect played. Pitch: - Pitch of the sound effect played. pan: - Pan of the sound effect played. ---
Sound: Play As Voice Line (Language)
- Plays a voice line based on target audio language.
- Uses volume channel and not SE volume channel.
Language Lines:
- Determine which line is used based on which voice language the player
has selected.
Default Line:
- Default voice line played when no language-based voice line is found.
Volume:
- Volume of the voice line played.
Pitch:
- Pitch of the voice line played.
pan:
- Pan of the voice line played.
---
Sound: Stop All Voice Lines - Stops all currently playing Voice Lines. ---
Sound: Stop Target Voice Lines
- Stops target Voice Lines if they are currently playing.
Specific Filenames:
- Filenames of sound files that should be stopped as a Voice Line.
- Case sensitive.
Filename Text Markers:
- Text markers used to automatically mark filenames (not folders) as
a Voice Line.
- Case sensitive.
Specific Folders:
- Anything that contains these folder names will be stopped as a
Voice Line.
- These can be main or sub folders.
- Case sensitive.
Folder Text Markers:
- Text markers used to automatically mark folders (not filenames) for
Voice Line playing.
- Case sensitive.
--- Weather Effects VisuStella MZThe following are Plugin Commands that come with this plugin. They can be accessed through the Plugin Command event command. --- Basic Plugin Commands
---
BASIC: Adjust Weather Power
- Adjusts the power of the target weather layer(s).
Layer(s):
- Which weather layer(s) do you wish to adjust?
- Use values between 1 and 10.
- You may use JavaScript code.
Upper/Lower?:
- Adjust weather layer(s) from the upper or lower layers?
- Upper refers to the weather layer(s) above the tilemap.
- Lower revers to the weather layer(s) below the tilemap.
- In battle, both are above the battle field.
Power:
- Adjust power by how much?
- Caps at 1 and 9.
- You may use JavaScript code.
Duration:
- How many frames to fully adjust the weather?
- You may use JavaScript code.
Wait For Completion?
- Wait for weather to completely adjust before moving on with the next
event command?
---
BASIC: Clear Weather
- Clears out target weather layer(s).
Layer(s):
- Which weather layer(s) do you wish to clear?
- Use values between 1 and 10.
- You may use JavaScript code.
Upper/Lower?:
- Clear weather layer(s) from the upper or lower layers?
- Upper refers to the weather layer(s) above the tilemap.
- Lower revers to the weather layer(s) below the tilemap.
- In battle, they are above the battlers and behind the battlebacks.
Duration:
- How many frames to fully clear the weather?
- You may use JavaScript code.
Wait For Completion?
- Wait for weather to completely adjust before moving on with the next
event command?
---
BASIC: Memorize Weather - Memorizes the settings for target weather pattern(s) so that you can reuse it later. Layer(s): - Which weather layer(s) do you wish to save? - Use values between 1 and 10. - You may use JavaScript code. Upper/Lower?: - Save weather layer(s) from the upper or lower layers? - Upper refers to the weather layer(s) above the tilemap. - Lower revers to the weather layer(s) below the tilemap. - In battle, both are above the battle field. ---
BASIC: Pre-Render Generated Weather - Selects target weather type to pre-render the generated graphics for it. - This is to help reduce future lag spikes on mobile devices. Weather Type: - Which weather type do you wish to pre-render? - This is to help reduce lag spikes when calling weathers. ---
BASIC: Replay Memorized Weather
- Replays target memorized weather pattern(s).
Layer(s):
- Which weather layer(s) do you wish to replay?
- Use values between 1 and 10.
- You may use JavaScript code.
Upper/Lower?:
- Replay weather layer(s) from the upper or lower layers?
- Upper refers to the weather layer(s) above the tilemap.
- Lower revers to the weather layer(s) below the tilemap.
- In battle, both are above the battle field.
Duration:
- How many frames to fully replay the weather?
- You may use JavaScript code.
Wait For Completion?:
- Wait for weather to completely replay before moving on with the next
event command?
--- Weather Pattern-Related Plugin Commands
---
Weather Pattern
- All weather patterns provided by this plugin use the following format.
Yes, all of them. This is to ensure that there is familiarity when modifying
one weather pattern and then moving to another and reducing the amount of
time needed to fiddle around with each of them. As such, the parameters will
affect each weather pattern the same exact way.
---
Main Settings:
Power:
- What weather power do you wish to apply?
- Use values between 1 and 9.
- You may use JavaScript code.
Duration:
- How many frames to fully change the weather?
- You may use JavaScript code.
Wait For Completion?:
- Wait for weather to completely change before moving on with the next
event command?
---
Layer Settings
Layer(s):
- Which weather layer(s) do you wish to apply changes?
- Use values between 1 and 10.
- You may use JavaScript code.
Upper/Lower?:
- Play the weather pattern above the tileset or below it?
- You can select "both" to affect both.
---
Customization
Custom Settings:
- Adjust the custom settings involving this weather.
- More information below:
---
Custom Settings
- Each weather pattern's "Custom Settings" will have each of the following
options available to it.
Sprite Settings:
- The general settings involving the weather sprites.
Dimmer Overlay:
- Settings involving the dimmer overlay cast over the screen.
Image Settings:
- Settings for the images used for the weather sprites.
- Weathers with multiple images will be picked at random.
Special Effects:
- Specialized effects that are turned on for specific weather types can
be found here.
Trajectory Settings:
- Settings used to determine the trajectory a weather sprite will take
and how they behave on it.
---
Sprite Settings
- The general settings involving the weather sprites.
Lifespan:
- Lifespan of each weather sprite in frames.
Variance:
- What variance is there to each lifespan value?
Spawn Location X:
- What x location should the weather sprites appear?
Offset X:
- Offset the spawn location by this many pixels.
- Negative: left. Positive: right.
Spawn Location Y:
- What y location should the weather sprites appear?
Offset Y:
- Offset the spawn location by this many pixels.
- Negative: up. Positive: down.
Map Bound?:
- Do the weather sprites move with the map scrolling?
Starting Opacity:
- Starting opacity of each weather sprite in frames.
Variance:
- What variance is there to each starting opacity value?
Easing Type:
- Select which easing type you wish to apply for opacity.
Fade In Time:
- How many frames does it take for the sprite to fade in?
- Use 0 to start immediately at full opacity.
Scale:
- What is the scale of the sprite?
- 0.0 = 0%. 0.5 = 50%. 1.0 = 100%. 1.5 = 150%. 2.0 = 200%.
Variance:
- What variance is there to the main scale value?
Ratio X:
Ratio Y:
- What is the ratio of this sprite's scale X/Y?
- 0.0 = 0%. 0.5 = 50%. 1.0 = 100%. 1.5 = 150%. 2.0 = 200%.
Total Sprite Minimum:
- What is the minimum number of sprites on the screen?
Total Per Power:
- Increase the total number of sprites per power by this.
- Lowest power is 1.
- Highest power is 9.
---
Dimmer Overlay
- Settings involving the dimmer overlay cast over the screen.
Color:
- Dimmer color. This uses #rrggbb format.
- Check your color here: https://htmlcolorcodes.com/
Opacity Minimum:
- What is the minimum opacity value for the dimmer?
Opacity Per Power:
- What is the total opacity value per power for the dimmer?
---
Image Settings
- Settings for the images used for the weather sprites.
- Weathers with multiple images will be picked at random.
Generated Image?:
- Include the plugin-generated image for this weather type?
Weight:
- What is the random weight?
- The higher the value, the more likely this is to be used
when randomized.
Icon(s):
- Which icons do you wish to include for the images to appear as?
- When using icons, icons are best made when aligned to the right at
"0 degrees". This is for settings like angle alignment tracking.
Weight:
- What is the random weight?
- The higher the value, the more likely this is to be used
when randomized.
Picture(s):
- Which pictures do you wish to include for the images to appear as?
- When using pictures, pictures are best made when aligned to the right at
"0 degrees". This is for settings like angle alignment tracking.
Weight:
- What is the random weight?
- The higher the value, the more likely this is to be used
when randomized.
Blend Mode:
- What kind of blend mode do you wish to apply to the weather sprite?
Hue Variations:
- What hue variations will be randomly selected from?
- Use a value between 0 and 360.
Tone Variations:
- What tone variations will be randomly selected from?
- Format for each: [Red, Green, Blue, Gray]
*NOTE*
Hues and tones are expensive to process graphically. Using a lot of hue
and/or tone variations on lots of weather sprites at the same time can
eat up a chunk of the player's FPS. If you do plan on using hue and/or
tone variations, keep the sprite count low by either using lower power
settings or less sprites on the screen.
---
Special Effects
- Specialized effects that are turned on for specific weather types can
be found here.
Allow Visible Player?:
- Make the player more visible by reducing the opacity of nearby weather
sprites?
Flat Fluttering?:
- Is the object flat and flutters in the wind?
- Or does the object have volume and doesn't?
Longevity:
- Weather effects with longevity don't expire until the weather pattern
type is changed.
Hue Sway Range:
- How much should the hue sway back and forth?
- JavaScript code can be used.
Hue Sway Speed:
- What speed does the angle sway?
- Lower is slower.
- Higher is faster.
- JavaScript code can be used.
Respawn Common Event:
- Play a specific Common Event when this event respawns?
- The Common Event will run as a Once Parallel.
Respawn Delay Minimum:
- Is there a delay to the respawn?
- This is how many frames the sprite must wait before respawning.
RNG Delay Per Power:
- How many randomized frames of delay per power must be waited?
Scale In:
- What scale ratio should the sprite spawn in at?
- Use 1.0 for regular ratios.
- You may use JavaScript.
Duration:
- How many frames should the scale in effect take?
- Scale in will always head towards 1.0.
Scale Out:
- What scale ratio should the sprite despawn out at?
- Use 1.0 for regular ratios.
- You may use JavaScript.
Duration:
- How many frames should the scale out effect take?
- Scale in will usually head from 1.0.
Custom Finish:
Fireworks Finish?:
- At the end of the weather particle's lifespan, finish up with a
fireworks explosion?
Sparkle Finish?:
- At the end of the weather particle's lifespan, finish up with a
fabulous spinning sparkle effect?
---
Trajectory Settings
- Settings used to determine the trajectory a weather sprite will take
and how they behave on it.
Trajectory Type:
- What trajectory type is used?
- Both Map and Battle
- Straight
- Frozen
- Map Only
- Player-Locked
- Follower-Locked
- Event-Locked
- Battle Only
- Actor-Locked
- Enemy-Locked
- User-Locked
- Target-Locked
Locked ID/Index:
- For locked trajectories only. Input the follower index.
- Or ID of event, actor, enemy.
Offset X (Locked):
- For locked trajectories only.
- Negative: left. Positive: right.
Offset Y (Locked):
- For locked trajectories only.
- Negative: up. Positive: down.
Speed:
- What speed is the sprite moving at? Lower is slower.
- Higher is faster.
- JavaScript code can be used.
Speed Variance:
- What variance is there to the speed value?
Angle:
- What angle (0 to 360) is the sprite moving toward?
- JavaScript code can be used.
Align Angle?:
- Should the sprite rotate itself according to the angle it is moving at
across the screen?
Angle Variance:
- What variance is there to the base angle?
Visual Angle Offset:
- Offset the visual by this many degrees. Used for images that aren't
made aligned with 0 degrees facing left.
Angle Arc:
- How should the trajectory arc when the sprite moves?
- JavaScript code can be used.
Angle Sway Range:
- How much should the angle sway as the sprite moves?
- JavaScript code can be used.
Angle Sway Speed:
- What speed does the angle sway? Lower is slower.
- Higher is faster.
- JavaScript code can be used.
Spin Speed:
- What speed do the sprites spin?
- JavaScript code can be used.
- Some generated weather pattern sprites use the clustering replication
technique. This allows the weather pattern to appear more full and have
higher volume while keeping sprite counts low. As such, not all weather
patterns will spin the way you expect. This is not a bug.
Spin Speed Variance:
- What variance is there to the spin speed?
Reverse Spin?:
- Can the spin go in the reverse direction?
X Sway Range:
Y Sway Range:
- How much should the X/Y value sway as the sprite moves?
- JavaScript code can be used.
Sway Speed:
- What speed does the sway move? Lower is slower.
- Higher is faster. JavaScript code can be used.
--- Weather Pattern-Type Plugin CommandsEach of the weather patterns below all use the same plugin command structure as listed in the section above. They are separated in various themes to help better organize them and quickly find them. Each weather pattern has their own generated image type that they use. --- Fire-Themed
FIRE: Embers: - Oh, Ember, you will remember. So warm and tender. - Embers rise off from the ground upward.
FIRE: Fireflies: - Take my love, take my land, take me where I cannot stand. - Fireflies will spawn and float around.
FIRE: Firestorm: - This is fine. - Rain fiery bolts of flames from the heavens!
FIRE: Fireworks: - You just gotta ignite the light and let it shine! - A shot of fire flies up and blows up into a flower.
FIRE: Flame Haze: - Flaming Hair Blazing Eyes! - A fiery smoke clouds the screen!
FIRE: Flame Wall: - Is it me, or is it hot in here? Oh, it's me. - A wall of flames appears on the bottom part of the screen.
FIRE: Heat Clouds: - Fiery conglomerations of clouds. - Heat clouds scorch the top of the screen.
FIRE: Meteor Shower: - Clustering wishes will become a new shining star! - A nonstop swarm of meteors fall in the night sky.
FIRE: Shooting Stars: - Make a wish! A wholesome one, please. - Shooting stars appear over the horizon of the night sky.
FIRE: Sunlight Beams: - Aka crepuscular rays. Makes any day brighter! - Sun beams shine down from the heavens. --- Ice-Themed
ICE: Arctic Gleam: - Oh, erie bluish glow of the arctic. - Illuminate the frozen land below!
ICE: Aurora Borealis: - Also known as the Northern Lights. - Auroras dance across the top of the screen.
ICE: Blizzard: - Let it go, let it go! Can't hold it back anymore! - Concentrated snowfall covers the screen.
ICE: Diamond Dust: - Diamond dust falls from the skies. - Slightly illuminated ice particles descend from above.
ICE: Glistening Ice: - Walkin' on thin ice! - Ice particles sparkle from all around.
ICE: Ice Fog: - Yo! VIP! Let's Kick it! - Frozen fog covers the whole screen.
ICE: Sleet: - Slightly heavier and more solid than snow! - Frozen ice crystals snow down from above.
ICE: Snow: - Brace yourselves! Winter is coming! - Snow falls from the sky and flutters downward.
ICE: Snow Clouds: - Icy gatherings of clouds ready to deliver snow. - Snow clouds blanket the top of the screen.
ICE: Snowflakes: - Snowflake! Snowflake! Little snowflake! - Generated snowflakes will have random patterns. --- Thunder-Themed
THUNDER: Discharge: - Danger! Danger! High voltage! - Electricity discharges from the sides of the screen.
THUNDER: Plasma Bolt: - A horizontal bolt of electricity! From left to right! - Best used with a Respawn Common Event for sound and/or screen flashes.
THUNDER: Plasma Surge: - The windows are becoming stained with a nostalgic color. - Nonstop plasma bolts flood the screen. - Best used with a Respawn Common Event for sound and/or screen flashes.
THUNDER: Purple Haze: - Purple haze all around. Don't know if I'm coming up or down. - A purple fog blankets the whole screen.
THUNDER: Spider Lightning: - Nothing to do with spiders. - Bolts expand outwards from a target.
THUNDER: Static Charge: - Snap! Crackle! Pop! - Highly charged target emits static. - Best used with a Respawn Common Event for sound and/or screen flashes.
THUNDER: Thunder Bolt: - More than just an expensive charging cable. Giant bolt flashes from above! - Best used with a Respawn Common Event for sound and/or screen flashes.
THUNDER: Thunder Clouds: - These thunderclouds, oh no, no! - Thunder-ready clouds fly atop the top of the screen.
THUNDER: Thunder Surge: - When you walk away, you don't hear me say. - Nonstop thunder bolts scour the skies. - Best used with a Respawn Common Event for sound and/or screen flashes.
THUNDER: Ultraviolet Beams: - Get out some of that SPF 100+! - (This is NOT real UV Light!) - Ultraviolet lights are coming from the sky! --- Water-Themed
WATER: Bubbles Rising: - Let's not burst your bubble! - Bubbles will rise up towards the top of the screen.
WATER: Cloud Burst: - A sudden massive deluge of rain! - A near vertical storm of massive volume.
WATER: Dripping Water: - Leaky ceilings? It's time to call a plumber. - Water droplets drip from above.
WATER: Mist: - Not to be confused with the video game. That has a Y. - A suspended mist covers the screen.
WATER: Rain: - Rain, rain, go away! Come again some other day! - Raindrops will fall from the sky all over the screen.
WATER: Rain Clouds: - It's raining men! Hallelujah! It's raining men, amen! - Rain-filled clouds hover menacingly at the top of the screen.
WATER: Rainbow Arch: - Somewhere over the rainbow~ - A large rainbow arch appears in the corner of the screen.
WATER: Rising Steam: - Take more photos to train your selfie steam! - Steam vapor clouds rise from below.
WATER: Soap Bubbles: - I will try to blow a bubble that will last all day. - Soap bubbles float and hover around.
WATER: Storm: - A MIGHTY storm! - Large and long raindrops fall from the sky creating a storm. --- Earth-Themed
EARTH: Acid Rain: - Real acid rain doesn't glow in the dark. - But this one sure does.
EARTH: Crumbling Cave: - Do NOT grab any suspiciously placed rubies. - Bits and pieces of the cave ceiling crumble.
EARTH: Dust Clouds: - Darkened dust covers the surroundings! - Dust clouds will fill up the screen.
EARTH: Dust Storm: - Happens in places other than Nashville. - Darkened dust launches across the screen.
EARTH: House Dust: - Floating white dust particles with nowhere to go. - So they'll just make themselves at home.
EARTH: Pollution Clouds: - Absolutely disgusting colored pollution clouds. - Pollution clouds cover the top of the screen.
EARTH: Radioactive Beams: - Alert! Alert! Alert! Nuclear green lights! - Nuclear green lights irradiate from the clouds.
EARTH: Sand Clouds: - Straight from the Pyramids of Giza! - Sand clouds will surround everything!
EARTH: Sandstorm: - Darude! Sandstorm! - Sand blasts across the screen from one end to the other.
EARTH: Toxic Gas: - More toxic than the comments section of social media! - A foggy green gas blankets the screen. --- Wind-Themed
WIND: Autumn Leaves: - Red, yellow, orange, brown leaves are falling all around. - See them dance in the cool, fall air.
WIND: Balloons: - You and I in a little toy shop, buy a bag balloons with the money we've got.
WIND: Cherry Blossoms: - The emblem of love and good luck. - Cherry blossom petals flutter down from above.
WIND: Dandelion Seeds: - Floating on the air. Never seem to care. - Dandelion seeds will flow up into the air.
WIND: Grassy Gust: - A gust of wind! - From right to left, grass flies with it. - Best when paired with a Tempest.
WIND: Green Leaves: - Leaf me alone! - Green leaves fall above, spinning round and round.
WIND: Pollen: - Bless you! Gesundheit! Salute! - A cloud of pollen grains travel about the screen.
WIND: Tempest: - Brought to you by a friendly slime. - Powerful gusts of wind blast across the screen.
WIND: White Clouds: - Not the main character from Final Fantasy VII. - Fluffy white clouds slowly drift across the upper screen.
WIND: Xtreme Speed: - Gotta go fast! Speedlines whip past! - Works best below the tileset layer. --- Light-Themed
LIGHT: Confetti: - Party like it's 1999! - Confetti of differing shapes drop from the sky.
LIGHT: Lens Flare: - Relive the amateur days from Photoshop! - A lens flare descends from the upper corner of the sky!
LIGHT: Light Burst: - Sometimes also known as Sun Bursts. - CAUTION: Bright lights! - Bright white light bursts out from a target.
LIGHT: Light Orbs: - Show me the light! - Light orbs fly round and round.
LIGHT: Pastel Brume: - Cute pastel colors forming a foggy brume. - Various bright colors cover the screen.
LIGHT: Prism Burst: - More color than a bag of candy! - CAUTION: Bright lights! - Lights of all colors expand out from a target.
LIGHT: Prismatic Gleam: - Our seven lights spring to the task! - Colors of all sorts shine from the skies high above.
LIGHT: Rainbow Clouds: - Colorful clouds dot the heavens. - Multi-colored clouds slowly drift across the upper screen.
LIGHT: Rainbow Orbs: - Taste the rainbow! - Multi-colored rainbow orbs spawn in and float about.
LIGHT: Star Fall: - You're a star. You're one in a million. - Stars fall out of the night sky spinning round and round. --- Dark-Themed
DARK: Ash Debris: - Gotta ketchum all. - Pieces of ash debris flutter through the air.
DARK: Ashfall: - But unlike thunder, this didn’t stop. It went on and on. - Volcanic ash pieces descend from the skies above.
DARK: Blood Rain: - It's actually a real phenomenon. - However, it's not really blood.
DARK: Dark Orbs: - Hello darkness, my old friend. - Dark orbs circle about the screen.
DARK: Fumes: - Don't inhale any! - Dark fume clouds plume from below.
DARK: Moonlight Beams: - Moonlight is the smuggler's enemy. - Light the path in the night sky by moonshine.
DARK: Shadow Siphon: - Drain all of the light! CAUTION: Dark lights! - Light from around is all drained into one area.
DARK: Smog: - Smoking is bad, mkay? - Smokey fog (aka Smog) cover the whole screen.
DARK: Smoke Clouds: - Accompanied by factories owned by evil corporations. - Smoke clouds blot out the sun.
DARK: Sootfall: - Try not to build a snowman out of this. - Smoke-contaminated snow falls from the sky. --- Icons-Related
SLOW: Flying Icons ↑: MEDIUM: Flying Icons ↑: FAST: Flying Icons ↑: - Icons fly to the top at slow, medium, or speeds. - To change icons used, go to Custom Settings > Image Settings > Icon(s). SLOW: Flying Icons ↗: MEDIUM: Flying Icons ↗: FAST: Flying Icons ↗: - Icons fly upper right at slow, medium, or speeds. - To change icons used, go to Custom Settings > Image Settings > Icon(s). SLOW: Flying Icons →: MEDIUM: Flying Icons →: FAST: Flying Icons →: - Icons fly to the right at slow, medium, or speeds. - To change icons used, go to Custom Settings > Image Settings > Icon(s). SLOW: Flying Icons ↘: MEDIUM: Flying Icons ↘: FAST: Flying Icons ↘: - Icons fly lower right at slow, medium, or speeds. - To change icons used, go to Custom Settings > Image Settings > Icon(s). SLOW: Flying Icons ↓: MEDIUM: Flying Icons ↓: FAST: Flying Icons ↓: - Icons fly to the bottom at slow, medium, or speeds. - To change icons used, go to Custom Settings > Image Settings > Icon(s). SLOW: Flying Icons ↙: MEDIUM: Flying Icons ↙: FAST: Flying Icons ↙: - Icons fly lower left at slow, medium, or speeds. - To change icons used, go to Custom Settings > Image Settings > Icon(s). SLOW: Flying Icons ←: MEDIUM: Flying Icons ←: FAST: Flying Icons ←: - Icons fly to the left at slow, medium, or speeds. - To change icons used, go to Custom Settings > Image Settings > Icon(s). SLOW: Flying Icons ↖: MEDIUM: Flying Icons ↖: FAST: Flying Icons ↖: - Icons fly upper left at slow, medium, or speeds. - To change icons used, go to Custom Settings > Image Settings > Icon(s). SLOW: Flying Icons ●: MEDIUM: Flying Icons ●: FAST: Flying Icons ●: - Icons hover at slow, medium, or speeds. - To change icons used, go to Custom Settings > Image Settings > Icon(s). --- End of List |
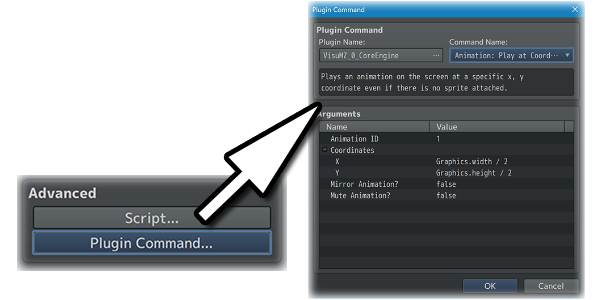


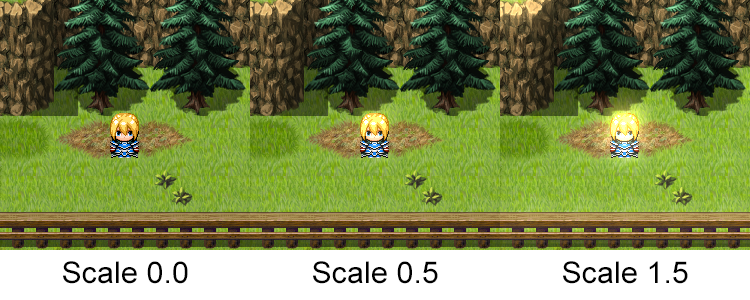
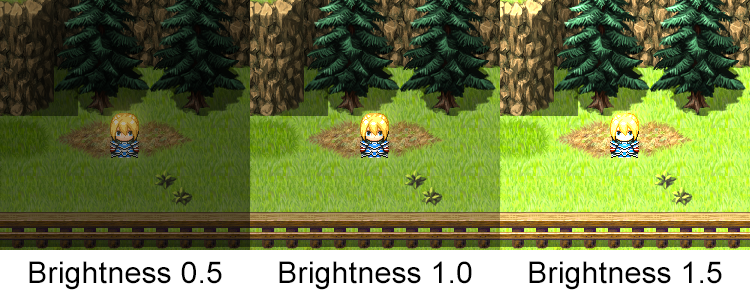
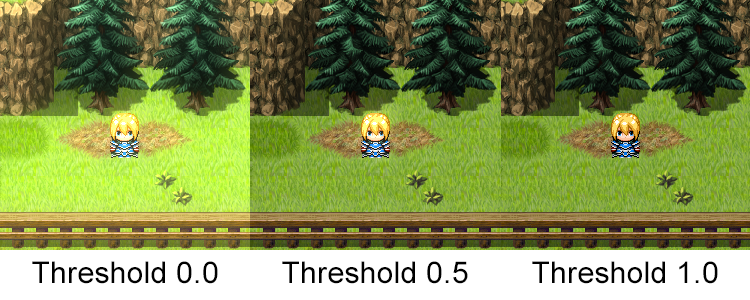


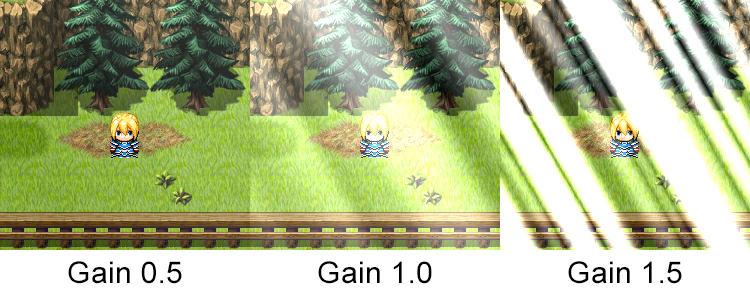
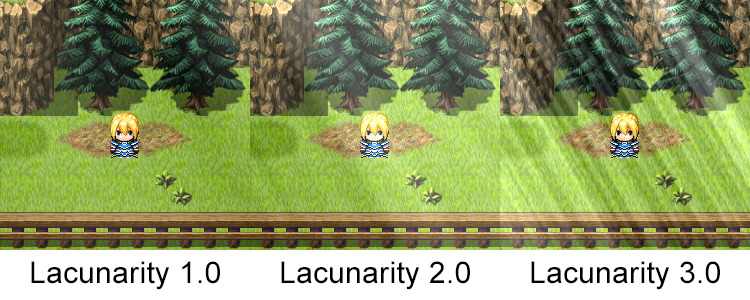
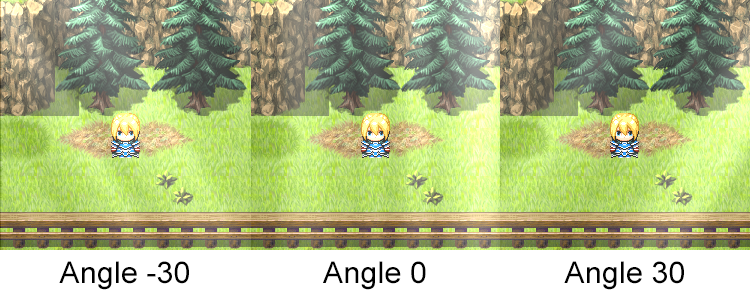
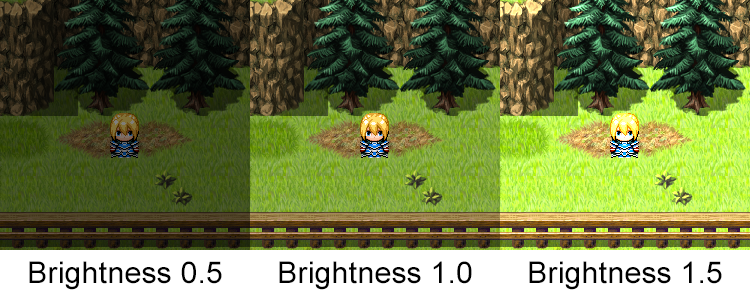
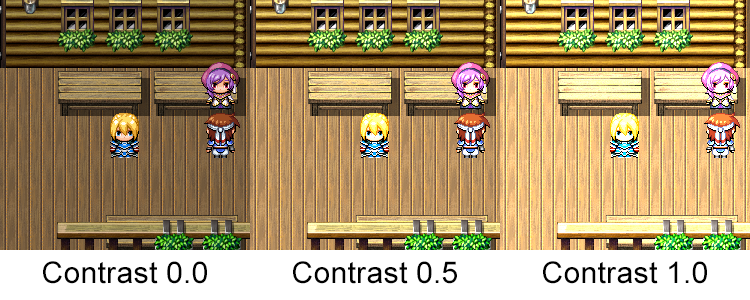
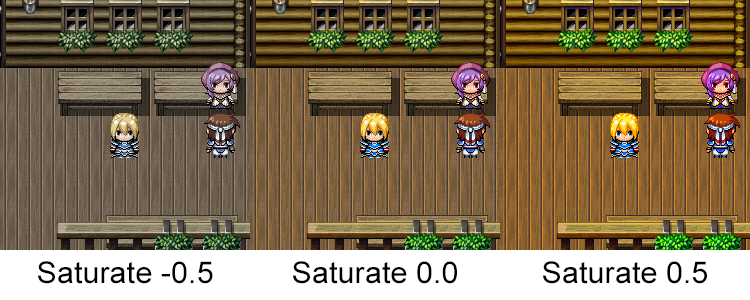


Pages in category "Plugin Commands (MZ)"
The following 103 pages are in this category, out of 103 total.
A
B
- Battle Core VisuStella MZ
- Battle Cursor VisuStella MZ
- Battle Grid System VisuStella MZ
- Battle System - ATB VisuStella MZ
- Battle System - BTB VisuStella MZ
- Battle System - CTB VisuStella MZ
- Battle System - ETB VisuStella MZ
- Battle System - FTB VisuStella MZ
- Battle System - OTB VisuStella MZ
- Battle System - PTB VisuStella MZ
- Battle System - STB VisuStella MZ
- Battle Voices VisuStella MZ
- Bestiary VisuStella MZ
- Bright Effects VisuStella MZ
- Button Common Events VisuStella MZ
- Button Trigger Events VisuStella MZ
C
D
E
- Elements and Status Menu Core VisuStella MZ
- Encounter Effects VisuStella MZ
- Enemy Levels VisuStella MZ
- Enhanced TP System VisuStella MZ
- Equip Battle Skills VisuStella MZ
- Equip Medal System VisuStella MZ
- Equip Passive System VisuStella MZ
- Event Chain Reactions VisuStella MZ
- Event Signals VisuStella MZ
- Event Title Scene VisuStella MZ
- Events and Movement Core VisuStella MZ
- Extended Message Functionality VisuStella MZ
- Extra Enemy Drops VisuStella MZ
F
I
M
P
S
V
- Variable Gauges VisuStella MZ
- Victory Aftermath VisuStella MZ
- Visual Battle Environment VisuStella MZ
- Visual Cutin Effect VisuStella MZ
- Visual Fogs VisuStella MZ
- Visual Novel Picture Busts VisuStella MZ
- Visual Parallaxes VisuStella MZ
- Visual Text Window VisuStella MZ
- Voice Acting Control VisuStella MZ