Items and Equips Core VisuStella MZ
|
VisuStella, Caz Wolf, Fallen Angel Olivia, Atelier Irina, and other affiliated content creators.
Download | ||
SystemThis is a plugin created for RPG Maker MZ. | ||
|
Click here for help on how to install plugins and an explanation on the Tier Hierarchy System. |
Click here to learn how to update plugins. |
Click here for how to troubleshoot plugins if you get an error. |
|
|
|
|
Extension PluginsThe following plugins are Extension Plugins that require this plugin as its Parent Plugin. Place the following plugins below this plugin located in the Plugin Manager if you plan on using them.
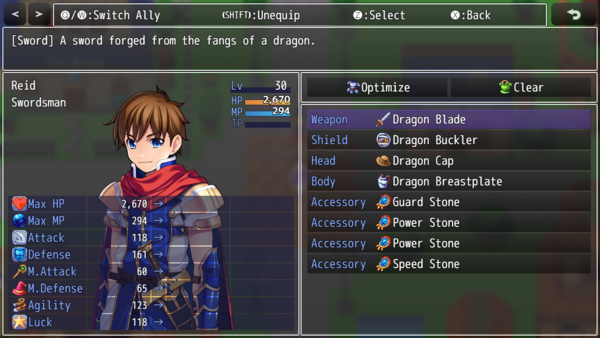
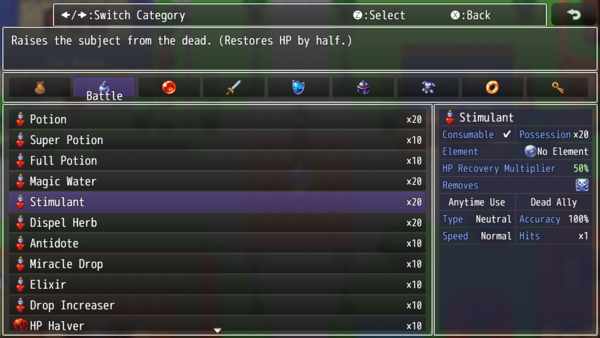
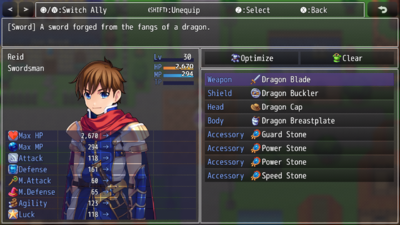
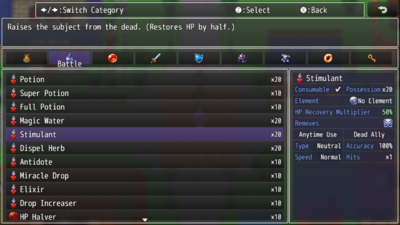
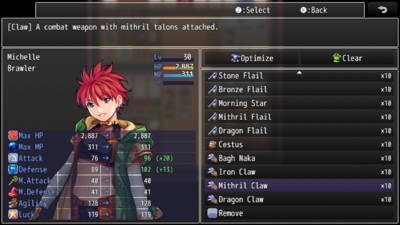
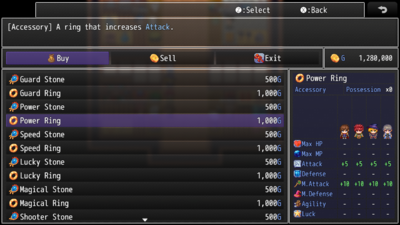
VisuStella MZThis plugin is a part of the VisuStella MZ Plugin Library. Click here if you want to help support VisuStella on Patreon. IntroductionThe Items & Equips Core makes improvements to the RPG Maker MZ item and equipment dedicated scenes (including the shop) and how they're handled. From more item categories, better parameter control, rulings, and more, game devs are able to take control over key aspects of their game's items. Features include all (but not limited to) the following:
RequirementsThis plugin is made for RPG Maker MZ. This will not work in other iterations of RPG Maker.
This plugin is a Tier 1 plugin. Place it under other plugins of lower tier value on your Plugin Manager list (ie: 0, 1, 2, 3, 4, 5). This is to ensure that your plugins will have the best compatibility with the rest of the VisuStella MZ Plugin library.
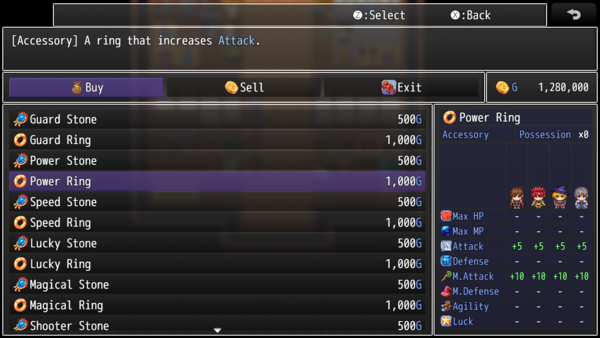
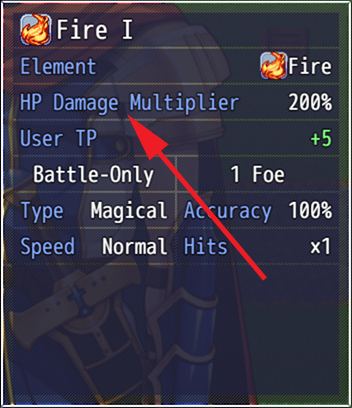
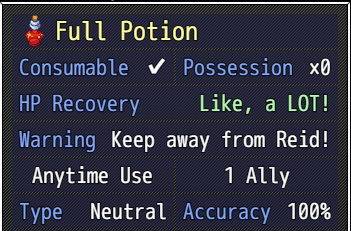
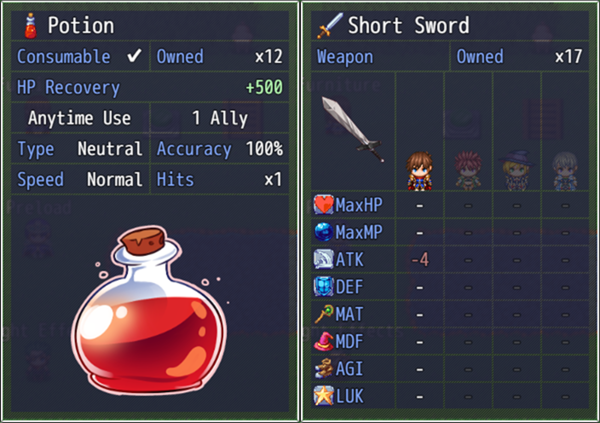
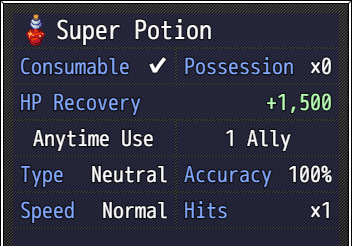
Major Changes: New Hard-Coded FeaturesThis plugin adds some new hard-coded features to RPG Maker MZ's functions. The following is a list of them. --- Equipment Type HandlingCharacters will no longer have one universal equipment slot setting. Classes can have different equipment type loadouts, made possible through the usage of notetags. Also, equipment types of matching names would be treated as the same type, where previously, they would be different types. This means if you have two "Accessory" slots, be it in the form of notetags or through the Database > Types tab, they can both equip the same type of accessories. The Change Equip event command is now updated to reflect this new change. When processing an equip change, the slot changed will go to the first empty slot of matching type. If all of the actor's matching slot types are equipped, then the equip will replace the last slot available. --- Shop Status WindowThe Status Window found in the Shop Scene was originally barren and did not display much information at all. This is changed through this plugin's new features. While the contents of the Shop Status Window can be customized through the Plugin Parameters, it is a change that cannot be reversed and for the better since it gives players the much needed information revolving around the game's items. --- Core Engine Compatibility: Modern ControlsIf the VisuStella Core Engine is added to your game with Modern Controls enabled, then the Item Menu Scene, Equip Menu Scene, and Shop Menu Scene's controls will be changed a bit. The Item Menu Scene will automatically have the Item List Window active, with using the Left/Right (for single column) or Page Up/Page Down (for multi-columns) to navigate between the Item Categories. Similar will occur when trying to sell items in the Shop Menu Scene. The Equip Menu Scene will automatically have the Equip Slots Window active and only activate the command window upon moving up to it. --- VisuStella MZ CompatibilityWhile this plugin is compatible with the majority of the VisuStella MZ plugin library, it is not compatible with specific plugins or specific features. This section will highlight the main plugins/features that will not be compatible with this plugin or put focus on how the make certain features compatible. --- Changing the "Damage Multiplier" or "Healing Multiplier" vocabulary for the Item and Equip Core's Shop Status Window is not done with the Item and Equip Core's Plugin Parameters if you have the Battle Core installed. Instead, go to Battle Core's Plugin Parameters, Damage Settings, Damage Styles, and adjust the style's version of the "Damage Multiplier" or "Healing Multiplier" text instead. Why does this work this way? Because not all damage styles work off "Multipliers" so in order for it to convey the proper message to the player, each damage style has its own vocabulary to be more accurate. In case you forget about that, when you visit the Item and Equip Core's plugin parameters for these, it should also remind you in the parameter's description on where to change it. --- Weapon Swap System VisuStella MZ The custom equip slots feature from the VisuStella MZ Items and Equips Core allowed you to add in extra weapon slots. This is now curated up to a max of one weapon slot per character. This needs to be done to make the Weapon Swap System viable. --- Notetags
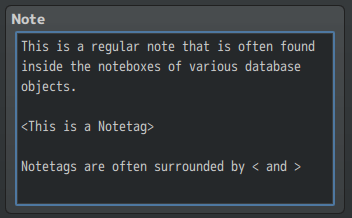
RPG Maker MZ's editor is unable to allow for custom traits/properties that a game dev may wish to associate with a database object, event, map, etc. Notetags are used to work around such limitations by allowing the game dev to tag certain traits/properties using specific Notetags declared by the related plugin. Here is a list of Notetag(s) that you may use.
GeneralThese notetags affect the Items, Weapons, and Armors on a general scale. --- <Max: x> - Used for: Item, Weapon, Armor Notetags - Determines the maximum quantity that can be held for this item. - Replace 'x' with a number value to determine the maximum amount. --- <Color: x> <Color: #rrggbb> - Used for: Item, Weapon, Armor, Skill Notetags - Determines the color of the object inside the in-game menus. - Replace 'x' with a number value depicting a window text color. - Replace 'rrggbb' with a hex color code for a more custom color. --- <Category: x> - Used for: Item, Weapon, Armor Notetags - Arranges items into certain/multiple categories to work with the Category Plugin Parameter setting: "Category:x". - Replace 'x' with a category name to mark this item as. --- <Categories> x x </Categories> - Used for: Item, Weapon, Armor Notetags - Arranges items into certain/multiple categories to work with the Category Plugin Parameter setting: "Category:x". - Replace each 'x' with a category name to mark this item as. --- <Conserve: x%> - Used for: Item - Gives the item a percent chance when used to not consume the item. - Replace 'x' with a number representing the percent chance to successfully conserve the item. - If an item cannot be consumed, conserve chance will be 100% regardless. --- <ID Sort Priority: x> - Used for: Item, Weapon, and Armor Notetags - Used for Scene_Item, Scene_Equip, Scene_Battle, and Scene_Shop's sell option (only when selling). - Changes sorting priority by ID for item, weapon, or armor to 'x'. - Default priority level is '50'. - Items, weapons, and armors with higher priority values will be sorted higher up on the list while lower values will be lower on the list. --- Item Accessibility NotetagsThe following notetags allow you to choose when items can/cannot be used based on switches. --- <Enable Switch: x> <Enable All Switches: x,x,x> <Enable Any Switches: x,x,x> - Used for: Item Notetags - Determines the enabled status of the item based on switches. - Replace 'x' with the switch ID to determine the item's enabled status. - If 'All' notetag variant is used, item will be disabled until all switches are ON. Then, it would be enabled. - If 'Any' notetag variant is used, item will be enabled if any of the switches are ON. Otherwise, it would be disabled. --- <Disable Switch: x> <Disable All Switches: x,x,x> <Disable Any Switches: x,x,x> - Used for: Item Notetags - Determines the enabled status of the item based on switches. - Replace 'x' with the switch ID to determine the item's enabled status. - If 'All' notetag variant is used, item will be enabled until all switches are ON. Then, it would be disabled. - If 'Any' notetag variant is used, item will be disabled if any of the switches are ON. Otherwise, it would be enabled. --- JavaScript Notetags: Item AccessibilityThe following are notetags made for users with JavaScript knowledge to determine if an item can be accessible by code. --- <JS Item Enable>
code
code
enabled = code;
</JS Item Enable>
- Used for: Item Notetags
- Determines the enabled status of the item based on JavaScript code.
- If the actor this is disabled for is the only party member, it will not be
visible in the item list unless the VisuStella Battle Core is installed.
- If the VisuStella Battle Core is installed, then all battle scope items
will be visible even if they're disabled.
- Replace 'code' to determine the type enabled status of the item.
- The 'enabled' variable returns a boolean (true/false) to determine if the
item will be enabled or not.
- The 'user' variable refers to the user with the item.
- The 'item' variable refers to the item being checked.
- All other item conditions must be met in order for this to code to count.
--- Equipment NotetagsThe following notetags provide equipment-related effects from deciding what equip slots can be given to classes to the base parameter changes asigned to weapons and armors. --- <Equip Slots> slotName slotName slotName </Equip Slots> - Used for: Class Notetags - Changes the equipment slot loadout for any actor who is that class. - Replace 'slotName' with an Equipment Type name from Database > Types. This is case-sensitive. - Insert or remove as many "slotName" equipment types as needed. --- <param: +x>
<param: -x>
- Used for: Weapon, Armor Notetags
- Changes the base parameter value for the equip item.
- Replace 'param' with any of the following: 'MaxHP', 'MaxMP', 'ATK', 'DEF',
'MAT', 'MDF', 'AGI', or 'LUK' to change that specific parameter's value.
- These notetags do NOT work with X Parameters, S Parameters, or any
custom parameters. These notetags ONLY work with the base parameters.
- Replace 'x' with a number value to set the parameter value to.
- This allows you to bypass the Database Editor's number limitations.
--- <Equip Copy Limit: x> - Used for: Weapon, Armor Notetags - Sets a maximum number of copies that the actor can wear of this equipment. - Replace 'x' with a number value to determine the copy limit. - This can be bypassed using Event Commands and/or Script Calls. - Usage Example: Actors can only equip one copy of the "One-of-a-Kind Ring" on at any time despite having empty accessory slots because the ring has a <Equip Copy Limit: 1> notetag. --- <Equip Weapon Type Limit: x> - Used for: Weapon - This weapon cannot be equipped with other weapons of the same type once the limited amount has been reached. - Replace 'x' with a number value to determine the weapon type limit. - This can be bypassed using Event Commands and/or Script Calls. - Usage Example: A dualwielding warrior who can only equip one sword and a dagger but never two swords or two daggers because the swords and daggers all have the <Equip Weapon Type Limit: 1> notetags on them. --- <Equip Armor Type Limit: x> - Used for: Armor - This armor cannot be equipped with other armors of the same type once the limited amount has been reached. - Replace 'x' with a number value to determine the armor type limit. - This can be bypassed using Event Commands and/or Script Calls. - Usage Example: People cannot equip more than two glove accessories on at a time because the glove is a "Glove" armor-type and each glove item has the <Equip Armor Type Limit: 2> notetags on them. --- <Party Artifact> <Troop Artifact> <Stackable Party Artifact> <Stackable Troop Artifact> - Used for: Armor - This armor cannot be equipped at all. However, by simply being in the party's inventory, its parameter bonuses and traits will be applied globally throughout the whole party or troop (depending on the notetag). - Add both notetags to affect both groups. - The normal versions of the notetag is only applied once regardless of the number of copies are found in the party's inventory. - The stackable versions of the notetag will have the bonuses and traits stacked multiple times relative to the number of copies found in the party's inventory. - This item will NOT be added during the setup phase for Battle Tests. - If you want to add the item, do it manually. --- <Equip For Class Only: x> <Equip For Classes Only: x, x, x> <Equip For Class Only: name> <Equip For Classes Only: name, name, name> - Used for: Weapon, Armor Notetags - This piece of equipment can only be worn by members with 'x' as the main class. If there are multiple classes listed, at least one of them need to be the actor's main class. - Replace 'x' with a number representing the ID of the class required. - For the 'name' variant, replace 'name' with the name of the required class the actor needs to have in order to equip this object. --- <Equip Requirements>
requirement
requirement
requirement
</Equip Requirements>
- Used for: Weapon, Armor Notetags
- Defines a requirement(s) for the actor to meet in order for the equip item
to be equippable.
- Failure to meet these requirements will cause the equipment to unequip
automatically.
- Keep in mind that in some cases, this will not happen immediately.
Things like switches will require the actor to meet its cache clear
in order to trigger the automatic unequip.
- Some ways to trigger a cache clear would be to change the actor's HP/MP,
or adding and then removing a state for the actor (preferrably an unused
state that has no real effect).
- Replace 'requirement' with one of the settings bellow:
- Add multiple 'requirement' lines for more requirements.
Requirements:
param > x
param >= x
param === x
param <= x
param < x
- Replace 'param' with 'level', 'maxhp', 'maxmp', 'atk', 'def', 'mat',
'mdf', 'agi', or 'luk'.
- This will make the piece of equipment require the actor's base parameter
to be greater than (>), greater than or equal to (>=), equal to (===),
less than or equal to (<=), or less than (<).
- This is NOT the value for the total parameter, only the base parameter.
- The base parameter is calculated by the user's class parameter value and
any bonuses received through permanent stat increases.
learned skill: x
learned skill: name
- This will make the piece of equipment require the actor to have learned
skill 'x'.
- If 'name' is used, priority will be given to the skill with the highest
ID in the database.
- The actor needs to have LEARNED the skill. This means that if you have
added a skill to the actor's kit through a trait, it will not count.
switch: x
- This will require switch X to be on.
- If it isn't, the piece of equipment cannot be worn.
- Insert multiple of these to add more switches that are are required to
be on.
***NOTE 1***
There is no "class: x" for these equip requirements. Instead, use the
<Equip For Class Only: x> notetags.
***NOTE 2***
For those wondering where "unique only" is, that does not exist in this
plugin. Instead, use the <Equip Copy Limit: x> notetag listed above.
Example A:
<Equip Requirements>
level >= 20
</Equip Requirements>
- Requires the user to be at least level 20 in order to equip.
Example B:
<Equip Requirements>
atk >= 50
def <= 50
</Equip Requirements>
- Requires the user have at least 50 base ATK to equip.
- Requires the user to be under 50 base DEF to equip.
--- <Added EType: x> <Added ETypes: x, x, x> - Used for: Armor Notetags - This is for armors only and does NOT work with weapons! - Allows a piece of armor to belong to multiple ETypes. This means a glove can be equipped as "Armgear" or as an "Accessory" if you so choose. - Replace 'x' with a number representing the ID of the EType you wish to add to the list of ETypes. - Insert multiple 'x' entries to add more than one EType ID. --- <Cursed>
- Used for: Weapon, Armor Notetags
- If this weapon or armor is equipped, it cannot manually be removed by the
player until it is purified.
- To remove it, it must be done by event commands, script calls, or through
the Purify-related Plugin Commands provided by this plugin.
- Once purified, the weapon or armor will become unequipped unless it has a
purify transformation.
- If the newly transformed weapon/armor is equippable, it will remain in
the actor's equipment slots.
- If you are using VisuMZ_2_WeaponSwapSystem, weapons cannot become cursed
in order to allow free weapon swapping. Weaponry will not be cursed
if VisuMZ_2_WeaponSwapSystem is installed.
--- <Purify Transform: id> <Purify Transform: name> - Used for: Weapon, Armor Notetags - If this notetag is present on a <Cursed> weapon or armor, then upon the actor receiving purification, the weapon or armor will transform into a different item. - Replace 'id' with a number representing the transformed weapon/armor's ID. - Replace 'name' with text representing the transformed weapon/armor's name. - Weapons can only transform into weapons. - Armors can only transform into armors. --- JavaScript Notetags: EquipmentThe following are notetags made for users with JavaScript knowledge to adjust the parameter through code. --- <JS Parameters> MaxHP = code; MaxMP = code; ATK = code; DEF = code; MAT = code; MDF = code; AGI = code; LUK = code; </JS Parameters> - Used for: Weapon, Armor Notetags - Uses JavaScript to determine the values for the basic parameters based on the code used to calculate its value. - The variables 'MaxHP', 'MaxMP', 'ATK', 'DEF', 'MAT', 'MDF', 'AGI', and 'LUK' are used to determine the finalized value of the parameter. This variable is case sensitive. - If a parameter is not present, its value will be treated as +0. '''WARNING!''' If you are trying to calculate a value based off a full parameter value, such as "ATK = user.atk * 0.10", it's going to break and will cause an infinite loop. Use base parameter values instead. --- Status Window NotetagsThe following notetags will affect the Shop Status Window info. If for any reason the data that is displayed is not to your liking or insufficient, you can change it up using the following notetags. --- <Status Info>
key: data
key: data
key: data
</Status Info>
- Used for: Skill, Item, Weapon, Armor Notetags
- If you do not like the generated data that's displayed, you can change it
using this notetag to display what you want.
- Replace 'key' with one of the following for skills and items:
- Consumable
- Quantity
- Occasion
- Scope
- Speed
- Success Rate
- Repeat
- Hit Type
- Element
- Damage Multiplier
- HP Recovery
- MP Recovery
- TP Recovery
- HP Damage
- MP Damage
- TP Damage
- User TP Gain
- Added Effects
- Removed Effects
- Replace 'key' with one of the following for weapons and armors:
- 'MaxHP', 'MaxMP', 'ATK', 'DEF', 'MAT', 'MDF', 'AGI', or 'LUK'
- For those with VisuMZ_0_CoreEngine:
- 'HIT', 'EVA', 'CRI', 'CEV', 'MEV', 'MRF', 'CNT', 'HRG', 'MRG', 'TRG'
- 'TGR', 'GRD', 'REC', 'PHA', 'MCR', 'TCR', 'PDR', 'MDR', 'FDR', 'EXR'
- Only relevant if the Draw Style for equipment is "classic" or "double".
- Replace 'data' with the text data you want to visually appear. You may use
text codes for this.
- This only affects info entries that are already visible and won't make
other categories suddenly appear.
- For clarity regarding "Damage Multiplier" and "HP Recovery"/"HP Damage":
- "Damage Multiplier" refers to the amount determined by damage formulas.
- "HP Recovery"/"HP Damage" refers to the "Recover HP" database effect.
- Likewise, the same will apply to "MP Recovery"/"MP Damage" if the damage
formula type is to deal MP recovery/damage instead.
- Insert or remove as many "key: data" lines as needed.
--- <Custom Status Info>
key: data
key: data
key: data
</Custom Status Info>
- Used for: Skill, Item, Weapon, Armor Notetags
- If you want custom categories and data to be displayed for your items that
aren't provided by the Shop Status Window Info to begin with, you can use
this notetag to add in your own entries.
- When used with weapon or armor database objects, this information is
only relevant if the Draw Style for equipment is "classic" or "double".
- Replace 'key' with text of the exact label you want. You may use text
codes for this.
- Replace 'data' with text of the exact text data you want. You may use text
codes for this.
- Insert or remove as many "key: data" lines as needed.
--- <Status Style: Compare>
<Status Style: Classic>
<Status Style: Double>
- Used for: Weapon and Armor Notetags
- Changes up the way the shop status window displays data for this database
object in particular.
- Compare - Compares selected equip to equipped gear
- Lists all main party actors
- Displays the parameter differences when equipped
- Calculates custom JS values
- Classic - Shows basic parameters of selected equip
- Involves no actors, only shows the item's stats
- Shows weapon or armor specific parameters
- Does not show custom JS values as those are calculated per actor
- Does not show custom parameters as those are calculated per actor
- Use <Status Info> and <Custom Status Info> notetags to overwrite or
add custom data to classic equip data
- Double - Shows basic parameters in double columns
- Involves no actors, only shows the item's stats
- Shows weapon or armor specific parameters
- Does not show custom JS values as those are calculated per actor
- Does not show custom parameters as those are calculated per actor
- Use <Status Info> and <Custom Status Info> notetags to overwrite or
add custom data to classic equip data
--- <Custom Status Parameters: name, name, name> - Used for: Weapon, Armor Notetags - Requires VisuMZ_0_CoreEngine! - This will not work otherwise! - Customize which parameters are displayed for this equipment object's shop status window. - This ONLY applies to the shop status window and not other windows. - Replace 'name' with any of the following to display custom parameters: - 'MaxHP', 'MaxMP', 'ATK', 'DEF', 'MAT', 'MDF', 'AGI', and 'LUK' - 'HIT', 'EVA', 'CRI', 'CEV', 'MEV', 'MRF', 'CNT', 'HRG', 'MRG', 'TRG' - 'TGR', 'GRD', 'REC', 'PHA', 'MCR', 'TCR', 'PDR', 'MDR', 'FDR', 'EXR' - Does not work with custom parameters as those are calculated per actor. - Parameters will be displayed in the order inserted into the notetag. --- <Shop Picture Name: filename> - Used for: Skill, Item, Weapon, Armor Notetags - Enables a shop picture for the status window. This image can be seen in the item scene, shop scene, and skill scene if enabled. - If this notetag is not used, there will be no image. - Replace 'filename' with the filename of the graphic to use from the game project's img/pictures/ folder. Filenames are case sensitive. Leave out the filename extension from the notetag. - Use the supporting notetags to determine where the image appears. If not, they will default to the background, fit to the window dimensions, centered at the middle of the window. --- <Shop Picture Layer: Background> <Shop Picture Layer: Foreground> - Used for: Skill, Item, Weapon, Armor Notetags - Determines which layer the graphic will be drawn on. - If the background layer is selected, the picture will appear behind the data text. - If the foreground layer is selected, the picture will appear in front of the data text. - If this notetag is not used, it will default to the background layer. --- <Shop Picture Max Width: x> <Shop Picture Max Height: y> <Shop Picture Max Dimensions: x, y> - Used for: Skill, Item, Weapon, Armor Notetags - Determines the maximum width and/or height for the image. - This means the image will be automatically scaled proportionally to that width or height as long as everything else does not break boundaries. - Replace 'x' and 'y' with number values representing the maximum dimensions the image can be in pixels. - If these notetags are not used, the image will be automatically scaled to the dimensions of the shop status window. --- <Shop Picture Alignment: Left> <Shop Picture Alignment: Center> <Shop Picture Alignment: Right> - Used for: Skill, Item, Weapon, Armor Notetags - Adjusts the horizontal alignment for the image. - Left, center, right determines how it's aligned horizontally if the image does not horizontally fit in the width of the window. - If any of these notetags are not used, the image will default to the 'center' alignment. --- <Shop Picture Position: Top> <Shop Picture Position: Middle> <Shop Picture Position: Bottom> - Used for: Skill, Item, Weapon, Armor Notetags - Adjusts the vertical position for the image. - Top, middle, bottom determines how it's positioned vertically if the image does not vertically fit in the width of the window. - If any of these notetags are not used, the image will default to the 'middle' position. --- <Shop Picture Offset X: +x> <Shop Picture Offset X: -x> <Shop Picture Offset Y: +y> <Shop Picture Offset Y: -y> <Shop Picture Offset: +x, +y> <Shop Picture Offset: -y, -y> - Used for: Skill, Item, Weapon, Armor Notetags - Offsets the X and Y positions of the image in the shop status window. - X offsets adjust the horizontal position by x pixels. - Positive goes right. - Negative goes left. - Y offsets adjust the horizontal position by y pixels. - Positive goes down. - Negative goes up. - Replace 'x' and 'y' with number values representing the pixels to offset the image by. The '+' and '-' signs are required. - If none of these notetags are used, there will be no offsets. --- <Shop Picture Opacity: x> <Shop Picture Opacity: x%> - Used for: Skill, Item, Weapon, Armor Notetags - Adjusts the opacity of the image used. - When using 'x' and not 'x%', use a number between 0 and 255. - The closer to 0, the more transparent the image is. - The closer to 255, the more opaque the image is. - When using 'x%' and not 'x', use a number between 0% and 100%. - The closer to 0%, the more transparent the image is. - The closer to 100%, the more opaque the image is. --- Shop Menu NotetagsThese notetags adjust how prices and such are managed inside the Shop Menu as well as whether or not some items are visible depending on switch states. --- <Price: x> - Used for: Item, Weapon, Armor Notetags - Adjusts the buying price for this item. - Replace 'x' with a number depicting the desired value for the buy price. - This allows you to bypass the RPG Maker MZ editor's limitation of 999,999. --- <Can Sell> <Cannot Sell> - Used for: Item, Weapon, Armor Notetags - Makes the item either always sellable or cannot be sold. - This bypasses the game's internal hard-coding to prevent items with a price of 0 from being able to be sold. - This bypasses the game's internal hard-coding to always allow items with a price value of being able to be sold. --- <Sell Price: x> - Used for: Item, Weapon, Armor Notetags - Changes the sell price to be something different than the default amount. - Replace 'x' with a number depicting the desired value for the sell price. --- <Show Shop Switch: x> <Show Shop All Switches: x,x,x> <Show Shop Any Switches: x,x,x> - Used for: Item, Weapon, Armor Notetags - Determines the visibility of the shop item based on switches. - Replace 'x' with the switch ID to determine the shop item's visibility. - If 'All' notetag variant is used, item will be hidden until all switches are ON. Then, it would be shown. - If 'Any' notetag variant is used, item will be shown if any of the switches are ON. Otherwise, it would be hidden. --- <Hide Shop Switch: x> <Hide Shop All Switches: x,x,x> <Hide Shop Any Switches: x,x,x> - Used for: Item, Weapon, Armor Notetags - Determines the visibility of the shop item based on switches. - Replace 'x' with the switch ID to determine the shop item's visibility. - If 'All' notetag variant is used, item will be shown until all switches are ON. Then, it would be hidden. - If 'Any' notetag variant is used, item will be hidden if any of the switches are ON. Otherwise, it would be shown. --- <Cannot Sell Switch: x> <Cannot Sell All Switches: x,x,x> <Cannot Sell Any Switches: x,x,x> - Used for: Item, Weapon, Armor Notetags - Determines the sellability of the shop item based on switches. - Replace 'x' with the switch ID to determine the shop item's sellability. - If 'All' notetag variant is used, item cannot be sold until all switches are ON. Otherwise, it can be sold. - If 'Any' notetag variant is used, item cannot be sold if any of the switches are ON. Otherwise, it can be sold. --- <Buy Turn On Switch: x> <Buy Turn On Switches: x, x, x> - Used for: Item, Weapon, Armor Notetags - When this item, weapon, or armor is bought in the shop scene, turn on the switch(es) 'x'. - Replace 'x' with a number representing the ID of the switch to turn on. - Insert multiple 'x' values to turn on multiple switches upon buying. --- <Buy Turn Off Switch: x> <Buy Turn Off Switches: x, x, x> - Used for: Item, Weapon, Armor Notetags - When this item, weapon, or armor is bought in the shop scene, turn off the switch(es) 'x'. - Replace 'x' with a number representing the ID of the switch to turn off. - Insert multiple 'x' values to turn off multiple switches upon buying. --- <Sell Turn On Switch: x> <Sell Turn On Switches: x, x, x> - Used for: Item, Weapon, Armor Notetags - When this item, weapon, or armor is sold in the shop scene, turn on the switch(es) 'x'. - Replace 'x' with a number representing the ID of the switch to turn on. - Insert multiple 'x' values to turn on multiple switches upon selling. --- <Sell Turn Off Switch: x> <Sell Turn Off Switches: x, x, x> - Used for: Item, Weapon, Armor Notetags - When this item, weapon, or armor is sold in the shop scene, turn off the switch(es) 'x'. - Replace 'x' with a number representing the ID of the switch to turn off. - Insert multiple 'x' values to turn off multiple switches upon selling. --- JavaScript Notetags: Shop MenuThe following are notetags made for users with JavaScript knowledge. These notetags are primarily aimed at Buy and Sell prices. --- <JS Buy Price> code code price = code; </JS Buy Price> - Used for: Item, Weapon, Armor Notetags - Replace 'code' to determine the buying 'price' of the item. - Insert the final buy price into the 'price' variable. - The 'item' variable refers to the item being bought. --- <JS Sell Price> code code price = code; </JS Sell Price> - Used for: Item, Weapon, Armor Notetags - Replace 'code' to determine the selling 'price' of the item. - Insert the final sell price into the 'price' variable. - The 'item' variable refers to the item being sold. --- Plugin CommandsPlugin Commands are event commands that are used to call upon functions added by a plugin that aren't inherently a part of RPG Maker MZ. Here is a list of Plugin Command(s) that you may use: ---
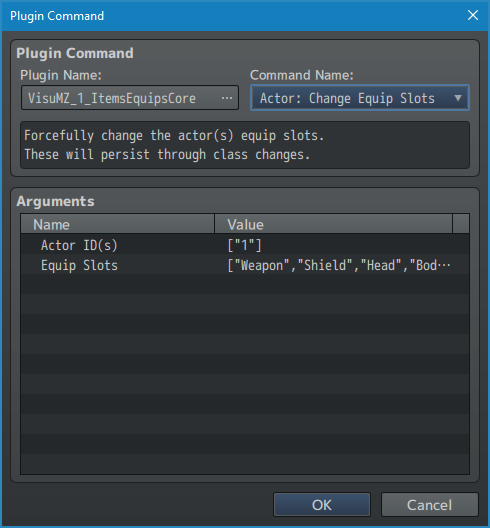
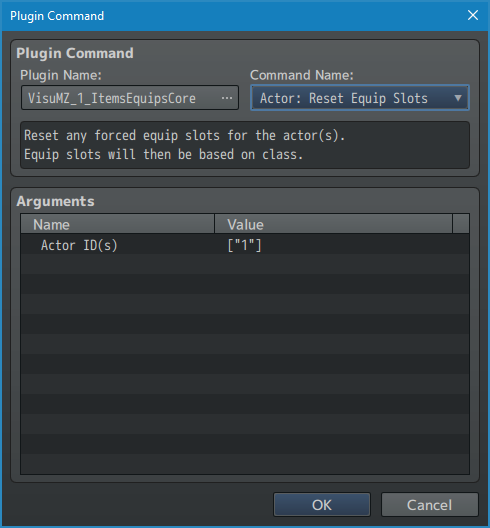
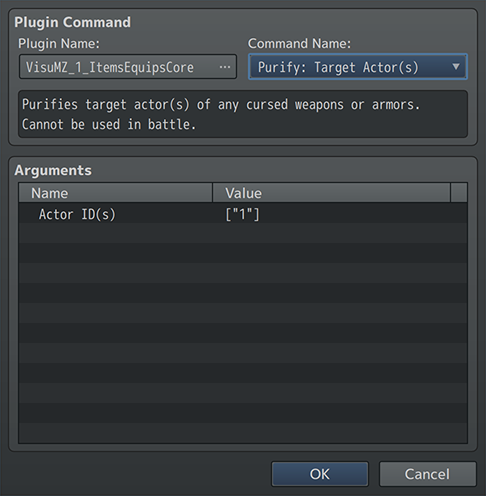
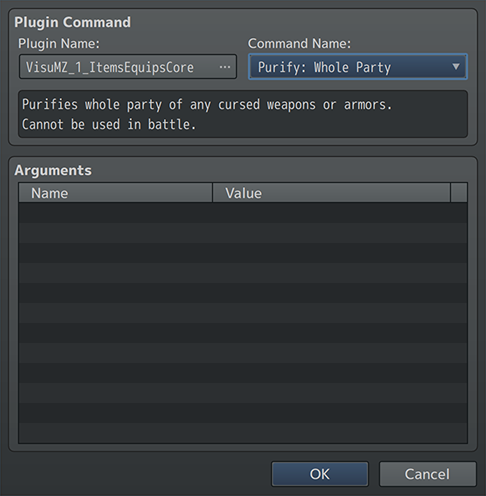
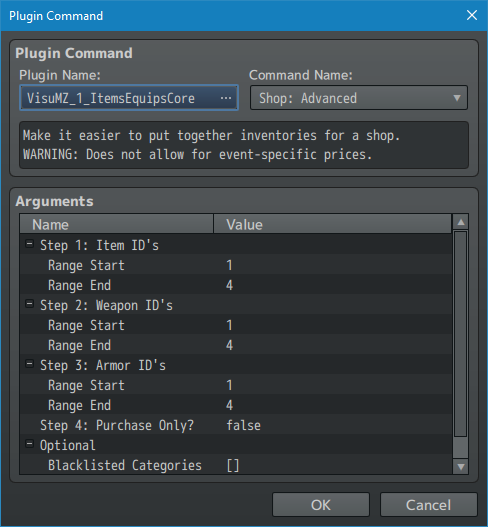
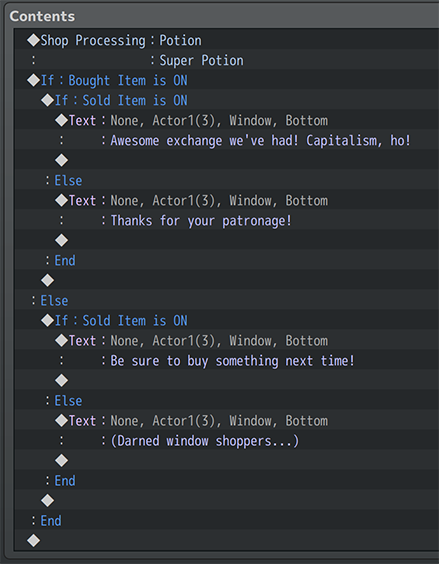
--- Actor Plugin Commands-- Actor: Change Equip Slots - Forcefully change the actor(s) equip slots. - These will persist through class changes. Actor ID(s): - Select which Actor ID(s) to affect. Equip Slots: - Insert the equip slots you want the actor(s) to have. - These entries are case-sensitive. -- Actor: Reset Equip Slots - Reset any forced equip slots for the actor(s). - Equip slots will then be based on class. Actor ID(s): - Select which Actor ID(s) to affect. --- Purify Plugin Commands--- Purify: Target Actor(s) - Purifies target actor(s) of any cursed weapons or armors. - Cannot be used in battle. Actor ID(s): - Select which Actor ID(s) to affect. --- Purify: Whole Party - Purifies whole party of any cursed weapons or armors. - Cannot be used in battle. --- Shop Plugin Commands--- Shop: Advanced
- Make it easier to put together inventories for a shop.
- WARNING: Does not allow for event-specific prices.
Step 1: Item ID's
- Select which Item ID ranges to add.
Step 2: Weapon ID's
- Select which Weapon ID ranges to add.
Step 3: Armor ID's
- Select which Armor ID ranges to add.
Step 4: Purchase Only?
- Make the shop purchase-only?
Optional:
Blacklist
- A list of categories to blacklist from the shop.
- Not used if empty. Mark categories with <Category: x>
Whitelist
- A list of categories to whitelist for the shop.
- Not used if empty. Mark categories with <Category: x>
This Plugin Command primarily functions as an alternative to the editor's
"Shop Processing" event command as that one requires you to add items one at
a time, making it extremely tedious to add large amounts of items. This
Plugin Command will mitigate that by allowing ID ranges to determine which
items to make available.
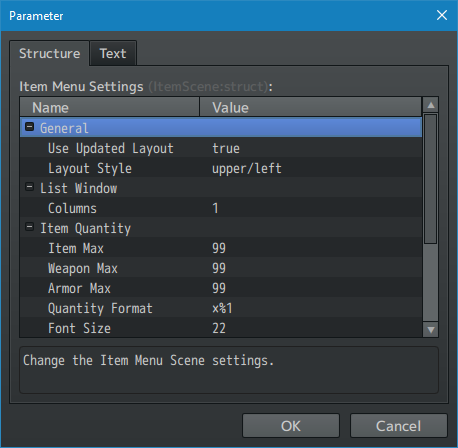
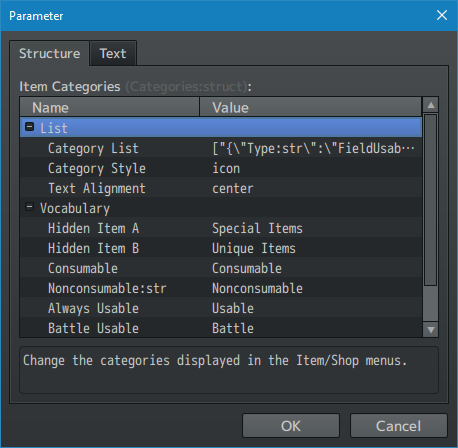
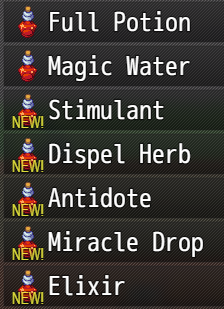
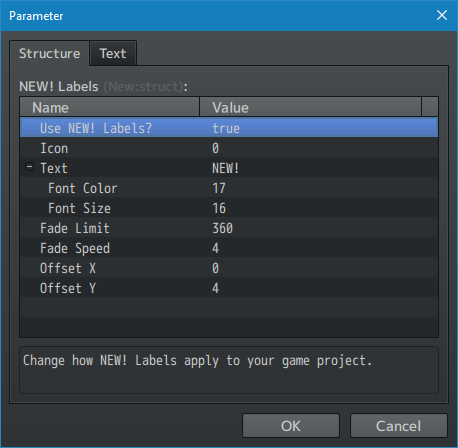
--- Plugin ParametersItem Menu SettingsThe Item Menu Settings allow you to adjust specifics on how key objects and windows in the Item Menu Scene operate. --- General Window Use Updated Layout: - Use the Updated Item Menu Layout provided by this plugin? - This will automatically enable the Status Window. - This will override the Core Engine windows settings. Layout Style: - If using an updated layout, how do you want to style the menu scene? - Upper Help, Left Input - Upper Help, Right Input - Lower Help, Left Input - Lower Help, Right Input --- List Window Columns: - Number of maximum columns. - If you are using the VisuStella MZ Core Engine and the "Modern Controls" Plugin Parameter, please read through that section in case you have any questions about how to switch between categories when using multiple columns of items at a time. --- Item Quantity Item Max: Weapon Max: Armor Max: - The default maximum quantity for items, weapons, and/or armors. Quantity Format: - How to display an item's quantity. - %1 - Item Quantity Font Size: - Default font size for item quantity. --- Shop Status Window Show in Item Menu?: - Show the Shop Status Window in the Item Menu? - This is enabled if the Updated Layout is on. Adjust List Window?: - Automatically adjust the Item List Window in the Item Menu if using the Shop Status Window? Background Type: - Select background type for this window. - 0 - Window - 1 - Dim - 2 - Transparent JS: X, Y, W, H: - Code used to determine the dimensions for this Status Window in the Item Menu. --- Button Assist Window Switch Category: - Button assist text used for switching categories. - For VisuStella MZ's Core Engine's Button Assist Window. --- Item CategoriesItem Categories appear both in the Item Menu Scene and Shop Menu Scene (but only under the Sell command). These Plugin Parameters give you the ability to add in the specific categories you want displayed, remove the ones you don't, and associate them with icons. --- List Category List - A list of the item categories displayed in the Item/Shop menus. Type: - A list of the item categories displayed in the Item/Shop menus. - Replace x with ID numbers or text. - AllItems, RegularItems, KeyItems - HiddenItemA, HiddenItemB - Consumable, Nonconsumable - AlwaysUsable, BattleUsable, FieldUsable, NeverUsable - AllWeapons, WType:x - AllArmors, AType:x, EType:x - Category:x Icon: - Icon used for this category. - Use 0 for no icon. Visibility Switch: - This Switch must be turned ON in order for the category to show. - Use 0 for no Switch requirement. Sort By: - Sort this category (in Scene_Item and Scene_Shop only) this way. Style: - How do you wish to draw categorie entries in the Category Window? - Text Only: Display only the text. - Icon Only: Display only the icon. - Icon + Text: Display the icon first, then the text. - Auto: Determine which is better to use based on the size of the cell. Text Alignment - Decide how you want the text to be aligned. --- Vocabulary Hidden Item A Hidden Item B Consumable Nonconsumable Always Usable Battle Usable Field Usable Never Usable - How these categories are named in the Item Menu. --- NEW! LabelsWhenever the player receives a new item(s), a NEW! Label can be placed on top of the item's icon when browsing a menu displaying the item(s). This is a quality of life addition from more modern RPG's to help players figure out what they've recently received. The following are Plugin Parameters made to adjust how the NEW! Labels are handled in-game. --- NEW! Labels Use NEW! Labels?: - Use the NEW! Labels or not? Icon: - The icon index used to represent the NEW! text. - Use 0 to not draw any icons. Text: - The text written on the NEW! Label. Font Color:
- Use #rrggbb for custom colors or regular numbers for text colors from
the Window Skin.
   Font Size:
   - The font size used for the NEW! text.
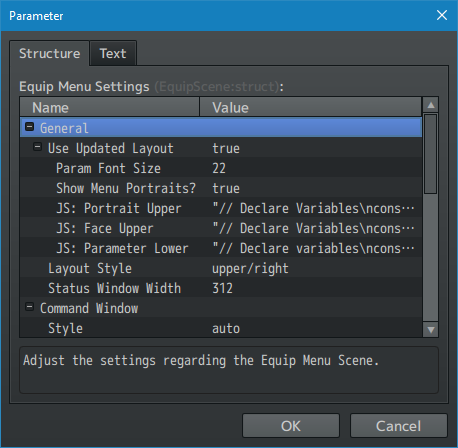
Fade Limit: - What's the upper opaque limit before reversing? Fade Speed: - What's the fade speed of the NEW! Label? Offset X: - How much to offset the NEW! Label's X position by. Offset Y: - How much to offset the NEW! Label's Y position by. --- Equip Menu SettingsThese Plugin Parameters adjust the Equipment Menu Scene, ranging from using a more updated and modern layout, changing the styles of other windows, and other key visual aspects of the Equip Menu Scene. Other settings here allow you to adjust how equipment operate under certain rulings, too. --- General Use Updated Layout: - Use the Updated Equip Layout provided by this plugin? - This will override the Core Engine windows settings. Param Font Size: - The font size used for parameter values. Show Menu Portraits?:
- If Main Menu Core is installed, display the Menu Portraits instead of
the actor's face in the status window?
   JS: Portrait Upper:
   - If Menu Portraits are available, this is code used to draw the upper
     data like this in the Status Window.
   JS: Face Upper:
   - If faces used used, this is code used to draw the upper data like this
     in the Status Window.
   JS: Parameter Lower:
   - Code to determine how parameters are drawn in the Status Window.
Layout Style: - If using an updated layout, how do you want to style the menu scene? - Upper Help, Left Input - Upper Help, Right Input - Lower Help, Left Input - Lower Help, Right Input Status Window Width: - The usual width of the status window if using the non-Updated Equip Menu Layout. Show Back Rectangles?: - Show back rectangles of darker colors to display information better? Back Rectangle Color:
- Use #rrggbb for custom colors or regular numbers for text colors
from the Window Skin.
 Cursed Equip Popup:
 - Text popup appears when an actor equips a cursed weapon/armor.
 - Text codes allowed.
 - Requires VisuMZ_0_CoreEngine!
 - Empty to not use.
 -  %1 - Actor, %2 - Equip, %3 - Icon.
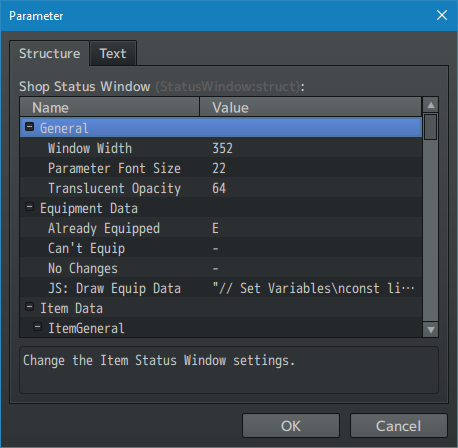
--- Command Window Style: - How do you wish to draw commands in the Command Window? - Text Only: Display only the text. - Icon Only: Display only the icon. - Icon + Text: Display the icon first, then the text. - Auto: Determine which is better to use based on the size of the cell. Text Align: - Text alignment for the Command Window. Equip Icon: - The icon used for the Equip command. Help Description: - Help description used when this command is selected. - Text codes allowed. Add Optimize Command?: - Add the "Optimize" command to the Command Window? Help Description: - Help description used when this command is selected. - Text codes allowed. Optimize Icon: - The icon used for the Optimize command. Add Clear Command?: - Add the "Clear" command to the Command Window? Help Description: - Help description used when this command is selected. - Text codes allowed. Clear Icon: - The icon used for the Clear command. --- Remove Equip Icon: - Icon used for equipment removal. Text: - Text used for equipment removal. Use SHIFT Shortcut?: - Add the "Shift" button as a shortcut key to removing items? --- Rulings Equip-Adjust HP/MP: - Adjust HP/MP differences after changing equips with MaxHP/MaxMP values. Non-Removable Types: - Insert ID's of the Equipment Types that must always have an item equipped and cannot be empty. Non-Optimized Types: - Insert ID's of the Equipment Types that will be ignored when equipment is being optimized. --- Button Assist Window SHIFT: Remove: - Button assist text used for the SHIFT Remove Shortcut. - For VisuStella MZ's Core Engine's Button Assist Window. --- Shop Menu SettingsThese Plugin Parameters allow you a number of options to adjust the Shop Menu Scene. These options range from enabling an updated and modern layout, adjust how various key visual aspects appear, and determine how prices can be affected when it comes to selling them or buying them (for coders). --- General Use Updated Layout: - Use the Updated Shop Layout provided by this plugin? - This will override the Core Engine windows settings. Layout Style: - If using an updated layout, how do you want to style the menu scene? - Upper Help, Left Input - Upper Help, Right Input - Lower Help, Left Input - Lower Help, Right Input --- Switches Switch: Buy: - Buying items in the Shop Scene turns this Switch to ON. - Switch reverts to OFF whenever the Shop Scene opens. Switch: Sell - Selling items in the Shop Scene turns this Switch to ON. - Switch reverts to OFF whenever the Shop Scene opens. --- Command Window Hide Unavailable?: - Hide all unavailable commands like when a shop is set to Purchase Only? Style: - How do you wish to draw commands in the Command Window? - Text Only: Display only the text. - Icon Only: Display only the icon. - Icon + Text: Display the icon first, then the text. - Auto: Determine which is better to use based on the size of the cell. Text Align: - Text alignment for the Command Window. Buy Icon: - The icon used for the Buy command. Sell Icon: - The icon used for the Sell command. Cancel Icon: - The icon used for the Cancel command. Rename "Cancel": - Rename Cancel to something more logical for the Shop Menu Scene. --- Prices Sell Price Rate: - The default sell price rate. JS: Buy Price: - Modificatons made to the buy price before finalizing it. JS: Sell Price: - Modificatons made to the sell price before finalizing it. --- Button Assist Window Small Increment: Large Increment: - Text used for changing amount bought/sold. - For VisuStella MZ's Core Engine's Button Assist Window. --- Shop Status WindowThese Plugin Parameters focuses on the Shop Status Window and determines how its data is displayed. --- General Window Width: - The usual width of the status window. Parameter Font Size: - Font size used for parameter changes. Translucent Opacity: - Opacity setting used for translucent window objects. Show Back Rectangles?: - Show back rectangles of darker colors to display information better? Back Rectangle Color:
- Use #rrggbb for custom colors or regular numbers for text colors
from the Window Skin.
--- Equipment Data Data Style:
- How do you wish to display equipment data?
- Compare - Compares selected equip to equipped gear
- Lists all main party actors
- Displays the parameter differences when equipped
- Calculates custom JS values
- Classic - Shows basic parameters of selected equip
- Involves no actors, only shows the item's stats
- Shows weapon or armor specific parameters
- Does not show custom JS values as those are calculated per actor
- Does not show custom parameters as those are calculated per actor
- Use <Status Info> and <Custom Status Info> notetags to overwrite or
add custom data to classic equip data
- Double - Shows basic parameters in double columns
- Involves no actors, only shows the item's stats
- Shows weapon or armor specific parameters
- Does not show custom JS values as those are calculated per actor
- Does not show custom parameters as those are calculated per actor
- Use <Status Info> and <Custom Status Info> notetags to overwrite or
add custom data to classic equip data
Compare Style: Already Equipped:
- Marker used to show an actor cannot equip an item.
     Can't Equip:
     - Marker used to show an actor cannot equip an item.
     No Changes:
     - Marker used to show no changes have occurred.
     JS: Draw Equip Data:
     - Code used to draw the equipment data for the Shop Status Window.
Classic Style: Added Weapon Params:
Added Armor Params:
- Display these parameters when a weapon/armor is selected.
- Requires VisuMZ_0_CoreEngine!
     JS: Draw Equip Data:
     - Code used to draw the equipment data for the Shop Status Window.
Double Style: Added Weapon Params:
Added Armor Params:
- Display these parameters when a weapon/armor is selected.
- Requires VisuMZ_0_CoreEngine!
     JS: Draw Equip Data:
     - Code used to draw the equipment data for the Shop Status Window.
 Delay MS:
 - How many milliseconds (MS) to delay the preview update?
 - This is to prevent lag spikes for equips only.
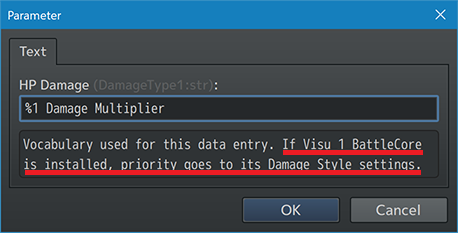
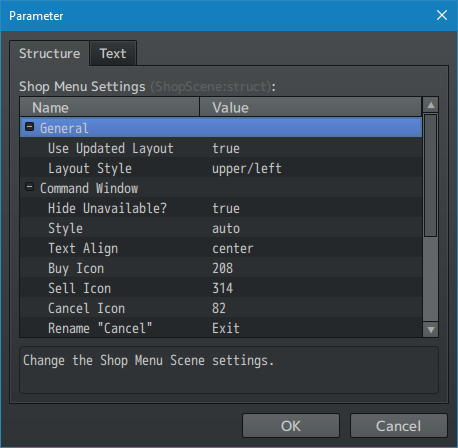
--- Item Data Max State/Buff Icons: - Maximum number of icons that can be displayed for Add/Remove States/Buffs. Multiplier Standard: - Constant standard to filter out random values when calculating the damage multiplier. JS: Draw Item Data: - Code used to draw the item data for the Shop Status Window. --- Vocabulary Consumable: Occasions: Scope: Speed: Success Rate: Repeats: Hit Type: Element: Damage Type: Effects: - Vocabulary used for these data entries. - Some of these have Plugin Parameters have sub-entries. NOTE: Regarding Damage Labels If Visu_1_BattleCore is installed, priority goes to its Damage Style settings. The label displayed is based on the damage style settings in place for that specific skill or item. Go to Battle Core > Plugin Parameters > Damage Settings > Style List > pick the damage style you want to edit > Damage Label and change the text settings you'd like there. ---
Terms of Use1. These plugins may be used in free or commercial games provided that they have been acquired through legitimate means at VisuStella.com and/or any other official approved VisuStella sources. Exceptions and special circumstances that may prohibit usage will be listed on VisuStella.com. 2. All of the listed coders found in the Credits section of this plugin must be given credit in your games or credited as a collective under the name: "VisuStella". 3. You may edit the source code to suit your needs, so long as you do not claim the source code belongs to you. VisuStella also does not take responsibility for the plugin if any changes have been made to the plugin's code, nor does VisuStella take responsibility for user-provided custom code used for custom control effects including advanced JavaScript notetags and/or plugin parameters that allow custom JavaScript code. 5. VisuStella is not responsible for problems found in your game due to unintended usage, incompatibility problems with plugins outside of the VisuStella MZ library, plugin versions that aren't up to date, nor responsible for the proper working of compatibility patches made by any third parties. VisuStella is not responsible for errors caused by any user-provided custom code used for custom control effects including advanced JavaScript notetags and/or plugin parameters that allow JavaScript code. 8. Any extensions and/or addendums made to this plugin's Terms of Use can be found on VisuStella.com and must be followed. Terms of Use: Japanese『VisuStella MZ』利用規約 1. これらのプラグインは、VisuStella.comおよび/または公式に承認されたVisuStellaのソースから合法的な手段で入手したものである限り、フリーゲームや商用ゲームに使用することができます。例外的に使用が禁止される場合については、VisuStella.comの記載をご確認ください。 2. 本プラグインの「クレジット」部分に記載されているすべてのコーダーの名前は、ゲーム内にクレジット表記を行うか、もしくは「VisuStella」という名前の下にまとめて表記する必要があります。 3. ソースコードを自分のものだと主張しない限りは、必要に応じて編集することが可能です。ただしプラグインのコードに変更が加えられた場合、VisuStellaはそのプラグインに対して一切の責任を負いません。高度なJavaScriptのノートタグやJavaScriptコードを許可するプラグインのパラメータを含む、カスタムコントロールエフェクトに使用される、ユーザー提供のカスタムコードについても、VisuStellaは一切の責任を負いません。 5. VisuStellaは、意図しない使用方法による問題、VisuStella MZライブラリ以外のプラグインとの非互換性の問題、プラグインのバージョンが最新でないことによる問題、第三者による互換性パッチが適切に動作していないことなどが原因でゲーム内で発生した問題については、一切の責任を負いません。VisuStellaは、高度なJavaScriptのノートタグやJavaScriptコードを許可するプラグインのパラメータを含む、カスタムコントロールエフェクトに使用される、ユーザー提供のカスタムコードに起因するエラーについても、一切の責任を負いません。 8. このプラグインの利用規約の追加項目や補足については、VisuStella.comに掲載されていますので、それを参照し従ってください。 CreditsIf you are using this plugin, credit the following people in your game: Team VisuStella
ChangelogVersion 1.59: October 16, 2025
Version 1.58: February 20, 2025
Version 1.57: January 16, 2025
Version 1.56: December 19, 2024
Version 1.55: November 14, 2024
Version 1.54: October 17, 2024
Version 1.53: July 18, 2024
Version 1.52: May 16, 2024
Version 1.51: December 14, 2023
Version 1.50: November 16, 2023
Version 1.49: October 12, 2023
Version 1.48: September 14, 2023
Version 1.47: July 13, 2023
Version 1.46: June 15, 2023
Version 1.45: May 18, 2023
Version 1.44: April 13, 2023
Version 1.43: March 16, 2023
Version 1.42: February 16, 2023
Version 1.41: December 15, 2022
Version 1.40: October 20, 2022
Version 1.39: September 29, 2022:
Version 1.38: March 3, 2022
Version 1.37: December 23, 2021
Version 1.36: December 2, 2021
Version 1.35: November 18, 2021
Version 1.34: October 28, 2021
Version 1.33: August 6, 2021
Version 1.32: July 23, 2021
Version 1.31: July 9, 2021
Version 1.30: July 2, 2021
Version 1.29: June 25, 2021
Version 1.28: June 4, 2021
Version 1.27: May 21, 2021
Version 1.26: April 30, 2021
Version 1.25: April 23, 2021
Version 1.24: April 16, 2021
Version 1.23: April 2, 2021
Version 1.22: March 26, 2021
Version 1.21: March 5, 2021
Version 1.20: February 26, 2021
Version 1.19: January 29, 2021
Version 1.18: January 15, 2021
Version 1.17: January 1, 2021
Version 1.16: December 25, 2020
Version 1.15: December 18, 2020
Version 1.14: December 11, 2020
Version 1.13: December 4, 2020
Version 1.12: November 15, 2020
Version 1.11: November 8, 2020
Version 1.10: November 1, 2020
Version 1.09: October 25, 2020
Version 1.08: October 18, 2020
Version 1.07: October 11, 2020
Version 1.06: October 4, 2020
Version 1.05: September 27, 2020
Version 1.04: September 13, 2020
Version 1.03: September 6, 2020
Version 1.02: August 30, 2020
Version 1.01: August 23, 2020
Version 1.00: August 20, 2020
See Also
|
End of File
- RPG Maker MZ Plugins
- RPG Maker MZ Parent Plugins
- RPG Maker MZ Tier 1 Plugins
- Notetags (MZ)
- Plugin Commands (MZ)
- RPG Maker MZ Core Plugins
- RPG Maker MZ Item Plugins
- RPG Maker MZ Equip Plugins
- RPG Maker MZ Gameplay Plugins
- RPG Maker MZ Utility Plugins
- RPG Maker MZ Mechanical Plugins
- RPG Maker MZ Visual Plugins
- RPG Maker MZ Menu Plugins
- RPG Maker MZ Quality of Life Plugins
