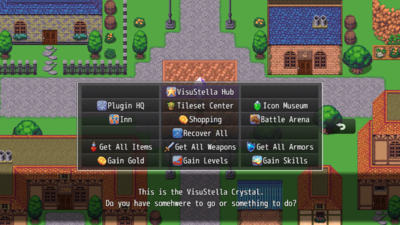
Extension Plugins
The following plugins are Extension Plugins that require this plugin as its Parent Plugin.
Place the following plugins below this plugin located in the Plugin Manager if you plan on using them.
This plugin is a part of the VisuStella MZ Plugin Library.

Click here if you want to help support VisuStella on Patreon.
Introduction
The Message Core plugin extends and builds upon the message functionality of
RPG Maker MZ and allows you, the game dev, to customize the workflow for
your game's message system.
Features include all (but not limited to) the following:
- Control over general message settings.
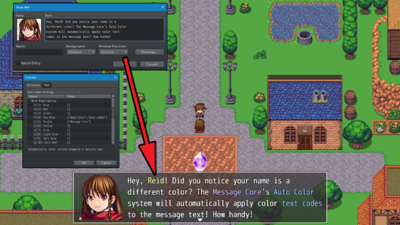
- Auto-Color key words and/or database entries.
- Increases the text codes available to perform newer functions/effects.
- Ability for you to implement custom Text Code actions.
- Ability for you to implement custom Text code string replacements.
- Invoke a macro system to speed up the dev process.
- Add a Text Speed option to the Options menu.
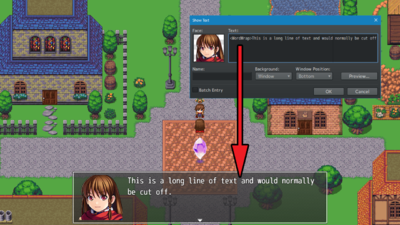
- Add the ever so useful Word Wrap to your message system.
- Extend the choice selection process to your liking.
- The ability to enable/disable as well as show/hide certain choices.
Requirements
This plugin is made for RPG Maker MZ. This will not work in other iterations
of RPG Maker.
- Tier 1
This plugin is a Tier 1 plugin. Place it under other plugins of lower tier value on your Plugin Manager list (ie: 0, 1, 2, 3, 4, 5).
This is to ensure that your plugins will have the best compatibility with the rest of the VisuStella MZ Plugin library.
Major Changes
Dim Background Extension
Before, when using the Dim Background as a part of a Show Text event, its
size is only the same as the message window's width itself. This looked
really ugly because it had hard edges cutting off while gradients are seen
elsewhere. To make it look better, we extended the dimmed background to span
the width of the screen instead.
Extended Messages
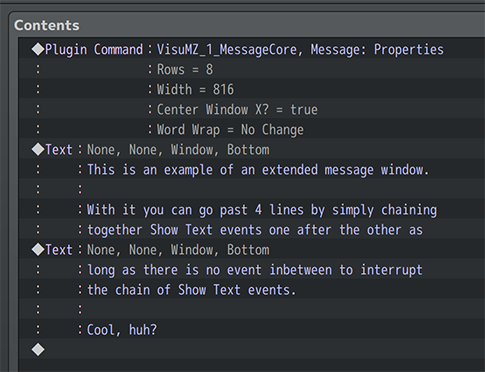
If you decide to expand the size of the message window to allow for more
rows to be displayed, you can type in the data for them by chaining together
Show Message events. They will take data from each other and display them in
the same message window as long as there are enough rows.
Extended Choice Lists
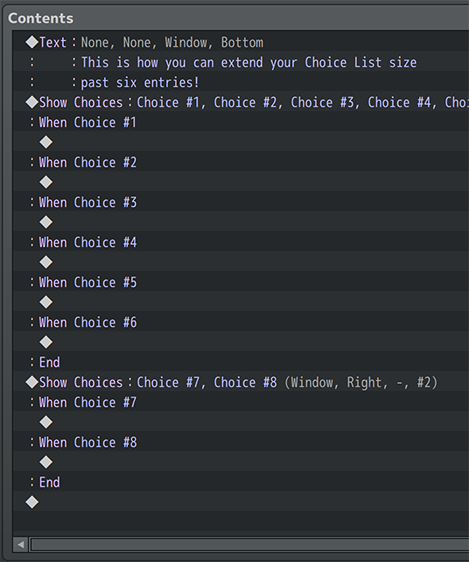
Choice lists can be extended by just chaining one Choice List event after
the other in succession along the same indentation. They do not extend if
there is any event other than a Choice List option between them on the same
indentation level.
Text Language Switching Information

As of Message Core version 1.46, Text Language Switching has been added.
The "Text Language" feature allows your players to switch between different
languages for your game to allow people from around the globe to enjoy what
story you have to tell.
Disclaimers: This is not an automatic translation tool. Translations made
through the "Text Language" feature of the VisuStella MZ Message Core
will require manual input by the game developer.
As of Message Core version 1.53, we've decided to add support for TSV.
This is because we have done our research and decided that CSV's are too
restricted to use due to their default nature of wanting to use commas as
separators. Thus, we've decided to switch to TSV where the default separator
is a tab space, something that is almost never used in RPG Maker text.
---
How to Enable Switching
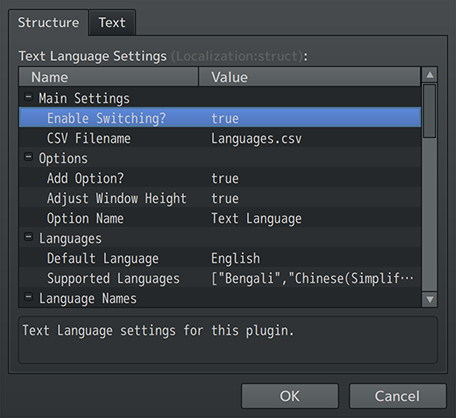
Text Language is NOT enabled by default. Here's what you have to do:
- Open up the Message Core's Plugin Parameters
- Plugin Parameters > Text Language Settings > Enable Switching?
- Change the "Enable Switching?" parameter setting to "true".
- Adjust any other settings as needed.
- Save the Plugin Parameter changes.
- Save your game.

Now, it's time to get the CSV/TSV file that will contain all of the text
used to translate your game's script.
- Play test your game. Make sure Play test mode is NOT disabled.
- A popup will appear asking to create a language CSV/TSV file.
- Click "OK" and let the plugin do its thing.
- The project's /data/ folder will appear with Language.csv/tsv made.
- The plugin will then ask you to restart your game.
IMPORTANT! The separator used for the CSV file must be a semicolon (;)
and not a comma (,) as to reduce the amount of punctuation conflicts. Keep
this in mind as most CSV editors will default to comma (,) instead of the
semicolon (;) for their separator.
---
How to Edit the Language CSV/TSV
The Language CSV/TSV is structured as a normal CSV/TSV file would be, which also
means it can be modified in programs like Microsoft Excel or Google Sheets.
We recommend using either of those programs to modify the text.
We do not recommend modifying the CSV/TSV file in programs like notepad directly
due to the way certain things like commas (,) are handled and how easy it is
to be error-prone.
The table will appear something like this at first:
    Key        English    Chinese    Japanese     Korean
    Greeting   Hello      你好       こんにちは    안녕하세요
    Farewell   Good-bye   再见       さようなら    안녕히
    Wow        Wow        哇         ワオ          와우
The "Key" column refers to the reference key used to determine which lines
will be inserted into the text. The columns with the languages will utilize
the respective phrases for that language.
You can remove columns containing languages that you aren't planning to
translate for your game.
---
Things to Keep in Mind
When adding text to the CSV/TSV file via the spreadsheet editor (Microsoft Excel or Google Sheets), there's a few things to keep in mind.
---
How to Load the CSV/TSV in Google Sheets
If you are using Google Sheets and wish to edit the CSV without it
converting all the separators into commas, here's what you do:
- . Go to "sheets.google.com"
- . Create a "Blank spreadsheet"
- . File > Import > Upload > Select the CSV/TSV file that was created in your game project's /data/ folder.
- . For "Separator Type", if you are using CSV, change it to "Custom" and insert the Semicolon ";". Otherwise, if you are using TSV, select "tab" as your separator type.
- . Uncheck "Convert text to numbers, dates, and formulas"

= How to Load the CSV/TSV in VS Code
- . Go to "https://code.visualstudio.com/"
- . Download and install it
- . Open up VS Code and go to View > Extensions
- . Search for an extension called "Edit CSV"
- . Load the CSV/TSV file into VS Code and view with the CSV Editor
- . Click the button that says "Edit CSV" in the upper right
Line Breaks
When you want to insert line breaks into the translated phrases, use the
<br> text code. This is best used for text that is to be transferred into
the message window or help window.
Text Codes
Text codes like \C[2] can be inserted normally. However, they only work in
windows that support text codes, such as the message window or help window.
Otherwise, the text codes will not transfer over properly.
Semicolons (CSV Only)
Due to the nature of the CSV file, we used the semicolon (;) as the
separator. As such, semicolons should not be used in the text entries.
Though some sentences will work with the semicolon, not all of them will. If
you do want to use a semicolon, use the text code <semicolon> instead.
  Example:

  "The pancakes were delicious<semicolon> they were fluffy and sweet."
Other variations of the semicolon text code are <semi> and <semi-colon>.
The <semicolon> text code and variants only work with the Language CSV and
are ignored otherwise when typed in a regular message box entry.
---
Macros and Language Switches
For those using both text macros and text language switches, macros will be
converted to text before language switches as it allows for better text
transitions that way.
---
How to Use the Reference Keys
Remember the "Key" column and the reference keys? Those are used to
determine which lines will be inserted into the text for the message window
and just about any other window. However, there's a specific way these keys
must be used in order for them to work.
The "text code" format works like this. Use any of the following:
  \tl{keyName}
  \translate{keyName}
  \loc{keyName}
  \locale{keyName}
  \localize{keyName}
or for those coming from different translation plugins but want to switch
over to the VisuStella MZ Message Core's translation system:
${keyName}
For example, to use one of the default keys made with the Language CSV:
\tl{Greeting}
This will yield "Hello" in English, "你好" in Chinese, "こんにちは" in
Japanese, and "안녕하세요" in Korean.
Key names are not case sensitive and any trailing spaces will be removed
from them in order to make sure the CSV/TSV table is stable to reference any
translated text from.
You can insert these language "text codes" into item names, skill names,
etc. as well as system entries like for Attack, Defense, etc.
---
Naming Weapon Types, Armor Types, Equip Types, Item Categories
You might have noticed that if you've decided to use \tl{keyName} for weapon
or other database types, other parts of the game will error out. Don't
worry, for these, you don't have to change the currently used database name.
Go straight to the CSV/TSV and insert in a new key for that particular database
name. For example, the equip type "Accessory" will use "Accessory" as the
automatic key to look for a translated phrase. If there isn't any in the CSV/TSV
file, then the default database text entry will be used.
---
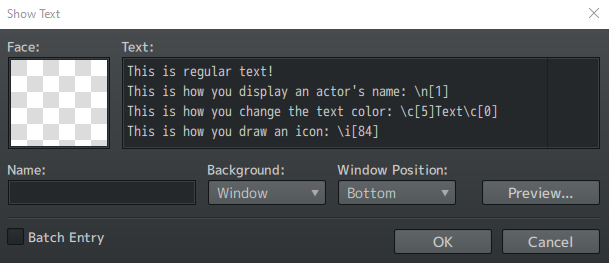
Text Codes are used in the Show Text event command. They are used to display things that text normally can't produce on its own, such as colors, get the name of a specific actor, change icons, and more.
RPG Maker MZ already comes with text codes of its own:
| \V[n]
|
Will be replaced with the value of the nth variable.
|
| \N[n]
|
Will be replaced with the name of the nth actor.
|
| \P[n]
|
Will be replaced by the name of the nth (arranged order) party member.
|
| \G
|
Will be replaced by the currency unit.
|
| \C[n]
|
Draw the subsequent text in the nth color. Text color conforms to the contents of the [Window.png] system image.
|
| \I[n]
|
Draws the nth icon.
|
| \FS[n]
|
Changes the text font size to 'n'.
|
| \{
|
Increases the text by 1 step.
|
| \}
|
Decreases the text by 1 step.
|
| \\
|
Replaced with the backslash character.
|
| \$
|
Open the gold window.
|
| \.
|
Wait for 1/4 second.
|
| \|
|
Wait for 1 second.
|
| \!
|
Wait for button input.
|
| \>
|
Display remaining text on same line all at once.
|
| \<
|
Cancel the effect that displays text all at once.
|
| \^
|
Do not wait for input after displaying the next.
|
The following are text codes that you may use with this plugin. Some of
these are original text codes provided by RPG Maker MZ, while others are
new text codes added through this plugin. You may even add your own text
codes through the plugin parameters.
RPG Maker MZ Text Codes
The following are text codes that come with RPG Maker MZ. These text codes
cannot be edited through the Plugin Parameters.
---
Default MZ Text Codes
| Text Code |
Effect (Global)
|
| \V[x]
|
Replaced by the value of variable 'x'.
|
| \N[x]
|
Replaced by the name of actor 'x'.
|
| \P[x]
|
Replaced by the name of party member 'x'.
|
| \C[x]
|
Draw the subsequent text with window skin color 'x'.
|
| \I[x]
|
Draw icon 'x'.
|
| \PX[x]
|
Moves text x position to 'x'.
|
| \PY[x]
|
Moves text y position to 'y'.
|
| \G
|
Replaced by the currency unit.
|
| \{
|
Increase the text font size by one step.
|
| \}
|
Decrease the text font size by one step.
|
| \FS[x]
|
Changes the text font size to 'x'.
|
| \\
|
Replaced by the backslash character.
|
---
Default MZ Message-Only Text Codes
| Text Code |
Effect (Message Window Only)
|
| \$
|
Opens the gold window.
|
| \.
|
Waits a 1/4 second.
|
| \|
|
Waits a full second.
|
| \!
|
Waits for button input.
|
| \>
|
Display remaining text on same line all at once.
|
| \<
|
Cancel the effect that displays text all at once.
|
| \^
|
Do not wait for input after displaying text to move on.
|
---
Message Core Hard-Coded Text Codes
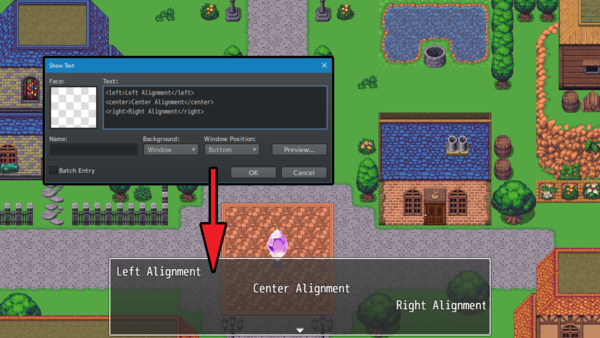
The following text codes are hard-coded into VisuStella MZ Message Core's
code. These text codes cannot be edited through the Plugin Parameters.
---
Global Hard-Coded Text Codes
| Text Code |
Effect (Global)
|
| <b>
|
Makes subsequent text bold.
|
| </b>
|
Removes bold from subsequent text.
|
| <i>
|
Makes subsequent text italic.
|
| </i>
|
Removes italic from subsequent text.
|
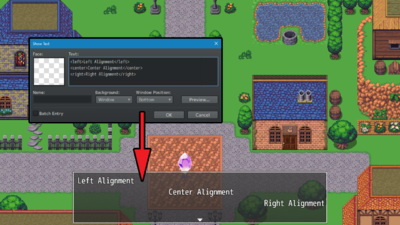
| <left>
|
Makes subsequent text left-aligned. *Note1*
|
| </left>
|
Removes left-alignment for subsequent text.
|
| <center>
|
Makes subsequent text center-aligned. *Note1*
|
| </center>
|
Removes center-alignment for subsequent text.
|
| <right>
|
Makes subsequent text right-aligned. *Note1*
|
| </right>
|
Removes right-alignment for subsequent text.
|
Note1: Use at line-start. Does not work with Word Wrap.
| Text Code |
Effect (Global)
|
| <ColorLock>
|
Text codes can't change text color for subsequent text.
|
| </ColorLock>
|
Removes Color Lock property.
|
| <WordWrap>
|
Enables Word Wrap for this window. *Note2*
|
| </WordWrap>
|
Disables Word Wrap for this window. *Note2*
|
| <br>
|
Adds a line break. Requires Word Wrap enabled.
|
| <line break>
|
Adds a line break. Requires Word Wrap enabled.
|
Note2: Some windows cannot use Word Wrap such as the Choice Window.
Word Wrap also cannot be used together with <left>, <center>, or <right> and
will disable itself if text alignment text codes are detected.
| Text Code |
Effect (Global)
|
| \picture<x>
|
Draws picture x (filename) at current text position.
|
| \CenterPicture<x>
|
Draws picture x (filename) centered at the window.
|
While these text codes are available globally, they are best suited for use
in the message window or any other window that does not change its contents.
The reason being is because the picture drawn is drawn into the background
of the window.
Therefore, we do not recommend using this in windows that change contents often
like Help Windows or Quest Descriptions. Instead, we recommend using icons instead.
As of the version 1.53 update, the Help Window now supports both of these
text codes. However, we still recommend using icons over using pictures as
there will be loading delays.
| Text Code |
Effect (Map Name)
|
| <left>
|
Makes map name align to left side of screen.
|
| <center>
|
Makes map name align to horizontally center of screen.
|
| <right>
|
Makes map name align to right side of screen.
|
| <top>
|
Makes map name align to top of screen.
|
| <middle>
|
Makes map name align to vertically middle of screen.
|
| <bottom>
|
Makes map name align to bottom of screen.
|
| <X: +n>
|
Adjusts the horizontal position of map name by n.
|
| <X: -n>
|
Adjusts the horizontal position of map name by n.
|
| <Y: +n>
|
Adjusts the vertical position of map name by n.
|
| <Y: -n>
|
Adjusts the vertical position of map name by n.
|
Note: All of these text codes require VisuMZ_0_CoreEngine installed and its "Map Name Text Code" plugin parameter enabled.

| Text Code |
Effect (Global)
|
| <Caps>
|
Makes all text after this capitalized. Turns off other auto-text case modes. ie: "hello world" becomes "HELLO WORLD"
|
| </Caps>
|
Turns off auto text-casing effects.
|
| <Upper>
|
Makes the first letter of any word after a space to be capitalized. Other letters are left alone. Turns off other auto-text case modes. ie. "old mcDonald" becomes "Old McDonald"
|
| </Upper>
|
Turns off auto text-casing effects.
|
| <Lower>
|
Makes all text after this lowercase. Turns off other auto-text case modes. ie: "THE QUICK BROWN FOX" becomes "the quick brown fox"
|
| </Lower>
|
Turns off auto text-casing effects.
|
| <Alt>
|
Makes all text after this alternate between uppercase and lowercase. Turns off other auto-text case modes. ie: "Hello" becomes "HeLlO"
|
| </Alt>
|
Turns off auto text-casing effects.
|
| <Chaos>
|
Makes all text after this randomize between uppercase and lowercase. Turns off other auto-text case modes. ie: "Wassup" becomes "waSsUP" or "WasSuP"
|
| </Chaos>
|
Turns off auto text-casing effects.
|
Clarity: In case you're wondering, the text codes </Caps>, </Upper>,
</Lower>, </Alt>, and </Chaos> all do the same thing and can be used
interchangeably with each other. For example, you can do this:
<Caps>hello world</Lower> and it would still accomplish the same effect, but
you won't do that because you're not a monster of a developer.
---
Message Window Only Hard-Coded Text Codes
| Text Code |
Effect (Message Window Only)
|
| \CommonEvent[x]
|
Runs common event x when text code is reached.
|
| \Wait[x]
|
Makes the message wait x frames before continuing.
|
| <Next Page>
|
Ends the current message page at this line. This is used for messages when rows are at 5 or above and the message lines don't match the amount. This is used to prevent grabbing message windows from following message events. Any lines following <Next Page> in the same message event will be ignored.
|
| <Auto>
|
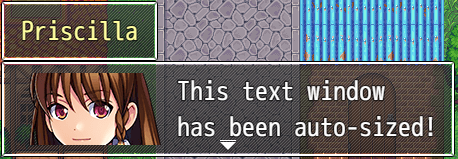
Resizes message window dimensions to fit text. *Note3*
|
| <Auto Width>
|
Resizes message window width to fit text. *Note3*
|
| <Auto Height>
|
Resizes message window height to fit text. *Note3*
|
| <Auto Actor: x>
|
Resizes message window and positions it over actor x sprite's head. *Note3*
|
| <Auto Party: x>
|
Resizes message window and positions it over party member x sprite's head. *Note3*
|
| <Auto Player>
|
Map-Only. Resizes message window and positions it over the player sprite's head. *Note3*
|
| <Auto Event: x>
|
Map-Only. Resizes message window and positions it over event x sprite's head. *Note3*
|
| <Auto Enemy: x>
|
Battle-Only. Resizes message window and positions it over enemy x sprite's head. *Note3*
|
Note3: Upon using these text codes, the message window's settings will be
reset for the upcoming message. These effects do not work with Word Wrap.
---
Battle-Only Hard-Coded Text Codes
| Text Code |
Effect (Battle Only)
|
| <Current Battle Target>
|
Replaces text code with the current target of an action in battle.
|
| <Current Battle User>
|
Replaces text code with the currently active user in battle.
|
| <Current Battle Action>
|
Replaces text code with the current battle action's name with an icon in front.
|
| <Current Battle Action Name>
|
Replaces text code with the current battle action's name without an icon.
|
If there is no battle, no target, no user, or no action, then the text code
will just be replaced with no text.
These text codes are NOT recommended to be used inside of Help Descriptions.
They are best used with "Show Text" event commands.
---
Choice Window-Only Hard-Coded Text Codes
| Text Code |
Effect (Choice Window Only)
|
| <Show>
|
Choice is always shown.
|
| <Show Switch: x>
|
Choice shown if switch x is ON.
|
| <Show Switches: x,x,x>
|
Choice shown if the x switches are all ON.
|
| <Show All Switches: x,x,x>
|
Choice shown if the x switches are all ON.
|
| <Show Any Switches: x,x,x>
|
Choice shown if any of x switches are ON.
|
| <Hide>
|
Choice is always hidden.
|
| <Hide Switch: x>
|
Choice hidden if switch x is ON.
|
| <Hide Switches: x,x,x>
|
Choice hidden if the x switches are all ON.
|
| <Hide All Switches: x,x,x>
|
Choice hidden if the x switches are all ON.
|
| <Hide Any Switches: x,x,x>
|
Choice hidden if any of x switches are ON.
|
| <Enable>
|
Choice is always enabled.
|
| <Enable Switch: x>
|
Choice enabled if switch x is ON.
|
| <Enable Switches: x,x,x>
|
Choice enabled if the x switches are all ON.
|
| <Enable All Switches: x,x,x>
|
Choice enabled if the x switches are all ON.
|
| <Enable Any Switches: x,x,x>
|
Choice enabled if any of x switches are ON.
|
| <Disable>
|
Choice is always disabled.
|
| <Disable Switch: x>
|
Choice disabled if switch x is ON.
|
| <Disable Switches: x,x,x>
|
Choice disabled if the x switches are all ON.
|
| <Choice Width: x>
|
Sets the minimum text area width to x. Applies to whole choice window.
|
| <Choice Indent: x>
|
Sets the indent to x value. Applies to current choice selection only.
|
| Text Code |
Effect (Choice Window Only)
|
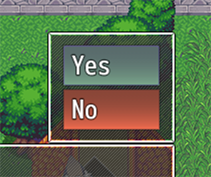
| <BgColor: x>
|
Requires VisuMZ_0_CoreEngine! Sets background color of this choice to 'x' text color. This will be combined with a fading
|
| <BgColor: x,y>
|
Requires VisuMZ_0_CoreEngine! Sets background color of this choice to 'x' to 'y' gradient text color.
|
| <BgColor: #rrggbb>
|
Requires VisuMZ_0_CoreEngine! Sets background color of this choice to '#rrggbb' color using hex color values.
|
| <BgColor: #rrggbb, #rrggbb>
|
Requires VisuMZ_0_CoreEngine! Sets background color of this choice to '#rrggbb' gradient using hex color values.
|
| Text Code |
Effect (Choice Window Only)
|
| <Help> text </Help>
|
Makes a help window appear and have it show 'text' in its contents. The help window will disappear if no text is displayed.
|
| Text Code |
Effect (Choice Window Only)
|
| <Shuffle>
|
Shuffles the order of all choices. Any cancel shortcuts other than "Branch" will be undone.
|
| <Shuffle: x>
|
Shuffles the order of all choices and only x number of them will appear. Any cancel shortcuts other than "Branch" will be undone. Hidden choices do not count towards x number.
|
| Text Code |
Background Effects (Choice Window Only)
|
| <BgImg: filename>
|
Creates a background image from img/pictures/ stretched across the choice rectangle.
|
| <BgImg LowerLeft: filename>
|
Creates a background image from img/pictures/ scaled to the lower left of choice rect. scaled to the lower center of choice rect.
|
| <BgImg LowerRight: filename>
|
Creates a background image from img/pictures/ scaled to the lower right of choice rect.
|
| <BgImg MidLeft: filename>
|
Creates a background image from img/pictures/ scaled to the middle left of choice rect.
|
| <BgImg Center: filename>
|
Creates a background image from img/pictures/ scaled to the center of choice rect.
|
| <BgImg MidRight: filename>
|
Creates a background image from img/pictures/ scaled to the middle right of choice rect.
|
| <BgImg UpperLeft: filename>
|
Creates a background image from img/pictures/ scaled to the upper left of choice rect. scaled to the upper center of choice rect.
|
| <BgImg UpperRight: filename>
|
Creates a background image from img/pictures/ scaled to the upper right of choice rect.
|
Note: For the <BgImg: filename> text code variants, even if the background
image is smaller than the choice contents, it will overscale to match its
choice rectangle dimensions.
Note: Using a background image will clear the dimmed background rectangle
that is normally behind each selectable choice.
Note: Each choice can only have one background image but can use a
combination of one background and one foreground image.
Note: Images in the background will appear behind the select cursor.
| Text Code |
Foreground Effects (Choice Window Only)
|
| <FgImg: filename>
|
Creates a foreground image from img/pictures/ stretched across the choice rectangle.
|
| <FgImg LowerLeft: filename>
|
Creates a foreground image from img/pictures/ scaled to the lower left of choice rect. scaled to the lower center of choice rect.
|
| <FgImg LowerRight: filename>
|
Creates a foreground image from img/pictures/ scaled to the lower right of choice rect.
|
| <FgImg MidLeft: filename>
|
Creates a foreground image from img/pictures/ scaled to the middle left of choice rect.
|
| <FgImg Center: filename>
|
Creates a foreground image from img/pictures/ scaled to the center of choice rect.
|
| <FgImg MidRight: filename>
|
Creates a foreground image from img/pictures/ scaled to the middle right of choice rect.
|
| <FgImg UpperLeft: filename>
|
Creates a foreground image from img/pictures/ scaled to the upper left of choice rect. scaled to the upper center of choice rect.
|
| <FgImg UpperRight: filename>
|
Creates a foreground image from img/pictures/ scaled to the upper right of choice rect.
|
Note: For the <FgImg: filename> text code variants, unlike the background
variant, the foreground image will not overscale past its original size.
Instead, it will maintain its original size or be smaller, so long as it can
be scaled to exist within the choice rectangle unless it is intended to be
stretched by using the <FgImg: filename> variant.
Note: Text is then written on top of the foreground image.
Note: Each choice can only have one foreground image but can use a
combination of one background and one foreground image.
Note: Images in the foreground will appear behind the select cursor.
---
Name Window-Only Hard-Coded Text Codes
| Text Code |
Effect (Name Window Only)
|
| <Left>
|
Positions the name box window to the left.
|
| <Center>
|
Positions the name box window to the center.
|
| <Right>
|
Positions the name box window to the right.
|
| <Position: x>
|
Replace 'x' with a number from 0 to 10. This positions the name box window on the screen relative to the position of the value 'x' represents.
|
| \NormalBG
|
Changes background type of window to normal type.
|
| \DimBG
|
Changes background type of window to dim type.
|
| \TransparentBG
|
Changes background type of window to transparent type.
|
---
Message-Only Position Hard-Coded Text Codes
| Text Code |
Effect (Message Window Only)
|
| <Position: x, y, width, height>
|
Forces the message window to exact listed coordinates and dimensions. Replace each of the arguments with numbers. *Note*
|
| <Coordinates: x, y>
|
Forces the message window to the exact listed coordinates. Replace each of the arguments with numbers. *Note*
|
| <Dimensions: width, height>
|
Forces the message window size to the exact listed dimensions. Replace each of the arguments with numbers. *Note*
|
| <Offset: +x, +y>
|
Quickly adjust the message window offset
|
| <Offset: -x, -y>
|
values to the x and y amounts. The values
|
| <Offset: +x, -y>
|
will replace the previous offset settings
|
| <Offset: -x, +y>
|
if there were any.
|
*NOTE:* These text codes do not work with Word Wrap.
---
Controls-Related Hard-Coded Text Codes
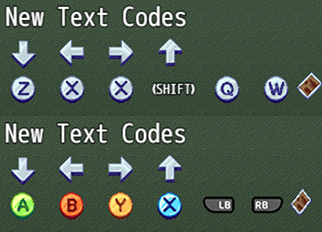
| Text Code |
Effect (Requires VisuMZ_0_CoreEngine)
|
| <Up Button>
|
Display's VisuMZ_0_CoreEngine's button assist text.
|
| <Left Button>
|
Display's VisuMZ_0_CoreEngine's button assist text.
|
| <Right Button>
|
Display's VisuMZ_0_CoreEngine's button assist text.
|
| <Down Button>
|
Display's VisuMZ_0_CoreEngine's button assist text.
|
| <Ok Button>
|
Display's VisuMZ_0_CoreEngine's button assist text.
|
| <Cancel Button>
|
Display's VisuMZ_0_CoreEngine's button assist text.
|
| <Shift Button>
|
Display's VisuMZ_0_CoreEngine's button assist text.
|
| <Menu Button>
|
Display's VisuMZ_0_CoreEngine's button assist text.
|
| <Page Up Button>
|
Display's VisuMZ_0_CoreEngine's button assist text.
|
| <Page Down Button>
|
Display's VisuMZ_0_CoreEngine's button assist text.
|
---
Random Text Pool
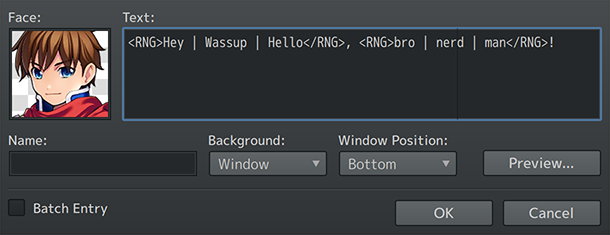
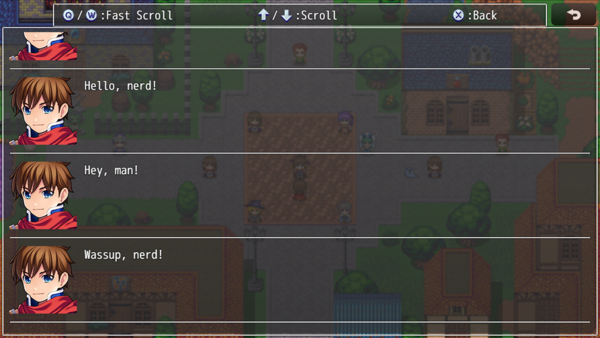
<RNG> text1 | text2 | text3 </RNG>
Using the above text code format in a Show Message entry, you can get a
random result out of the various inserted texts. Use "|" (without quotes) as
a separator between text entries. You can have unlimited entries. The result
will have any excess white space trimmed.
This text code cannot be inserted into a macro and parsed properly.
---
Message Core Customizable Text Codes

The following text codes can be altered through the Message Core's various
Plugin Parameters to adjust replacements and actions.
---
Default Customizable Text Codes
| Text Code |
Effect (Global)
|
| \Class[x]
|
Draws class x's icon (if have) and name.
|
| \ClassName[x]
|
Draws class x's name only.
|
| \Skill[x]
|
Draws skill x's icon (if have) and name.
|
| \SkillName[x]
|
Draws skill x's name only.
|
| \Item[x]
|
Draws item x's icon (if have) and name.
|
| \ItemName[x]
|
Draws item x's name only.
|
| \ItemQuantity[x]
|
Inserts the number of item x's owned by the party.
|
| \Weapon[x]
|
Draws weapon x's icon (if have) and name.
|
| \WeaponName[x]
|
Draws weapon x's name only.
|
| \WeaponQuantity[x]
|
Inserts the number of weapon x's owned by the party.
|
| \Armor[x]
|
Draws armor x's icon (if have) and name.
|
| \ArmorName[x]
|
Draws armor x's name only.
|
| \ArmorQuantity[x]
|
Inserts the number of armor x's owned by the party.
|
| \LastGainObj
|
Draws the icon + name of the last party-gained object.
|
| \LastGainObjName
|
Draws the name of the last party-gained object.
|
| \State[x]
|
Draws state x's icon (if have) and name.
|
| \StateName[x]
|
Draws state x's name only.
|
| \Enemy[x]
|
Draws enemy x's icon (if have) and name.
|
| \EnemyName[x]
|
Draws enemy x's name only.
|
| \Troop[x]
|
Draws troop x's icon (if have) and name.
|
| \TroopName[x]
|
Draws troop x's name only.
|
| \TroopMember[x]
|
Draws troop member x's icon (if have) and name. *Note1*
|
Note1: Only works in battle.
| Text Code |
Effect (Global)
|
| \NormalBG
|
Changes background type of window to normal type.
|
| \DimBG
|
Changes background type of window to dim type.
|
| \TransparentBG
|
Changes background type of window to transparent type.
|
| \FontChange<x>
|
Changes font face to x font name.
|
| \ResetFont
|
Resets font settings.
|
| \ResetColor
|
Resets color settings.
|
| \HexColor<x>
|
Changes text color to x hex color (ie. #123abc).
|
| \OutlineColor[x]
|
Changes outline color to text color x.
|
| \OutlineWidth[x]
|
Changes outline width to x thickness.
|
| \WindowMoveTo<?>
|
Moves window to exact coordinates. *Note2*
|
| \WindowMoveBy<?>
|
Moves window by relative values. *Note2*
|
| \WindowReset
|
Resets window position to original position.
|
Note2: Replace '?' with the following format:
  targetX, targetY, targetWidth, targetHeight, duration, easingType

  Only targetX and targetY are required arguments. These will only alter the
  window dimensions when the text has arrived at that point. They will not
  alter the window preemptively. This is not used as a window positioner.
  Use the <Position: x, y, width, height> text code for that.
---
Default Message Effect Text Codes
| Text Code |
Effect (Message Window Only)
|
| \ActorFace[x]
|
Inserts actor x's face into the Message Window.
|
| \PartyFace[x]
|
Inserts party member x's face into the Message Window.
|
| \ChangeFace<x,y>
|
Changes message face to x filename, y index.
|
| \FaceIndex[x]
|
Changes message face index to x.
|
| \TextDelay[x]
|
Sets delay in frames between characters to x frames.
|
Note: These text codes only work with the Message Window. Keep in mind that even if some windows might look like the Message Window, it may not necessarily be one.
---
As these text codes can be added, removed, and/or altered, their functions
may or may not be the same depending on how you've altered them. VisuStella
is not responsible for any errors caused by changes made to pre-made text
codes nor any new text codes they did not make.
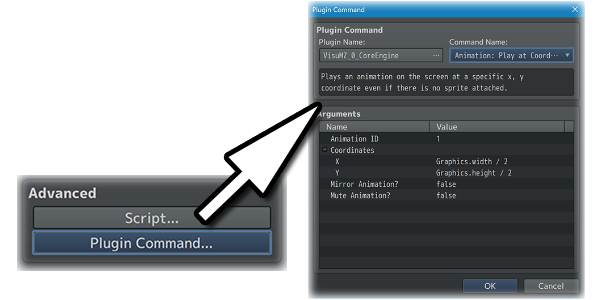
Plugin Commands are event commands that are used to call upon functions added by a plugin that aren't inherently a part of RPG Maker MZ.
Here is a list of Plugin Command(s) that you may use:
---
The following are Plugin Commands that come with this plugin. They can be
accessed through the Plugin Command event command.
---
Message Plugin Commands
---
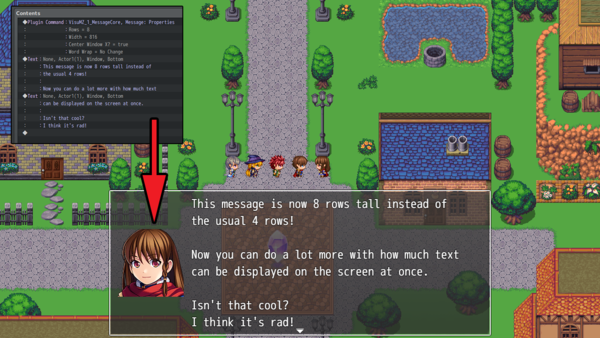
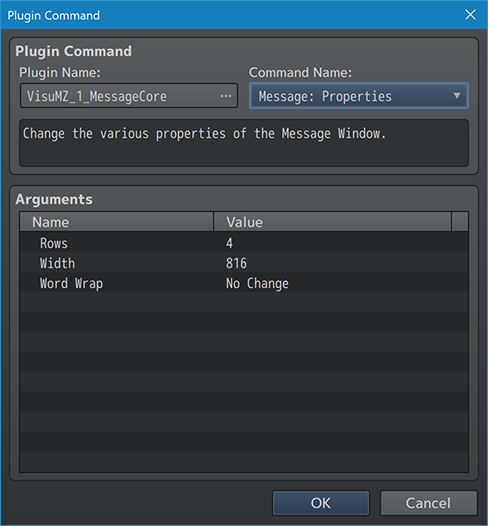
Message: Properties
  Change the various properties of the Message Window.

  Rows:
  - Change the number of Message Window rows.
  - Leave at 0 to keep it unchanged.

  Width:
  - Change the Message Window width in pixels.
  - Leave at 0 to keep it unchanged.

  Word Wrap:
  - Enable or disable Word Wrap for the Message Window?
---
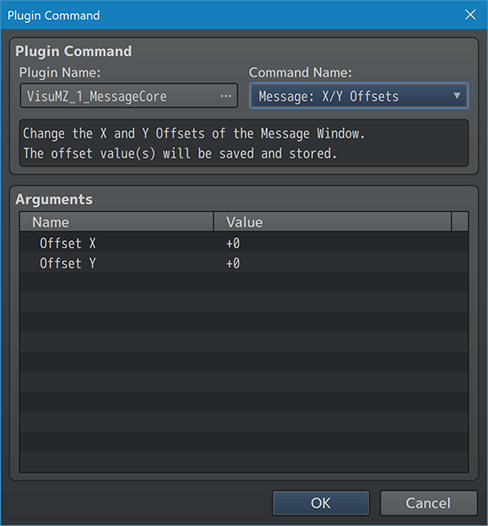
Message: X/Y Offsets
- Change the X and Y Offsets of the Message Window.
- The offset value(s) will be saved and stored.

  Offset X:
  - Offset Message Window horizontally.
  - Negative: Left; Positive: Right
  - Message Window coordinates are still restricted via clamping.

  Offset Y:
  - Offset Message Window vertically.
  - Negative: Up; Positive: Down
  - Message Window coordinates are still restricted via clamping.
---
Choice Plugin Commands
---
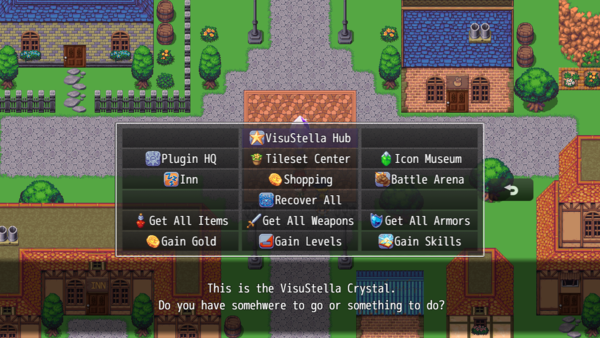
---
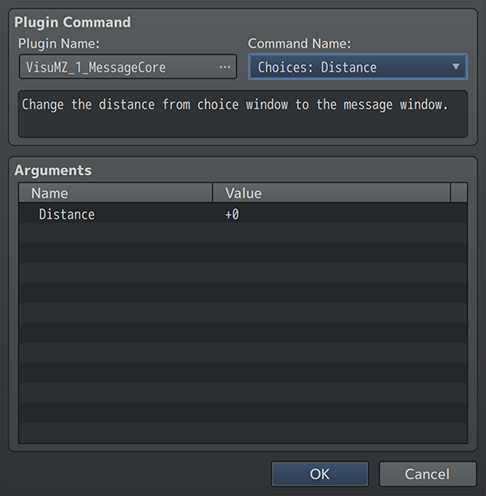
Choices: Distance
- Change the distance from choice window to the message window.

  Distance:
  - Change distance between the choice and message windows.
  - Default distance is 0.
  - Use negative to center align with remaining space.
---
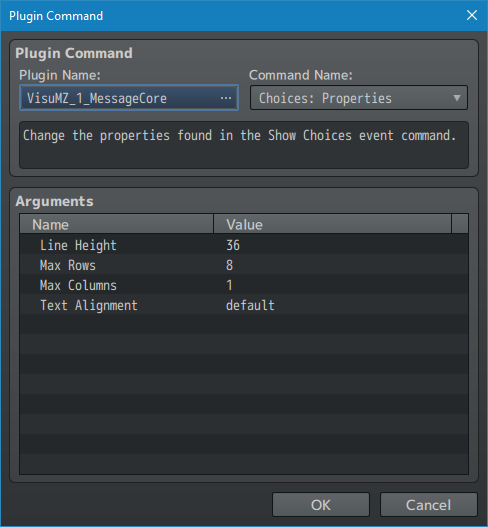
Choice: Properties
  Change the properties found in the Show Choices event command.

  Choice Line Height:
  - Change the line height for the show choices.
  - Leave at 0 to keep this unchanged.

  Minimum Choice Width:
  - What is the minimum width size for each choice?
  - 96 is the default width.

  Max Rows:
  - Maximum number of choice rows to be displayed.
  - Leave at 0 to keep this unchanged.

  Max Columns:
  - Maximum number of choice columns to be displayed.
  - Leave at 0 to keep this unchanged.

  Text Alignment:
  - Text alignment for Show Choice window.
---
Picture Plugin Commands
---
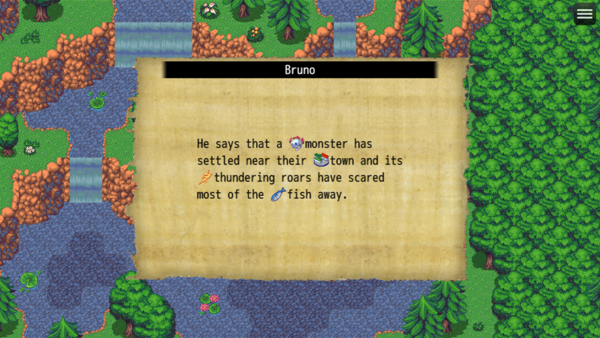
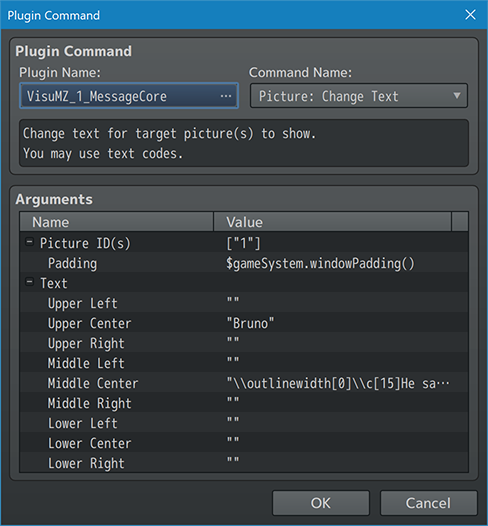
Picture: Change Text
- Change text for target picture(s) to show.
- You may use text codes.
- Text will adapt to picture's properties.
- Settings will be erased if picture is erased.

  Picture ID(s):
  - The ID(s) of the picture(s) to set text to.

  Padding:
  - How much padding from the sides should there be?

  Text:

    Upper Left:
    Upper Center:
    Upper Right:
    Middle Left:
    Middle Center:
    Middle Right:
    Lower Left:
    Lower Center:
    Lower Right:
    - The text that's aligned to this picture's side.
    - You may use text codes.
---
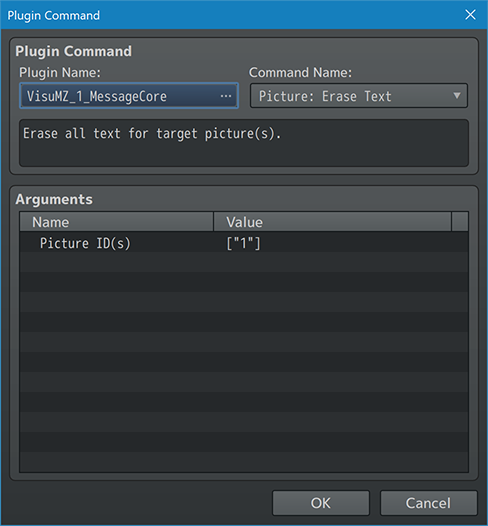
Picture: Erase Text
- Erase all text for target picture(s).

  Picture ID(s):
  - The ID(s) of the picture(s) to erase text for.
---
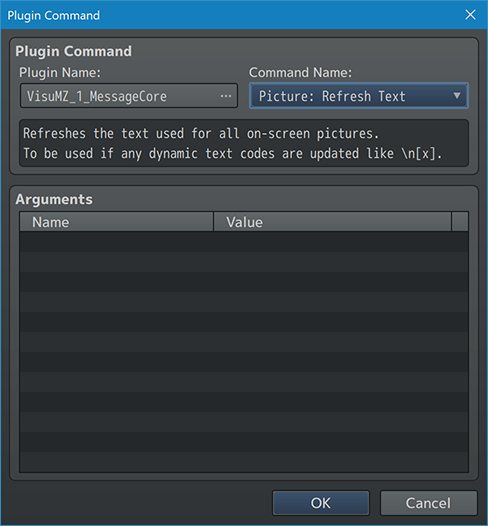
Picture: Refresh Text
- Refreshes the text used for all on-screen pictures.
- To be used if any dynamic text codes are updated like \n[x].
---
Select Plugin Commands
---
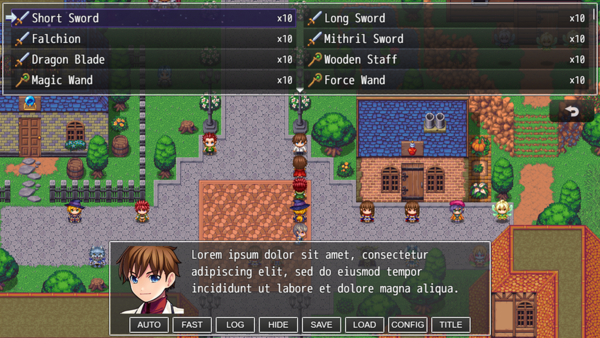
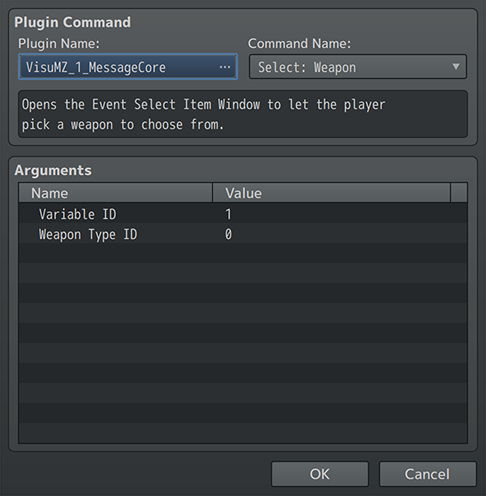
Select: Weapon
- Opens the Event Select Item Window to let the player pick a weapon to
  choose from.
- Can be opened while the Message Window is open.

  Variable ID:
  - This variable will be used to record the ID of the selected weapon.
  - It will result in 0 otherwise.

  Weapon Type ID:
  - Reduce all the weapons to a specific weapon type.
  - Leave at 0 to not use filters.
---
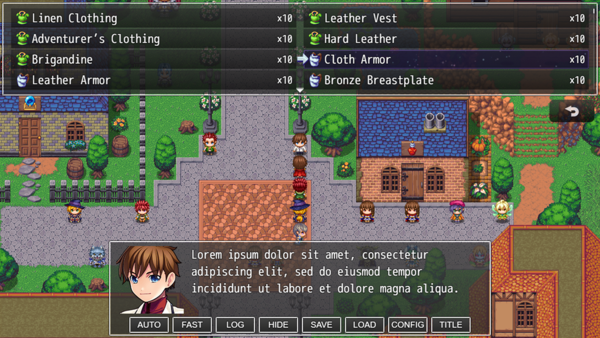
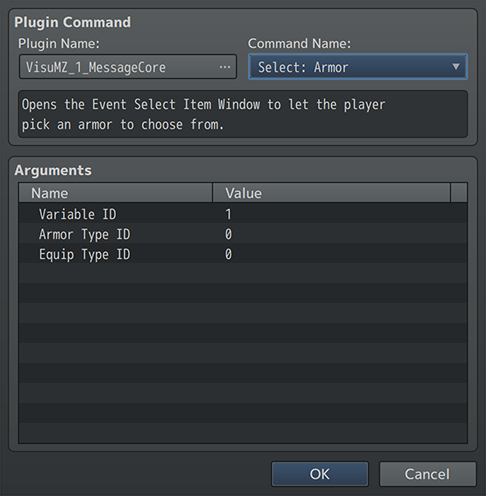
Select: Armor
- Opens the Event Select Item Window to let the player pick an armor to
  choose from.
- Can be opened while the Message Window is open.

  Variable ID:
  - This variable will be used to record the ID of the selected armor.
  - It will result in 0 otherwise.

  Armor Type ID:
  - Reduce all the armors to a specific armor type.
  - Leave at 0 to not use filters.

  Equip Type ID:
  - Reduce all the armors to a specific equip type.
  - Leave at 0 to not use filters.
---
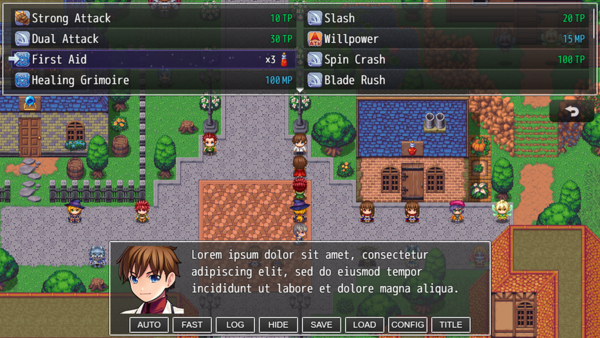
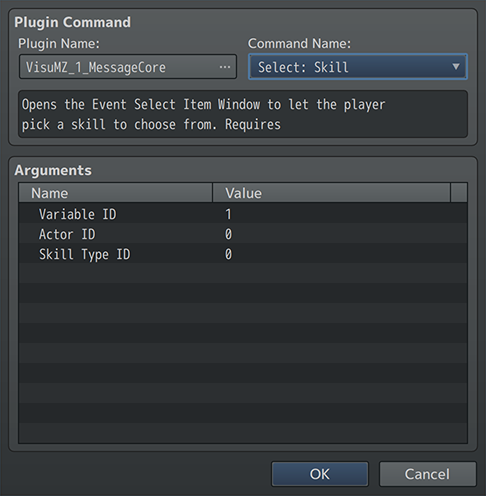
Select: Skill
- Opens the Event Select Item Window to let the player pick a skill to
  choose from.
- Requires VisuMZ_1_SkillsStatesCore!
- Can be opened while the Message Window is open.
- Skills will not be listed if they are hidden by the actor.
- Skills will not be listed if the actor lacks access to their Skill Type.

  Variable ID:
  - This variable will be used to record the ID of the selected skill.
  - It will result in 0 otherwise.

  Actor ID:
  - Select an actor to get the skill list from.
  - Use 0 to select from the party leader.

  Skill Type ID:
  - Reduce all the skills to a specific skill type.
  - Leave at 0 to not use filters.
---
Plugin Parameters
General Settings
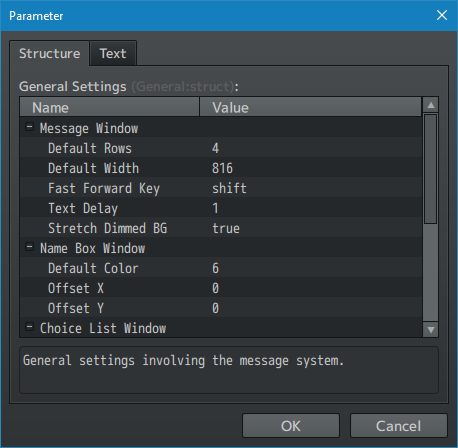
General settings involving the message system. These settings range from
adjust how the Message Window looks to more intricate settings like how
some of the default text codes work.
---
Message Window
 Default Rows:
 - Default number of rows to display for the Message Window.
 Default Width:
 - Default Message Window width in pixels.
 Fast Forward Key:
 - This is the key used for fast forwarding messages.
 - WARNING: If this key is the same as the dash button, this will clear out
   any held down inputs upon triggering an event  to prevent players from
   skipping potentially useful information stored in messages. If you do
   not want the input to be cleared, use a different key.
 Text Delay:
 - How many frames to wait between characters drawn?
 - Use 0 for instant.
 Offset X:
 Offset Y:
 - Offset Message Window horizontally or vertically.
 - Horizontal: Left; Positive: Right
 - Veritcal: Negative: Up; Positive: Down
 Stretch Dimmed BG:
 - Stretch dimmed window background to fit the whole screen.
 Default Outline Width:
 - Changes the default outline width to this many pixels thick.
 Each Message Start:
 Each Message End:
 - This is text that is added at the start/end of each message.
 - You may use text codes.
 - Keep in mind that if a message extends to a different page (due to word
   wrap, excess lines, etc), that does not mean the starting text will
   be added to where the next page begins or the ending text will be added
   where the previous page ends.
 - Can be used for things like adding "<center>" to the start of each
   message without having to type it every time.
---
Name Box Window
 Default Color:
 - Default color for the Name Box Window's text.
 Offset X:
 - How much to offset the name box window X by
   (as long as it doesn't go offscreen).
 Offset Y:
 - How much to offset the name box window Y by
   (as long as it doesn't go offscreen).
---
Choice List Window
 Line Height:
 - What is the default line height for Show Choices?
 Max Rows:
 - Maximum number of rows to visibly display?
 Max Columns:
 - Maximum number of columns to visibly display?
 Text Alignment:
 - Default alignment for Show Choice window.
---
Default Text Codes
 Relative \PX \PY:
 - Make \PX[x] and \PY[x] adjust relative starting position than
   exact coordinates.
 \{ Maximum:
 - Determine the maximum size that \{ can reach.
 \} Minimum:
 - Determine the minimum size that \} can reach.
 \{ Change \}
 - How much does \{ and \} change font size by?
---
Auto-Color Settings
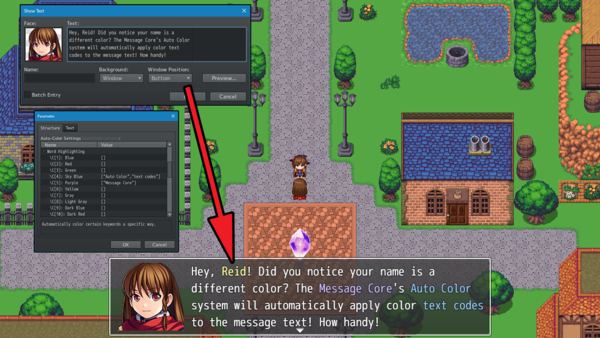
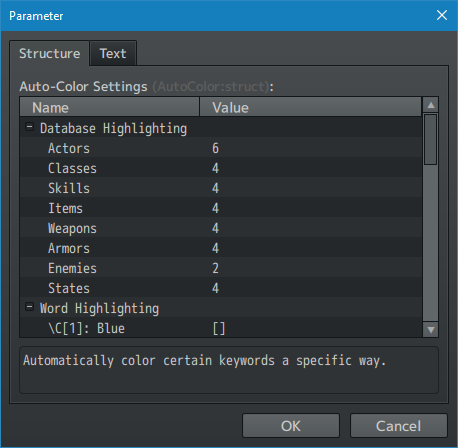
For certain windows such as the Message Window, Help Window, and Choice
Window, Auto-Color is enabled to automatically highlight and color certain
database entries, keywords, and just about anything you, the game dev, wants
to be automatically colored. This is done to avoid typing out \C[6]Jack\C[0]
every time Jack's name is written out as it will be automatically colored in
those specific windows.
The Plugin Parameters will give you full reign over which database entries
and keywords you want to be automatically colored as long as they follow a
few rules:
Auto-Color Rules:
- 1. Database names and keywords are case sensitive.
- This means if "Potion" is a marked keyword, typing out "potion" will not prompt the auto-color to highlight "potion". You must add the lowercase version of the word into the keyword list if you want it to count.
- 2. Database names and keywords are exact size (for Roman languages)
- This means if "Potion" is a marked keyword, typing out "potions" will not prompt the auto-color to highlight "potions". You must type out all of the variations of the words you want affected into the keyword list to prompt the auto-color highlight.
- This does not apply to Japanese, Korean, or Chinese languages.
- 3. Possessive cases and other language symbols aren't counted.
- Symbols such as periods, commas, quotes, parentheses, and similar symbols do no count towards Rule 2. This means if "Potion" is a marked keyword, the typing out "(Potion)" will still highlight the "Potion" part of the word according to the auto-color.
- 4. Names with special characters like !, ?, [, ], etc. will be ignored.
- These cause conflicts with how auto-colors are detected.
---
Database Highlighting
 Actors:
 Classes:
 Skills:
 Items:
 Weapons:
 Armors:
 Enemies:
 States:
 - Any usage of a the selected database entry's name is auto-colored with
   the text code number.
 - Use 0 to not auto-color.
---
Word Highlighting
 \C[x]: Color
 - These are lists of all the words that will be automatically colored with
   the x text color.
---
Custom Font Manager
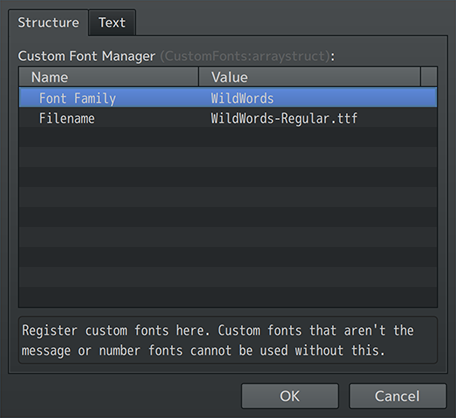
Custom fonts that aren't the message or number fonts cannot be used without
registration. If you try to use custom fonts in RPG Maker MZ without
registering their font family first, you will find out that they will not
work. These plugin parameters allow you to register your game's custom fonts
here.
---
Settings:
 Font Family:
 - This will be what's used by RPG Maker MZ and plugins to reference this
   specific font.
 - NO filename extensions!
 Filename:
 - What is the filename of the custom font you would like to use?
 - Located inside the project's "fonts" folder.
---
Examples:
 Font Family: WildWords
 Filename: WildWords-Regular.ttf
How you would use this in other plugins as a preface to the font face or
font family would be to use "WildWords" as the font face/family name. Then
RPG Maker MZ will use its own innate FontManager to refer that to the
"WildWords-Regular.ttf" file found in the game's "fonts" folder.
---
Text Code Actions
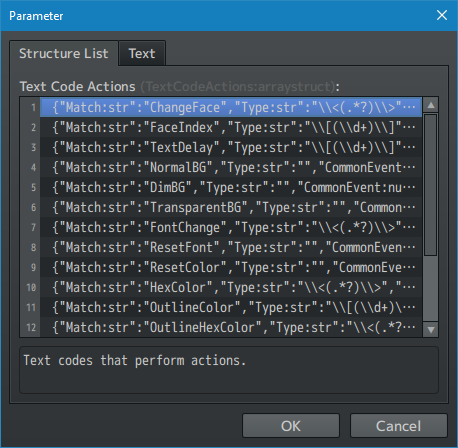
Text codes are used for one of two things: performing actions or replacing
themselves with text data. This Plugin Parameter will focus on the aspect of
performing actions. These actions can be done through each JavaScript or by
a common event (if it is used in the Message Window). Adequate knowledge of
both is recommended before attempting to modify and/or add new Text Code
Actions to the Plugin Parameters.
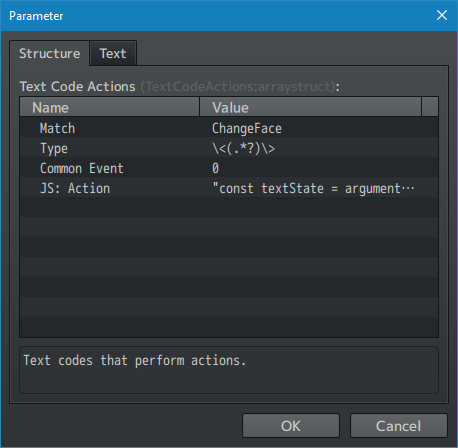
Each of the Text Code Actions are formatted in such a way:
---
Text Code Action
 Match:
 - This is what needs to be matched in order for this text code to work.
 - This is the primary text marker after the \ in a text code.
 - In \N[x], this would be the 'N'.
 Type:
 - The type of parameter to obtain (none, number, or string).
 - This is the way the text code determines the condition type.
 - In \N[x], this would be the '[x]'.
 Common Event:
 - Select a common event to run when this text code is used in a message.
 JS: Action:
 - JavaScript code used to perform an action when this text code appears.
---
Text Code Replacements
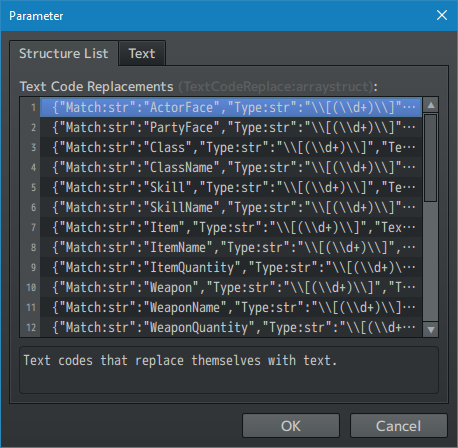
Text codes are used for one of two things: performing actions or replacing
themselves with text data. This Plugin Parameter will focus on the aspect of
replacing the text codes with text data. Text data can be replaced with
an exact exchange of text or dynamically through JavaScript. Adding a new
Text Code Replacement is done through the Plugin Parameters.
Each of the Text Code Replacements are formatted in such a way:
---
Text Code Replacement
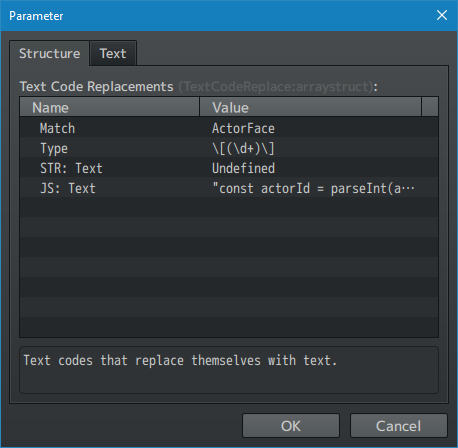
 Match:
 - This is what needs to be matched in order for this text code to work.
 - This is the primary text marker after the \ in a text code.
 - In \N[x], this would be the 'N'.
 Type:
 - The type of parameter to obtain (none, number, or string).
 - This is the way the text code determines the condition type.
 - In \N[x], this would be the '[x]'.
 STR: Text:
 - The text that will appear if this match appears.
   If this has a value, ignore the JS: Text version.
 JS: Text:
 - JavaScript code used to determine the text that will appear if this
   match appears.
---
Text Macros
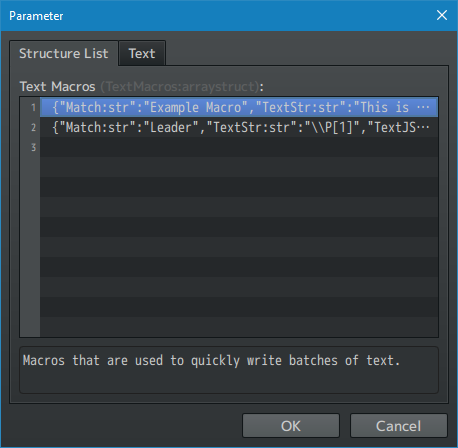
Text macros are used in similar fashion to text codes replacements to
replace themselves with text data. The primary difference is that macros are
made in a different format with no conditional argument modifiers (ie the
[x] that follows a text code).
To use a text macro, type in the matching keyword between two [brackets] and
it will be replaced by the string data or run the JavaScript code found in
the Plugin Parameter settings.
For example, if you have the text macro "Leader", made to return the party
leader's name, you can type in [Leader] in the Message Window and it will be
replaced with the party leader's name. The output can also output text codes
into the resulting text.
This does NOT work with \MacroName as it did with Yanfly Engine Plugins.
Use the method stated before with the brackets to [MacroName] instead.
Each of the Text Macros are formatted in such a way:
---
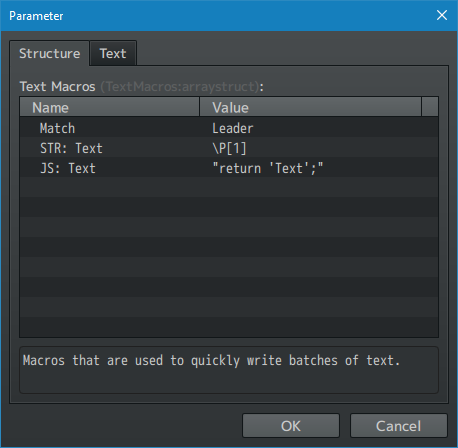
Text Macro
 Match:
 - This is what needs to be matched in order for this macro to work.
 - In [Leader], this would be the 'Leader' text.
 STR: Text:
 - The replacement text that will appear from the macro.
 - If this has a value, ignore the JS: Text version.
 JS: Text:
 - JavaScript code used to determine the text that will appear if this
   macro appears.
---
Text Language Settings
The "Text Language" feature allows your players to switch between different
languages for your game to allow people from around the globe to enjoy what
story you have to tell.
Disclaimers: This is not an automatic translation tool. Translations made
through the "Text Language" feature of the VisuStella MZ Message Core
will require manual input by the game developer.
See the "Text Language Information" for more information.
---
Main Settings:
 Enable Switching?:
 - Enable language switching settings for this plugin?
 CSV Filename:
 - What is the filename of the CSV file to read from?
 - Located within the project's /data/ folder.
---
Options:
 Add Option?:
 - Add the 'Text Language' option to the Options menu?
 Adjust Window Height:
 - Automatically adjust the options window height?
 Option Name:
 - Command name of the option.
---
Languages:
 Default Language:
 - What is the default language used for this game?
 Supported Languages:
 - What are all the supported languages supported by this game's
   script?
 - Remove any that aren't translated.
---
Language Names:
 Bengali:
 Chinese (Simplified):
 Chinese (Traditional):
 Czech:
 Danish:
 Dutch:
 English:
 Finnish:
 French:
 German:
 Greek:
 Hindi:
 Hungarian:
 Indonesian:
 Italian:
 Japanese:
 Korean:
 Norwegian:
 Polish:
 Portuguese:
 Romanian:
 Russian:
 Slovak:
 Spanish:
 Swedish:
 Tamil:
 Thai:
 Turkish:
 - How does this language appear in the in-game options?
---
Language Fonts
Different default fonts used for different languages. This allows different
stylistic choices to be made for different languages in case the current
font you're using doesn't have support for other language types.
Keep in mind that players can override this with Options Core if they select
a text option other than 'Default' for the 'Text Font' option.
Make sure any new custom fonts used for different languages are registered
with the 'Custom Font Manager' found in this plugin's Plugin Parameters.
---
Languages:
 Bengali:
 Chinese (Simplified):
 Chinese (Traditional):
 Czech:
 Danish:
 Dutch:
 English:
 Finnish:
 French:
 German:
 Greek:
 Hindi:
 Hungarian:
 Indonesian:
 Italian:
 Japanese:
 Korean:
 Norwegian:
 Polish:
 Portuguese:
 Romanian:
 Russian:
 Slovak:
 Spanish:
 Swedish:
 Tamil:
 Thai:
 Turkish:
 - What font face is used for this language?
 - Make sure it is registered under Custom Font Manager.
---
Language Images
Allows different images to be used when different languages are used. This
is for images that have text on it that you want to appear in different
languages based on the text language selected by the player.
There are two ways this works:
 #1: Folder Name
 - The name of the folder containing those images will be named something
   like "Scrolls[XX]"
 - When a different language is picked, like English, it can reference
   the 'Scrolls[EN]' folder instead. If Japanese is used, it can refer to
   the 'Scrolls[JP]' folder as well.
 - The text used to replace the [XX] in the folder name can be determined
   in the Plugin Parameters.
   - Make sure you change the settings for each language you wish to use to
     have translated images for.
 #2: Filename
 - The filename of the image to be translated can be named something like
   ReidProfile[XX].png
 - When a different language is picked, like English, it will reference the
   'ReidProfile[EN].png' image instead. For Japanese, it will reference the
   'ReidProfile[JP].png' as well.
 - The text used to replace the [XX] in the filename can be determined in
   the Plugin Parameters.
   - Make sure you change the settings for each language you wish to use to
     have translated images for.
---
Settings
 Convert Default?
 - ON: Default language uses converted marker.
 - OFF: Default languages uses [XX] as marker.
Here's an explanation of what this does:
 - The default language picked is English and the player has English picked
   as their desired language.
 - If the "Convert Default?" Plugin Parameter is ON, then 'ReidProfile[XX]'
   will reference and look for the 'ReidProfile[EN]' image.
 - If the "Convert Default?" Plugin Parameter is OFF, 'ReidProfile[XX]' is
   then used for the English language instead of 'ReidProfile[EN]'.
   - This is to avoid duplicate images and save on file space.
 - The reasoning behind the [XX] is that there needs to be an anchor image
   used for the RPG Maker MZ client in order to have something to reference
   before branching out to different languages.
---
Languages
 Bengali:
 Chinese (Simplified):
 Chinese (Traditional):
 Czech:
 Danish:
 Dutch:
 English:
 Finnish:
 French:
 German:
 Greek:
 Hindi:
 Hungarian:
 Indonesian:
 Italian:
 Japanese:
 Korean:
 Norwegian:
 Polish:
 Portuguese:
 Romanian:
 Russian:
 Slovak:
 Spanish:
 Swedish:
 Tamil:
 Thai:
 Turkish:
 - This text will replace [XX] with in image folder names and filenames
   when this language is selected.
---
Text Speed Option Settings
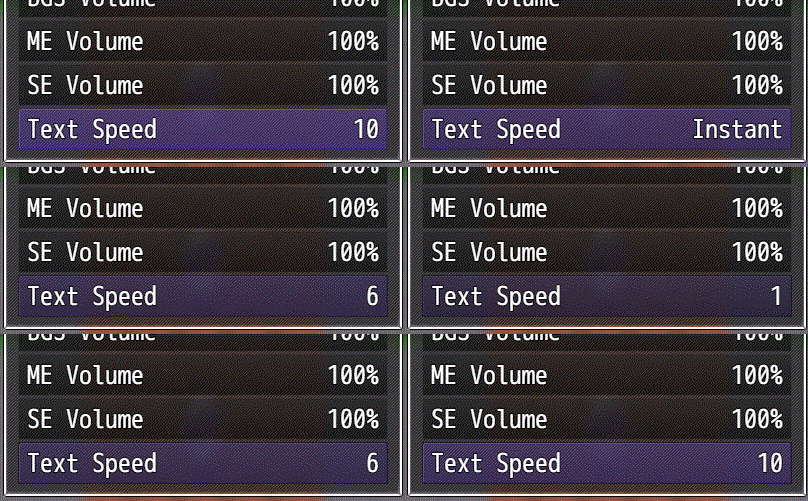
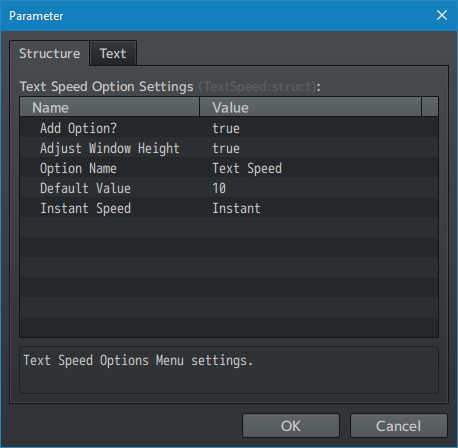
Modern RPG's on the market have the option to adjust the message speed rate
for players. These Plugin Parameters allow you to add that option to the
Options Menu as well.
---
Text Speed Option Settings
 Add Option?:
 - Add the 'Text Speed' option to the Options menu?
 Adjust Window Height:
 - Automatically adjust the options window height?
 Option Name:
 - Command name of the option.
 Default Value:
 - 1 - 10, slowest to fastest.
 - 11 is instant value.
 Instant Speed:
 - Text to show "instant" text.
---
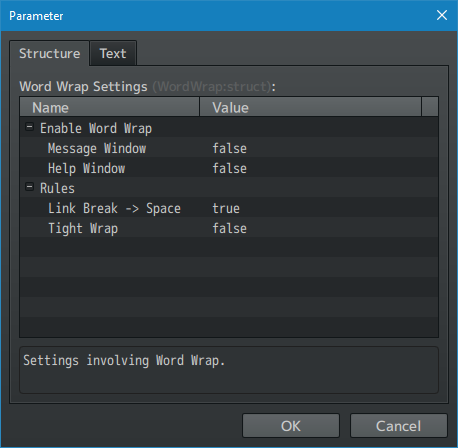
Word Wrap Settings
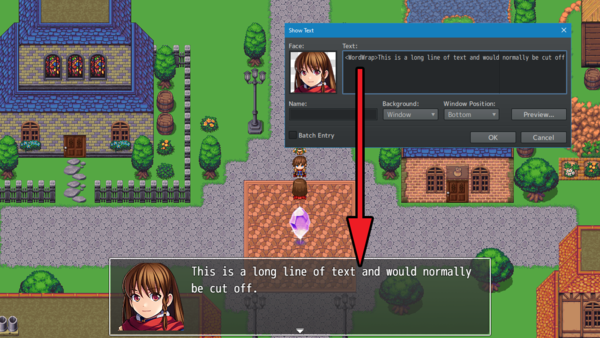
Word wrap is a property that will cause any overflowing text to wrap around
and move into the next line. This property can only be enabled inside text
that accept text codes, such as the Message Window and Help Window. However,
word wrap is disabled for the Choice Window due to the nature of the Choice
Window's base properties.
Word wrap can be enabled or disabled in three ways. One is by using the text
code <WordWrap> to enable it or </WordWrap> to disable it. The second method
is by enabling it with the Plugin Command: 'Message: Properties'. The third
method is by enabling it by default with the Plugin Parameters.
Word Wrap also cannot be used together with <left>, <center>, or <right> and
will disable itself if text alignment text codes are detected.
Word wrap only supports left-to-right alphabetical languages that utilize
spaces.
As of the v1.44 update, some Asian languages such as Chinese and Japanese
are now supported for word wrap. Korean language is only supported if spaces
are used.
---
Enable Word Wrap
 Message Window:
 - Automatically enable Word Wrap for this window?
 Help Window:
 - Automatically enable Word Wrap for this window?
---
Rules
 Link Break -> Space:
 - Convert manually placed (non tagged) line breaks with spaces?
 - Line breaks must be inserted using the
 text code.
 Tight Wrap:
 - If a face graphic is present in a message, word wrap will be tighter.
 End Padding:
 - Add extra padding to your window to make text wrap further away from the
   end of the window.
 - This will default to 0.
---
Terms of Use
1. These plugins may be used in free or commercial games provided that they
have been acquired through legitimate means at VisuStella.com and/or any
other official approved VisuStella sources. Exceptions and special
circumstances that may prohibit usage will be listed on VisuStella.com.
2. All of the listed coders found in the Credits section of this plugin must
be given credit in your games or credited as a collective under the name:
"VisuStella".
3. You may edit the source code to suit your needs, so long as you do not
claim the source code belongs to you. VisuStella also does not take
responsibility for the plugin if any changes have been made to the plugin's
code, nor does VisuStella take responsibility for user-provided custom code
used for custom control effects including advanced JavaScript notetags
and/or plugin parameters that allow custom JavaScript code.
4. You may NOT redistribute these plugins nor take code from this plugin to
use as your own. These plugins and their code are only to be downloaded from
VisuStella.com and other official/approved VisuStella sources. A list of
official/approved sources can also be found on VisuStella.com.
5. VisuStella is not responsible for problems found in your game due to
unintended usage, incompatibility problems with plugins outside of the
VisuStella MZ library, plugin versions that aren't up to date, nor
responsible for the proper working of compatibility patches made by any
third parties. VisuStella is not responsible for errors caused by any
user-provided custom code used for custom control effects including advanced
JavaScript notetags and/or plugin parameters that allow JavaScript code.
6. If a compatibility patch needs to be made through a third party that is
unaffiliated with VisuStella that involves using code from the VisuStella MZ
library, contact must be made with a member from VisuStella and have it
approved. The patch would be placed on VisuStella.com as a free download
to the public. Such patches cannot be sold for monetary gain, including
commissions, crowdfunding, and/or donations.
7. If this VisuStella MZ plugin is a paid product, all project team members
must purchase their own individual copies of the paid product if they are to
use it. Usage includes working on related game mechanics, managing related
code, and/or using related Plugin Commands and features. Redistribution of
the plugin and/or its code to other members of the team is NOT allowed
unless they own the plugin itself as that conflicts with Article 4.
8. Any extensions and/or addendums made to this plugin's Terms of Use can be
found on VisuStella.com and must be followed.
Terms of Use: Japanese
『VisuStella MZ』利用規約
1. これらのプラグインは、VisuStella.comおよび/または公式に承認されたVisuStellaのソースから合法的な手段で入手したものである限り、フリーゲームや商用ゲームに使用することができます。例外的に使用が禁止される場合については、VisuStella.comの記載をご確認ください。
2. 本プラグインの「クレジット」部分に記載されているすべてのコーダーの名前は、ゲーム内にクレジット表記を行うか、もしくは「VisuStella」という名前の下にまとめて表記する必要があります。
3. ソースコードを自分のものだと主張しない限りは、必要に応じて編集することが可能です。ただしプラグインのコードに変更が加えられた場合、VisuStellaはそのプラグインに対して一切の責任を負いません。高度なJavaScriptのノートタグやJavaScriptコードを許可するプラグインのパラメータを含む、カスタムコントロールエフェクトに使用される、ユーザー提供のカスタムコードについても、VisuStellaは一切の責任を負いません。
4. これらのプラグインやプラグイン内のコードを、「自分のもの」として再配布したり使用したりすることはできません。これらのプラグインとそのコードは、VisuStella.comおよび、その他の公式/承認済みVisuStellaソースからのみダウンロードすることができます。公式/承認済みのソースのリストは、VisuStella.comでご確認いただけます。
5. VisuStellaは、意図しない使用方法による問題、VisuStella MZライブラリ以外のプラグインとの非互換性の問題、プラグインのバージョンが最新でないことによる問題、第三者による互換性パッチが適切に動作していないことなどが原因でゲーム内で発生した問題については、一切の責任を負いません。VisuStellaは、高度なJavaScriptのノートタグやJavaScriptコードを許可するプラグインのパラメータを含む、カスタムコントロールエフェクトに使用される、ユーザー提供のカスタムコードに起因するエラーについても、一切の責任を負いません。
6. VisuStella MZライブラリのコードを使用した互換性パッチをVisuStellaとは関係のない第三者を通じて作成する必要がある場合は、まずVisuStellaのメンバーと連絡を取り、承認を得る必要があります。パッチはVisuStella.comに公開され、誰でも無料でダウンロードすることができるようになります。このようなパッチを、制作発注やクラウドファンディングの対象にしたり、寄付などの金銭的な利益を得るために販売することはできません。
7. このVisuStella MZプラグインが商用製品である場合、プロジェクトチームのすべてのメンバーは、それを使用するため、それぞれ製品を購入しなければなりません。使用方法には、関連するゲームメカニクスの作業、関連するコードの管理、および/または関連するプラグインコマンドや機能の使用、が含まれます。プラグインそのものやそのコードをチームの他のメンバーに再配布することは第4項に抵触するため、そのメンバーがプラグインそのものを所有していない限りは許可されません。
8. このプラグインの利用規約の追加項目や補足については、VisuStella.comに掲載されていますので、それを参照し従ってください。
Credits
If you are using this plugin, credit the following people in your game:
Team VisuStella
Changelog
Version 1.54: May 15, 2025
- Bug Fixes!
- Fixed a bug where the text width of translated text was not taken into account. Fix made by Arisu
Version 1.53: February 20, 2025, 2025
- Bug Fixes!
- Fixed an error with text language translations not working properly for the last listed language in the translation sheet. Fix made by Irina.
- Compatibility Update!
- Updated for RPG Maker MZ Core Scripts 1.9.0!
- Removed picture limit of 100 from Picture-related Plugin Commands.
- Documentation Update!
- Help file updated for new features.
- Text Language Information section included for TSV.
- Updated text code note for \picture<x> and \CenterPicture<x>
Version 1.52: December 19, 2024
- Documentation Update!
- Help file updated for new features.
- New Features!
- New Text Codes added by Arisu:
- <left>
- <center>
- <right>
- When used in the Map Name, instead of aligning the text which is centered by default, the text code will align the horizontal position of the name displayed on the screen.
- <top>
- <middle>
- <bottom>
- When used in the Map Name, the text code will align the vertical position of the name displayed on the screen.
- <X: +n>
- <X: -n>
- <Y: +n>
- <Y: -n>
- Adjusts the horizontal/vertical position of map name by 'n' value.
- All of these text codes require VisuMZ_0_CoreEngine installed and its "Map Name Text Code" plugin parameter enabled.
Version 1.51: October 17, 2024
- Bug Fixes!
- Fixed a bug where \LastGainObj text code did not work with text language key codes. Fix made by Irina.
- Documentation Update!
- Help file updated for new features.
- Added note to Text Language Information > How to Enable Switching
- IMPORTANT! The separator used for the CSV file must be a semicolon (;) and not a comma (,) as to reduce the amount of punctuation conflicts. Keep this in mind as most CSV editors will default to comma (,) instead of the semicolon (;) for their separator.
- Added note to Text Language Information > Naming Weapon Types, etc:
- You might have noticed that if you've decided to use \tl{keyName} for weapon or other database types, other parts of the game will error out. Don't worry, for these, you don't have to change the currently used database name. Go straight to the CSV and insert in a new key for that particular database name. For example, the equip type "Accessory" will use "Accessory" as the automatic key to look for a translated phrase. If there isn't any in the CSV file, then the default database text entry will be used.
- New Features!
- New Plugin Parameters added by Irina:
- Parameters > Text Language Settings > Language Fonts
- Different default fonts used for different languages. This allows different stylistic choices to be made for different languages in case the current font you're using doesn't have support for other language types.
- Keep in mind that players can override this with Options Core if they select a text option other than 'Default' for the 'Text Font' option.
- Make sure any new custom fonts used for different languages are registered with the 'Custom Font Manager' found in this plugin's Plugin Parameters.
- Parameters > Text Language Settings > Language Images
- Allows different images to be used when different languages are used. This is for images that have text on it that you want to appear in different languages based on the text language selected by the player.
Version 1.50: July 18, 2024
- Documentation Update!
- Help file updated for new features.
- New Features!
- New text codes added by Irina:
- <Caps> </Caps>
- <Upper> </Upper>
- <Lower> </Lower>
- Auto-text case textcodes will automatically adjust text inserted between them to respectively be completely capitalized, first-letter capitalized, or completely lowercase.
- More information in the help file.
- <Alt> </Alt>
- Alternates between uppercase and lowercase for letters.
- <Chaos> </Chaos>
- Randomly uses uppercase and lowercase for letters.
Version 1.49: May 16, 2024
- Bug Fixes!
- Fixed a problem where using text codes to get database object names did not apply translated text.
- Documentation Update!
- Added note for Message Window Only text code effects:
- These text codes only work with the Message Window. Keep in mind that even if some windows might look like the Message Window, it may not necessarily be one.
- Feature Update!
- Added a failsafe for when Choice List Window doesn't have any viable options (due to being hidden or disabled). Update made by Irina.
- Added a failsafe for Language CSV when empty rows are added.
- Updated some default Text Code actions in order to make sure they're only used by the Message Window and not anything else. Update made by Irina.
Version 1.48: April 18, 2024
- Bug Fixes!
- Added fail safe for help description checks parsing from objects without help descriptions normally. Fix made by Irina.
Version 1.47: February 15, 2024
- Documentation Update!
- Help file updated for new features.
- New Features!
- New Plugin Parameters added by Irina:
- Plugin Parameters > Custom Font Manager
- Register custom fonts here.
- Custom fonts that aren't the message or number fonts cannot be used without registration.
- See help file for more information.
Version 1.46: January 18, 2024
- Bug Fixes!
- Fixed a bug where script calls used to create message choices would not work properly. Fix made by Irina.
- Documentation Update!
- Help file updated for new features.
- New Features!
- Text Language Switching added by Irina:
- Plugin Parameters > Text Language Settings
- The "Text Language" feature allows your players to switch between different languages for your game to allow people from around the globe to enjoy what story you have to tell.
- Disclaimers: This is not an automatic translation tool. Translations made through the "Text Language" feature of the VisuStella MZ Message Core will require manual input by the game developer.
- Read more about it in detail within the "Text Language Information" section in the help file.
- New Plugin Parameter added by Irina:
- Choices: Distance
- Change the distance from choice window to the message window.
- New parameter added to Plugin Command "Choices: Properties" by Irina:
- Minimum Choice Width
- What is the minimum width size for each choice?
- New Plugin Parameter for "Message Window" added by Irina:
- Parameters > Message Window: Choice List Window> Minimum Choice Width
- What is the minimum width size for each choice?
- New Text Codes for Choice Window added by Irina:
- <BgImg: filename> and variants
- <FgImg: filename> and variants
- These text codes allow adding a background or foreground image to a choice rectangle in stretched/scaled size.
Version 1.45: December 14, 2023
- Bug Fixes!
- Punctuation was, for some reason, excluded when using Wordwrap with Japanese and Chinese languages. This should be fixed now. Fixed by Irina.
- Documentation Update!
- Help file updated for new features.
- Added clarity to the <left>, <center>, and <right> being unable to be used together with word wrap.
- Word Wrap also cannot be used together with <left>, <center>, or <right> and will disable itself if text alignment text codes are detected.
- Feature Update!
- Wordwrap <br> now works properly with Japanese and Chinese languages.
- New Features!
- New Plugin Parameters added by Irina:
- Plugin Parameters > General Settings > Each Message Start
- Plugin Parameters > General Settings > Each Message End
- This is text that is added at the start/end of each message.
- Keep in mind that if a message extends to a different page (due to word wrap, excess lines, etc), that does not mean the starting text will be added to where the next page begins or the ending text will be added where the previous page ends.
- Can be used for things like adding "<center>" to the start of each message without having to type it every time.
Version 1.44: October 12, 2023
- Documentation Update!
- Help file updated for new features.
- Updated "Plugin Parameters: Word Wrap Settings" section:
- As of the v1.44 update, some Asian languages such as Chinese and Japanese are now supported for word wrap. Korean language is only supported if spaces are used.
- Feature Update!
- Word Wrap is now supported for Japanese and Chinese languages.
- Feature updated by Irina and sponsored by AndyL.
- New Features!
- New text codes added by Irina for "Show Choices" event command.
- <Shuffle>
- Shuffles the order of all choices. Any cancel shortcuts other than "Branch" will be undone.
- <Shuffle: x>
- Shuffles the order of all choices and only x number of them appear. Any cancel shortcuts other than "Branch" will be undone. Hidden choices do not count towards x number.
Version 1.43: April 13, 2023
- Compatibility Update!
- Fixed incompatibilities with auto message positioning with the Map Zoom plugin. Update made by Irina.
Version 1.42: March 16, 2023
- Bug Fixes!
- Fixed some text codes that would capture way too much data than intended. Fix made by Irina.
- Documentation Update!
- Help file updated for new features.
- New Features!
- New text code added by Irina for Show Choice Window only:
- <Help> text </Help>
- Makes a help window appear and have it show 'text' in its contents.
- The help window will disappear if no text is displayed.
- New Plugin Commands added by Arisu:
- Select: Weapon
- Select: Armor
- Select: Skill
- Opens the Event Select Item Window to let the player pick a weapon, armor, or skill to choose from. The selected object will have its ID recorded in a variable. These can be opened while the Message Window is opened just like the event "Select Item".
Version 1.41: December 15, 2022
- Compatibility Update!
- Added compatibility functionality for future plugins.
- Documentation Update!
- Help file updated for new features.
- New Features!
- New text codes added by Irina!
- For the Choice Window Only text codes:
- <BgColor: x>
- <BgColor: x, y>
- <BgColor: #rrggbb>
- <BgColor: #rrggbb, #rrggbb>
- Requires VisuMZ_0_CoreEngine! Sets the background color of this choice to 'x' text color, 'x' to 'y' gradient text color, or using '#rrggbb' hex color values.
Version 1.40: November 3, 2022
- Documentation Update!
- Help file updated for new features.
- New Feature!
- New text code added by Irina:
- <RNG> text1 | text2 | text3 </RNG>
- Using the above text code format in a Show Message entry, you can get a random result out of the various inserted texts. Use "|" (without quotes) as a separator between text entries. You can have unlimited entries. The result will have any excess white space trimmed.
- This text code cannot be inserted into a macro and parsed properly.
Version 1.39: September 22, 2022
- Bug Fixes!
- Macros now support quotes (' and ") in the STR: Text. Fix made by Irina.
Version 1.38: July 21, 2022
- Optimization Update!
- Plugin should run more optimized.
Version 1.37: June 9, 2022
- Documentation Update!
- Help file updated for new features.
- Feature Update!
- Picture texts with \v[x] text codes are now updated automatically.
- This is the only dynamic text code that updates this way for optimization purposes and to prevent overabundant CPU usage.
- Everything else will require the new Plugin Command.
- New Features!
- New Plugin Command added by Irina:
- Picture: Refresh Text
- Refreshes the text used for all on-screen pictures.
- To be used if any dynamic text codes are updated like \n[x].
- New Features!
- New text codes added by Arisu and sponsored by ImGonnaPutMyGameOnXboxAndYouCantStopMe:
- <Up Button>, <Left Button>, <Right Button>, <Down Button>
- <Ok Button>, <Cancel Button>, <Shift Button>, <Menu Button>
- <Page Up Button>, <Page Down Button>
- Display's VisuMZ_0_CoreEngine's button assist text.
Version 1.36: April 7, 2022
- Feature Update!
- Auto size related text codes should now automatically disable word wrap effects as they should have before. Update made by Irina.
Version 1.35: March 31, 2022
- Bug Fixes!
- Bug fixed where if autosizing is used and it goes from a message that is shorter to longer, an extra key press is needed. This should no longer be the case. Fix made by Irina.
Version 1.34: February 24, 2022
- Documentation Update!
- Help file updated for new features.
- New Features!
- New Choice Window Text Codes made by Irina and sponsored by AndyL:
- <Choice Width: x>
- Sets the minimum text area width to x. Applies to whole choice window.
- <Choice Indent: x>
- Sets the indent to x value. Applies to current choice selection only.
Version 1.33: February 10, 2022
- Documentation Update!
- Help file updated for new features.
- New Features!
- New Plugin Commands added by Irina:
- Picture: Change Text
- This new plugin command allows you to place text on top of pictures (usually in the form of empty pages or cards) to function as stationary or other uses. Text codes are allowed.
- Text codes are supported.
- Picture: Erase Text
- Removes text from target picture(s).
Version 1.32: January 20, 2022
- Bug Fixes!
- Extra Show Choice notetags will now be properly hidden. Fix by Irina.
- Compatibility Update!
- Self Switches are now made compatible with work with Show Choices. Update made by Irina.
Version 1.31: December 9, 2021
- Documentation Update!
- Help file updated for new features.
- New Features!
- New hard-coded message-only text code added by Irina:
- <Next Page>
- Ends the current message page at this line. This is used for messages when rows are at 5 or above and the message lines don't match the amount. This is used to prevent grabbing message windows from following message events. Any lines following <Next Page> in the same message event will be ignored.
Version 1.30: November 11, 2021
- Documentation Update!
- Help file updated for new features.
- Help file updated for removed "Center Window X" bit.
- Feature Update!
- Message: Properties now has "Center Window X?" removed
- Changes will now be automatically centered.
- This change is made for the new Plugin Command added for offsets which more or less replaces them.
- New Features!
- New Plugin Command added by Irina and sponsored by Puddor:
- Message: X/Y Offsets
- Change the X and Y Offsets of the Message Window.
- The offset value(s) will be saved and stored.
- New Plugin Parameters added by Irina and sponsored by Puddor:
- Plugin Parameters > General Settings > Message Window > Offset X
- Plugin Parameters > General Settings > Message Window > Offset Y
- Allows you to offset the horizontal and/or vertical positions of the message window accordingly.
- New Text Codes added by Irina and sponsored by Puddor:
- <Offset: +x, +y>
- <Offset: -x, -y>
- <Offset: +x, -y>
- <Offset: -x, +y>
- Quickly adjust the message window offset values to the x and y amounts. The values will replace the previous offset settings if there were any.
Version 1.29: October 21, 2021
- Feature Update
- Word Wrap flags are now properly adjusted when converting macros and adding bypasses towards regular messages. Update by Irina.
Version 1.28: October 14, 2021
- Compatibility Update
- Added compatibility functionality for future plugins.
Version 1.27: October 7, 2021
- Optimization Update!
- Plugin should run more optimized.
Version 1.26: September 3, 2021
- Bug Fixes!
- Macros should now work properly with any \x<n> based text codes. Fix made by Irina.
Version 1.25: August 27, 2021
- Feature Update!
- Macros should now work with the <WordWrap> text code. Update by Irina.
Version 1.24: August 20, 2021
- Feature Update!
- Macros should now work with window placement and resize options. Update made by Irina.
- Macros should now work with choice-related enable and visibility options. Update made by Irina.
Version 1.23: July 16, 2021
- Documentation Update!
- Help file updated for new features.
- New Features!
- New Plugin Parameter added by Irina:
- Plugin Parameters > Word Wrap Settings > End Padding
- Add extra padding to your window to make text wrap further away from the end of the window. This will default to 0.
Version 1.22: July 2, 2021
- Documentation Update!
- Help file updated for new features.
- New Features!
- New Text Codes added by Irina and sponsored by AndyL:
- <Current Battle Target>
- <Current Battle User>
- Replaces the text code with the current target or current user's name in-battle. Otherwise, returns nothing.
- Not recommended to be used inside of Help Descriptions. They are best used with "Show Text" event commands.
- <Current Battle Action>
- <Current Battle Action Name>
- Replaces the text code with the current battle action's name with the icon or without it respectively. Otherwise, returns nothing.
- Not recommended to be used inside of Help Descriptions. They are best used with "Show Text" event commands.
Version 1.21: June 4, 2021
- Documentation Update!
- Added extra note to the new <Position: x, y, width, height> text codes that they do not work with Word Wrap.
- Feature Update!
- Added fail safe for preventing Common Events that don't exist from being ran at all by the Message Window. Added by Arisu.
Version 1.20: May 28, 2021
- Documentation Update!
- Help file updated for new features.
- Added additional clarity for \WindowMoveTo<?> and \WindowMoveBy<?> and \WindowReset text codes with "Note 2".
- Replace '?' with the following format: targetX, targetY, targetWidth, targetHeight, duration, easingType. Only targetX and targetY are required arguments. These will only alter the window dimensions when the text has arrived at that point. They will not alter the window preemptively. This is not used as a window positioner. Use the <Position: x, y, width, height> text code for that.
- New Features!
- New hard-coded text codes added for Message Window Only. Added by Irina.
- <Position: x, y, width, height>
- <Coordinates: x, y>
- <Dimensions: width, height>
Version 1.19: May 14, 2021
- Feature Updates!
- Line breaks can now be used by Show Choices. Make sure that there is enough room to contain the text through Plugin Commands. Update by Irina.
Version 1.18: April 30, 2021
- Bug Fixes!
- Moving windows with 0 duration via text code should now instantly move the windows to the desired location with no delay. Fix made by Olivia.
Version 1.17: April 9, 2021
- Feature Update!
- <Auto> text codes for message windows will round up calculations for the message width to the nearest even number for better calculations.
Version 1.16: April 2, 2021
- Bug Fixes!
- \CommonEvent[x] text code will no longer run upon message window size calculation. Fix made by Arisu.
- Documentation Update!
- Added further clarification for "Text Macros" section.
- This does NOT work with \MacroName as it did with Yanfly Engine Plugins. Use the method stated before with the brackets to [MacroName] instead.
Version 1.14: February 12, 2021
- Bug Fixes!
- Auto positioned messages in battle will no longer cover the battler in question. Fix made by Irina.
Version 1.13: February 5, 2021
- Bug Fixes!
- Choice List Window with a dimmed background should now have a more consistent sized dim sprite. Fix made by Irina.
Version 1.12: January 22, 2021
- Feature Update!
- Name Box Window Default Color is now disabled by default to 0 because users do not understand why their names are showing up yellow and did not bother reading the documentation. If users want this feature turned on, they will have to do it manually from now on. Update made by Irina.
Version 1.11: January 15, 2021
- Optimization Update!
- Plugin should run more optimized.
Version 1.10: January 8, 2021
- Bug Fixes!
- <Auto Actor: x> and <Auto Party: x> text codes should now work properly. Fix made by Irina.
- Feature Update!
- Auto Color Plugin Parameters now have their default settings set to 0. This is due to an influx of "bug reports" from users who do not understand how this feature works, and the VisuStella team has decided it is better for the feature to default to an inactive state until users decide to search and utilize it themselves. Update made by Irina.
Version 1.09: January 1, 2021
- Feature Update!
- Auto-color no longer applies to database names that are only numbers. Auto-color entries that are only numbers will also be ignored. This is to prevent breaking the text code parsing. Update made by Yanfly.
Version 1.08: November 15, 2020
- Documentation Update!
- Some text codes left for the Name Box Window have been accidentally left out. These text codes allow for the positioning of the Name Box Window. Also, added to this section are the \NormalBG, \DimBG, and \TransparentBG text codes since people have been asking for how to change the name box window's background, but have skimmed over those text codes in different sections of the help file.
- Optimization Update!
- Plugin should run more optimized.
Version 1.07: November 8, 2020
- Bug Fixes!
- When using auto size functions, the message pause symbol will no longer appear semi-transparent the whole time. Fix made by Irina.
Version 1.06: October 25, 2020
- Documentation Update!
- Added a warning message to the Fast Forward Key plugin parameter:
- WARNING: If this key is the same as the dash button, this will clear out any held down inputs upon triggering an event to prevent players from skipping potentially useful information stored in messages. If you do not want the input to be cleared, use a different key.
- Updated help file for new features.
- Feature Update!
- The default Fast Forward Key setting has now been changed from "Shift" to "Page Down". Change made by Yanfly
- New Feature!
- New Plugin Parameter added by Irina.
- Plugin Parameters > General > Default Outline Width
- Changes the default outline width to this many pixels thick.
Version 1.06: September 27, 2020
- Bug Fixes!
- Setting an actor's autocolor will now disable it from \N[x] and \P[x] text codes. Fix made by Irina.
Version 1.05: September 20, 2020
- Bug Fixes!
- Auto Position text codes not place positions properly if the screen width and height differ from the box width and box height. Fix made by Irina.
Version 1.04: September 13, 2020
- Bug Fixes!
- Word wrap no longer affects specific battle messages. Fix made by Irina.
- Word wrap now updates properly after using the 'Message: Properties' Plugin Command. Fix made by Arisu.
Version 1.03: September 6, 2020
- Bug Fixes!
- Autoplacement of the name box window now takes its offset Y setting into account before sending it to the bottom of the message window. Fix made by Yanfly.
- Added automatic feature setting to turn off word wrap when using the auto-size and auto-position text codes. This is because the auto-size and auto-position effects don't work properly with Word Wrap based on how they both clash when adjusting the window settings. Fix made by Irina.
- New message pages after auto-sizing no longer put out empty messages. Fix made by Irina and Shiro.
- Documentation Update!
- Extended the note for auto-size and auto-position text codes to include that they do not work with Word Wrap. Added by Irina.
Version 1.02: August 30, 2020
- New Features!
- Added new hard-coded text codes for auto-sizing and auto-positioning:
- <Auto>, <Auto Width>, <Auto Height>
- <Auto Actor: x>, <Auto Party: x>, <Auto Enemy: x>
- <Auto Player>, <Auto Actor: x>, <Auto Party: x>, <Auto Event: x>
- New features added by Irina.
Version 1.01: August 23, 2020
- Bug Fixes!
- </Wordwrap> now works.
- \ActorFace[x] text code now fixed.
- Users updating from version 1.00 will need to fix this problem by either removing the plugin from the Plugin Manager list and reinstalling it, or going to Plugin Parameters > Text Code Replacements > ActorFace > JS: Text > and changing "$gameActors.actor(1)" to "$gameActors.actor(actorId)"
- Actors with empty names would cause auto hightlight problems. Fixed!
- Auto-colors now ignore names with special characters like !, ?, [, ], and so on.
- Line break spacing fixed.
- New Features!
- Wordwrap now works with left, center and right alignment tags.
Version 1.00: August 20, 2020
See Also
End of File
| 