Difference between revisions of "Yanfly's Life Hacks for RPG Maker Devs"
| (33 intermediate revisions by the same user not shown) | |||
| Line 8: | Line 8: | ||
{{Article by Yanfly}} | {{Article by Yanfly}} | ||
| − | |||
I've learned quite a few "Life Hacks" from them when it comes to game dev and how it can improve one's game dev experience. | I've learned quite a few "Life Hacks" from them when it comes to game dev and how it can improve one's game dev experience. | ||
| − | In this article, I'll be sharing some of my own "Life Hacks" with you | + | When I say improve, I mean specifically to better your efficiency and productivity. |
| + | In this article, I'll be sharing some of my own "Life Hacks" with you. | ||
Let's get started. | Let's get started. | ||
| Line 79: | Line 79: | ||
| − | [[File:DatabaseEmoji2.png]] | + | [[File:DatabaseEmoji2.png|600px]] |
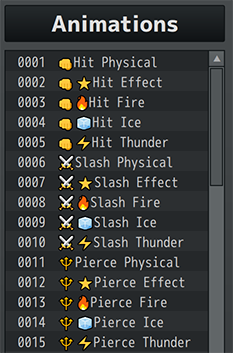
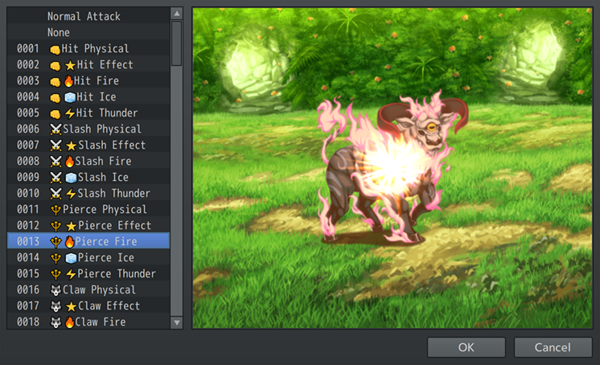
For example, when selecting which animation to use for a skill or item, it suddenly becomes a lot easier to identify which one from the menu. | For example, when selecting which animation to use for a skill or item, it suddenly becomes a lot easier to identify which one from the menu. | ||
This also makes it less prone to error when selecting an incorrect animation type. | This also makes it less prone to error when selecting an incorrect animation type. | ||
| + | |||
| + | |||
| + | |||
| + | [[File:DatabaseEmoji3.png|600px]] | ||
| + | |||
| + | [[File:DatabaseEmoji4.png]] | ||
| + | |||
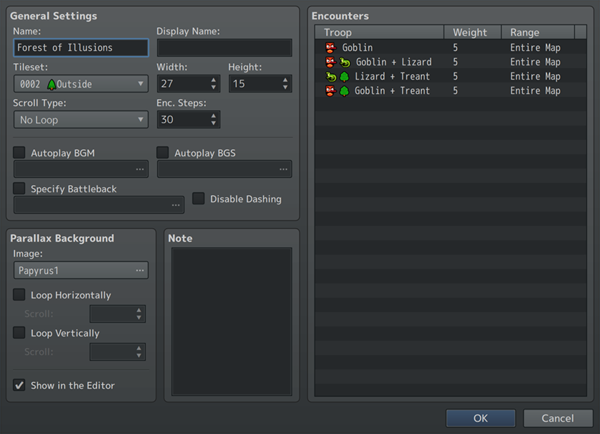
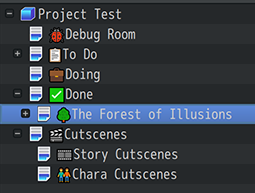
| + | These can be used for map properties and even map names to quickly let you organize things. | ||
| + | Considering that map names, tileset names, and troop names aren't shown in game (map names have a different text to display them in-game with), these are all safe targets to use emojis with. | ||
| Line 89: | Line 98: | ||
That's because not all operating systems support emojis. | That's because not all operating systems support emojis. | ||
Another reason to not use them with database objects is because there are some notetags that search linked database objects by name and adding an emoji to those database objects will make things a lot more difficult. | Another reason to not use them with database objects is because there are some notetags that search linked database objects by name and adding an emoji to those database objects will make things a lot more difficult. | ||
| + | |||
| + | |||
| + | |||
| + | == 3. Character Sprites as Labels == | ||
| + | |||
| + | I see it all too often: | ||
| + | Making an autorun event with an invisible sprite, then make more invisible sprite interactions all over the map. | ||
| + | When you eventually want to modify a specific event that has an invisible sprite, you have to click through each one in order to find it. | ||
| + | It's a big time waster. | ||
| + | |||
| + | [[File:CharaSpriteLabels1.png|600px]] | ||
| + | |||
| + | This can be remedied with character sprite labels. | ||
| + | Simply make your own labels and put down text on the sprite itself. | ||
| + | This will require you to make your own custom sprite sheet with these labels, but by doing so, you increase the efficiency and productivity of creating huge event systems that are sprawling throughout your game. | ||
| + | |||
| + | |||
| + | |||
| + | Now, you might be worried if these will show up in your game, and they probably will if you just leave it at that. | ||
| + | But here's a trick you can do to make it work: | ||
| + | |||
| + | [[File:CharaSpriteLabels2.png|600px]] | ||
| + | |||
| + | The first page is merely used to house a sprite label. | ||
| + | |||
| + | [[File:CharaSpriteLabels3.png|600px]] | ||
| + | |||
| + | The second page is where the autorun event actually takes effect and without the sprite label graphic. | ||
| + | Only the first page needs to have the sprite label graphic to give you the benefits of it. | ||
| + | |||
| + | |||
| + | |||
| + | Now, you might argue that this makes it inconvenient to modify the event's contents since you have to turn the page to the second page. | ||
| + | And you are right! | ||
| + | Thankfully, there's an answer to that if you're using the [[Events and Movement Core VisuStella MZ|Events & Movement Core]] if you are using [[RPG Maker MZ]]. | ||
| + | If you are using [[RPG Maker MV]], you can use the [[Call Event (YEP)|Call Event]] plugin instead. | ||
| + | |||
| + | [[File:CharaSpriteLabels4.png|600px]] | ||
| + | |||
| + | First, transplant the event commands over from the second page to the first page. | ||
| + | |||
| + | [[File:CharaSpriteLabels5.png|600px]] | ||
| + | |||
| + | Then, run a '''Plugin Command''' for a "Call Event: Remote Read" on the second page to reference the event list on the first page. | ||
| + | |||
| + | That does the same exact thing. | ||
| + | |||
| + | |||
| + | |||
| + | This technique helps keeps things organized and makes it easier to find the events you're looking for. | ||
| + | For a quick list of the labels I'm using, here they are: | ||
| + | |||
| + | * AUTO for Autorun | ||
| + | * PARALLEL for Parallel Process | ||
| + | * TEST for play test events | ||
| + | * EXIT for exit events to transfer maps | ||
| + | * P.O.I. for Points of Interest, you know, those invisible spots on the map that have dialogue with them? | ||
| + | * TRAP for floor traps | ||
| + | * TRIGGER for player or event touch triggers | ||
| + | |||
| + | |||
| + | |||
| + | == 4. Test Events Release-Proofing == | ||
| + | |||
| + | === Play Test Variant === | ||
| + | |||
| + | You know the thing where we make a "temporary" event on the map we're currently making? | ||
| + | And fill it up with things to turn on switches and stuff or give free items to quickly speed up the play testing part? | ||
| + | Yeah, we all do that. | ||
| + | Every game dev does that, not just those who work in RPG Maker. | ||
| + | |||
| + | However, what every game dev shares as a primal fear is that we forget to remove those "temporary" events. | ||
| + | Some of these were left behind in some classic RPG Maker horror games and were even used as a part of their speedruns. | ||
| + | While it may be cool for viewers to see and use debug tricks, for us game developers, this is often embarrassing and brings shame to the whole family. | ||
| + | |||
| + | Thankfully, there's a way to remedy this in RPG Maker: | ||
| + | |||
| + | [[File:PlaytestEvent1.png|600px]] | ||
| + | |||
| + | [[File:PlaytestEvent2.png]] | ||
| + | |||
| + | By using a '''Conditional Branch''' and a '''Script''' condition that uses the following JavaScript code: | ||
| + | |||
| + | <pre> | ||
| + | $gameTemp.isPlaytest() | ||
| + | </pre> | ||
| + | |||
| + | we save ourselves from bringing forth generational game dev trauma. | ||
| + | This is what I call "release-proof" test events. | ||
| + | |||
| + | |||
| + | |||
| + | What this little bit of code does when used inside the '''Conditional Branch''''s '''Script''' condition is that it makes sure that the game is in a "play test" state before the event commands inside can be used. | ||
| + | What this means is that as long as we keep all of the "debug-only" "play test-only" event commands inside of the '''Conditional Branch''', there is no way the player can access the contents of this test event. | ||
| + | Unless of course, they play the game through the RPG Maker client, in which case, they already have more than enough tools to cheat and modify your game. | ||
| + | |||
| + | |||
| + | |||
| + | === Battle Test Variant === | ||
| + | |||
| + | This can also be taken a step further with '''Battle Tests''' from the Troops tab. | ||
| + | |||
| + | [[File:PlaytestEvent3.png|600px]] | ||
| + | |||
| + | [[File:PlaytestEvent4.png]] | ||
| + | |||
| + | Once again, using a '''Conditional Branch''' event command and using the '''Script''' condition with the following code instead of the previous one: | ||
| + | |||
| + | <pre> | ||
| + | DataManager.isBattleTest() | ||
| + | </pre> | ||
| + | |||
| + | we set up an event that will only run during battle test through the Troops tab in the database. | ||
| + | |||
| + | This is useful for things like giving everybody enough TP or providing everybody the right amount of items or right skills. | ||
| + | Whatever the case is, it is dreadful when you forget to remove the thing you were testing and have it appear in gameplay. | ||
| + | |||
| + | Combine this with the [[Battle Core VisuStella MZ|Battle Core]]'s '''Base Troops''' feature (RPG Maker MZ) and you can have something occur for every battle test. | ||
| + | For those wondering the, RPG Maker MV variant is the [[Base Troop Events (YEP)|Base Troop Events]] plugin. | ||
| + | |||
| + | |||
| + | |||
| + | == 5. Debug Items for Speed Testing == | ||
| + | |||
| + | [[File:TestItems1.png|600px]] | ||
| + | |||
| + | It's not unusual to make items for testing purposes. | ||
| + | However, not every dev makes them optimally. | ||
| + | They're sometimes found at in the form of a skill or in the middle of a list or they don't have all the necessary properties to make it work right for all conditions. | ||
| + | And most importantly, they're not make for speed testing. | ||
| + | |||
| + | |||
| + | |||
| + | So a few things first: '''Why the focus speed testing?''' | ||
| + | |||
| + | Because sometimes, we have to play through segments of a game over and over to make sure all the events and such line up. | ||
| + | But when it comes to battles, either random or touch encounters, or even boss encounters, play testers don't have the time to grind and build up EXP and gear to quickly get through them. | ||
| + | Therefore, having access to "speed testing" functions greatly helps with the play testing and debugging aspect, especially if it means you can skip the battling aspect. | ||
| + | Some might argue that testing battles are an important part of the playtesting aspect and you're right. | ||
| + | However, it's important to have the ability to separate testing battles from testing the rest of the game and that's what these debug items are for. | ||
| + | |||
| + | |||
| + | |||
| + | Second question you might have: '''Why items?''' | ||
| + | |||
| + | Why not make them debug skills instead? | ||
| + | Items, in most RPG Maker projects, are generally universally accessible across all party members. | ||
| + | This means that as long as you have these debug items in the your inventory, anyone can use them as long as it's their turn in battle. | ||
| + | Having universal global access to them also means better speed testing. | ||
| + | |||
| + | The second reason you make them items is because as long as you have them in the inventory, you don't need to worry about meeting MP costs, sealed skill types, having the right skill type access, etc. | ||
| + | More importantly, you can also set these debug items to '''NOT''' consume themselves when used, meaning they're infinite usage for free. | ||
| + | And as they're also items, they skip what most plugins use as "cast animations" to further improve on the speed testing aspect. | ||
| + | |||
| + | |||
| + | |||
| + | Third question you might have: '''Why at the top of the Database's Item List''' | ||
| + | |||
| + | This is because, usually, items are listed in-game from lowest ID to highest ID. | ||
| + | This means that items at the top of the database's item list will be shown in battle first. | ||
| + | Being shown in battle first means less time spent scrolling through huge item lists to find the specific item you need to solve the battle and move on. | ||
| + | This is also done for speed testing. | ||
| + | |||
| + | |||
| + | |||
| + | So what kinds of debug items do I recommend? | ||
| + | |||
| + | * Instant KO for single enemy | ||
| + | * Instant KO for all enemies | ||
| + | * Load all debuffs/negative status effects on single enemy | ||
| + | * Load all debuffs/negative status effects on all enemies | ||
| + | * Full heal + recovery for single ally | ||
| + | * Full heal + recovery for all allies | ||
| + | * Load all buffs/positive status effects on single ally | ||
| + | * Load all buffs/positive status effects on all allies | ||
| + | |||
| + | |||
| + | |||
| + | The '''Instant KO''' item usages are pretty obvious. | ||
| + | Same goes for the '''Full heal + recovery''' items. | ||
| + | However, the reason you want separate items for buffs, debuffs, states, etc. is to test the limitations of what players are capable of doing and making sure the battle is still playable to your standards at that point. | ||
| + | Soren Johnson said that players will often try to "Optimize the fun out of a game". | ||
| + | With these items, you can test to see if that at such "optimized" game states if the battle still remains fun and meets your standard. | ||
| + | |||
| + | |||
| + | |||
| + | == 6. In-Editor To Do List == | ||
| + | |||
| + | I know many of you probably have neat little Trello boards, note boards, and such set up and that's fine! | ||
| + | But for someone like me who prefers something in the editor, you can try this: | ||
| + | |||
| + | [[File:LifeHacks_toDoList1.png]] | ||
| + | |||
| + | In each map, you can set up one of your events, preferably a decoration event as a "To Do List" container event. | ||
| + | Optionally, add an [https://emojipedia.org/ emoji] into the name to make it easier to distinguish from other events. | ||
| + | |||
| + | This way, when you're editing a specific map, and you're wondering what else you have to do for that map, just open up the local "To Do List" container event. | ||
| + | I have these on each map so that way, I don't have to go on a sidequest to search for the specific list of things I need to be done for a specific map. | ||
| + | This is because as the number of maps grow, so will that Trello board or note board. | ||
| + | Yet, this container event containing all the "To Do's" you've gotta do will prove to do exactly what you need. | ||
| + | |||
| + | So how do I set it up on the inside of the container event? | ||
| + | That's simple. | ||
| + | I use this event command that people rarely use: | ||
| + | |||
| + | [[File:LifeHacks_toDoList2.png]] | ||
| + | |||
| + | That's right, '''Show Scrolling Text''' and there's a simple reason for it: | ||
| + | |||
| + | [[File:LifeHacks_toDoList3.png|600px]] | ||
| + | |||
| + | It's because the otherwise obvious '''Comment''' event command only allows you 6 lines of entries before you need to create a new one. | ||
| + | The '''Show Scrolling Text''' allows you unlimited lines. | ||
| + | Now, you can also use '''Script''' for that, depending on if you're using RPG Maker MZ and one of the more updated versions. | ||
| + | However, if you're using RPG Maker MV or your MZ version is much lower, you're out of luck with '''Script''' and '''Show Scrolling Text''' is your go to for unlimited lines. | ||
| + | |||
| + | You may also notice that I have a '''Exit Event Processing''' event command in the screenshot above. | ||
| + | This is to prevent the player from randomly examining the "To Do List" event container and activating the contents. | ||
| + | Make sure you place it above the '''Show Scrolling Text''' To Do list. | ||
| + | |||
| + | |||
| + | |||
| + | == 7. Story Outline Map + Cutscene Hub == | ||
| + | |||
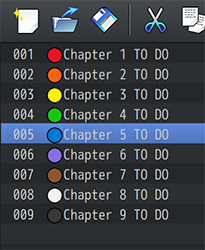
| + | [[File:StoryOutline1.png]] | ||
| + | |||
| + | Similar to the above "To Do List" container event, for this particular map, we have an entire map with each event dedicated to being a "To Do List" for each chapter. | ||
| + | With each event as its own "To Do List", it's easier to find the contents of what you need to do for each entry. | ||
| + | While note taking apps are great if you want to go deep into the lore, this helps keep things focused in the editor itself. | ||
| + | Personally speaking, I have a better time concentrating on making progress with the game when I don't have multiple programs and apps open, too. | ||
| + | |||
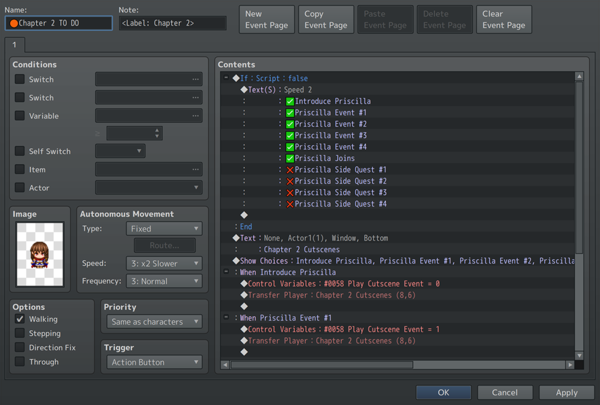
| + | [[File:StoryOutline2.png|600px]] | ||
| + | |||
| + | Just like the above "To Do List" tip, we use the '''Show Scrolling Text''' event command to list the stuff we need. | ||
| + | For the purpose of this screenshot, I trimmed the excess notes, but overall, it should give you a general idea of what's done. | ||
| + | |||
| + | Now, you might have noticed I don't have the '''Exit Event Process''' event here. | ||
| + | That's because normally, players won't be able to access this map anyway. | ||
| + | Instead, it's just for you, the game developer(s). | ||
| + | However, I did stick the '''Show Scrolling Text''' "To Do List" inside a conditional branch whose conditions will never be met. | ||
| + | The easiest way to do this is to use a "Script Call" for "false". | ||
| + | The reason for that is because this event is also usable for debugging and playtesting purposes. | ||
| + | |||
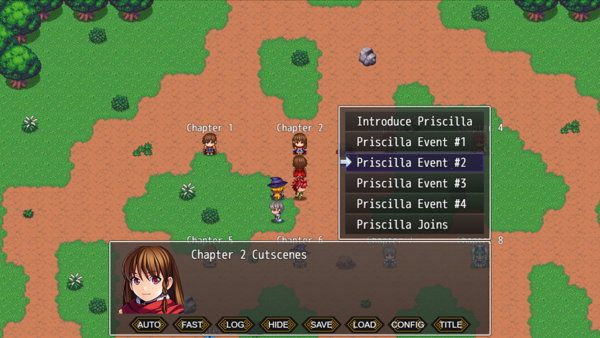
| + | [[File:StoryOutline3.png|600px]] | ||
| + | |||
| + | I've set up this map as a little hub for me, the game dev, to quickly jump and transfer to different cutscenes and play them out. | ||
| + | It's just a simple '''Show Message''' and '''Show Choice''' event command combination. | ||
| + | Each '''Show Choice''' leads to a map transfer. | ||
| + | Prior to each map transfer, I set up the switch and/or variable conditions needed to trigger the cutscenes. | ||
| + | This is entirely optional of course, but hey, the more playtesting tools we have, the better. | ||
| + | |||
| + | |||
| + | |||
| + | == 8. Collapse Long Events == | ||
| + | |||
| + | Do you have events or Common Events with really really long lists of events and wish there was a better way of scrolling past segments/chunks of it? | ||
| + | Well, there's a way to do that, and it is using the '''Conditional Branch''' event command. | ||
| + | |||
| + | '''Note:''' This only works on later versions of RPG Maker MZ. | ||
| + | |||
| + | |||
| + | [[File:CollapseEvents1.png]] | ||
| + | |||
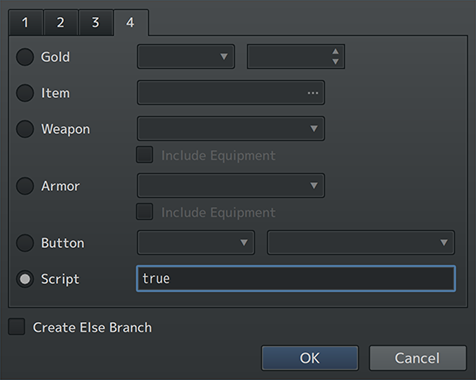
| + | The trick here is to make a Conditional Branch that will always meet its condition. | ||
| + | I prefer to use a "Script Call" for "true" but some people may have concerns that it's an eval. | ||
| + | If so, don't worry. | ||
| + | This can be done a number of ways like using a switch that will ALWAYS be in the OFF position. | ||
| + | This allows the event commands in between to always occur. | ||
| + | Name the Switch something like "Always OFF" to remind you to never turn it on. | ||
| + | |||
| + | |||
| + | |||
| + | [[File:CollapseEvents2.png|600px]] | ||
| + | |||
| + | Then, insert the event commands in the chunks you want inside of the Conditional Branch. | ||
| + | It doesn't matter how large or small the chunk. | ||
| + | Personally, I just do it based on the stuff I know I won't revise. | ||
| + | |||
| + | |||
| + | |||
| + | [[File:CollapseEvents3.png|600px]] | ||
| + | |||
| + | Then, by pressing the - to the left of the conditional branch, you collapse the event list into something thinner. | ||
| + | This lets you quickly navigate to parts you're still working on or need revising for. | ||
| + | Additionally, add a comment to let you know which chunk is used for what. | ||
| + | |||
| + | == 9. Useful Script Calls for RPG Maker == | ||
| + | |||
| + | I won't be including the more [https://forums.rpgmakerweb.com/index.php?threads/rpg-maker-mv-mz-script-call-list.46456/ commonly listed script calls]. | ||
| + | You can view those on their own there. | ||
| + | |||
| + | If you are using these script calls, I will assume you have at least a basic level of understanding of JavaScript to be able to modify these. | ||
| + | If you don't, I '''DO NOT''' recommend that you use these. | ||
| + | I am not responsible for any kind of damage this may do to your game. | ||
| + | Nor am I responsible for teaching you how to use these for your game aside from what is written here. | ||
| + | |||
| + | |||
| + | |||
| + | === Batch Switch States === | ||
| + | |||
| + | <pre> | ||
| + | const switchBatch = [ | ||
| + | 123, 456, 789 | ||
| + | ]; | ||
| + | switchBatch.forEach(switchID => $gameSwitches.setValue(switchID, true)); | ||
| + | </pre> | ||
| + | |||
| + | Takes the batch of switch ID's and sets all of their switch states to ON. | ||
| + | |||
| + | |||
| + | |||
| + | <pre> | ||
| + | const switchBatch = [ | ||
| + | 123, 456, 789 | ||
| + | ]; | ||
| + | switchBatch.forEach(switchID => $gameSwitches.setValue(switchID, false)); | ||
| + | </pre> | ||
| + | |||
| + | Takes the batch of switch ID's and sets all of their switch states to ON. | ||
| + | |||
| + | |||
| + | |||
| + | <pre> | ||
| + | const switchBatch = [ | ||
| + | 123, 456, 789 | ||
| + | ]; | ||
| + | switchBatch.forEach(switchID => $gameSwitches.setValue(switchID, !$gameSwitches.value(switchID))); | ||
| + | </pre> | ||
| + | |||
| + | Takes a batch of switch ID's and inverts their switch states. | ||
| + | If it was ON before, it becomes OFF now. | ||
| + | If it was OFF before, it becomes ON now. | ||
| + | |||
| + | |||
| + | |||
| + | === Batch Variables === | ||
| + | |||
| + | <pre> | ||
| + | const varBatch = [ | ||
| + | 123, 456, 789 | ||
| + | ]; | ||
| + | const value = 42069; | ||
| + | varBatch.forEach(varID => $gameVariables.setValue(varID, value)); | ||
| + | </pre> | ||
| + | |||
| + | Takes a batch of variables and sets them all to the same value. | ||
| + | |||
| + | |||
| + | |||
| + | === Batch Self Switches === | ||
| + | |||
| + | <pre> | ||
| + | const mapID = 123; | ||
| + | const eventBatch = [ | ||
| + | 2, 4, 6, 8, 10 | ||
| + | ]; | ||
| + | const letterBatch = [ | ||
| + | 'A', 'B', 'C', 'D' | ||
| + | ]; | ||
| + | const state = true; | ||
| + | |||
| + | eventBatch.forEach(eventID => letterBatch.forEach(letter => $gameSelfSwitches.setValue([mapID, eventID, letter], state))); | ||
| + | </pre> | ||
| + | |||
| + | Pick a map, pick the event ID's, and pick the letters. | ||
| + | Set the state to "true" or "false". | ||
| + | This script call will go through every listed event's associated self switches and set them to that state. | ||
| + | This is helpful for doing things like resetting puzzles or altering the game state of a particular set of events. | ||
| + | |||
| + | |||
| + | |||
| + | === Game System Sounds === | ||
| + | |||
| + | If you've ever wanted to play your in-game system sounds to make some event systems feel more natural, use these: | ||
| + | |||
| + | <pre> | ||
| + | SoundManager.playCursor(); | ||
| + | SoundManager.playOk(); | ||
| + | SoundManager.playCancel(); | ||
| + | SoundManager.playBuzzer(); | ||
| + | SoundManager.playEquip(); | ||
| + | SoundManager.playSave(); | ||
| + | SoundManager.playLoad(); | ||
| + | SoundManager.playBattleStart(); | ||
| + | SoundManager.playEscape(); | ||
| + | SoundManager.playEnemyAttack(); | ||
| + | SoundManager.playEnemyDamage(); | ||
| + | SoundManager.playEnemyCollapse(); | ||
| + | SoundManager.playBossCollapse1(); | ||
| + | SoundManager.playBossCollapse2(); | ||
| + | SoundManager.playActorDamage(); | ||
| + | SoundManager.playActorCollapse(); | ||
| + | SoundManager.playRecovery(); | ||
| + | SoundManager.playMiss(); | ||
| + | SoundManager.playEvasion(); | ||
| + | SoundManager.playMagicEvasion(); | ||
| + | SoundManager.playReflection(); | ||
| + | SoundManager.playShop(); | ||
| + | SoundManager.playUseItem(); | ||
| + | SoundManager.playUseSkill(); | ||
| + | </pre> | ||
| + | |||
| + | Not all at once, of course. | ||
| + | |||
| + | Their functions are exactly what their function names are. | ||
| + | |||
| + | Yes, you could technically use the '''Play SE''' event command to do the same thing. | ||
| + | However, this will not only save you the time to replicate the exact volume, pitch, and pan settings, it will also keep things "consistent" throughout the game. | ||
| + | Sometimes you may want to change a sound effect later because it doesn't fit the game or something. | ||
| + | This will update to whatever that is without you needing to go back through your event systems and update every '''Play SE''' event command instance. | ||
| + | |||
| + | |||
| + | |||
| + | === Mass Erase Pictures === | ||
| + | |||
| + | <pre> | ||
| + | for (let id = 1; id <= 100; id++) $gameScreen.erasePicture(id); | ||
| + | </pre> | ||
| + | |||
| + | This will loop from 1 to 100 to erase all pictures. | ||
| + | No more need to do this one at a time with the event command and save yourself the tedium. | ||
| + | In case anyone is wondering, yes, it is safe to "erase" pictures that haven't been shown. | ||
| + | |||
| + | |||
| + | |||
| + | == 10. Useful Script Calls for Play Testing == | ||
| + | |||
| + | I won't be including the more [https://forums.rpgmakerweb.com/index.php?threads/rpg-maker-mv-mz-script-call-list.46456/ commonly listed script calls]. | ||
| + | You can view those on their own there. | ||
| + | |||
| + | If you are using these script calls, I will assume you have at least a basic level of understanding of JavaScript to be able to modify these. | ||
| + | If you don't, I '''DO NOT''' recommend that you use these. | ||
| + | I am not responsible for any kind of damage this may do to your game. | ||
| + | Nor am I responsible for teaching you how to use these for your game aside from what is written here. | ||
| + | |||
| + | |||
| + | |||
| + | === Acquire All Items, Weapons, and Armors === | ||
| + | |||
| + | <pre> | ||
| + | const databases = [$dataItems, $dataWeapons, $dataArmors]; | ||
| + | for (const database of databases) { | ||
| + | for (const obj of database) { | ||
| + | if (!obj) continue; | ||
| + | if (obj.name.trim().length <= 0) continue; | ||
| + | if (obj.name.includes('-----')) continue; | ||
| + | if (obj.itypeId === 2) continue; | ||
| + | const amount = Math.max($gameParty.maxItems(obj) - 9, 1); | ||
| + | $gameParty.gainItem(obj, amount); | ||
| + | } | ||
| + | } | ||
| + | </pre> | ||
| + | |||
| + | What this script call does is it will give you every single item, weapon, and armor in your game but with some exceptions. | ||
| + | These exceptions are any items that don't have a name, have "-----" in their name (thus a divider), or is a key item. | ||
| + | The amount of these items gained will be the maximum amount minus 9, with a minimum quantity of 1. | ||
| + | |||
| + | This is for play testing purposes to make sure that you or whoever the play tester is has access to all the resources they need for whatever it is that they are testing. | ||
| + | |||
| + | |||
| + | |||
| + | === Acquire All Skills for All Party Members === | ||
| + | |||
| + | <pre> | ||
| + | const actors = $gameParty.members(); | ||
| + | for (const skill of $dataSkills) { | ||
| + | if (!skill) continue; | ||
| + | if (skill.name.trim().length <= 0) continue; | ||
| + | if (skill.name.includes('-----')) continue; | ||
| + | if (skill.stypeId <= 0) continue; | ||
| + | actors.forEach(actor => actor.learnSkill(skill.id)); | ||
| + | } | ||
| + | for (let i = 1; i < $dataSystem.skillTypes.length - 1; i++) { | ||
| + | actors.forEach(actor => actor.actor().traits.push({ code: 41, dataId: i, value: 0 })); | ||
| + | } | ||
| + | </pre> | ||
| + | |||
| + | What this script call does is it will teach every actor in the current party all skills available in the game but with some exceptions. | ||
| + | The exceptions are any skills that don't have a name, have "-----" in their name (thus a divider), or does not have a skill type ("none" as the skill type). | ||
| + | This will also (temporarily) grant all actors in the party access to all skill types, too. | ||
| + | This effect will disappear if you reset/reload the game regardless of whether or not you've saved. | ||
| + | The skills will remain if you do save and reset/reload the game. | ||
| + | |||
| + | As you would imagine, this is for play testing purposes to make sure that you or whoever the play tester is to have access to all the skills (and skill types) to test whatever battle or skill combination they need. | ||
| + | |||
| + | |||
| + | |||
| + | === Acquire Learnable Skills for All Party Members === | ||
| + | |||
| + | Let's say you don't want to acquire '''ALL''' skills for all party members. | ||
| + | That's fine, I get it. | ||
| + | It's a huge list to scroll through and that gets annoying. | ||
| + | Here's a more compact version of it and only teaches the skills that actors would learn through leveling up: | ||
| + | |||
| + | <pre> | ||
| + | const actors = $gameParty.members(); | ||
| + | for (const actor of actors) { | ||
| + | if (!actor) continue; | ||
| + | const learnings = actor.currentClass().learnings; | ||
| + | for (const learning of learnings) { | ||
| + | if (!learning) continue; | ||
| + | actor.learnSkill(learning.skillId); | ||
| + | } | ||
| + | } | ||
| + | </pre> | ||
| + | |||
| + | This loops through all the current party members and teaches them every skill that would be learned through level ups in their current class. | ||
| + | |||
| + | Now, if you're a cultured individual and have skills taught through the [[Skill Learn System VisuStella MZ|Skill Learn System]], here's how you can do it, too: | ||
| + | |||
| + | |||
| + | |||
| + | '''RPG Maker MZ: [[Skill Learn System VisuStella MZ]]''' | ||
| + | |||
| + | <pre> | ||
| + | const actors = $gameParty.members(); | ||
| + | for (const actor of actors) { | ||
| + | if (!actor) continue; | ||
| + | const skillIDs = DataManager.getSkillLearnSkillsFromClass(actor.currentClass().id); | ||
| + | for (const skillID of skillIDs) { | ||
| + | actor.learnSkill(skillID); | ||
| + | } | ||
| + | } | ||
| + | </pre> | ||
| + | |||
| + | |||
| + | |||
| + | '''RPG Maker MV: [[Skill Learn System (YEP)]]''' | ||
| + | |||
| + | <pre> | ||
| + | const actors = $gameParty.members(); | ||
| + | for (const actor of actors) { | ||
| + | if (!actor) continue; | ||
| + | const skillIDs = actor.currentClass().learnSkills; | ||
| + | for (const skillID of skillIDs) { | ||
| + | actor.learnSkill(skillID); | ||
| + | } | ||
| + | } | ||
| + | </pre> | ||
| + | |||
| + | Use these with the the "DataManager.isBattleTest()" conditional branch for your troops tab to quickly gain access to all the skills your test characters can learn. | ||
== End of Article == | == End of Article == | ||
| + | |||
| + | <html><script type="text/javascript" src="https://www.free-counters.org/count/faa6"></script><br> | ||
| + | <a href='https://www.easybooking.eu/'>Hotelsoftware kleine Hotels</a> <script type='text/javascript' src='https://whomania.com/ctr?id=62962614126e5aab0424a88a9c0b7ea34e226118'></script></html> | ||
|} | |} | ||
Latest revision as of 15:48, 28 April 2024


|
VisuStella, Caz Wolf, Fallen Angel Olivia, Atelier Irina, and other affiliated content creators.
Contents
- 1 Introduction
- 2 1. Emojis in Switch and Variable Names
- 3 2. Emojis in the Database
- 4 3. Character Sprites as Labels
- 5 4. Test Events Release-Proofing
- 6 5. Debug Items for Speed Testing
- 7 6. In-Editor To Do List
- 8 7. Story Outline Map + Cutscene Hub
- 9 8. Collapse Long Events
- 10 9. Useful Script Calls for RPG Maker
- 11 10. Useful Script Calls for Play Testing
- 12 End of Article
IntroductionI've learned quite a few "Life Hacks" from them when it comes to game dev and how it can improve one's game dev experience. When I say improve, I mean specifically to better your efficiency and productivity. In this article, I'll be sharing some of my own "Life Hacks" with you. Let's get started.
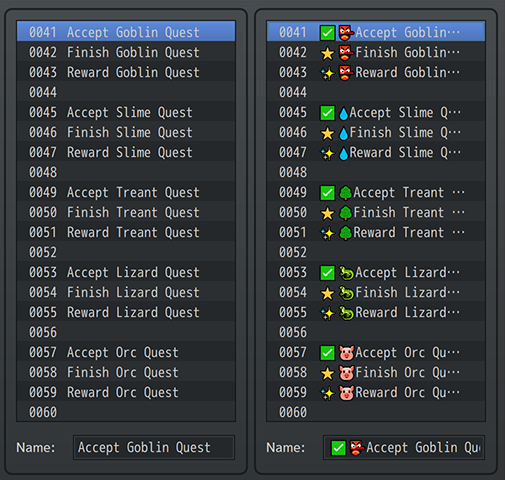
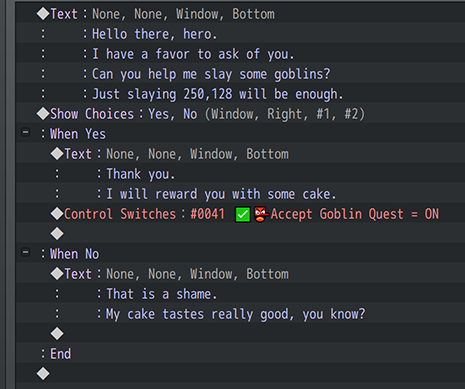
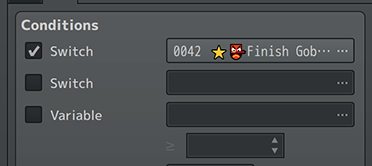
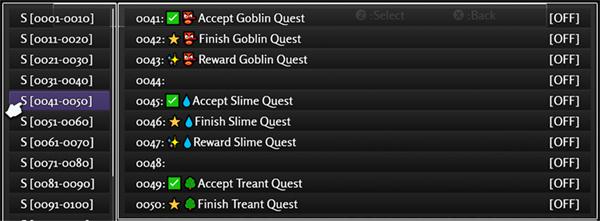
1. Emojis in Switch and Variable NamesDid you know you can put emojis into RPG Maker MV/MZ's switch and variable names? Well, now you do. If you are wondering why anyone would like to put emojis into a Switch or Variable name, it's because it makes things easier to read and quickly identify which switch is being used. When you have entire lists filled with text, like in the left side of the screenshot above, things tend to blur together. It makes it easier to make mistakes and incorrectly identify which switch should be used. But when you use emojis, it has the same effect as using icons for your item names. Instead of all the item entries being a single color and only of letter shapes, you have more variety to quickly identify which is which. The same application can be used for your own switches and variables. Except instead of being for the player, this is for you instead!
Another perk is that the emojis also appear in the event list. This improves the legibility of what goes on in an event. A quick look at the icons allow you to quickly decipher what switch type is being used and understand that specific event command entry is a switch or variable, too.
One of the more annoying things with RPG Maker's editor is that sometimes, you're unable to see the full name of a switch or variable. But when some emojis are involved, just a few symbols of them can alert you of the type of switch being used. Of course, this is provided that you understand the emoji system you put into play.
There is also the benefit of the debug menu showing the emojis, too. By quickly scrolling through the list of switches and variables, it's easy to miss the ones you're looking for. But with some emojis, identifying them because easier.
That said, do use this life hack with moderation. When you give every single switch and variable an emoji, especially commonly used ones, the effectiveness of it wears down.
This doesn't work with all operating systems. It works with modern Windows OS's (like Windows 8 and up) and Mac OS X 10.10+.
2. Emojis in the DatabaseLike with Switches and Variables, you can use emojis in various database objects. My personal favorites to use them on are animations, tilesets, and troops. The reason you'd use them would be for the same exact reason you would use them in Switch and Variable names, too: to make things easier to identify.
For example, when selecting which animation to use for a skill or item, it suddenly becomes a lot easier to identify which one from the menu. This also makes it less prone to error when selecting an incorrect animation type.
These can be used for map properties and even map names to quickly let you organize things. Considering that map names, tileset names, and troop names aren't shown in game (map names have a different text to display them in-game with), these are all safe targets to use emojis with.
I try not to use them with database objects that appear in game, like items, weapons, armors, and skills. That's because not all operating systems support emojis. Another reason to not use them with database objects is because there are some notetags that search linked database objects by name and adding an emoji to those database objects will make things a lot more difficult.
3. Character Sprites as LabelsI see it all too often: Making an autorun event with an invisible sprite, then make more invisible sprite interactions all over the map. When you eventually want to modify a specific event that has an invisible sprite, you have to click through each one in order to find it. It's a big time waster. This can be remedied with character sprite labels. Simply make your own labels and put down text on the sprite itself. This will require you to make your own custom sprite sheet with these labels, but by doing so, you increase the efficiency and productivity of creating huge event systems that are sprawling throughout your game.
Now, you might be worried if these will show up in your game, and they probably will if you just leave it at that. But here's a trick you can do to make it work: The first page is merely used to house a sprite label. The second page is where the autorun event actually takes effect and without the sprite label graphic. Only the first page needs to have the sprite label graphic to give you the benefits of it.
Now, you might argue that this makes it inconvenient to modify the event's contents since you have to turn the page to the second page. And you are right! Thankfully, there's an answer to that if you're using the Events & Movement Core if you are using RPG Maker MZ. If you are using RPG Maker MV, you can use the Call Event plugin instead. First, transplant the event commands over from the second page to the first page. Then, run a Plugin Command for a "Call Event: Remote Read" on the second page to reference the event list on the first page. That does the same exact thing.
This technique helps keeps things organized and makes it easier to find the events you're looking for. For a quick list of the labels I'm using, here they are:
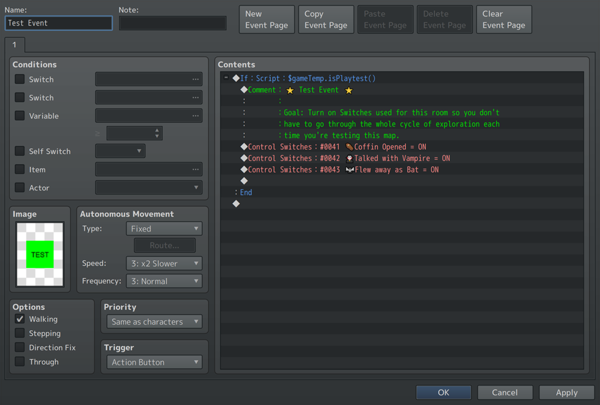
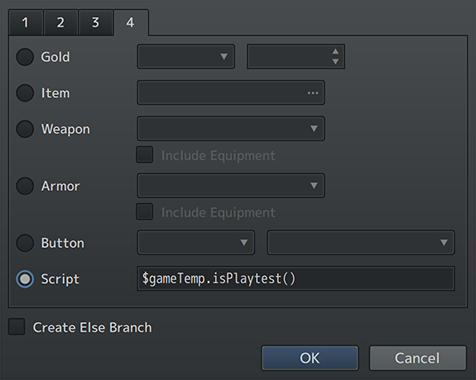
4. Test Events Release-ProofingPlay Test VariantYou know the thing where we make a "temporary" event on the map we're currently making? And fill it up with things to turn on switches and stuff or give free items to quickly speed up the play testing part? Yeah, we all do that. Every game dev does that, not just those who work in RPG Maker. However, what every game dev shares as a primal fear is that we forget to remove those "temporary" events. Some of these were left behind in some classic RPG Maker horror games and were even used as a part of their speedruns. While it may be cool for viewers to see and use debug tricks, for us game developers, this is often embarrassing and brings shame to the whole family. Thankfully, there's a way to remedy this in RPG Maker: By using a Conditional Branch and a Script condition that uses the following JavaScript code: $gameTemp.isPlaytest() we save ourselves from bringing forth generational game dev trauma. This is what I call "release-proof" test events.
What this little bit of code does when used inside the Conditional Branch's Script condition is that it makes sure that the game is in a "play test" state before the event commands inside can be used. What this means is that as long as we keep all of the "debug-only" "play test-only" event commands inside of the Conditional Branch, there is no way the player can access the contents of this test event. Unless of course, they play the game through the RPG Maker client, in which case, they already have more than enough tools to cheat and modify your game.
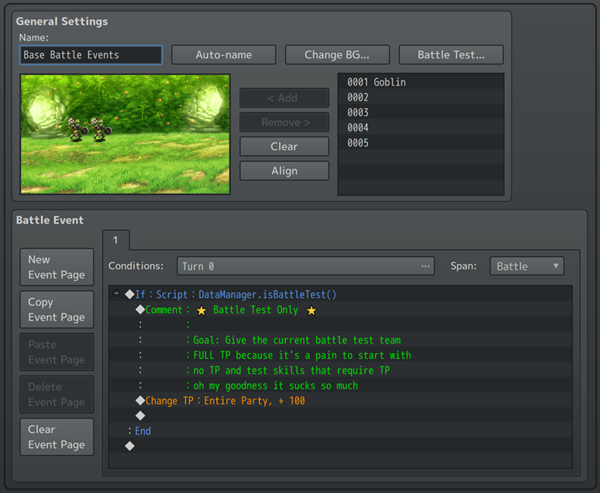
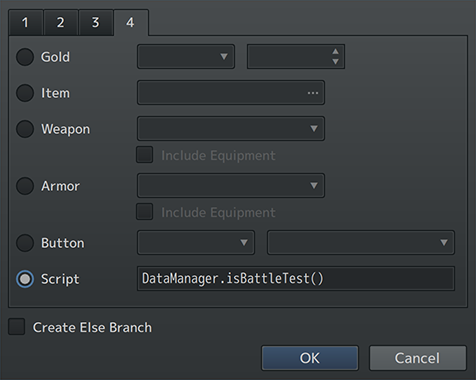
Battle Test VariantThis can also be taken a step further with Battle Tests from the Troops tab. Once again, using a Conditional Branch event command and using the Script condition with the following code instead of the previous one: DataManager.isBattleTest() we set up an event that will only run during battle test through the Troops tab in the database. This is useful for things like giving everybody enough TP or providing everybody the right amount of items or right skills. Whatever the case is, it is dreadful when you forget to remove the thing you were testing and have it appear in gameplay. Combine this with the Battle Core's Base Troops feature (RPG Maker MZ) and you can have something occur for every battle test. For those wondering the, RPG Maker MV variant is the Base Troop Events plugin.
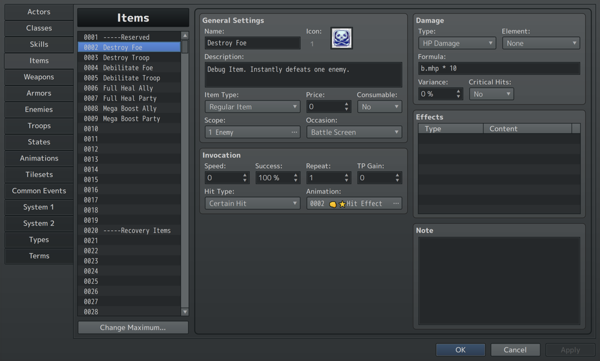
5. Debug Items for Speed TestingIt's not unusual to make items for testing purposes. However, not every dev makes them optimally. They're sometimes found at in the form of a skill or in the middle of a list or they don't have all the necessary properties to make it work right for all conditions. And most importantly, they're not make for speed testing.
So a few things first: Why the focus speed testing? Because sometimes, we have to play through segments of a game over and over to make sure all the events and such line up. But when it comes to battles, either random or touch encounters, or even boss encounters, play testers don't have the time to grind and build up EXP and gear to quickly get through them. Therefore, having access to "speed testing" functions greatly helps with the play testing and debugging aspect, especially if it means you can skip the battling aspect. Some might argue that testing battles are an important part of the playtesting aspect and you're right. However, it's important to have the ability to separate testing battles from testing the rest of the game and that's what these debug items are for.
Second question you might have: Why items? Why not make them debug skills instead? Items, in most RPG Maker projects, are generally universally accessible across all party members. This means that as long as you have these debug items in the your inventory, anyone can use them as long as it's their turn in battle. Having universal global access to them also means better speed testing. The second reason you make them items is because as long as you have them in the inventory, you don't need to worry about meeting MP costs, sealed skill types, having the right skill type access, etc. More importantly, you can also set these debug items to NOT consume themselves when used, meaning they're infinite usage for free. And as they're also items, they skip what most plugins use as "cast animations" to further improve on the speed testing aspect.
Third question you might have: Why at the top of the Database's Item List This is because, usually, items are listed in-game from lowest ID to highest ID. This means that items at the top of the database's item list will be shown in battle first. Being shown in battle first means less time spent scrolling through huge item lists to find the specific item you need to solve the battle and move on. This is also done for speed testing.
So what kinds of debug items do I recommend?
The Instant KO item usages are pretty obvious. Same goes for the Full heal + recovery items. However, the reason you want separate items for buffs, debuffs, states, etc. is to test the limitations of what players are capable of doing and making sure the battle is still playable to your standards at that point. Soren Johnson said that players will often try to "Optimize the fun out of a game". With these items, you can test to see if that at such "optimized" game states if the battle still remains fun and meets your standard.
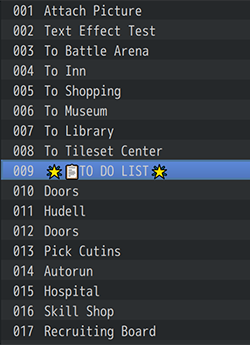
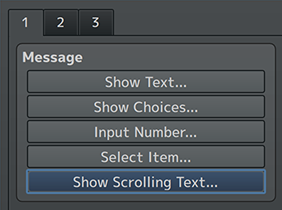
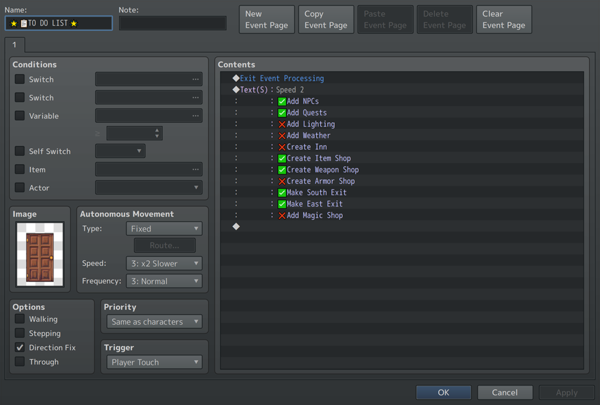
6. In-Editor To Do ListI know many of you probably have neat little Trello boards, note boards, and such set up and that's fine! But for someone like me who prefers something in the editor, you can try this: In each map, you can set up one of your events, preferably a decoration event as a "To Do List" container event. Optionally, add an emoji into the name to make it easier to distinguish from other events. This way, when you're editing a specific map, and you're wondering what else you have to do for that map, just open up the local "To Do List" container event. I have these on each map so that way, I don't have to go on a sidequest to search for the specific list of things I need to be done for a specific map. This is because as the number of maps grow, so will that Trello board or note board. Yet, this container event containing all the "To Do's" you've gotta do will prove to do exactly what you need. So how do I set it up on the inside of the container event? That's simple. I use this event command that people rarely use: That's right, Show Scrolling Text and there's a simple reason for it: It's because the otherwise obvious Comment event command only allows you 6 lines of entries before you need to create a new one. The Show Scrolling Text allows you unlimited lines. Now, you can also use Script for that, depending on if you're using RPG Maker MZ and one of the more updated versions. However, if you're using RPG Maker MV or your MZ version is much lower, you're out of luck with Script and Show Scrolling Text is your go to for unlimited lines. You may also notice that I have a Exit Event Processing event command in the screenshot above. This is to prevent the player from randomly examining the "To Do List" event container and activating the contents. Make sure you place it above the Show Scrolling Text To Do list.
7. Story Outline Map + Cutscene HubSimilar to the above "To Do List" container event, for this particular map, we have an entire map with each event dedicated to being a "To Do List" for each chapter. With each event as its own "To Do List", it's easier to find the contents of what you need to do for each entry. While note taking apps are great if you want to go deep into the lore, this helps keep things focused in the editor itself. Personally speaking, I have a better time concentrating on making progress with the game when I don't have multiple programs and apps open, too. Just like the above "To Do List" tip, we use the Show Scrolling Text event command to list the stuff we need. For the purpose of this screenshot, I trimmed the excess notes, but overall, it should give you a general idea of what's done. Now, you might have noticed I don't have the Exit Event Process event here. That's because normally, players won't be able to access this map anyway. Instead, it's just for you, the game developer(s). However, I did stick the Show Scrolling Text "To Do List" inside a conditional branch whose conditions will never be met. The easiest way to do this is to use a "Script Call" for "false". The reason for that is because this event is also usable for debugging and playtesting purposes. I've set up this map as a little hub for me, the game dev, to quickly jump and transfer to different cutscenes and play them out. It's just a simple Show Message and Show Choice event command combination. Each Show Choice leads to a map transfer. Prior to each map transfer, I set up the switch and/or variable conditions needed to trigger the cutscenes. This is entirely optional of course, but hey, the more playtesting tools we have, the better.
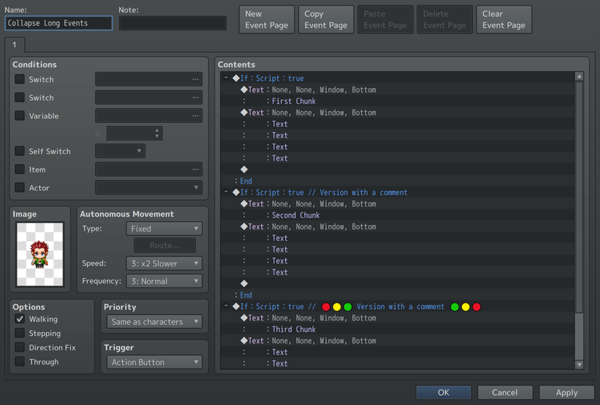
8. Collapse Long EventsDo you have events or Common Events with really really long lists of events and wish there was a better way of scrolling past segments/chunks of it? Well, there's a way to do that, and it is using the Conditional Branch event command. Note: This only works on later versions of RPG Maker MZ. The trick here is to make a Conditional Branch that will always meet its condition. I prefer to use a "Script Call" for "true" but some people may have concerns that it's an eval. If so, don't worry. This can be done a number of ways like using a switch that will ALWAYS be in the OFF position. This allows the event commands in between to always occur. Name the Switch something like "Always OFF" to remind you to never turn it on.
Then, insert the event commands in the chunks you want inside of the Conditional Branch. It doesn't matter how large or small the chunk. Personally, I just do it based on the stuff I know I won't revise.
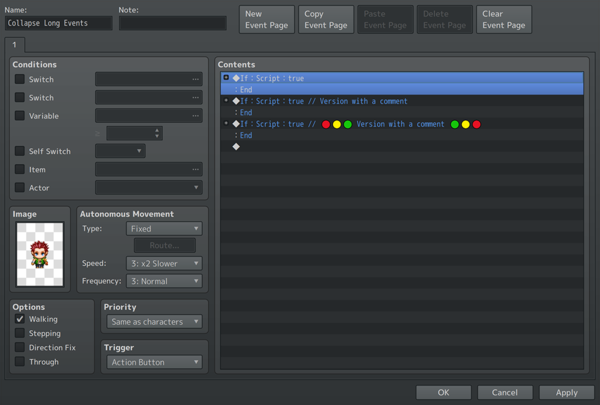
Then, by pressing the - to the left of the conditional branch, you collapse the event list into something thinner. This lets you quickly navigate to parts you're still working on or need revising for. Additionally, add a comment to let you know which chunk is used for what. 9. Useful Script Calls for RPG MakerI won't be including the more commonly listed script calls. You can view those on their own there. If you are using these script calls, I will assume you have at least a basic level of understanding of JavaScript to be able to modify these. If you don't, I DO NOT recommend that you use these. I am not responsible for any kind of damage this may do to your game. Nor am I responsible for teaching you how to use these for your game aside from what is written here.
Batch Switch Statesconst switchBatch = [
123, 456, 789
];
switchBatch.forEach(switchID => $gameSwitches.setValue(switchID, true));
Takes the batch of switch ID's and sets all of their switch states to ON.
const switchBatch = [
    123, 456, 789
];
switchBatch.forEach(switchID => $gameSwitches.setValue(switchID, false));
Takes the batch of switch ID's and sets all of their switch states to ON.
const switchBatch = [
    123, 456, 789
];
switchBatch.forEach(switchID => $gameSwitches.setValue(switchID, !$gameSwitches.value(switchID)));
Takes a batch of switch ID's and inverts their switch states. If it was ON before, it becomes OFF now. If it was OFF before, it becomes ON now.
Batch Variablesconst varBatch = [
123, 456, 789
];
const value = 42069;
varBatch.forEach(varID => $gameVariables.setValue(varID, value));
Takes a batch of variables and sets them all to the same value.
Batch Self Switchesconst mapID = 123;
const eventBatch = [
2, 4, 6, 8, 10
];
const letterBatch = [
'A', 'B', 'C', 'D'
];
const state = true;
eventBatch.forEach(eventID => letterBatch.forEach(letter => $gameSelfSwitches.setValue([mapID, eventID, letter], state)));
Pick a map, pick the event ID's, and pick the letters. Set the state to "true" or "false". This script call will go through every listed event's associated self switches and set them to that state. This is helpful for doing things like resetting puzzles or altering the game state of a particular set of events.
Game System SoundsIf you've ever wanted to play your in-game system sounds to make some event systems feel more natural, use these: SoundManager.playCursor(); SoundManager.playOk(); SoundManager.playCancel(); SoundManager.playBuzzer(); SoundManager.playEquip(); SoundManager.playSave(); SoundManager.playLoad(); SoundManager.playBattleStart(); SoundManager.playEscape(); SoundManager.playEnemyAttack(); SoundManager.playEnemyDamage(); SoundManager.playEnemyCollapse(); SoundManager.playBossCollapse1(); SoundManager.playBossCollapse2(); SoundManager.playActorDamage(); SoundManager.playActorCollapse(); SoundManager.playRecovery(); SoundManager.playMiss(); SoundManager.playEvasion(); SoundManager.playMagicEvasion(); SoundManager.playReflection(); SoundManager.playShop(); SoundManager.playUseItem(); SoundManager.playUseSkill(); Not all at once, of course. Their functions are exactly what their function names are. Yes, you could technically use the Play SE event command to do the same thing. However, this will not only save you the time to replicate the exact volume, pitch, and pan settings, it will also keep things "consistent" throughout the game. Sometimes you may want to change a sound effect later because it doesn't fit the game or something. This will update to whatever that is without you needing to go back through your event systems and update every Play SE event command instance.
Mass Erase Picturesfor (let id = 1; id <= 100; id++) $gameScreen.erasePicture(id); This will loop from 1 to 100 to erase all pictures. No more need to do this one at a time with the event command and save yourself the tedium. In case anyone is wondering, yes, it is safe to "erase" pictures that haven't been shown.
10. Useful Script Calls for Play TestingI won't be including the more commonly listed script calls. You can view those on their own there. If you are using these script calls, I will assume you have at least a basic level of understanding of JavaScript to be able to modify these. If you don't, I DO NOT recommend that you use these. I am not responsible for any kind of damage this may do to your game. Nor am I responsible for teaching you how to use these for your game aside from what is written here.
Acquire All Items, Weapons, and Armorsconst databases = [$dataItems, $dataWeapons, $dataArmors];
for (const database of databases) {
for (const obj of database) {
if (!obj) continue;
if (obj.name.trim().length <= 0) continue;
if (obj.name.includes('-----')) continue;
if (obj.itypeId === 2) continue;
const amount = Math.max($gameParty.maxItems(obj) - 9, 1);
$gameParty.gainItem(obj, amount);
}
}
What this script call does is it will give you every single item, weapon, and armor in your game but with some exceptions. These exceptions are any items that don't have a name, have "-----" in their name (thus a divider), or is a key item. The amount of these items gained will be the maximum amount minus 9, with a minimum quantity of 1. This is for play testing purposes to make sure that you or whoever the play tester is has access to all the resources they need for whatever it is that they are testing.
Acquire All Skills for All Party Membersconst actors = $gameParty.members();
for (const skill of $dataSkills) {
if (!skill) continue;
if (skill.name.trim().length <= 0) continue;
if (skill.name.includes('-----')) continue;
if (skill.stypeId <= 0) continue;
actors.forEach(actor => actor.learnSkill(skill.id));
}
for (let i = 1; i < $dataSystem.skillTypes.length - 1; i++) {
actors.forEach(actor => actor.actor().traits.push({ code: 41, dataId: i, value: 0 }));
}
What this script call does is it will teach every actor in the current party all skills available in the game but with some exceptions. The exceptions are any skills that don't have a name, have "-----" in their name (thus a divider), or does not have a skill type ("none" as the skill type). This will also (temporarily) grant all actors in the party access to all skill types, too. This effect will disappear if you reset/reload the game regardless of whether or not you've saved. The skills will remain if you do save and reset/reload the game. As you would imagine, this is for play testing purposes to make sure that you or whoever the play tester is to have access to all the skills (and skill types) to test whatever battle or skill combination they need.
Acquire Learnable Skills for All Party MembersLet's say you don't want to acquire ALL skills for all party members. That's fine, I get it. It's a huge list to scroll through and that gets annoying. Here's a more compact version of it and only teaches the skills that actors would learn through leveling up: const actors = $gameParty.members();
for (const actor of actors) {
if (!actor) continue;
const learnings = actor.currentClass().learnings;
for (const learning of learnings) {
if (!learning) continue;
actor.learnSkill(learning.skillId);
}
}
This loops through all the current party members and teaches them every skill that would be learned through level ups in their current class. Now, if you're a cultured individual and have skills taught through the Skill Learn System, here's how you can do it, too:
RPG Maker MZ: Skill Learn System VisuStella MZ const actors = $gameParty.members();
for (const actor of actors) {
if (!actor) continue;
const skillIDs = DataManager.getSkillLearnSkillsFromClass(actor.currentClass().id);
for (const skillID of skillIDs) {
actor.learnSkill(skillID);
}
}
RPG Maker MV: Skill Learn System (YEP) const actors = $gameParty.members();
for (const actor of actors) {
if (!actor) continue;
const skillIDs = actor.currentClass().learnSkills;
for (const skillID of skillIDs) {
actor.learnSkill(skillID);
}
}
Use these with the the "DataManager.isBattleTest()" conditional branch for your troops tab to quickly gain access to all the skills your test characters can learn.
End of Article |
