Difference between revisions of "Category:Script Calls (MV)"
| Line 2: | Line 2: | ||
== [[Action Cutin (Irina)|Action Cutin]] == | == [[Action Cutin (Irina)|Action Cutin]] == | ||
| − | <html><img src='https://img.itch.zone/aW1nLzIwNDU1MjgucG5n/original/d4xNHK.png' width=' | + | <html><img src='https://img.itch.zone/aW1nLzIwNDU1MjgucG5n/original/d4xNHK.png' width='300'></html> |
Action cutins can be called upon and used in either in battle or on the map screen. To call them, there's various ways of doing so. Look below for instructions on how to get each one working. These require knowledge of how to use JavaScript to utilize. I am not responsible for improper usage or teaching you how to use JavaScript so you can further use these. If you wish to understand how to use RPG Maker MV's JavaScript base, I suggest taking a look at Trihan's "Jump Into JavaScript" article found here: | Action cutins can be called upon and used in either in battle or on the map screen. To call them, there's various ways of doing so. Look below for instructions on how to get each one working. These require knowledge of how to use JavaScript to utilize. I am not responsible for improper usage or teaching you how to use JavaScript so you can further use these. If you wish to understand how to use RPG Maker MV's JavaScript base, I suggest taking a look at Trihan's "Jump Into JavaScript" article found here: | ||
| Line 10: | Line 10: | ||
; Single Battler Action Cutin | ; Single Battler Action Cutin | ||
| − | <html><img src='https://img.itch.zone/aW1nLzIwNDUxODcuZ2lm/original/Ns7Jix.gif' width=' | + | <html><img src='https://img.itch.zone/aW1nLzIwNDUxODcuZ2lm/original/Ns7Jix.gif' width='300'></html> |
<pre> | <pre> | ||
| Line 31: | Line 31: | ||
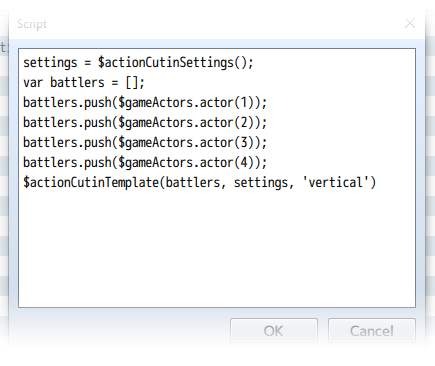
; Multiple Battlers Action Cutin | ; Multiple Battlers Action Cutin | ||
| − | <html><img src='https://img.itch.zone/aW1nLzIwNDUxODguZ2lm/original/cbQMAW.gif' width=' | + | <html><img src='https://img.itch.zone/aW1nLzIwNDUxODguZ2lm/original/cbQMAW.gif' width='300'></html> |
<pre> | <pre> | ||
| Line 67: | Line 67: | ||
; Custom Settings | ; Custom Settings | ||
| − | <html><img src='https://img.itch.zone/aW1nLzIwNDU1MzUuZ2lm/original/5x2Lbe.gif' width=' | + | <html><img src='https://img.itch.zone/aW1nLzIwNDU1MzUuZ2lm/original/5x2Lbe.gif' width='300'></html> |
If you don't like the settings made in certain skills/items or would just like to create your own without having to create new skills/items, then start with the following code. | If you don't like the settings made in certain skills/items or would just like to create your own without having to create new skills/items, then start with the following code. | ||
| Line 133: | Line 133: | ||
; Changing Battler Face Cutins | ; Changing Battler Face Cutins | ||
| − | <html><img src='https://img.itch.zone/aW1nLzIwNDU1MzkucG5n/original/rtCW5T.png' width=' | + | <html><img src='https://img.itch.zone/aW1nLzIwNDU1MzkucG5n/original/rtCW5T.png' width='300'></html> |
<pre> | <pre> | ||
Revision as of 20:43, 24 June 2019


|
VisuStella, Caz Wolf, Fallen Angel Olivia, Atelier Irina, and other affiliated content creators.
Contents
Action Cutin
Action cutins can be called upon and used in either in battle or on the map screen. To call them, there's various ways of doing so. Look below for instructions on how to get each one working. These require knowledge of how to use JavaScript to utilize. I am not responsible for improper usage or teaching you how to use JavaScript so you can further use these. If you wish to understand how to use RPG Maker MV's JavaScript base, I suggest taking a look at Trihan's "Jump Into JavaScript" article found here:
https://rpgmaker.net/tutorials/1230/
- Single Battler Action Cutin
var battler = $gameActors.actor(1);
var settings = $actionCutinSettings();
$actionCutin(battler, settings);
- This will create a singular cutin of the designated battler while using the default cutin settings defined in the Plugin Parameters. In the above example, it creates a singular action cutin of actor 1 while using the default cutin settings.

var battler = $gameActors.leader();
var settings = $actionCutinSettings($dataSkills[10]);
$actionCutin(battler, settings);
- This will create a singular cutin of the designated battler while using the cutin settings associated with a skill's notetags in the database. In the above example, it creates a singular action cutin of the party leader while using skill 10's notetag settings.

var battler = $gameTroop.members()[0];
var settings = $actionCutinSettings($dataItems[20]);
$actionCutin(battler, settings);
- This will create a singular cutin of the designated battler while using the cutin settings associated with an item's notetags in the database. In the above example, it creates a singular action cutin of the game troop member with index 0 while using item 20's notetag settings.
- Multiple Battlers Action Cutin
var battlers = [];
battlers.push($gameActors.actor(1));
battlers.push($gameActors.actor(2));
battlers.push($gameActors.actor(3));
battlers.push($gameActors.actor(4));
var settings = $actionCutinSettings($dataSkills[10]);
var template = 'Horizontal';
$actionCutinTemplate(battlers, settings, template);
- This uses the templates found in the Plugin Parameters to create multiple cutins of battlers at a time and using certain notetag settings from a designated skill selected by the game dev. In the above example, actors 1 through 4 are listed as a part of the battlers, with notetag settings from skill 10 in the database, and the 'Horizontal' template that's defined in the Plugin Parameters.

var battlers = [];
battlers.push($gameParty.members()[0]);
battlers.push($gameParty.members()[1]);
battlers.push($gameParty.members()[2]);
battlers.push($gameParty.members()[3]);
var settings = $actionCutinSettings($dataItems[20]);
var template = 'Vertical';
$actionCutinTemplate(battlers, settings, template);
- This uses the templates found in the Plugin Parameters to create multiple cutins of battlers at a time and using certain notetag settings from a designated item selected by the game dev. In the above example, party members with an index value between 0 and 3 are listed as a part of the battlers, with notetag settings from item 20 in the database, and the 'Vertical' template that's defined in the Plugin Parameters.

var battlers = [];
battlers.push($gameTroop.members()[0]);
battlers.push($gameTroop.members()[1]);
battlers.push($gameTroop.members()[2]);
battlers.push($gameTroop.members()[3]);
var settings = $actionCutinSettings();
var template = 'Horizontal';
$actionCutinTemplate(battlers, settings, template);
- This uses the templates found in the Plugin Parameters to create multiple cutins of battlers at a time and using the default cutin settings defined in the Plugin Parameters. In the above example, enemy troop members with an index value between 0 and 3 are listed as a part of the battlers, with default cutin settings, and the 'Horizontal' template that's defined in the Plugin Parameters.
- Custom Settings
If you don't like the settings made in certain skills/items or would just like to create your own without having to create new skills/items, then start with the following code.
var settings = $actionCutinSettings();
This grabs the default cutin settings. As long as you modify it before inserting it into $actionCutin or $actionCutinTemplate, then the settings will behave differently from the default. Below is a list of the various things you can do to your code to change it up. You're not required to use all of them. Just pick the settings alterations that need changing.
settings.backgroundImg = 'Speedlines';
settings.backgroundHue = 0;
settings.blendMode = 1;
settings.borderThickness = 5;
settings.borderColor = 'black';

settings.x = 0;
settings.y = Graphics.boxHeight / 2;
settings.width = Graphics.boxWidth;
settings.height = 300;
settings.speedX = 40;
settings.speedY = 0;

settings.shiftDistanceX = 480;
settings.shiftDistanceY = 0;
settings.shiftFrames = 16;

settings.flash = true;
settings.flashColor = [255, 255, 255, 170];
settings.flashDuration = 20;

settings.shake = true;
settings.shakePower = 5;
settings.shakeSpeed = 5;
settings.shakeDuration = 20;

settings.sound = true;
settings.soundName = 'Magic3';
settings.soundVolume = 90;
settings.soundPitch = 150;
settings.soundPan = 0;

settings.duration = 90;
settings.opacitySpeed = 16;

settings.forcedScale = 2.0;
settings.forcedAntiAlias = false;
settings.forcedOffsetX = 0;
settings.forcedOffsetY = 0;
Pick and choose the setting changes you want before inserting them into $actionCutin or $actionCutinTemplate's arguments. Below is an example of how to use it in a complete script call.
var battler = $gameParty.leader();
var settings = $actionCutinSettings();
settings.backgroundHue = 180;
settings.blendMode = 0;
$actionCutin(battler, settings);
The above script call changes the speedlines to have a hue of 180 while changing the blend mode to 'Normal'. A regular single battler action cutin is then used through the $actionCutin function.
- Changing Battler Face Cutins
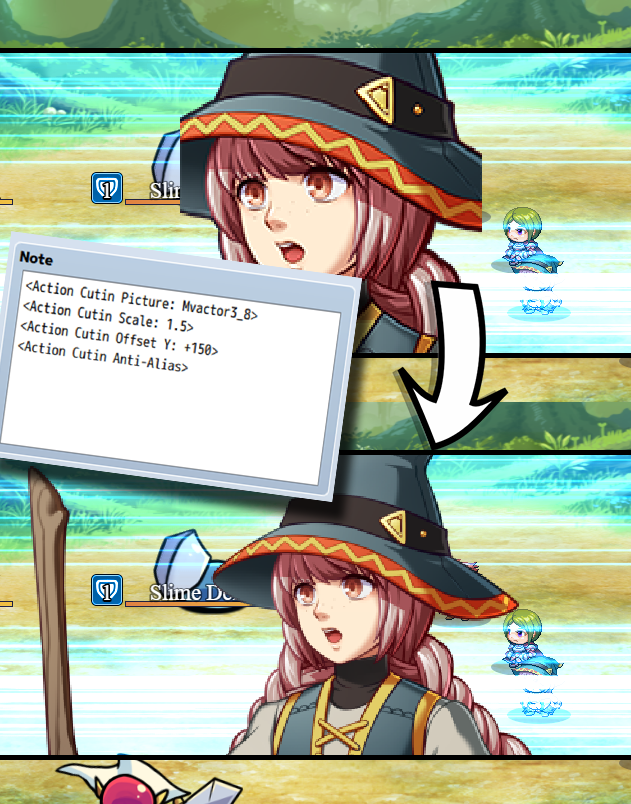
var battler = $gameActors.actor(1);
battler.changeActionCutinFaceData(type, filename, index, hue);
- Replace 'type' with 'picture', 'face', 'svbattler', or 'battler' (keep the quotes). This determines the type of asset to use.
- Replace 'filename' with the filename of the associated graphic.
- The filename is case sensitive!
- Replace 'index' with a numeric value starting from 0 to determine the cell.
- Index is used with 'face' and 'svbattler'.
- Replace 'hue' with a numeric value (0 to 360) to determine its hue.
- Hue is used with 'battler'.

var battler = $gameActors.actor(1);
battler.changeActionCutinFaceScale(scale);
- Replace 'scale' with a numeric value to determine the cutin's scale.
- 1.0 is 100%. 0.5 is 50%. 2.25 is 225%.

var battler = $gameActors.actor(1);
battler.changeActionCutinFaceOffset(offsetX, offsetY);
- Replace 'offsetX' and 'offsetY' with numeric values to determine how many pixels to offset the face cutin by.

var battler = $gameActors.actor(1);
battler.changeActionCutinFaceAntiAlias(boolean);
- Replace 'boolean' with 'true' or 'false' (remove the quotes) to determine if the face cutin graphic will use anti-alias or not.

var battler = $gameActors.actor(1);
battler.clearActionCutinFaceData();
- Removes all changes made to the designated battler regarding face cutins. This will revert the battler to using its original face cutin data that's made through notetags or through the plugin's defaults.
Visual Novel Busts
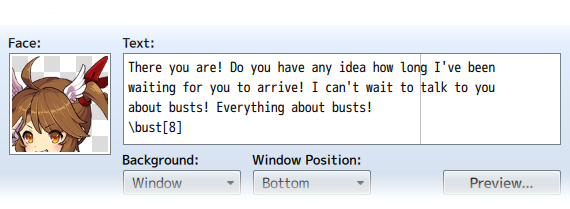
- Displaying a Bust
Does exactly what it means, display a bust. There are 11 busts that can be controlled. 0 is the Message Window's bust graphic. 1 through 10 are the busts that are shown on the screen behind the Message Window.
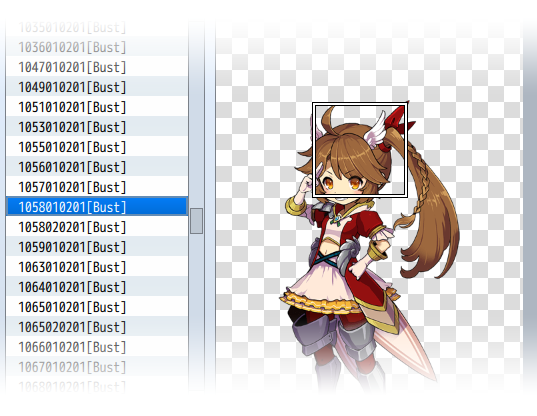
Insert [BUST] into the filenames of face graphics and they will be setup automatically to change as the bust graphic. Harold.png will become Harold[BUST].png. This makes it unnecessary for you to use \bust[0] every time you want to set a bust to the message window itself. This only works for images in the img/faces/ folder.
Script Call:
     $bust(id).loadBitmap('face', 'filename')
     $bust(id).loadBitmap('picture', 'filename')
     - Replace id with the bust ID you want to implant the face graphic on.
       - 0 if you want to use the message bust.
       - 1 through 10 if you want to use the screen busts.
     - Decide if you're going to load from img/faces/ or img/pictures/
     - Replace 'filename' with the exact case sensitive filename of the file
     while keeping the quotes.
     - Examples:
       - $bust(0).loadBitmap('face', 'Harold[BUST]')
       - $bust(1).loadBitmap('picture', 'Therese[BUST]')
- Clear
Clearing a bust removes it from view and resets it to the default settings so that the next time it's used, it will be a fresh slate. This is done automatically for message busts after the Message Window closes. A plugin parameter setting can be turned on to make all busts clear after an event finishes running.
Script Call:
     $bust(id).clear(duration)
     - Replace id with the bust ID you want to affect.
       - 0 if you want to affect the message bust.
       - 1 through 10 if you want to affect the screen busts.
     - (Optional) Replace duration with how long it takes to clear.
       - If no duration is used, then use the value in the plugin parameters
     - Examples:
       - $bust(0).clear()
       - $bust(2).clear(20)
- Expressions
If you have set up a bust to use expressions, you can use this text code to change the expression of the bust. Please refer to the "Expression List" part of the help section up above to learn how to set up busts to make an expression sheet.
Script Call:
     $bust(id).setExpression(expression)
     - Replace id with the bust ID you want to affect.
       - 0 if you want to affect the message bust.
       - 1 through 10 if you want to affect the screen busts.
     - Replace expression with either a number index or the string that is
       associated with that expression to display the wanted expression.
     - Examples:
       - $bust(0).setExpression(1)
       - $bust(2).setExpression('Angry')
- Battle Animations
You can play battle animations on the busts to depict actions, emotions, whatever you want them to do. These will play the battle animation only once before closing out.
Script Call:
     $bust(id).startAnimation(ani, mirror, delay)
     - Replace id with the bust ID you want to affect.
       - 0 if you want to affect the message bust.
       - 1 through 10 if you want to affect the screen busts.
     - Replace ani with the ID of the battle animation
       - Alternatively, you can type out the battle animation's name, too.
         If you do, make it into a string for the Script Call.
     - (Optional) Replace mirror with true/face to mirror the animation.
     - (Optional) Replace delay with the frames to wait before playing.
     - Examples:
       - $bust(0).startAnimation(5)
       - $bust(2).startAnimation('Healing One 2', true, 20)
- Repeating Battle Animations

Play battle animations repeatedly instead of one time. Otherwise, this is the same as playing regular battle animations. Repeating animations will stop automatically for message busts when the window closes. For screen busts, they will vanish once the event terminates.
Script Call:
     $bust(id).setupRepeatingAnimation(ani, mirror, delay)
     - Replace id with the bust ID you want to affect.
       - 0 if you want to affect the message bust.
       - 1 through 10 if you want to affect the screen busts.
     - Replace ani with the ID of the battle animation
       - Alternatively, you can type out the battle animation's name, too.
         If you do, make it into a string for the Script Call.
     - (Optional) Replace mirror with true/face to mirror the animation.
     - (Optional) Replace delay with the frames to wait before playing.
     - Examples:
       - $bust(0).setupRepeatingAnimation(5)
       - $bust(2).setupRepeatingAnimation('Healing One 2', true, 20)
- Clear Repeating Battle Animation
Put an end to a repeating battle animation because otherwise that is going to go on forever until the currently running event fully terminates.
Script Call:
     $bust(id).clearRepeatingAnimation();
     - Replace id with the bust ID you want to affect.
       - 0 if you want to affect the message bust.
       - 1 through 10 if you want to affect the screen busts.
     - Examples:
       - $bust(0).clearRepeatingAnimation();
       - $bust(3).clearRepeatingAnimation();
- Move To
Allows bust sprites to move to specific x and y coordinates. This does not work for message busts as they're locked to the Message Window.
Script Call:
     $bust(id).moveTo(x, y, duration)
     - Replace id with the bust ID you want to affect.
       - 1 through 10 if you want to affect the screen busts.
     - Replace x with the x coordinate on the screen to move to.
     - Replace y with the y coordinate on the screen to move to.
     - (Optional) Replace duration with how long it takes to move there.
       - If no duration is used, then use the value in the plugin parameters
     - Examples:
       - $bust(1).moveTo(640, 720)
       - $bust(5).moveTo(100, 360, 60)
- Move By
Allows bust sprites to move relative to their current position. This does not work for message busts as they're locked to the Message Window.
Script Call:
     $bust(id).moveBy(+x, +y, duration)
     $bust(id).moveBy(-x, -y, duration)
     - Replace id with the bust ID you want to affect.
       - 1 through 10 if you want to affect the screen busts.
     - Replace x with how far left(-) or right(+) to move by.
     - Replace y with how far up(-) or down(+) to move by.
     - (Optional) Replace duration with how long it takes to move there.
       - If no duration is used, then use the value in the plugin parameters
     - Examples:
       - $bust(1).moveBy(-100, +0)
       - $bust(5).moveBy(+200, -50, 60)
- Move Home
Returns a bust sprite back to the home position. For those moments you're too confused, lazy, or both to figure out how to bring a bust sprite back to the original coordinates it was in. This does not work for message busts as they're locked to the Message Window.
Script Call:
     $bust(id).moveHome(duration)
     - Replace id with the bust ID you want to affect.
       - 1 through 10 if you want to affect the screen busts.
     - (Optional) Replace duration with how long it takes to move there.
       - If no duration is used, then use the value in the plugin parameters
     - Examples:
       - $bust(1).moveHome()
       - $bust(4).moveHome(60)
- Move Type
Allows you to adjust the rate, acceleration, and easing when a bust moves.
Script Call:
     $bust(id).moveType('type')
     - Replace id with the bust ID you want to affect.
       - 1 through 10 if you want to affect the screen busts.
     - Replace type with the movement type. Look below for a list.
     - Examples:
       - $bust(0).moveType('Linear')
       - $bust(4).moveType('OutBounce')

Types:
     Linear ......... No easing, no acceleration

     InSine ......... Slight acceleration from zero to full speed
     OutSine ........ Slight deceleration at the end
     InOutSine ...... Slight accel. at beginning and slight decel. at end

     InQuad ......... LV2 Accelerating from zero velocity
     OutQuad ........ LV2 Decelerating to zero velocity
     InOutQuad ...... LV2 Acceleration until halfway, then deceleration

     InCubic ........ LV3 Accelerating from zero velocity
     OutCubic ....... LV3 Decelerating to zero velocity
     InOutCubic ..... LV3 Acceleration until halfway, then deceleration

     InQuart ........ LV4 Accelerating from zero velocity
     OutQuart ....... LV4 Decelerating to zero velocity
     InOutQuart ..... LV4 Acceleration until halfway, then deceleration

     InQuint ........ LV5 Accelerating from zero velocity
     OutQuint ....... LV5 Decelerating to zero velocity
     InOutQuint ..... LV5 Acceleration until halfway, then deceleration

     InExpo ......... Accelerate exponentially until finish
     OutExpo ........ Initial exponential acceleration slowing to stop
     InOutExpo ...... Exponential acceleration and deceleration

     InCirc ......... Increasing velocity until stop
     OutCirc ........ Start fast, decreasing velocity until stop
     InOutCirc ...... Fast increase in velocity, fast decrease in velocity

     InBack ......... Slow movement backwards then fast snap to finish
     OutBack ........ Fast snap to backwards point then slow to finish
     InOutBack ...... Back In, then Back Out

     InElastic ...... Bounces slowly then quickly to finish
     OutElastic ..... Fast acceleration, bounces to zero
     InOutElastic ... Slow start and end, two bounces sandwich a fast motion

     InBounce ....... Bounce increasing in velocity until completion
     OutBounce ...... Bounce to completion
     InOutBounce .... Bounce in and bounce out
- Fade In, Fade Out
Fade in to 255 opacity or fade out 0 opacity. This can affect any bust and you can also declare the duration of the fading process.
Script Call:
     $bust(id).fadeIn(duration)
     $bust(id).fadeOut(duration)
     - Replace id with the bust ID you want to affect.
       - 0 if you want to affect the message bust.
       - 1 through 10 if you want to affect the screen busts.
     - (Optional) Replace duration with how long it takes to fade in or out.
       - If no duration is used, then use the value in the plugin parameters
     - Examples:
       - $bust(1).fadeIn()
       - $bust(6).fadeOut(40)
- Opacity To
If you don't want to fully change a bust's opacity to either 0 or 255, set it to whatever opacity level you want instead.
Script Call:
     $bust(id).opacityTo(opacity, duration)
     - Replace id with the bust ID you want to affect.
       - 0 if you want to affect the message bust.
       - 1 through 10 if you want to affect the screen busts.
     - Replace opacity with a number between 0 and 255 for how opaque it is.
     - (Optional) Replace duration with how long it takes to fade in or out.
       - If no duration is used, then use the value in the plugin parameters
     - Examples:
       - $bust(0).opacityTo(128)
       - $bust(7).opacityTo(64)
- Opacity By

This changes the opacity level of a bust relative to its current opacity instead of needing to put in an exact value.
Script Call:
     $bust(id).opacityBy(+opacity, duration)
     $bust(id).opacityBy(-opacity, duration)
     - Replace id with the bust ID you want to affect.
       - 0 if you want to affect the message bust.
       - 1 through 10 if you want to affect the screen busts.
     - Replace opacity with how much you wish to adjust the opacity by.
     - (Optional) Replace duration with how long it takes to change opacity.
       - If no duration is used, then use the value in the plugin parameters
     - Examples:
       - $bust(0).opacityBy(+32)
       - $bust(8).opacityBy(-64)
- Slide In, Slide Out
Sliding In and Sliding Out is a small move and fade in/out combo that is based around the bust's home position. This makes busts look like they're fading into the scene or fading out of them.
Script Call:
     $bust(id).slideIn(duration)
     $bust(id).slideInFromLeft(duration)
     $bust(id).slideInFromRight(duration)
     $bust(id).slideOut(duration)
     $bust(id).slideOutToLeft(duration)
     $bust(id).slideOutToRight(duration)
     - Replace id with the bust ID you want to affect.
       - 0 if you want to affect the message bust.
       - 1 through 10 if you want to affect the screen busts.
     - Use the FromLeft, FromRight, ToLeft, ToRight versions to control the
       direction the busts are going or leave it up to the plugin.
     - (Optional) Replace duration with how long it takes to slide in/out.
       - If no duration is used, then use the value in the plugin parameters
     - Examples:
       - $bust(0).slideIn()
       - $bust(9).slideOut(20)
- Mirror, Unmirror, MirrorToggle
Lets you set the bust sprite to mirror, unmirror, or toggle the mirror setting it currently has.
Script Call:
     $bust(id).mirror()
     $bust(id).unmirror()
     $bust(id).mirrorToggle()
     - Replace id with the bust ID you want to affect.
       - 0 if you want to affect the message bust.
       - 1 through 10 if you want to affect the screen busts.
     - Examples:
       - $bust(0).slideIn()
       - $bust(9).slideOut(100, 20)
- Scale To

This lets you change the scale of the bust sprite to an exact amount. Now, I know that sprites with a negative value for scale flip over, but these text codes and script calls will disable that. If you want to mirror something, use the mirror text codes for it.
Script Call:
     $bust(id).scaleTo(scale, duration)
     $bust(id).scaleToX(scale, duration)
     $bust(id).scaleToY(scale, duration)
     - Replace id with the bust ID you want to affect.
       - 0 if you want to affect the message bust.
       - 1 through 10 if you want to affect the screen busts.
     - Replace scale with a number value on how to scale it.
       - 0.5 is 50%. 1.0 is 100%. 1.5 is 150%.
     - (Optional) Replace duration with how long it takes to scale.
       - If no duration is used, then use the value in the plugin parameters
     - Use the X and Y variations if you want to adjust those specifically
     - Examples:
       - $bust(0).scaleTo(1.0)
       - $bust(2).scaleToX(0.5, 20)
       - $bust(4).scaleToX(2.5, 60)
- Scale By
This lets you change the scale of the bust sprite relative to its current scale value. This will work with an absolute value of the current scale to remove any confusion about how mirrored scaling works, so just treat a bust that is mirrored the same way you'd treat a bust that's not mirrored.
Script Call:
     $bust(id).scaleBy(+scale, duration)
     $bust(id).scaleByX(-scale, duration)
     $bust(id).scaleByY(+scale, duration)
     - Replace id with the bust ID you want to affect.
       - 0 if you want to affect the message bust.
       - 1 through 10 if you want to affect the screen busts.
     - Replace scale with a number value on how to scale it.
       - 0.5 is 50%. 1.0 is 100%. 1.5 is 150%.
     - (Optional) Replace duration with how long it takes to scale.
       - If no duration is used, then use the value in the plugin parameters
     - Use the X and Y variations if you want to adjust those specifically
     - Examples:
       - $bust(0).scaleBy(-1.0)
       - $bust(2).scaleToX(+0.5, 20)
       - $bust(4).scaleToX(-2.5, 60)
- Tone

Give busts a tone! Tones will tint the colors on a bust. The bust will then change its tint towards that tone over time.
Script Call:
     $bust(id).setTone(red, green, blue, gray, duration)
     - Replace id with the bust ID you want to affect.
       - 0 if you want to affect the message bust.
       - 1 through 10 if you want to affect the screen busts.
     - Replace red with a number between -255 and 255.
     - Replace green with a number between -255 and 255.
     - Replace blue with a number between -255 and 255.
     - Replace gray with a number between 0 and 255.
     - (Optional) Replace duration with how long it takes to change tone.
       - If no duration is used, then use the value in the plugin parameters
     - Examples:
       - $bust(0).setTone(-68, -68, 0, 68)
       - $bust(5).setTone(-68, -68, -68, 0, 60)
- Dim, Light
Dim and Light are preset tones that are primarily used for tinting busts. Usually visual novels will dim busts that aren't talking and light the busts that are. This is to speed up the process so that you don't have to type out a tone code every time. You can set the dim and light values in the plugin parameters. They'll also use the duration for tones if no duration is used to specify that specific dim or light tone change.
Script Call:
     $bust(id).dim(duration)
     $bust(id).light(duration)
     - Replace id with the bust ID you want to affect.
       - 0 if you want to affect the message bust.
       - 1 through 10 if you want to affect the screen busts.
     - (Optional) Replace duration with how long it takes to change tone.
       - If no duration is used, then use the value in the plugin parameters
     - Examples:
       - $bust(0).dim()
       - $bust(5).light(60)
- Mass Bust Script Calls
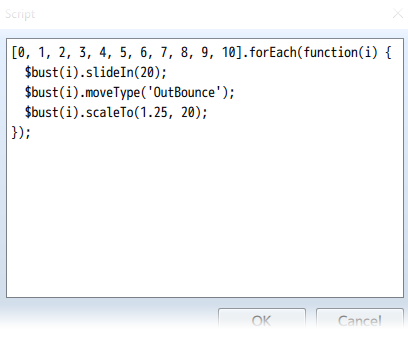
To have multiple busts do a bunch of things at once, you can use this piece of code in a script to accomplish it with whatever script call listed above.
[0, 1, 2, 3, 4, 5, 6, 7, 8, 9, 10].forEach(function(i) {
  $bust(i).slideIn(20);
  $bust(i).moveType('OutBounce');
  $bust(i).scaleTo(1.25, 20);
});
Replace the numbers in the array with the bust ID's that you want it to affect and whatever script calls in the middle after the $bust(i). Do not replace the i because that tells the code which bust to affect.
Any number that's not listed in that array won't have the bust associated with it performing any of the listed actions in the middle.
Pages in category "Script Calls (MV)"
The following 40 pages are in this category, out of 40 total.