Random Dungeon Maps VisuStella MZ


|
VisuStella, Caz Wolf, Fallen Angel Olivia, Atelier Irina, and other affiliated content creators.
Contents
- 1 Download
- 2 System
- 3 VisuStella MZ
- 4 Introduction
- 5 Requirements
- 6 Major Changes
- 7 Instructions - Quick Start (Plugin Assisted)
- 8 Instructions - Quick Start (Manual)
- 8.1 Step 1: Create the Cell Container Map
- 8.2 Step 2: Create 16 Individual Cell Maps
- 8.3 Step 4: Mark regions with the Individual Cell Maps
- 8.4 Step 5: Add Events to Cell Container Map
- 8.5 Optional Step: Add Events to Individual Cell Maps
- 8.6 Step 6: Make a Plugin Command on a Regular Map
- 8.7 Step 7: Play test! Try Out Your Random Dungeon Map!
- 9 Cell Container Map Rules
- 9.1 Cell Container Maps are Plugin Command targets.
- 9.2 Cell Container Maps contains its Cell Maps as children maps.
- 9.3 Cell Container Maps must have one of each exit Individual Cell Map.
- 9.4 Cell Container Map Properties Carried Over
- 9.5 Cell Container Map Events are Spawned First
- 9.6 Cell Container Map Events Require Location Notetags
- 10 Individual Cell Map Rules
- 11 Notetags
- 12 Plugin Commands
- 13 Plugin Parameters
- 14 Terms of Use
- 15 Credits
- 16 Changelog
- 17 See Also
- 18 End of Helpfile

Download
| ||
SystemThis is a plugin created for RPG Maker MZ. | ||
|
|
|
|
|
Click here for help on how to install plugins and an explanation on the Tier Hierarchy System. |
Click here to learn how to update plugins. |
Click here for how to troubleshoot plugins if you get an error. |


|
|
|
|
|
|
VisuStella MZThis plugin is a part of the VisuStella MZ Plugin Library.
Click here if you want to help support VisuStella on Patreon. IntroductionRPG Maker MZ's random "Genderate Dungeon" feature is pretty barebones and doesn't give you a means of generating dungeons in-game. This plugin seeks to remedy those problems by giving you, the game dev, full control over the way the randomized dungeon looks through cell maps, utilizes a better random dungeon layout algorithm, and generates them during gameplay allowing for a potential roguelike experience. Features include all (but not limited to) the following:
RequirementsThis plugin is made for RPG Maker MZ. This will not work in other iterations of RPG Maker.
This plugin is a Tier 2 plugin. Place it under other plugins of lower tier value on your Plugin Manager list (ie: 0, 1, 2, 3, 4, 5). This is to ensure that your plugins will have the best compatibility with the rest of the VisuStella MZ Plugin library.
Major ChangesThis plugin adds some new hard-coded features to RPG Maker MZ's functions. The following is a list of them. --- Map IDThe game is relatively unchanged for the most part. However, there are small modifications to the map properties when inside of Random Dungeon Map. The Map ID will no longer be a number, but instead, a text string consisting of the map's key name and floor. Be wary of this if you ever use the Map ID number for any reason and use it to compare to other numbers. Likewise, because of this, self switches will also utilize the text string name of the Map ID to grab and store data with. If you are referencing exact self switch data, you will need to keep this in mind. ---
Instructions - Quick Start (Plugin Assisted)Here are some instructions to get yourself started quickly on using the Random Dungeon Maps plugin with the aid of the plugin's Cell Map Generation Assistant feature. --- Step 1: Create the Cell Container Map
The Cell Container Map is the foundation map that determines which map cells are used when generating Random Dungeon Maps. --- Step 2: Make a Plugin Command on a Regular Map
This Plugin Command is normally used to send the player to a randomly generated dungeon map. However, since there are no cell maps found in the container map, a different occurrance will appear instead: --- Step 3: Play test to Utilize the Cell Map Generation Assistant.
This pop up system is the Cell Map Generation Assistant. It will generate very basic versions of all the cell map types the container map is missing. These maps will be 17x13 in size and will use tileset 4. The 9 tiles in the middle of each cell map will be marked with Region 1 as it is the default spawn region. As these maps are extremely basic in nature, you will still need to go back and edit them to make them appear the way you want. --- Step 4: Accept RPG Maker MZ's proposal to reload.
RPG Maker MZ will reload the game project and you can now see the newly added maps. As mentioned in the previous step, these maps are extremely basic and will need your attention in editing them to appear the way you want them to appear. --- Step 5: Play test! Try Out Your Random Dungeon Map!
Go back to Play Test and revisit the event with the Plugin Command. Instead of being met with the Cell Map Generation Assistant, your player character will be sent to a randomized dungeon instead. Congratulations! From here, edit the cell maps as needed. Be sure to read the rest of the Help File for more information. ---
Instructions - Quick Start (Manual)Here are some instructions to get yourself started quickly on using the Random Dungeon Maps plugin in a manual format. --- Step 1: Create the Cell Container Map
The Cell Container Map is the foundation map that determines which map cells are used when generating Random Dungeon Maps. --- Step 2: Create 16 Individual Cell Maps
   Pick a type column. Each of those cells in that column need to be present
   as a child map to the Container Map.

   Cardinal        Direction        Numpad         Symbol

   <Cell: X>       <Cell: Z>        <Cell: 0>      <Cell: ◌>
   <Cell: S>       <Cell: D>        <Cell: 2>      <Cell: ↓>
   <Cell: W>       <Cell: L>        <Cell: 4>      <Cell: →>
   <Cell: E>       <Cell: R>        <Cell: 6>      <Cell: ←>
   <Cell: N>       <Cell: U>        <Cell: 8>      <Cell: ↑>
   <Cell: SW>      <Cell: DL>       <Cell: 24>     <Cell: ↓←>
   <Cell: SE>      <Cell: DR>       <Cell: 26>     <Cell: ↓→>
   <Cell: SN>      <Cell: DU>       <Cell: 28>     <Cell: ↓↑>
   <Cell: WE>      <Cell: LR>       <Cell: 46>     <Cell: ←→>
   <Cell: WN>      <Cell: LU>       <Cell: 48>     <Cell: ←↑>
   <Cell: EN>      <Cell: RU>       <Cell: 68>     <Cell: →↑>
   <Cell: SWE>     <Cell: DLR>      <Cell: 246>    <Cell: ↓←→>
   <Cell: SWN>     <Cell: DLU>      <Cell: 248>    <Cell: ↓←↑>
   <Cell: SEN>     <Cell: DRU>      <Cell: 268>    <Cell: ↓→↑>
   <Cell: WEN>     <Cell: LRU>      <Cell: 468>    <Cell: ←→↑>
   <Cell: SWEN>    <Cell: DLRU>     <Cell: 2468>   <Cell: ↓←→↑>
These are all of the potential exit point combinations that can be used for Individual Cell Maps. Therefore, one of each combination has to be present for the Cell Container Map in order to properly create a Random Dungeon Map. --- Step 3: Draw Tiles For the Individual Cell Maps
Individual Cell Maps are used as references when creating the Random Dungeon Maps. Their tile data will be copied over when the Random Dungeon Map is being created by the plugin. --- Step 4: Mark regions with the Individual Cell Maps
When using the "Arrival Point" option to transfer the player, the player will randomly pick a tile marked by Region 1 (or whatever is set in the Plugin Parameters) and transfer to that tile. --- Step 5: Add Events to Cell Container Map
Event 1: Exit Event
- Name: Exit
- Notetag: <Spawn on Player>
- Event Commands: Transfer the player to a regular map outside of the
  Random Dungeon Map.
- Game Purpose: Gives the player a way to exit out of the Random Dungeon Map
  if they ever get stuck or just want to go back.
Event 2: Merchant Event - Name: Merchant - Notetag: <Spawn Region: 1> - Event Commands: Opens up a shop containing items. - Game Purpose: Lets the player buy items inside of the Random Dungeon Map. Event 3: Spawned Enemy Events - Name: Enemy - Notetag: <Spawn Region: 1> <Not Cell With Player> <Spawn Chance: 50%> - Event Commands: Starts a battle. - Game Purpose: Populates the Random Dungeon Map with enemies (if you don't want to use random encounters) and makes them have a random chance of spawning throughout the various cells. - Make multiple of these events if you so wish. Event 4: Spawned Treasure Events - Name: Treasure - Notetag: <Spawn Region: 1> <Not Cell With Event: Enemy> - Event Commands: Gives the player items. - Game Purpose: Populates the Random Dungeon Map with goodies and makes them have a random chance of spawning throughout the various cells. - Make multiple of these events if you so wish. Event 5: Goal Event - Notetag: <Spawn Region: 1> <Not Cell With Event: Exit> - Event Command: A Plugin Command that leads to a goal map. - Game Purpose: Gives a sense of purpose on where the player needs to go. These events will be spawned throughout the Region 1 tiles (or whichever Regions you want to use) when the Random Dungeon Map is created. --- Optional Step: Add Events to Individual Cell Maps
Events found inside the Individual Cell Maps will be copied into their relative positions on where they are in the Random Dungeon Map. --- Step 6: Make a Plugin Command on a Regular Map
This Plugin Command is used to send the player to a randomly generated dungeon map made using cell maps found in the container map. --- Step 7: Play test! Try Out Your Random Dungeon Map!
Congratulations! It's a lot of work but you did it! Be sure to read the rest of the Help File for more information. ---
Cell Container Map RulesThere are certain rules that the Container Maps have when they are used for the creation of a Random Dungeon Map. --- Cell Container Maps are Plugin Command targets.A Cell Container Map is the Map ID target of the Plugin Commands used for this plugin. When the "Random Map" or "Named Map" plugins create a map from scratch, the Cell Container Map is the one selected. Selecting any other maps will not work for Random Dungeon Map creation. --- Cell Container Maps contains its Cell Maps as children maps.A Cell Container Map will show up in the RPG Maker MZ editor as the parent map of the Individual Cell Maps used for Random Dungeon Map creation. This is how the plugin determines if an Individual Cell Map is tied to a specific Cell Container Map during Random Dungeon Map creation. --- Cell Container Maps must have one of each exit Individual Cell Map.There are 16 cell exit combinations, and at least one of each combination must be made into a cell for the Cell Container Map to be valid. Pick a type column. Each of those cells in that column need to be present as a child map to the Container Map. Any duplicates will be counted as cell variations when used to create the Random Dungeon Map. Cardinal Direction Numpad Symbol <Cell: X> <Cell: Z> <Cell: 0> <Cell: ◌> <Cell: S> <Cell: D> <Cell: 2> <Cell: ↓> <Cell: W> <Cell: L> <Cell: 4> <Cell: →> <Cell: E> <Cell: R> <Cell: 6> <Cell: ←> <Cell: N> <Cell: U> <Cell: 8> <Cell: ↑> <Cell: SW> <Cell: DL> <Cell: 24> <Cell: ↓←> <Cell: SE> <Cell: DR> <Cell: 26> <Cell: ↓→> <Cell: SN> <Cell: DU> <Cell: 28> <Cell: ↓↑> <Cell: WE> <Cell: LR> <Cell: 46> <Cell: ←→> <Cell: WN> <Cell: LU> <Cell: 48> <Cell: ←↑> <Cell: EN> <Cell: RU> <Cell: 68> <Cell: →↑> <Cell: SWE> <Cell: DLR> <Cell: 246> <Cell: ↓←→> <Cell: SWN> <Cell: DLU> <Cell: 248> <Cell: ↓←↑> <Cell: SEN> <Cell: DRU> <Cell: 268> <Cell: ↓→↑> <Cell: WEN> <Cell: LRU> <Cell: 468> <Cell: ←→↑> <Cell: SWEN> <Cell: DLRU> <Cell: 2468> <Cell: ↓←→↑> Cell maps with switch conditions, floor conditions, or unique flags will NOT count towards the requirement. If you have a cell map with <Cell: S> and it has <Unique> attached to it, you will need to have a <Cell: S> map without the <Unique> or any of the switch or floor condition tags. --- Cell Container Map Properties Carried OverThe following are the map properties that are carried over with the Cell Container Map: - Display Name - Encounter Steps - Encounter List - Autoplay BGM - Autoplay BGS - Specify Battleback - Disable Dashing - Parallax Background - Notes and Notetags The following properties are NOT carried over with the Cell Container Map: - Tileset - Width - Height The tileset, width, and height will be determined by the first cell with a south exit. The South Exit Cell with the lowest ID will determine the tileset used, the width (multiplied by the number of horizontal cells), and the height (multiplied by the number of vertical cells). --- Cell Container Map Events are Spawned FirstWhen creating the Cell Container Map, the events found there are spawned first before the Individual Cell Maps. This means that the events have their exact event ID's found in the Cell Container Map. Any events that don't meet the requirements of being spawned due to conditional tags will be changed to "null" events and not appear, but will still be "present" in order to maintain the event ID structure. --- Cell Container Map Events Require Location NotetagsEvents on the Cell Container Map require the assistance of notetags to help determine where they will spawn at. The <Spawn Region: x> notetag determines which tiles marked by region 'x' they can spawn on. If there are multiple tiles marked by the region, the event will pick a random tile marked by that region to spawn on. The <Spawn on Player> notetag will not require regions but instead, will spawn exactly where the player's initial arrival point is. ---
Individual Cell Map RulesThere are certain rules that the Individual Cell Maps have when they are used for the creation of a Random Dungeon Map. --- Individual Cell Maps can have Child MapsThe child maps of an Individual Cell Map will be counted as a part of the Cell Container Map's available options when making the cells for random dungeon map creation. --- The First South Exit Individual Cell Map is ImportantThe first available South Exit Individual Cell Map will be marked with the <Cell: S> name tag (or <Cell: 2> or <Cell: D> if you choose to use those). The first available South Exit Individual Cell Map is more important than the others because it also contains the information to determine the rest of the way the dungeon is formed. Here are the properties that the first available South Exit Individual Cell Map will bring to the table: - Tileset - Width - Height Whatever tileset the first South Exit Individual Cell Map uses will be the tileset that the generated Random Dungeon Map will use. The reason why we picked this instead of the Cell Container Map is because you actually have to place tiles on the cell map in order to reduce user error and to make sure that the tileset you want to use for the map matches the cell. The width and height of the first South Exit Individual Cell Map will determine the width and height standard of all other cell maps used. If any of the other Individual Cell Maps don't have matching width/height, then visual errors are bound to occur. Make sure their dimensions match the first South Exit Individual Cell Map. --- Individual Cell Map Events are Spawned AfterWhere the Cell Container Map's events are spawned first, the Individual Cell Map Events are spawned after. The order they spawn in will go in the order of cells from left to right, then up to down. When all of the events in one cell are carried over (the ones that meet the conditions of spawning) then the events in the next cell will be spawned. The order the events spawn in an Individual Cell Map will depend on their ID in the Individual Cell Map itself. The ID of a spawned event from an Individual Cell Map will continue from where the current events on the map have left off, either from the Cell Container Map's events itself or another Individual Cell Map. --- Individual Cell Map Events have Relative LocationThe location of the events do not require events. Instead, they spawn into their relative location of the Individual Cell Map. If an event is located on 5 across, 5 down on the Individual Cell Map, then its location on the created Random Dungeon Map will also be located 5 across and 5 down from where the Individual Cell Map starts. --- Individual Cell Map Events Will DuplicateIf multiple copies of an Individual Cell Map are used on the random dungeon map, then multiple copies of that cell map's events will also spawn onto the Random Dungeon Map. Create your events with this in mind. ---
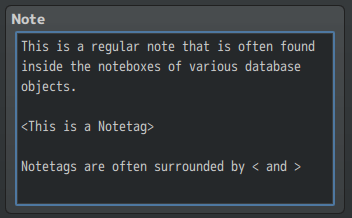
Notetags
RPG Maker MZ's editor is unable to allow for custom traits/properties that a game dev may wish to associate with a database object, event, map, etc. Notetags are used to work around such limitations by allowing the game dev to tag certain traits/properties using specific Notetags declared by the related plugin. Here is a list of Notetag(s) that you may use. Template:VisuMZ InsertPluginName Notetags
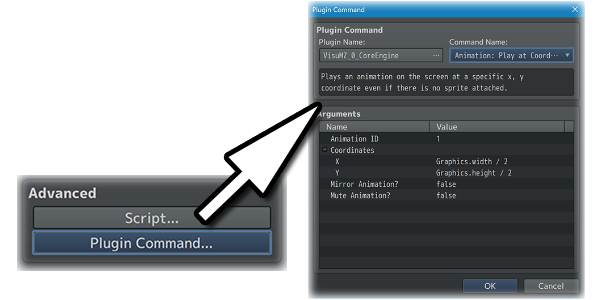
Plugin Commands
Plugin Commands are event commands that are used to call upon functions added by a plugin that aren't inherently a part of RPG Maker MZ. Here is a list of Plugin Command(s) that you may use: --- Template:VisuMZ InsertPluginName Plugin Commands
Plugin ParametersGeneral SettingsThese are the general settings for this plugin. --- Dungeon Creation Arrival Region(s): - These regions determine initial player arrival spawn point tiles. - If a genenrated map does not have a tile marked with an Arrival Region, it is considered an illegal map. Upper Cell Limit: - What is the max number of cells on creation? - Don't go too high with this number. - Recommended number is 10. --- Floor Text Upper Floor Format: - How are positive floors displayed? - Replaces <Floor> in the Map's Display Name. - %1 - Floor Number (Absolute) Lower Floor Format: - How are negative floors displayed? - Replaces <Floor> in the Map's Display Name. - %1 - Floor Number (Absolute) Text Floor Format: - How floors are displayed if they use strings/text. - Replaces <Floor> in the Map's Display Name. - %1 - Floor String/Text ---
Optional SettingsThese are the default optional settings when used to generate Random Dungeon Maps if no specific optional settings are used for the individual Plugin Command event commands. --- Algorithm Empty Cell Modifier: - Low - Less Empty; High - More Empty - Low - More Full; High - Less Full Linear Modifier: - Low - Less Linear; High - More Linear - Low - More Turns; High - Less Turns Loop Modifier: - Low - Less Looping; High - More Looping - Low - More Dead Ends; High - Less Dead Ends Remove Padding: - If the dungeon map has padding, make a border of empty cells around it. --- Player Arrival Direction: - Which direction do you want the player to face when arriving? Arrival Region(s): - These regions determine initial arrival spawn point tiles. - Overrides Plugin Parameters > General Settings' version. - If a genenrated map does not have a tile marked with an Arrival Region, it is considered an illegal map. Arrival Spawn Cell X: - Determines which cells are valid when the player first arrives on the map. - Anywhere - Any column is valid - - Left - Any cell in the left-most column of the map - Center - Any cell in the center column of the map - Right - Any cell in the right-most column of the map - - Left Half - Any cell in the left-half of the map - Right Half - Any cell in the right-half of the map - - Inner - Any cell not the left-most or right-most column of the map - Outer - Any cell in the left-most or right-most column of the map Arrival Spawn Cell Y: - Determines which cells are valid when the player first arrives on the map. - Anywhere - Any row is valid - - Top - Any cell in the top-most row of the map - Middle - Any cell in the middle row of the map - Bottom - Any cell in the bottom-most row of the map - - Top Half - Any cell in the top-half of the map - Bottom Half - Any cell in the bottom-half of the map - - Inner - Any cell not the top-most or bottom-most row of the map - Outer - Any cell in the top-most or bottom-most row of the map Transfer Fade Style: - What fade style do you want when transferring the player to the generated random map? ---
Terms of Use1. These plugins may be used in free or commercial games provided that they have been acquired through legitimate means at VisuStella.com and/or any other official approved VisuStella sources. Exceptions and special circumstances that may prohibit usage will be listed on VisuStella.com. 2. All of the listed coders found in the Credits section of this plugin must be given credit in your games or credited as a collective under the name: "VisuStella". 3. You may edit the source code to suit your needs, so long as you do not claim the source code belongs to you. VisuStella also does not take responsibility for the plugin if any changes have been made to the plugin's code, nor does VisuStella take responsibility for user-provided custom code used for custom control effects including advanced JavaScript notetags and/or plugin parameters that allow custom JavaScript code. 5. VisuStella is not responsible for problems found in your game due to unintended usage, incompatibility problems with plugins outside of the VisuStella MZ library, plugin versions that aren't up to date, nor responsible for the proper working of compatibility patches made by any third parties. VisuStella is not responsible for errors caused by any user-provided custom code used for custom control effects including advanced JavaScript notetags and/or plugin parameters that allow JavaScript code. 8. Any extensions and/or addendums made to this plugin's Terms of Use can be found on VisuStella.com and must be followed. Terms of Use: Japanese『VisuStella MZ』利用規約 1. これらのプラグインは、VisuStella.comおよび/または公式に承認されたVisuStellaのソースから合法的な手段で入手したものである限り、フリーゲームや商用ゲームに使用することができます。例外的に使用が禁止される場合については、VisuStella.comの記載をご確認ください。 2. 本プラグインの「クレジット」部分に記載されているすべてのコーダーの名前は、ゲーム内にクレジット表記を行うか、もしくは「VisuStella」という名前の下にまとめて表記する必要があります。 3. ソースコードを自分のものだと主張しない限りは、必要に応じて編集することが可能です。ただしプラグインのコードに変更が加えられた場合、VisuStellaはそのプラグインに対して一切の責任を負いません。高度なJavaScriptのノートタグやJavaScriptコードを許可するプラグインのパラメータを含む、カスタムコントロールエフェクトに使用される、ユーザー提供のカスタムコードについても、VisuStellaは一切の責任を負いません。 5. VisuStellaは、意図しない使用方法による問題、VisuStella MZライブラリ以外のプラグインとの非互換性の問題、プラグインのバージョンが最新でないことによる問題、第三者による互換性パッチが適切に動作していないことなどが原因でゲーム内で発生した問題については、一切の責任を負いません。VisuStellaは、高度なJavaScriptのノートタグやJavaScriptコードを許可するプラグインのパラメータを含む、カスタムコントロールエフェクトに使用される、ユーザー提供のカスタムコードに起因するエラーについても、一切の責任を負いません。 8. このプラグインの利用規約の追加項目や補足については、VisuStella.comに掲載されていますので、それを参照し従ってください。
CreditsIf you are using this plugin, credit the following people in your game: Team VisuStella
ChangelogVersion 1.00 Official Release Date: September 25, 2023
See Also
End of Helpfile |