Common Event Menu VisuStella MZ


|
VisuStella, Caz Wolf, Fallen Angel Olivia, Atelier Irina, and other affiliated content creators.
Download
| ||
SystemThis is a plugin created for RPG Maker MZ. | ||
|
|
|
|
|
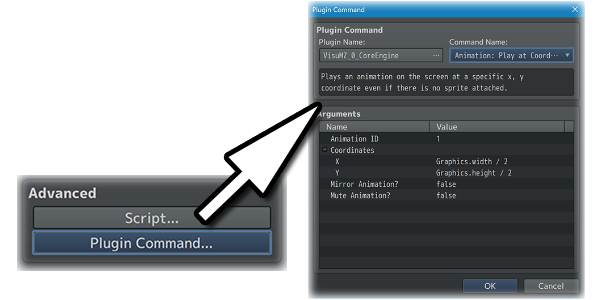
Click here for help on how to install plugins and an explanation on the Tier Hierarchy System. |
Click here to learn how to update plugins. |
Click here for how to troubleshoot plugins if you get an error. |


|
|
|
|
|
Required PluginsThe following plugins are required in order to use this plugin. Place the following plugins above this plugin located in the Plugin Manager.
VisuStella MZThis plugin is a part of the VisuStella MZ Plugin Library.
Click here if you want to help support VisuStella on Patreon. IntroductionThe Common Event Menu allows you to create your own custom menu setups all through a simple Plugin Command. When using it, you can list whatever Common Events you so wish and generate a menu that when selecting the menu command, it will run the Common Event. This Common Event Menu setup allows you to utilize a help window, a picture window, and a subtext window to allow for your own personal touch when using the Common Event list window. Features include all (but not limited to) the following:
RequirementsThis plugin is made for RPG Maker MZ. This will not work in other iterations of RPG Maker. Required Plugin ListThis plugin requires the above listed plugins to be installed inside your game's Plugin Manager list in order to work. You cannot start your game with this plugin enabled without the listed plugins.
This plugin is a Tier 2 plugin. Place it under other plugins of lower tier value on your Plugin Manager list (ie: 0, 1, 2, 3, 4, 5). This is to ensure that your plugins will have the best compatibility with the rest of the VisuStella MZ Plugin library.
Extra FeaturesThere are some extra features found if other VisuStella MZ plugins are found present in the Plugin Manager list. --- Options Core VisuStella MZWhen selecting pre-made Layouts for the Common Event Menu, depending on the settings for the Help Window Position and Input Window Position, the four main windows for the Common Event Menu will be positioned differently to account for these main settings. Right Input would put the List Window towards the right side of the screen. If it is off, then the List Window would appear towards the left side of the screen. When a layout with "Mirror" is in place, these settings are reversed to apply the mirror effect. Bottom Help would put the Help Window towards the bottom of the screen and the Subtext would go towards the top. If the Bottom Help position is turned off, then the Help Window would appear at the top while the Subtext would appear at the bottom. When a layout with "Inverse" is in place, these settings are reversed to apply the inverse effect. When viewing the previews on the Yanfly.moe wiki, the previews will be displayed with the Help Window towards the top and the input towards the right side of the screen (ie the Recommended Settings). !! WARNING !! These settings do NOT apply to Custom Layouts in order to reduce confusion for the game dev. If the game dev wishes to implement them in, then utilize Scene_Base's "isBottomHelpMode" and "isRightInputMode" functions when inserting the JavaScript code needed. !! WARNING !! Not all pre-made layouts work with all screen resolutions as this is very much so the case if you plan on using a smaller-than-normal screen resolution. If a specific layout does not work with a resolution you want, pick another layout that works. These layouts are made under the industry standard of a 16:9, 1280x720 screen resolution. --- Plugin Commands
Plugin Commands are event commands that are used to call upon functions added by a plugin that aren't inherently a part of RPG Maker MZ. Here is a list of Plugin Command(s) that you may use: ---
--- Common Event Menu Plugin Command
This is the Plugin Command that lets you create the Common Event Menu. The Common Event Menu is inaccessible from any other way. --- Common Event Menu: Start
- Start a Common Event Menu with the below settings.
Common Events:
- Select the Common Events you want shown in the menu.
Cancel Event:
- Runs this Common Event when Cancel is pressed.
- Insert 0 to disable Cancel.
Layout:
- Pick a layout to use for the Common Event Menu.
- Select "Custom" to position windows via JavaScript.
- Picking '-' will not create any Common Event Menus.
- Look on Yanfly.moe for a visual list of all the layouts.
Custom Layout:
- Modify the settings for a Custom layout.
- Requires the above parameter to be "Custom".
Optional Settings:
- Optional settings for the Common Event Menu.
!! WARNING !! Not all pre-made layouts work with all screen resolutions as this is very much so the case if you plan on using a smaller-than-normal screen resolution. If a specific layout does not work with a resolution you want, pick another layout that works. These layouts are made under the industry standard of a 16:9, 1280x720 screen resolution. ---
Common Events (Sub Settings)
- Select the Common Events you want shown in the menu.

  Specific ID's:

    ID(s):
    - Select the Common Events you want displayed in the menu based on their
      exact ID's.

  ID Range:

    Range Start:
    - Select the Common Event ID range to start from.
    - This will select all the ID's up to the end range.

    Range End:
    - Select the Common Event ID range to end with.
    - This will select all the ID's from the start range.

  JS:

    Custom JS:
    - Create a list of Common Event ID's with JavaScript.

  Filters:

    Empty Name:
    - Apply filter for Common Events without a name?

    ----- Name:
    - Apply filter for Common Events with ----- in their name?
---
Custom Layout (Sub Settings)
- Modify the settings for a Custom layout.
- Requires the above parameter to be "Custom".

  Main Windows:

    JS: List Window:
    JS: Picture Window:
    JS: Help Window:
    JS: Sub Window:
    - Determine how this Window is positioned.
    - Only applies with Custom layouts.

  Extra Windows:

    JS: Extra Window 1:
    JS: Extra Window 2:
    JS: Extra Window 3:
    JS: Extra Window 4:
    JS: Extra Window 5:
    JS: Extra Window 6:
    JS: Extra Window 7:
    JS: Extra Window 8:
    JS: Extra Window 9:
    JS: Extra Window 10:
    - Determine how this Extra Window is positioned.
    - Only applies with Custom layouts.
!! WARNING !! These settings do NOT apply to Custom Layouts in order to reduce confusion for the game dev. If the game dev wishes to implement them in, then utilize Scene_Base's "isBottomHelpMode" and "isRightInputMode" functions when inserting the JavaScript code needed. ---
Optional Settings (Sub Settings)
- Optional settings for the Common Event Menu.

  All Windows:

    Background Type:
    - Select the background type for all of the Common Event Menu windows.
      - 0 - Window
      - 1 - Dim
      - 2 - Transparent

    Boundary Size:
    - Pick the boundary size for the layout.
    - Does NOT apply to Custom Layouts.
      - Full      (Game Screen)
      - UI Size   (UI Resolution)
      - Padded    (16 px Border)
      - Huge      (32 px Border)
      - Large     (48 px Border)
      - Medium    (64 px Border)
      - Small     (96 px Border)
      - Tiny      (128 px Border)
      - Micro     (160 px Border)
      - Wut       (192 px Border)

  List Window:

    List Columns:
    - The number of columns the List Window has.
    - Use 'auto' to determine it automatically.
    - You may use JavaScript.

    Auto Select:
    - Which Common Event should be selected at the start?
    - Use 'last' for last picked ID.
    - You may use JavaScript.

    Auto-Sort ID's:
    - Automatically sort the Common Event's inserted into the Plugin Command
      by their database ID's?
    - This only applies to the "Specific" and "Custom JS" list where the
      order of the ID's inserted can be controlled. "ID Range" settings are
      always going to be sorted by ID.
    - This can be disabled for those who wish to manually switch around the
      order of their displayed Common Event ID's.

    Text Alignment:
    - How do you want the text to be aligned for the List Window?

  Cancel Button:

    Show Cancel Button:
    - Show the Cancel Button?
    - Requires a Cancel Common Event.

    Button Scale:
    - Scale the button size by this much.

    Button Position:
    - Select where the button appears.

    Button Offset X:
    - Offset the Cancel Button X position by this much.

    Button Offset Y:
    - Offset the Cancel Button Y position by this much.

  Picture Window:

    Auto-Fit Image:
    - Automatically fit the picture to the size of the Picture Window if the
      picture is larger than the window?

    Image Anchor X:
    - Pick how the picture is anchored horizontally in the Picture Window.

    Image Anchor Y:
    - Pick how the picture is anchored vertically in the Picture Window.
--- Comment TagsThe following are comment tags that have been added through this plugin. Thesecomment tags will not work with your game if this plugin is OFF or not present. To make a comment tag, create a comment inside of the Common Event and type in any of the comment tags seen below for their effects. --- Basic-Related Comment Tags--- <Name: text> - Used for: Common Event Comment Tag - Replaces the text that appears in the Common Event Menu List with this instead of the Common Event's name found in the database. - Replace 'text' with the name you want to be displayed in the List Window. - If this comment tag is not used, default to the Common Event's name. --- <Icon: x> - Used for: Common Event Comment Tag - Sets the icon shown next to this Common Event. - Replace 'x' with a number representing the icon index used for this Common Event. - If this comment tag is not used, default to the Plugin Parameters. --- <Indent: x> - Used for: Common Event Comment Tag - Indents the name when it appears in the Common Event List. - Replace 'x' with the number of times to indent the name. - Each indent is equal to an icon width. --- <Picture: filename> - Used for: Common Event Comment Tag - Description - Replace 'filename' with a picture found within your game project's img/pictures/ folder. - Filenames are case sensitive. - Leave out the filename extension from the notetag. --- Description-Related Comment Tags--- <Help Description> text text </Help Description> - Used for: Common Event Comment Tag - When this Common Event is selected, display this text in the Help Window. - Replace 'text' with the text you want to display in the Help Window when this Common Event is selected. - You can chain together Comment event commands in the RPG Maker Editor to combine their contents in case you want to add more than 4 lines of text. --- <Subtext Description> text text </Subtext Description> - Used for: Common Event Comment Tag - When this Common Event is selected, display this text in the Sub Window. - Replace 'text' with the text you want to display in the Sub Window when this Common Event is selected. - You can chain together Comment event commands in the RPG Maker Editor to combine their contents in case you want to add more than 4 lines of text. --- <Extra Description x> text text </Extra Description x> - Used for: Common Event Comment Tag - When this Common Event is selected, display this text in the Extra Window. - Replace 'x' with a number from 1 to 10 to determine which Extra Window to display the text in. - Replace 'text' with the text you want to display in the Extra Window when this Common Event is selected. - You can chain together Comment event commands in the RPG Maker Editor to combine their contents in case you want to add more than 4 lines of text. --- Visibility-Related Comment Tags--- <Show Switch: x> <Show All Switches: x,x,x> <Show Any Switches: x,x,x> - Used for: Common Event Comment Tag - Determines the visible status of the Common Event based on switches. - Replace 'x' with the switch ID to determine the Common Event's visibility. - If 'All' notetag variant is used, the Common Event will be hidden until all switches are ON. Then, it would be shown. - If 'Any' notetag variant is used, the Common Event will be shown if any of the switches are ON. Otherwise, it would be hidden. --- <Hide Switch: x> <Hide All Switches: x,x,x> <Hide Any Switches: x,x,x> - Used for: Common Event Comment Tag - Determines the visible status of the Common Event based on switches. - Replace 'x' with the switch ID to determine the Common Event's visibility. - If 'All' notetag variant is used, the Common Event will be shown until all switches are ON. Then, it would be hidden. - If 'Any' notetag variant is used, the Common Event will be hidden if any of the switches are ON. Otherwise, it would be shown. --- JavaScript Comment Tag: VisibilityThe following are notetags made for users with JavaScript knowledge to determine if a Common Event is visible in the menu by code. --- <JS Visible> code code visible = code; </JS Visible> - Used for: Common Event Comment Tag - Determines the visible status of the Common Event based on JavaScript code. - Replace 'code' to determine the type visible status of the Common Event. - You can chain together Comment event commands in the RPG Maker Editor to combine their contents in case you want to add more than 4 lines of code. - The 'visible' variable returns a boolean (true/false) to determine if the Common Event will be visible or not. - All other Common Event conditions must be met in order for this to code to count. --- Enable-Related Comment Tags--- <Enable Switch: x> <Enable All Switches: x,x,x> <Enable Any Switches: x,x,x> - Used for: Common Event Comment Tag - Determines the enabled status of the Common Event based on switches. - Replace 'x' with the switch ID to determine if the Common Event's enabled. - If 'All' notetag variant is used, the Common Event will be disabled until all switches are ON. Then, it would be enabled. - If 'Any' notetag variant is used, the Common Event will be enabled if any of the switches are ON. Otherwise, it would be disabled. --- <Disable Switch: x> <Disable All Switches: x,x,x> <Disable Any Switches: x,x,x> - Used for: Common Event Comment Tag - Determines the enabled status of the Common Event based on switches. - Replace 'x' with the switch ID to determine if the Common Event's enabled. - If 'All' notetag variant is used, the Common Event will be enabled until all switches are ON. Then, it would be disabled. - If 'Any' notetag variant is used, the Common Event will be disabled if any of the switches are ON. Otherwise, it would be enabled. --- JavaScript Comment Tag: EnableThe following are notetags made for users with JavaScript knowledge to determine if a Common Event can be selectable by code. --- <JS Enable> code code enabled = code; </JS Enable> - Used for: Common Event Comment Tag - Determines the enabled status of the Common Event based on JavaScript code. - Replace 'code' to determine the type enabled status of the Common Event. - You can chain together Comment event commands in the RPG Maker Editor to combine their contents in case you want to add more than 4 lines of code. - The 'enabled' variable returns a boolean (true/false) to determine if the Common Event will be enabled or not. - All other Common Event conditions must be met in order for this to code to count. --- Plugin ParametersDefault SettingsThere's only a single plugin parameter for the default settings and that's to define the default icon displayed for the Common Event Menu when a Common Event does not have the <Icon: x> comment tag. --- Settings Default Icon: - Select what icon will be the default Common Event entry icon. ---
Terms of Use1. These plugins may be used in free or commercial games provided that they have been acquired through legitimate means at VisuStella.com and/or any other official approved VisuStella sources. Exceptions and special circumstances that may prohibit usage will be listed on VisuStella.com. 2. All of the listed coders found in the Credits section of this plugin must be given credit in your games or credited as a collective under the name: "VisuStella". 3. You may edit the source code to suit your needs, so long as you do not claim the source code belongs to you. VisuStella also does not take responsibility for the plugin if any changes have been made to the plugin's code, nor does VisuStella take responsibility for user-provided custom code used for custom control effects including advanced JavaScript notetags and/or plugin parameters that allow custom JavaScript code. 5. VisuStella is not responsible for problems found in your game due to unintended usage, incompatibility problems with plugins outside of the VisuStella MZ library, plugin versions that aren't up to date, nor responsible for the proper working of compatibility patches made by any third parties. VisuStella is not responsible for errors caused by any user-provided custom code used for custom control effects including advanced JavaScript notetags and/or plugin parameters that allow JavaScript code. 8. Any extensions and/or addendums made to this plugin's Terms of Use can be found on VisuStella.com and must be followed. Terms of Use: Japanese『VisuStella MZ』利用規約 1. これらのプラグインは、VisuStella.comおよび/または公式に承認されたVisuStellaのソースから合法的な手段で入手したものである限り、フリーゲームや商用ゲームに使用することができます。例外的に使用が禁止される場合については、VisuStella.comの記載をご確認ください。 2. 本プラグインの「クレジット」部分に記載されているすべてのコーダーの名前は、ゲーム内にクレジット表記を行うか、もしくは「VisuStella」という名前の下にまとめて表記する必要があります。 3. ソースコードを自分のものだと主張しない限りは、必要に応じて編集することが可能です。ただしプラグインのコードに変更が加えられた場合、VisuStellaはそのプラグインに対して一切の責任を負いません。高度なJavaScriptのノートタグやJavaScriptコードを許可するプラグインのパラメータを含む、カスタムコントロールエフェクトに使用される、ユーザー提供のカスタムコードについても、VisuStellaは一切の責任を負いません。 5. VisuStellaは、意図しない使用方法による問題、VisuStella MZライブラリ以外のプラグインとの非互換性の問題、プラグインのバージョンが最新でないことによる問題、第三者による互換性パッチが適切に動作していないことなどが原因でゲーム内で発生した問題については、一切の責任を負いません。VisuStellaは、高度なJavaScriptのノートタグやJavaScriptコードを許可するプラグインのパラメータを含む、カスタムコントロールエフェクトに使用される、ユーザー提供のカスタムコードに起因するエラーについても、一切の責任を負いません。 8. このプラグインの利用規約の追加項目や補足については、VisuStella.comに掲載されていますので、それを参照し従ってください。 CreditsIf you are using this plugin, credit the following people in your game: Team VisuStella ChangelogVersion 1.00 Official Release Date: March 1, 2021
End of File |