Difference between revisions of "Category:Plugin Commands (MV)"
(→Improved Battlebacks) |
(→Improved Battlebacks) |
||
| Line 1,163: | Line 1,163: | ||
HideMenuHelpCommand | HideMenuHelpCommand | ||
- Will make the 'Help' command hidden in the main menu. | - Will make the 'Help' command hidden in the main menu. | ||
| + | </nowiki> | ||
| + | |||
| + | == [[Icon Balloons (YEP)|Icon Balloons]] == | ||
| + | |||
| + | <nowiki> | ||
| + | Use these plugin commands to get icon balloons playing on the player/events. | ||
| + | |||
| + | Plugin Commands | ||
| + | |||
| + | --- | ||
| + | |||
| + | ShowIconBalloon x on Player | ||
| + | ShowIconBalloon x on Player, Wait | ||
| + | |||
| + | ShowIconBalloon x on Event y | ||
| + | ShowIconBalloon x on Event y, Wait | ||
| + | |||
| + | ShowIconBalloon x on Follower y | ||
| + | ShowIconBalloon x on Follower y, Wait | ||
| + | |||
| + | ShowIconBalloon x on This Event | ||
| + | ShowIconBalloon x on This Event, wait | ||
| + | - This will cause the Icon Balloon using icon index x to appear on the | ||
| + | player, event y, or follower y. If 'wait' is used, then the event will | ||
| + | wait until the balloon has finished playing. | ||
| + | |||
| + | --- | ||
| + | |||
| + | ShowIconBalloon x to y on Player | ||
| + | ShowIconBalloon x to y on Player, Wait | ||
| + | |||
| + | ShowIconBalloon x to y on Event z | ||
| + | ShowIconBalloon x to y on Event z, Wait | ||
| + | |||
| + | ShowIconBalloon x to y on Follower z | ||
| + | ShowIconBalloon x to y on Follower z, Wait | ||
| + | |||
| + | ShowIconBalloon x to y on This Event | ||
| + | ShowIconBalloon x to y on This Event, Wait | ||
| + | - This will cause the Icon Balloon start on icon index x and move through | ||
| + | to y, the next icon upward each few frames up to icon index y. This icon | ||
| + | balloon will be played on the player, event z, or follower z. If 'wait' is | ||
| + | used, then the event will wait until the balloon has finished playing. | ||
| + | When using this command, x cannot be greater than y. | ||
</nowiki> | </nowiki> | ||
Revision as of 18:05, 27 June 2019


|
VisuStella, Caz Wolf, Fallen Angel Olivia, Atelier Irina, and other affiliated content creators.
Contents
- 1 Advanced Switches & Variables
- 2 Anti-Audio Delay
- 3 Action Sequence Fast Forward/Skip
- 4 Battle Engine Core
- 5 Button Common Events
- 6 Call Event
- 7 Class Change Core
- 8 Common Event Menu
- 9 Core Engine
- 10 Credits Page
- 11 Damage Core
- 12 Dash Toggle
- 13 Enemy Levels
- 14 Enhanced TP
- 15 Equip Battle Skills
- 16 Equip Core
- 17 Event Chase Player
- 18 Event Mini Label
- 19 Event Timer Control
- 20 External Links
- 21 Footstep Sounds
- 22 Force Advantage
- 23 Gab Window
- 24 Help File Access
- 25 Icon Balloons
- 26 Improved Battlebacks
- 27 Item Core
- 28 Item Synthesis
- 29 Job Points
- 30 Message Core
- 31 Party System
- 32 Quest Journal System
- 33 Repel & Lure Encounters
- 34 Row Formation
- 35 Save Core
- 36 Self Switches & Variables
- 37 Skill Core
- 38 Skill Learn System
- 39 Stat Allocation
- 40 Status Menu Core
- 41 Victory Aftermath
- 42 Weather In Battle
Advanced Switches & Variables
These plugin commands can be used to immediately refresh a map or troop
troop event to ensure that switch/variable data gets noticed and triggered
or updated upon your call.

Plugin Command:

  RefreshMap
  - This will refresh all of the map's events. This will update any page
  conditions with Advanced Switches or Variables that may have changed
  values prior to using this plugin command. This can only be used outside
  of battle!

  RefreshTroop
  - This will refresh the current event interpreter in battle. This will
  update any page condition within the current troop that utilizes Advanced
  Switches or Variables that may have changed values prior to using this
  plugin command.
  * NOTE: If you are using the Battle Engine Core, using this won't be
  necessary for the majority of the time.
Anti-Audio Delay
FlushAudioCache BGM
FlushAudioCache BGS
FlushAudioCache ME
FlushAudioCache SE
FlushAudioCache ALL
These will clear the audio caches for the written type of audio. If you pick all, then all four types will be flushed out of memory. This will give your game a clear slate for the the audio cache, which means the game may lag a little bit upon reloading the new BGM files.
In my opinion, these plugin commands should never need to be used since the plugin will automatically clear them once the cache goes over the limit, but I'm just giving you control over the audio cache for your game just in case you want to do something with it.
Action Sequence Fast Forward/Skip
If your item/skill's battle action sequence runs a common event that requires you to temporarily stop Fast Forward and Skip Forward, you can use these plugin commands to control them:
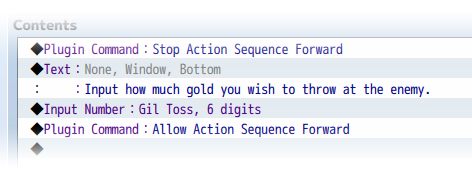
STOP ACTION SEQUENCE FORWARD
- This will stop Fast Forward and Skip Forward at this point onward.

ALLOW ACTION SEQUENCE FORWARD
- This will reenable Fast Forward and Skip Forward from this point onward.
Battle Engine Core
While the player is not in battle, you can change the battle system using a
Plugin Command. With only this plugin, there is only one battle system
included: the default battle system.

Plugin Command:
  setBattleSys DTB      Sets battle system to Default Turn Battle.

Other future plugins may include other battle systems that may utilize the
Battle Engine Core.
Battle System - ATB
To change your battle system to Active Turn Battle if it isn't the default
battle system, you can use the following Plugin Command:

Plugin Command:
  setBattleSys ATB      Sets battle system to Active Turn Battle.
  setBattleSys DTB      Sets battle system to Default Turn Battle.

Using the above Plugin Commands, you can toggle between the Default Battle
System and Active Turn Battle!
Battle System - CTB
To change your battle system to Charge Turn Battle if it isn't the default
battle system, you can use the following Plugin Command:

Plugin Command:
  setBattleSys CTB      Sets battle system to Charge Turn Battle.
  setBattleSys DTB      Sets battle system to Default Turn Battle.

Using the above Plugin Commands, you can toggle between the Default Battle
System and Charge Turn Battle!
Battle System - STB
To change your battle system to Standard Turn Battle if it isn't the default
battle system, you can use the following Plugin Command:

Plugin Command:
  setBattleSys STB      Sets battle system to Standard Turn Battle.
  setBattleSys DTB      Sets battle system to Default Turn Battle.

Using the above Plugin Commands, you can toggle between the Default Battle
System and Standard Turn Battle!
In-Battle Status
For those who would like to change whether the 'Status' option is shown or
hidden midway through the game, you can use the following plugin commands:

Plugin Commands:

  ShowInBattleStatus
  - This will cause the 'Status' command to show.

  HideInBattleStatus
  - This will cause the 'Status' command to not show.
Turn Order Display
Use the following plugin commands to control the Turn Order Display.

Plugin Command:

  EnableTurnOrderDisplay
  - Turns on the Turn Order Display to be shown in battle if the battle is
  a turn-based battle system can support the Turn Order Display.

  DisableTurnOrderDisplay
  - Turns off the Turn Order Display to be hidden in battle.
Button Common Events
For those who would like for a way to toggle back and forth between the
bound common events and the default buttons, use these plugin commands.

Plugin Commands

  RevertButton Ok
  RevertButton Cancel
  RevertButton Dash
  RevertButton PageUp
  RevertButton PageDown
  RevertButton Left
  RevertButton Up
  RevertButton Right
  RevertButton Down
  RevertButton All
  - Reverts all keys bound to any of the original functions back to their
  original buttons and unbinds the common events bound to them. If the "All"
  function is reverted, then all affected buttons will revert back to their
  original functions.

  SwitchButton Ok
  SwitchButton Cancel
  SwitchButton Dash
  SwitchButton PageUp
  SwitchButton PageDown
  SwitchButton Left
  SwitchButton Up
  SwitchButton Right
  SwitchButton Down
  SwitchButton All
  - Switches all keys with original functions to use the common event binds
  instead of their original versions. If the "All" function is switched,
  then all affected buttons will switch to common event bindings if there
  are any.

  TriggerButton Ok
  TriggerButton Cancel
  TriggerButton Dash
  TriggerButton PageUp
  TriggerButton PageDown
  TriggerButton Left
  TriggerButton Up
  TriggerButton Right
  TriggerButton Down
  - This will cause the game to simulate triggering the button command of
  one of those original functions even if there is a common event bound to
  all of the keys of that original function.
Call Event
To call upon events from the current map or a different map, use the plugin
commands found below:

  Plugin Commands:

  CallEvent x
  - This will call upon event x from the current map and use the event list
  from the first page of the event.

  CallEvent x, Page y
  - This will call upon event x from the current map and use the event list
  from page y of the event.

  CallEvent x, Map y
  - This will call upon event x from map y and use the event list from the
  first page of the event.

  CallEvent x, Page y, Map z
  - This will call upon event x from map z and use the event list from
  page y of the event.

  CallEvent x, Map y, Page z
  - This will call upon event x from map y and use the event list from
  page z of the event.

*Note1: Because of the programming structure of RPG Maker MV's source, the
called event data may or may not be instantaneous depending on the size of
the map file that is needed to be loaded. At best, it will take a couple of
frames of loading time depending on the size.

*Note2: If any of the events, pages, and/or maps do not exist, then no
events will be called and the plugin will skip forward as if nothing has
happened. Be cautious about how you call these call events.
Class Change Core
Included in this plugin are multiple Plugin Commands to help assist you with
class changing for your game.

Plugin Command
  OpenClass
  - This opens the class changing scene.

  ShowClass
  HideClass
  - This shows/hides the Class option from the main menu.

  EnableClass
  DisableClass
  - This makes the Class option enabled/disabled.

  UnlockClass 5 6
  - This allows Actor 5 to unlock Class 6.

  RemoveClass 5 7
  - This causes Actor 5 to no longer access Class 7.

  UnlockClassAll 8
  - This unlocks Class 8 for the global pool.

  RemoveClassAll 9
  - This removes Class 9 from the global pool.

  EnablePrimaryClassChange 5
  DisablePrimaryClassChange 5
  - This enables/disables primary class changing for actor 5.
Subclass
You can use these following plugin commands to change subclassing throughout
the game!

Plugin Command:

  ShowSubclass
  HideSubclass
  - Shows/Hides the Subclass command in the Class Change Menu.

  EnableSubclass
  DisableSubclass
  - Enables/Disables the Subclass command in the Class Change Menu.

  ChangeSubclass x y
  - Changes actor x's subclass to y. Replace y with 0 to remove a subclass.

  EnableSubclassChange 5
  DisableSubclassChange 5
  - This enables/disables subclass changing for actor 5.
Common Event Menu
The following plugin commands are used to work the Common Event Menu. Look
over each of the settings carefully:

Plugin Command:

  ---

  ClearCommonEventMenu
  - This clears all the listed common events from the Common Event Menu Data
  pool meaning it has to be filled again. You can do so with the next plugin
  command:

  ---

  AddCommonEventMenu 1
     - or -
  AddCommonEventMenu 2, 3, 4, 5
     - or -
  AddCommonEventMenu 6 through 10
  - This will add the listed common event numbers into the common event list
  that will be shown in the common event menu.

  ---

  SetCommonEventMenuCancel 20
  - This will set the cancel button for the common event menu to run common
  event 20 when canceled. If it is left at 0, no event will run, but the
  menu can allow the cancel button to be pressed (and prematurely end it).

  ---

  DisableCommonEventMenuCancel
  EnableCommonEventMenuCancel
  - This will disable the cancel button for the common event menu from being
  pressed. Pressing cancel while the common event menu is active will do
  nothing. Use 'SetCommonEventMenuCancel x' to re-enable the cancel button.
  The Enable version will reenable the cancel function as 0.

  DisableCommonEventMenuConfirm
  EnableCommonEventMenuConfirm
  - This will disable the confirm button for the common event menu from
  being pressed. This is made for those who wish to use the menu only as a
  list and not a selectable menu. The Enable version will reenable the
  confirm function.

  ---

  OpenCommonEventMenu
  - After you've set everything up, this command will be used to open up the
  common event menu. This can be used on the map. If you are using the
  Battle Engine Core, this menu can be opened in battle as well. All of the
  common events listed by the 'AddCommonEventMenu' plugin command will
  appear in this list.

  ---

  CommonEventMenuX 0
  CommonEventMenuY this.fittingHeight(2)
  CommonEventMenuWidth Graphics.boxWidth / 2
  CommonEventMenuHeight Graphics.boxHeight - this.fittingHeight(2)
  CommonEventMenuOpacity 255
  CommonEventMenuColumns 1
  - These plugin commands allow you to adjust the x, y, width, height,
  opacity, and the number of columns used for the main common event menu
  list. Make sure all of these settings are done BEFORE the common event
  menu is opened with the 'OpenCommonEventMenu' plugin command.

  ---

  ShowCommonEventMenuHelp
  HideCommonEventMenuHelp
  - This will allow you to decide if the help window will be shown or hidden
  for the next 'OpenCommonEventMenu' plugin command usage.

  ---

  CommonEventMenuHelpX 0
  CommonEventMenuHelpY 0
  CommonEventMenuHelpWidth Graphics.boxWidth
  CommonEventMenuHelpHeight this.fittingHeight(2)
  CommonEventMenuHelpOpacity 255
  - These plugin commands allow you to adjust the x, y, width, height, and
  opacity of the help window for the common event menu list. Make sure all
  of these settings are done BEFORE the common event menu is opened with the
  'OpenCommonEventMenu' plugin command.

  ---

  ShowCommonEventMenuPicture
  HideCommonEventMenuPicture
  - This will allow you to decide if the help window will be shown or hidden
  for the next 'OpenCommonEventMenu' plugin command usage.

  ---

  CommonEventMenuPictureX Graphics.boxWidth / 2
  CommonEventMenuPictureY this.fittingHeight(2)
  CommonEventMenuPictureWidth Graphics.boxWidth / 2
  CommonEventMenuPictureHeight this.fittingHeight(10)
  CommonEventMenuPictureOpacity 255
  - These plugin commands allow you to adjust the x, y, width, height, and
  opacity of the picture window for the common event menu list. Make sure
  all of these settings are done BEFORE the common event menu is opened with
  the 'OpenCommonEventMenu' plugin command.

  ---

  ShowCommonEventMenuSubtext
  HideCommonEventMenuSubtext
  - This will allow you to decide if the help window will be shown or hidden
  for the next 'OpenCommonEventMenu' plugin command usage.

  ---

  CommonEventMenuSubtextX Graphics.boxWidth / 2
  CommonEventMenuSubtextY Graphics.boxHeight - height
  CommonEventMenuSubtextWidth Graphics.boxWidth / 2
  CommonEventMenuSubtextHeight Graphics.boxHeight - this.fittingHeight(2) -
    this.fittingHeight(10)
  CommonEventMenuSubtextOpacity 255
  - These plugin commands allow you to adjust the x, y, width, height, and
  opacity of the subtext window for the common event menu list. Make sure
  all of these settings are done BEFORE the common event menu is opened with
  the 'OpenCommonEventMenu' plugin command.

  ---

  SetCommonEventMenuSettings Default Setup
  SetCommonEventMenuSettings Basic Setup
  - This allows you to set the common event windows to position themselves
  to the default setup provided by the plugin parameters or a basic setup
  made of just the main list and a help window.
Common Event Menu Setup Pack 1
Use the following plugin commands to change the menu setup of your common
event menu before opening it up. To see what the layouts look like, please
refer to the Youtube video link and/or this plugin's page on Yanfly.moe.

Plugin Command:
  SetCommonEventMenuSettings Reverse Setup
  - This puts the Help Window at the top of the screen. The picture and
  subtext menus appear on the left left of the screen. The main list window
  appears on the right half of the screen.
  SetCommonEventMenuSettings Full Single Setup
  - This makes the main list window cover the entire screen. The help,
  picture, and subtext windows do not appear. There is only one column used.
  SetCommonEventMenuSettings Full Double Setup
  - This makes the main list window cover the entire screen. The help,
  picture, and subtext windows do not appear. There are two columns used.
  SetCommonEventMenuSettings Double Common Setup
  - The Help Window appears at the top of the screen with the main list
  window underneath it with two columns. The picture and subtext windows do
  not appear.
  SetCommonEventMenuSettings Double Subtext Setup
  - The Help Window appears at the top of the screen with the main list
  window underneath it with two columns. The subtext window appears at the
  bottom of the screen. The picture window does not appear.
  SetCommonEventMenuSettings Double Picture Setup
  - The Help Window appears at the top of the screen with the main list
  window underneath it with two columns. The picture window appears at the
  bottom of the screen. The subtext window does not appear.
  SetCommonEventMenuSettings Double Hybrid Setup
  - The Help Window appears at the top of the screen with the main list
  window underneath it with two columns. Both picture and subtext windows
  appear at the bottom of the screen with the picture window on the left
  side and the subtext window on the right side.
  SetCommonEventMenuSettings Double Reverse Hybrid Setup
  - The Help Window appears at the top of the screen with the main list
  window underneath it with two columns. Both picture and subtext windows
  appear at the bottom of the screen with the subtext window on the left
  side and the picture window on the right side.
  SetCommonEventMenuSettings Sandwich Single Setup
  - The Help Window appears at the top of the screen and the subtext window
  appears at the bottom. The main list is sandwiched in between using only
  one column.
  SetCommonEventMenuSettings Sandwich Double Setup
  - The Help Window appears at the top of the screen and the subtext window
  appears at the bottom. The main list is sandwiched in between using two
  columns for the common event list.
  SetCommonEventMenuSettings Sandwich Picture Setup
  - The Help Window appears at the top of the screen and the subtext window
  appears at the bottom. The main list is sandwiched in between using one
  column on the left side. The picture window is also sandwiched on the
  right side of the screen.
  SetCommonEventMenuSettings Sandwich Reverse Picture Setup
  - The Help Window appears at the top of the screen and the subtext window
  appears at the bottom. The picture window is sandwiched in between the two
  windows on the left half of the screen while the main list is sandwiched
  in between using one column on the right half.
Common Event Menu Setup Pack 2
Use the following plugin commands to change the menu setup of your common
event menu before opening it up. To see what the layouts look like, please
refer to the Youtube video link and/or this plugin's page on Yanfly.moe.

Plugin Command:
  SetCommonEventMenuSettings Side Subtext Setup
  - This puts the Help Window at the top of the screen. The main list will
  appear on the left half of the screen while the subtext window takes the
  right half of the screen. The picture window does not appear.
  SetCommonEventMenuSettings Side Reverse Subtext Setup
  - This puts the Help Window at the top of the screen. The main list will
  appear on the right half of the screen while the subtext window takes the
  left half of the screen. The picture window does not appear.
  SetCommonEventMenuSettings Subtext Picture Setup
  - This puts the Help Window at the top of the screen. The main list will
  appear on the left half of the screen while the subtext window takes the
  right half of the screen. The main list will be 4 lines tall while the
  picture window takes the remainder of the height.
  SetCommonEventMenuSettings Subtext Reverse Picture Setup
  - This puts the Help Window at the top of the screen. The main list will
  appear on the right half of the screen while the subtext window takes the
  left half of the screen. The main list will be 4 lines tall while the
  picture window takes the remainder of the height.
  SetCommonEventMenuSettings Picture Subtext Setup
  - This puts the Help Window at the top of the screen. The main list will
  appear on the left half of the screen while the picture window takes the
  right half of the screen. The main list will be 4 lines tall while the
  subtext window takes the remainder of the height.
  SetCommonEventMenuSettings Picture Reverse Subtext Setup
  - This puts the Help Window at the top of the screen. The main list will
  appear on the right half of the screen while the picture window takes the
  left half of the screen. The main list will be 4 lines tall while the
  subtext window takes the remainder of the height.
  SetCommonEventMenuSettings Side Picture Setup
  - This puts the Help Window at the top of the screen. The main list will
  appear on the left half of the screen while the picture window takes the
  right half of the screen. The subtext window does not appear.

  SetCommonEventMenuSettings Side Reverse Picture Setup
  - This puts the Help Window at the top of the screen. The main list will
  appear on the right half of the screen while the picture window takes the
  right left of the screen. The subtext window does not appear.
  SetCommonEventMenuSettings Left Half Setup
  - This puts the Help Window and main list on the left half of the screen.
  Everything is half width.
  SetCommonEventMenuSettings Left Half Subtext Setup
  - This puts the Help Window, main list, and subtext window on the left
  half of the screen. Everything is half width.
  SetCommonEventMenuSettings Left Half Picture Setup
  - This puts the Help Window, main list, and picture window on the left
  half of the screen. Everything is half width. The main list is only four
  commands tall.
  SetCommonEventMenuSettings Right Half Setup
  - This puts the Help Window and main list on the right half of the screen.
  Everything is half width.
  SetCommonEventMenuSettings Right Half Subtext Setup
  - This puts the Help Window, main list, and subtext window on the right
  half of the screen. Everything is half width.
  SetCommonEventMenuSettings Right Half Picture Setup
  - This puts the Help Window, main list, and picture window on the right
  half of the screen. Everything is half width. The main list is only four
  commands tall.
Core Engine
Plugin Command:
  GainGold 1234567890       # Party gains 1234567890 gold.
  LoseGold 9876543210       # Party loses 9876543210 gold.
Credits Page
For those who wish to display the credits window from the map scene during
the middle of your game, you can now do so with a plugin command!

Plugin Command:

  OpenCreditsWindow
  - Opens the credit window from in-game during the map scene. This will
  cause the player and events to be unable to move.
Damage Core
The following are plugins you can use to set the damage cap rulings for your
game. Keep in mind that individual aspects such as equipment traits, skill
properties, etc. will take priority over these default caps.

Plugin Command:
  SetDamageCap 9999     Sets the default damage cap to 9999.
  SetHealingCap 9999    Sets the default healing cap to 9999.
  EnableDamageCap       Enables default cap for both damage and healing.
  DisableDamageCap      Disables default cap for both damage and healing.
Dash Toggle
You can use these plugin commands to enable or disable dashing mid-game!

Plugin Command

  EnableDashing
  - Enables the player to be able to dash. However, this will not take
  priority in maps that disable dashing altogether.

  DisableDashing
  - Disables the player from being able to dash.

  ToggleDashing
  - This will enable/disable dashing. This will not take priority in maps
  that disable dashing altogether.
Enemy Levels
If you wish to change enemy levels through plugin commands, you can use the
following plugin commands to alter them. These plugin commands are only used
inside battle.

Plugin Command:

  EnemyLevelChange 2 to 50
  - This will reset the enemy in position 2's level to 50.

  EnemyLevelChangeAll 50
  - This will change the levels of all enemies to 50.

  EnemyGainLevel 3 by 20
  - This will cause the enemy in positon 3 to gain 20 levels.

  EnemyGainLevelAll 20
  - This will cause all enemies to gain 20 levels.

  EnemyLoseLevel 4 by 10
  - This will cause the enemy in positon 4 to lose 10 levels.

  EnemyLoseLevelAll 10
  - This will cause all enemies to lose 10 levels.

  EnemyLevelReset 5
  - This will reset the enemy in position 5's level to the level it had at
  the start of battle.

  EnemyLevelResetAll
  - This will reset all enemy levels to their original levels.
Difficulty Slider
For those who wish to show/hide the Difficulty Slider from the options menu
midway through the game, you can control it using these plugin commands:

Plugin Commands:

  ShowDifficultySlider
  - This will show the Difficulty Slider and enable it making it apply to
  all enemies in the game that do not have an unaffected notetag.

  HideDifficultySlider
  - This will hide the Difficulty Slider and also disable the slider's
  effects on enemy levels in the game.
Enhanced TP
You can use the following Plugin Commands to alter Enhanced TP.

Plugin Command:

  ShowTpMode
  HideTpMode
  This will show/hide the TP Mode from the Skill Menu.

  EnableTpMode
  DisableTpMode
  This will enable/disable the TP Mode in the Skill Menu.

  ChangeTpMode Actor 1 to 5
  This will change the TP mode of Actor 1 to TP Mode 5.

  ChangeTpMode Party 2 to 6
  This will change the TP mode of Party Member 2 to TP Mode 6.

  UnlockTpMode Actor 3 Mode 7
  This will make Actor 3 unlock TP Mode 7.

  UnlockTpMode Party 4 Mode 8
  This will make Party Member 4 unlock TP Mode 8.

  RemoveTpMode Actor 1 Mode 9
  This will make Actor 1 remove TP Mode 9.

  RemoveTpMode Party 2 Mode 10
  This will make Party Member 2 remove TP Mode 10.

  UnlockAllTpModes Actor 1
  This will make Actor 1 unlock all TP modes.

  UnlockAllTpModes Party 2
  This will make Party member 2 unlock all TP modes.

  RemoveAllTpModes Actor 1
  This will make Actor 1 remove all TP modes.

  RemoveAllTpModes Party 2
  This will make Party member 2 remove all TP modes.
Equip Battle Skills
You can use the following plugin commands to increase or decrease the amount
of battle slots for specific actors.

Plugin Command:

  IncreaseActorBattleSlots 3 by 4
  - This will increase actor 3's number of battle skill slots by 4. The
  total amount of battle skill slots cannot go beyond the 'Maximum Skills'
  plugin parameter.

  DecreaseActorBattleSlots 5 by 2
  - This will decrease actor 5's number of battle skill slots by 2. The
  total amount of battle skill slots cannot go beneath 1.
Here are some plugin commands you can use for your game!

Plugin Command:

  EnableEquipBattleSkills
  - This will enable the 'Equip Skills' command in the skill menu.

  DisableEquipBattleSkills
  - This will disable the 'Equip Skills' command in the skill menu.

  ShowEquipBattleSkills
  - This will show the 'Equip Skills' command in the skill menu.

  HideEquipBattleSkills
  - This will hide the 'Equip Skills' command in the skill menu.
Equip Core
Equip Customize Command
There's a couple of plugin commands you can use with this plugin.

Plugin Command:

  ShowEquipCustomize
  - This will show the 'Customize' command in the equip menu.

  HideEquipCustomize
  - This will hide the 'Customize' command in the equip menu.
Event Chase Player
Event Chase Stealth
You can use the following Plugin Commands to adjust Stealth Mode in your
game mid-game!

Plugin Command:

  StealthTime x
  - Puts the player character into Stealth Mode for x frames. Once the
  timer is up, the player exits Stealth Mode.

  StealthMode On
  - Puts the player character into Stealth Mode. There is no timer for this.

  StealthMode Off
  - Puts the player character out of Stealth Mode. This also resets the
  Stealth Timer to 0.

  EnableStealthDash
  - Enables the player to be able to dash while in Stealth Mode.

  DisableStealthDash
  - Disables the player from being able to dash while in Stealth Mode.

  SetStealthMoveSpeed x
  - Sets the move speed while in Stealth Mode to x.

  HideStealthGauge
  - This prevents the Stealth Gauge from being shown at all.

  ShowStealthGauge
  - This will show the Stealth Gauge whenever the player is in Stealth Mode.

  EnableDifferentStealthSpeed
  - Sets the player to have a different move speed when in Stealth Mode.

  DisableDifferentStealthSpeed
  - The player won't have a different move speed when in Stealth Mode.
Event Mini Label
If you would like to shut off the Event Mini Label mid-game or turn it on,
you can use the following plugin commands:

Plugin Command:

  HideMiniLabel
  Hides all Event Mini Label.

  ShowMiniLabel
  Shows all Event Mini Label.

  RefreshMiniLabel
  Refreshes all Event Mini Labels on the map.
Event Timer Control
Use the following plugin commands to make use of the new features added by
this plugin to control the event timer.

Plugin Commands:

  --- PAUSE/RESUME ---

  EventTimer Pause
  - Pauses the event timer.

  EventTimer Resume
  - Resumes the event timer if it has been paused.

  --- COUNT DOWN/UP ---

  EventTimer Countdown
  - Changes the direction of the event timer to decrease and count down
  towards 0 seconds.

  EventTimer Count Up
  - Changes the direction of the event timer to increase and count upwards
  endlessly until manually stopped

  EventTimer Count Toggle
  - Switches the current direction of the event timer to either increase or
  decrease each second it is active.

  --- INCREASE/DECREASE ---

  EventTimer Increase x Frames
  EventTimer Decrease x Frames
  - Replace 'x' with a number value to determine how many frames to
  increase or decrease the event timer by.

  EventTimer Increase x Seconds
  EventTimer Decrease x Seconds
  - Replace 'x' with a number value to determine how many seconds to
  increase or decrease the event timer by.

  EventTimer Increase x Minutes
  EventTimer Decrease x Minutes
  - Replace 'x' with a number value to determine how many minutes to
  increase or decrease the event timer by.

  EventTimer Increase x Hours
  EventTimer Decrease x Hours
  - Replace 'x' with a number value to determine how many hours to
  increase or decrease the event timer by.

  You can also combine them together as such:

  EventTimer Increase x Hours, y Seconds
  EventTimer Increase x Hours, y Minutes
  EventTimer Increase x Minutes, y Seconds
  EventTimer Increase x Hours, y Minutes, z Seconds
External Links
If you wish to send players to other links, you can use the following
plugin commands.

Plugin Command
  OpenNewTab http://www.google.com/     Opens link in a new tab.
  OpenNewWindow http://www.google.com/  Opens link in a new window.

Some web browsers may not differentiate these commands too much.
Footstep Sounds
If at any time you wish to enable/disable footstep sounds in your game, you
can use some plugin commands to do so.

Plugin Commands:

  EnableFootsteps
  - Turns on footstep sounds.

  DisableFootsteps
  - Turns off footstep sounds.
Force Advantage
Use the following plugin commands to force a battle advantage on the next
upcoming battle:

Plugin Command:

  ForceAdvantage Pre-Emptive
  ForceAdvantage Preemptive
  ForceAdvantage First Strike
  ForceAdvantage Player
  - Forces a pre-emptive strike giving the player the advantage.

  ForceAdvantage Surprise
  ForceAdvantage Back Attack
  ForceAdvantage Enemy
  - Forces a surprise attack giving the enemy party the advantage.

  ForceAdvantage None
  ForceAdvantage Normal
  ForceAdvantage Neutral
  - Forces a neutral advantage where neither party has the advantage.

  ForceAdvantage Clear
  - Clears any forced advantage settings imposed by the above commands.
Gab Window
Using the Gab Window is quite simple. By default, it can be used in either
the map scene or the battle scene. To call upon it, you will to use a few
Plugin Commands to set up what you wish for the Gab Window to display.

Plugin Commands:

--- Setup Commands ---

GabText text
This will set the gab window to type out the above text. Text codes can be
used for the Gab Window.

GabFaceName filename
If you wish to display a face graphic, use this plugin command to have it
display a face from the filename.

GabFaceIndex x
Used in combination with the above plugin command to define which index the
face will use.

GabSpriteName filename
If you wish to display a particular character sprite, use this plugin
command to have it display a sprite from the filename.

GabSpriteIndex x
Used in combination with the above plugin command to define which index the
sprite will use.

GabActor x
GabActorFace x
This will display actor x's face graphic where x is the actor's ID.

GabActorSprite x
This will display actor x's sprite graphic where x is the actor's ID.

GabParty x
GabPartyFace x
This will display party member x's face graphic where x is the position.

GabPartySprite x
This will display party member x's sprite graphic where x is the position.

GabSound filename
This will play a sound from the SE folder under that particular filename.

GabSwitch x
This will enable switch x when this gab finishes playing.

WaitForGab
Causes the game to wait until all gabs are finished playing.

--- Display Commands ---

ShowGab
Once the above settings are complete, use this Plugin Command to launch the
Gab Window and display the above data. This will put the gab data into a
queue which means if there's another gab playing, this will be next in line.

*Note If multiple ShowGabs are used, they will be queued up. The current
playing gab will finish playing before moving onto the next. If it so
happens that the inputted Gab would have the same exact settings as a
previously loaded gab within the same queue, it will not be inserted to
prevent any redundancy amongst the conversation.

ForceGab
Once the above settings are complete, use this Plugin Command to clear all
the other gabs in the Gab Window and display the above data.

ClearGab
This clears out the Gab Window of the current gab and any gabs queued.
Help File Access
You can use the following plugin commands to adjust how accessing the help
file is done for your game.

Plugin Commands

  OpenHelp
  - This will open up the help file or URL for your game.

  ShowMenuHelpCommand
  - Will make the 'Help' command show up in the main menu.

  HideMenuHelpCommand
  - Will make the 'Help' command hidden in the main menu.
Icon Balloons
Use these plugin commands to get icon balloons playing on the player/events.

Plugin Commands

  ---

  ShowIconBalloon x on Player
  ShowIconBalloon x on Player, Wait

  ShowIconBalloon x on Event y
  ShowIconBalloon x on Event y, Wait

  ShowIconBalloon x on Follower y
  ShowIconBalloon x on Follower y, Wait

  ShowIconBalloon x on This Event
  ShowIconBalloon x on This Event, wait
  - This will cause the Icon Balloon using icon index x to appear on the
  player, event y, or follower y. If 'wait' is used, then the event will
  wait until the balloon has finished playing.

  ---

  ShowIconBalloon x to y on Player
  ShowIconBalloon x to y on Player, Wait

  ShowIconBalloon x to y on Event z
  ShowIconBalloon x to y on Event z, Wait

  ShowIconBalloon x to y on Follower z
  ShowIconBalloon x to y on Follower z, Wait

  ShowIconBalloon x to y on This Event
  ShowIconBalloon x to y on This Event, Wait
  - This will cause the Icon Balloon start on icon index x and move through
  to y, the next icon upward each few frames up to icon index y. This icon
  balloon will be played on the player, event z, or follower z. If 'wait' is
  used, then the event will wait until the balloon has finished playing.
  When using this command, x cannot be greater than y.
Improved Battlebacks
You can use the following plugin commands to alter how battlebacks behave in
your game. Keep in mind that these plugin commands must be used while the
party is in battle.

---

BATTLEBACK id ADD: folder, filename
BATTLEBACK id ADD: folder, filename, hue
- Replace 'id' with the battleback you wish to alter as a number larger than
2 (i.e. 3 or above). Replace 'folder' with the exact folder name in your
project's 'img' folder (case sensitive). Replace 'filename' with the image
filename without the file extension (case sensitive). If 'hue' is used,
replace 'hue' with a number between 0 and 360 to change the hue of the image
used. This will add a new battleback stacked on top of battlebacks 1 and 2
with higher ID's being on top. When newly added, the new battleback will
start at opacity 0 and fade in with a duration of 20 frames.

BATTLEBACK id REMOVE
- Replace 'id' with the battleback you wish to alter as a number larger than
2 (i.e. 3 or above). This will remove the battleback from being shown. When
this command is used, the battleback will fade with a duration of 20 frames.
Once it reaches 0 opacity, the battleback will be removed from the battle.

BATTLEBACK id CHANGE TO: folder, filename
BATTLEBACK id CHANGE TO: folder, filename, hue
- Replace 'id' with the battleback you wish to alter. Replace 'folder' with
the exact folder name in your project's 'img' folder (case sensitive).
Replace 'filename' with the image filename without the file extension (case
sensitive). This will change the designated battleback's image to use the
desired image depicted by the folder and filename. If 'hue' is used, replace
'hue' with a number between 0 and 360 to change the hue of the image used.

BATTLEBACK id FADE OUT
BATTLEBACK id FADE OUT: duration
BATTLEBACK id FADE IN
BATTLEBACK id FADE IN: duration
- Replace 'id' with the battleback you wish to alter. This will cause the
designated battleback to fade out/in. If 'duration' is used, replace it with
a number to indicate how many frames will be used for the fade out/in. If
no duration is specified, it will default to 20 frames.

BATTLEBACK id OPACITY: n
BATTLEBACK id OPACITY: n%
- Replace 'id' with the battleback you wish to alter. Replace 'n' with the
opacity value you wish to achieve (from 0 to 255) or replace 'n%' with the
opacity rate you wish to set the battleback to (from 0% to 100%). This will
set the designated battleback's opacity to that value. If there are any fade
in or out commands occurring as this command is issued, they'll be disabled.

BATTLEBACK id SCROLL SPEED X: +n
BATTLEBACK id SCROLL SPEED X: -n
BATTLEBACK id SCROLL SPEED Y: +n
BATTLEBACK id SCROLL SPEED Y: -n
- Replace 'id' with the battleback you wish to alter. Replace 'n' with the
value you wish to change the scroll speed X or scroll speed Y of. The higher
the 'n' value, the faster it scrolls.

BATTLEBACK id RESET SCROLL SPEED
- Replace 'id' with the battleback you wish to alter. Resets the scroll
speeds for X and Y back to 0.
Item Core
If you wish to be able to add items to your player's inventory without the
random variance being applied to it, you can use the following plugin
commands to adjust the settings for that.

Plugin Command:
  EnableVarianceStock  - Causes all items acquired from this point forward
                         to have its variance give stock (nonrandom) values.
  DisableVarianceStock - Causes all items acquired from this point forward
                         to have its variance give random values.

A small note is that if you enabled the variance stock values, if the player
restarts the game by either going through the title screen or just turning
off the program and starting it back up, the random variance will be in
effect again. This plugin command is meant to exist as a short term disable.
Attachable Augments
There's a couple of pluging commands you can use with this plugin.

Plugin Command:

  EnableAugments
  - This will enable augments in the item action menu. With them enabled,
  the player can now attach and detach augments to their items.

  DisableAugments
  - This will disable augments in the item action menu and hide their
  options so that the player will be unable to attach or detach augments
  from their items.

  ShowAugments
  - This will show the augments in the item info window when looking at
  item details.

  HideAugments
  - This will hide the augments in the item info window when looking at
  item details.
Item Disassemble
You can use the following plugin commands to alter Item Disassemble related
aspects of your game:

Plugin Command:

  ShowItemDisassemble
  - Shows the Disassemble command in the item menu if the item permits
  disassembling.

  HideItemDisassemble
  - Hides the Disassemble command in the item menu regardless.
Item Durability
There are a few plugin commands you can utilize to show/hide the Repair
option in the Item Action Window and/or enable/disable it.

Plugin Commands

  ShowRepairDurability
  HideRepairDurability
  - This will show/hide the Repair command in the Item Action Window.

  EnableRepairDurability
  DisableRepairDurability
  - This will enable/disable the Repair command in the Item Action Window.
Item Upgrade Slots
The following are some Plugin Commands you can use for your game regarding
the upgrade option in the item menu:

Plugin Command:
  ShowItemUpgrade    - Shows the upgrade option in the item menu.
  HideItemUpgrade    - Hides the upgrade option in the item menu.
  DisableItemUpgrade - Disables the upgrade option in the item menu.
  EnableItemUpgrade  - Enables the upgrade option in the item menu.

You can use those Plugin Commands at any time to adjust the upgrade option.
Item Synthesis
The following are Plugin Commands you may use with events.

Plugin Command:
  OpenSynthesis          Opens up the Synthesis Scene from the field.
  ShowSynthesis          Shows the Synthesis command from the main menu.
  HideSynthesis          Hides the Synthesis command from the main menu.
  EnableSynthesis        Enables the Synthesis command from the main menu.
  DisableSynthesis       Disables the Synthesis command from the main menu.

For those who wish to make the player synthesize only specific recipes, you
can use the following command.

  OpenSynthesis Item 15 Recipe
  - or -
  OpenSynthesis Weapon 20 Recipe
  - or -
  OpenSynthesis Armor 30 Recipe

This will make the synthesis menu, when opened up, only allow the recipes of
the Item 15, Weapon 20, or Armor 30 without needing it and not showing the
recipes of any recipe items within the player's inventory.
Job Points
For those wondering how to manually give, remove, or set JP for an actor,
you can use the following Plugin Commands.

Plugin Commands:

  gainJp actorId jp
  gainJp actorId jp classId
  Replace 'actorId' with the ID of the actor you wish to change the JP of.
  Replace 'jp' with the amount of JP you wish to alter. If you are using
  'classId', replace it with the ID of the actor's class you wish to alter.
  This command will let the actor gain JP.

  loseJp actorId jp
  loseJp actorId jp classId
  Replace 'actorId' with the ID of the actor you wish to change the JP of.
  Replace 'jp' with the amount of JP you wish to alter. If you are using
  'classId', replace it with the ID of the actor's class you wish to alter.
  This command will cause the actor to lose JP.

  setJp actorId jp
  setJp actorId jp classId
  Replace 'actorId' with the ID of the actor you wish to change the JP of.
  Replace 'jp' with the amount of JP you wish to alter. If you are using
  'classId', replace it with the ID of the actor's class you wish to alter.
  This command will set the actor's JP to a particular value.
Message Core
The following are some plugin commands you can use through the Event Editor
to change various aspects about the Message system.

Plugin Comand
  MessageRows 6
  - Changes the Message Rows displayed to 6. If you are using continuous
  Show Text events, this will continue displaying the following lines's
  texts until it hits the row limit. Anything after that is cut off until
  the next message starts to avoid accidental overlap.

  MessageWidth 400
  - Changes the Message Window Width to 400 pixels. This will cut off any
  words that are shown too far to the right so adjust accordingly!

  EnableWordWrap
  - Enables wordwrapping. If a word extends past the window size, it will
  automatically move onto the next line. Keep in mind, you will need to use
  \br to perform line breaks.

  DisableWordWrap
  - This disables wordwrapping. Line breaks will be automatic at points
  where a new line is started in the editor.

  EnableFastForward
  - Enables Fast Forward key from working with messages.

  DisableFastForward
  - Disables Fast Forward key from working with messages.
Extended Message Pack 1
You can use the following plugin commands to adjust a few of the settings
regarding the Message Window.

Plugin Commands

  --- Letter Sounds ---

  EnableLetterSound
  DisableLetterSound
  - These commands will enable or disable the letter sounds respectively.

  LetterSoundName Cursor2
  - This will replace the current letter sound with the written filename.
  The filename is case sensitive. Do not use the file extension.

  LetterSoundVolume 100
  - This will change the letter sound volume to 100.

  LetterSoundPitch 125
  - This will change the letter sound pitch to 125.

  LetterSoundPitchVariance 10
  - This will cause the letter sound's pitch to fluctuate between -10 & 10.

  LetterSoundPan 0
  - This will change the letter sound's pan to 0.

  LetterSoundPanVariance 10
  - This will cause the letter sound's pan to fluctuate between -10 and 10.

  LetterSoundInterval 2
  - This will change the interval at which the letter sounds are played to
  2 letters. Change it to 0 to play on every letter written out.

  LetterSoundReset
  - This will reset the letter sounds to their default settings.

  --- Choice Settings ---

  ChoiceRowMax 4
  - This will set the maximum amount of visible choices to 4.

  HideChoice 5
  - This will cause choice 5 to be hidden.

  ShowChoice 6
  - This will cause choice 6 to be shown and no longer hidden.

  ClearHiddenChoices
  - All choices become visible and are no longer hidden.

  DisableChoice 1
  - This will cause choice 1 to be disabled.

  EnableChoice 2
  - This will cause choice 2 to be enabled.

  ClearDisabledChoices
  - All choices become enabled and are no longer disabled.

  ClearChoiceSettings
  - All choices are shown and enabled.

  --- Message Window Positions ---

  MessageRows 6
  - Changes the Message Rows displayed to 6. If you are using continuous
  Show Text events, this will continue displaying the following lines's
  texts until it hits the row limit. Anything after that is cut off until
  the next message starts to avoid accidental overlap.

  MessageWidth 400
  - Changes the Message Window Width to 400 pixels. This will cut off any
  words that are shown too far to the right so adjust accordingly!

  MessagePositionX 300
  - Sets the Message Window's X Position to 300. This position will be
  relative to its horizontal anchor point.

  MessagePositionY 400
  - Sets the Message Window's Y Position to 400. This position will be
  relative to its vertical anchor point.

  MessagePositionXAuto
  - Sets the Message Window's X Position to be automatically fitted and not
  set relative to its horizontal anchor point.

  MessagePositionYAuto
  - Sets the Message Window's Y Position to be automatically fitted and not
  set relative to its vertical anchor point.

  MessageAnchorX left
  - Sets the Message Window's x anchor to 'left', 'center', or 'right' if
  you are using specified coordinates.

  MessageAnchorY bottom
  - Sets the Message Window's y anchor to 'top', 'center', or 'bottom' if
  you are using specified coordinates.

  MessagePositionReset
  - Resets both the Message Window's X and Y Positions to its automatic
  positions and not adjusted to its anchor points. The Message Width and the
  Message Rows.
Message Backlog
The following plugin commands can be used to alter various settings
regarding the Message Backlog.

Plugin Command:

  EnableMessageBacklog
  DisableMessageBacklog
  - This enables/disables the message backlog from being playeraccessed.

  EnableMessageLogging
  DisableMessageLogging
  - If enabled, new messages will be recorded to the backlog.
  If disabled, they won't be recorded.

  OpenMessageBacklog
  - This will forcefully open the message backlog if done on the map scene.
  (Highly recommended to be used with Button Common Events)
Party System
Here are some plugin commands you can use!

Plugin Command:
  OpenPartyMenu     Opens up the Party Menu from the field.

Actors can also be required, meaning the player must have that actor(s) in
the party before the player is able to leave the party menu. Required actors
can be moved around, unlike locked actors. Keep in mind if you do make some
actors required, do not make the game require more actors than the possible
maximum battle members or else the player will be stuck in the party menu.

Plugin Command:
  ShowBattleFormation    - Shows 'Formation' command in battle.
  HideBattleFormation    - Hides 'Formation' command in battle.
  EnableBattleFormation  - Enables 'Formation' command in battle.
  DisableBattleFormation - Disables 'Formation' command in battle.

  LockActor 3          - Locks actor 3.
  LockActor 4 5 6      - Locks actors 4, 5, and 6.
  UnlockActor 3        - Unlocks actor 3.
  UnlockActor 4 5 6    - Unlocks actors 4, 5, and 6.
                       * Locked Actors cannot be moved out of their current
                         position and must be in the party.

  RequireActor 3       - Player must have actor 3 in party.
  RequireActor 4 5 6   - Player must have actors 4, 5, and 6 in party.
  UnrequireActor 3     - Player no longer needs actor 3 in party.
  UnrequireActor 4 5 6 - Player no longer needs actors 4, 5, and 6 in party.
                       * Required Actors must be in the party in order for
                         the player to be able to exit the party menu.

  ChangePartyMax 5     - Changes max party size to 5.
Actor Party Switch
For those who'd like to be able to change the settings of Actor Part Switch
midway through the game, use the following plugin commands:

Plugin Commands:

  ShowActorPartySwitch
  HideActorPartySwitch
  - Shows/hides the 'Switch' command from the actor command window from
  being visible.

  EnableActorPartySwitch
  DisableActorPartySwitch
  - Enables/disables the 'Switch' command from the actor command window
  from being able to selected.

  ResetActorPartySwitchCooldowns
  - Resets all cooldowns for actor party switching.
Quest Journal System
There are various plugin commands you can use to control the quest journal
system in your game.

=-=-=-=-=-=-=-=-=-=-=-=-=-=-=-=-=-=-=-=-=-=-=-=-=-=-=-=-=-=-=-=-=-=-=-=-=-=-
Plugin Commands:
=-=-=-=-=-=-=-=-=-=-=-=-=-=-=-=-=-=-=-=-=-=-=-=-=-=-=-=-=-=-=-=-=-=-=-=-=-=-

  Quest Journal Open
  - Opens the quest journal system menu with no quest selected.

  Quest Journal Open To x
  - Replace 'x' with the quest ID you wish to open the quest journal system
  to. If the quest isn't known to the player at the time this plugin command
  takes place, then the quest will be added to the player's quest journal.

  ---

  Quest Journal Show
  Quest Journal Hide
  - Show or hide the Quest Journal option from the main menu.

  Quest Journal Enable
  Quest Journal Disable
  - Enable or disable the Quest Journal option in the main menu.

  ---

  Quest Add x
  - Replace 'x' with an integer. Adds quest ID 'x' to the quest journal as
  an available quest. This will make it viewable from the in-game quest
  journal system menu.

  Quest Add x to y
  - Replace 'x' and 'y' with integer values determining the quest ID range
  you wish to add in mass amounts to the quest journal.

  Quest Add x, x, x
  - Replace 'x' values with integer values representing the quest ID's you
  wish to add to the quest journal.

  ---

  Quest Remove x
  - Replace 'x' with an integer. This will remove quest ID 'x' from the
  quest journal.

  Quest Remove x to y
  - Replace 'x' and 'y' with integer values determining the quest ID range
  you wish to remove in mass amounts from the quest journal.

  Quest Remove x, x, x
  - Replace 'x' values with integer values representing the quest ID's you
  wish to remove from the quest journal.

  ---

  Quest Set Completed x
  Quest Set Failed x
  Quest Set Available x
  - Replace 'x' with the quest ID you wish to change the quest status to
  'completed', 'failed', or 'available'.

  Quest Set Completed x to y
  Quest Set Failed x to y
  Quest Set Available x to y
  - Replace 'x' and 'y' with integer values determining the quest ID range
  you wish to set as completed, failed, or available.

  Quest Set Completed x, x, x
  Quest Set Failed x, x, x
  Quest Set Available x, x, x
  - Replace 'x' values with integer values representing the quest ID's you
  wish to set as completed, failed, or available.

  ---

  Quest x Change Description Entry To y
  - Replace 'x' with the Quest ID you want to modify the description of.
  Replace 'y' with the description entry ID you wish to change the quest to.
  This will make the description, when viewed in-game in the quest journal,
  to display the description entry ID 'y' found in the plugin parameters for
  quest 'x'. This is used for times you wish to update the description text
  midway through a quest.

  ---

  Quest x Show Objective y
  Quest x Hide Objective y
  - Replace 'x' with the Quest ID you wish to alter the objective of.
  Replace 'y' with the objective ID you wish to make visible/hidden. Quests
  can show multiple objectives at once.

  Quest x Show Objective y to z
  Quest x Hide Objective y to z
  - Replace 'x' with the Quest ID you wish to alter the objective of.
  Replace 'y' and 'z' with the objective ID range you wish to make
  visible/hidden. Quests can show multiple objectives at once.

  Quest x Show Objective y, y, y
  Quest x Hide Objective y, y, y
  - Replace 'x' with the Quest ID you wish to alter the objective of.
  Replace 'y' values with integer values representing the objective ID's you
  wish to make visible/hidden. Quests can show multiple objectives at once.

  Quest X Show All Objectives
  Quest X Hide All Objectives
  - Replace 'x' with the Quest ID you wish to alter the objectives of.
  This will show/hide all of the quest's objectives.

  Quest x Complete Objective y
  Quest x Fail Objective y
  Quest x Normalize Objective y
  - Replace 'x' with the Quest ID you wish to alter the objective of.
  Replace 'y' with the objective ID you wish to change the status of.
  Using 'Complete' will mark the objective as completed. Using 'Fail' will
  mark the objective as failed. Using 'Normalize' will set the objective's
  status to neither completed or failed.

  Quest x Complete Objective y to z
  Quest x Fail Objective y to z
  Quest x Normalize Objective y to z
  - Replace 'x' with the Quest ID you wish to alter the objective of.
  Replace 'y' and 'z' with the objective ID range you wish to change the
  status of. Using 'Complete' will mark the objective as completed. Using
  'Fail' will mark the objective as failed. Using 'Normalize' will set the
  objective's status to neither completed or failed.

  Quest x Complete Objective y, y, y
  Quest x Fail Objective y, y, y
  Quest x Normalize Objective y, y, y
  - Replace 'x' with the Quest ID you wish to alter the objective of.
  Replace 'y' values with integer values representing the objective ID's you
  wish to change the status of. Using 'Complete' will mark the objective as
  completed. Using 'Fail' will mark the objective as failed. Using
  'Normalize' will set the objective's status to neither completed or
  failed.

  Quest x Complete All Objectives
  Quest x Fail All Objectives
  Quest x Normalize All Objectives
  - Replace 'x' with the Quest ID you wish to alter the objectives of.
  This will complete/fail/normalize all of the quest's objectives.

  ---

  Quest x Show Reward y
  Quest x Hide Reward y
  - Replace 'x' with the Quest ID you wish to alter the reward of. Replace
  'y' with the reward ID you wish to make visible/hidden. Quests can show
  multiple reward at once.

  Quest x Show Reward y to z
  Quest x Hide Reward y to z
  - Replace 'x' with the Quest ID you wish to alter the reward of. Replace
  'y' and 'z' with the reward ID range you wish to make visible/hidden.
  Quests can show multiple reward at once.

  Quest x Show Reward y, y, y
  Quest x Hide Reward y, y, y
  - Replace 'x' with the Quest ID you wish to alter the reward of. Replace
  'y' values with integer values representing the reward ID's you wish to
  make visible/hidden. Quests can show multiple reward at once.

  Quest x Show All Rewards
  Quest x Hide All Rewards
  - Replace 'x' with the Quest ID you wish to alter the rewards of. This
  will show/hide all of the quest's rewards.

  Quest x Claim Reward y
  Quest x Deny Reward y
  Quest x Normalize Reward y
  - Replace 'x' with the Quest ID you wish to alter the reward of. Replace
  'y' with the reward ID you wish to change the status of. Using 'Claim'
  will mark the reward as claimed. Using 'Deny' will mark the reward as
  denied. Using 'Normalize' will set the reward's status to neither claimed
  or denied.

  Quest x Claim Reward y to z
  Quest x Deny Reward y to z
  Quest x Normalize Reward y to z
  - Replace 'x' with the Quest ID you wish to alter the reward of. Replace
  'y' and 'z' with the reward ID range you wish to change the status of.
  Using 'Claim' will mark the reward as claimed. Using 'Deny' will mark the
  reward as denied. Using 'Normalize' will set the reward's status to
  neither claimed or denied.

  Quest x Claim Reward y, y, y
  Quest x Deny Reward y, y, y
  Quest x Normalize Reward y, y, y
  - Replace 'x' with the Quest ID you wish to alter the reward of. Replace
  'y' values with integer values representing the reward ID you wish to
  change the status of. Using 'Claim' will mark the reward as claimed. Using
  'Deny' will mark the reward as denied. Using 'Normalize' will set the
  reward's status to neither claimed or denied.

  Quest x Claim All Rewards
  Quest x Deny All Rewards
  Quest x Normalize All Rewards
  - Replace 'x' with the Quest ID you wish to alter the rewards of. This
  will claim/deny/normalize all of the quest's rewards.

  ---

  Quest x Change Subtext Entry To y
  - Replace 'x' with the Quest ID you want to modify the subtext of. Replace
  'y' with the subtext entry ID you wish to change the quest to. This will
  make the subtext, when viewed in-game in the quest journal, to display the
  subtext entry ID 'y' found in the plugin parameters for quest 'x'. This is
  used for times you wish to update the subtext text midway through a quest.

  ---
Map Quest Window
You can use the following plugin commands to change the behavior of the
Map Quest Window.

Plugin Commands:

  SetActiveQuest x
  - Sets the active quest to x.

  RefreshActiveQuestWindow
  - Refreshes the map quest window.

  ShowActiveQuestWindow
  HideActiveQuestWindow
  - Changes the Active Map Quest Window to be visible/hidden. This will not
  override the player's Options Menu's setting to hide the window.
Repel & Lure Encounters
For those who would like to adjust the lure rates and lure flat values
mid-game, you can use the following plugin commands.

Plugin Commands:

  SetLureRate x
  - Sets the lure rate for encounters to x when the Lure Variable is active.
  You can use JavaScript code for x if you are familiar with JavaScript.

  SetLureFlat x
  - Sets the flat value for encounters to x when the Lure Variable is active.
  You can use JavaScript code for x if you are familiar with JavaScript.
Row Formation
The following are some plugin commands you can use to adjust rows mid-game.

Plugin Command:

  ShowMenuRow
  HideMenuRow
  This will either show or hide the Row command from the main menu.

  EnableMenuRow
  DisableMenuRow
  This will either enable or disable the Row command from the main menu.

  ShowBattleRow
  HideBattleRow
  This will either show or hide the Row command from the battle party menu.
  This requires the YEP_BattleEngineCore plugin to take effect.

  EnableBattleRow
  DisableBattleRow
  This will either enable or disable the Row command from the battle party
  menu. This requires the YEP_BattleEngineCore plugin to take effect.

  SetActorRow actorId x
  This will set the actor represented by actorId to move to row x. If you
  want to move actor 3 to the 2nd row, the plugin command would look like:
  SetActorRow 3 2

  SetPartyRow slotId x
  This will set the party member in slotId to move to row x. If you want to
  move the 3rd party member to the 2nd row, the plugin command would look
  like: SetPartyRow 3 2

  SetEnemyRow slotId x
  This will set the enemy member in slotId to move to row x. If you want to
  move the 3rd enemy member to the 2nd row, the plugin command would look
  like: SetEnemyRow 3 2
  * Note: If you use this plugin command during turn 0 and the parameter
  'Adjust Relative' is set to false, the enemies will not move and
  automatically assume the position they are in will be the row they'll be
  in. On the other hand, using this plugin on anything after turn 0 will
  move the enemy visually to a different position on the screen. If the
  parameter 'Adjust Relative' is true, the enemies will move.
Save Core
Autosave
Autosave is manually done by the game developer using plugin commands. There
are also other plugin commands that can control autosaving, too.

  Plugin Commands:

     Autosave
     - This will make the game automatically save in the last saved file
     slot used by the player. If the player has started a new game and did
     not save into a slot yet, nothing will happen. If autosave is disabled
     by the player through the Options menu or disabled by the system with
     a plugin command, nothing will happen either.

     EnableAutosave
     DisableAutosave
     - This will forcibly enable or disable autosaving done by the game.
     This will not bypass the player's option to disable Autosave if trying
     to enable it. The player's decision to disable Autosaving will take
     priority over the game dev's. If you wish to take this option away from
     the player, please change it in the plugin parameters.
New Game+
To set the current save to have New Game+ settings, you'll need to use these
plugin commands to alter the settings:

Plugin Commands:

  EnableNewGamePlus
  - This will cause any save after this has been enabled to have a New Game+
  option instead of the "Load" command on the loading screen.

  DisableNewGamePlus
  - This will disable the New Game+ option for saves made after this plugin
  command has run. The "Load" option will appear instead of "New Game+".
Self Switches & Variables
Those who would like to remotely control Self Switches and Self Variables
can use the following plugin commands:

Plugin Commands:

  SelfSwitch Map x, Event y, Switch z to true
  SelfSwitch Map x, Event y, Switch z to false
  SelfSwitch Map x, Event y, Switch z to code
  - This will change the Self Switch used for map 'x', event 'y', and
  switch 'z' to the value of 'code' value. You can replace 'code' with a
  'true' or 'false' value or a piece of code like '$gameSwitches.value(4)'.

  SelfVariable Map x, Event y, Variable z to 12345
  SelfVariable Map x, Event y, Variable z to value + 100
  SelfVariable Map x, Event y, Variable z to code
  - This will change the Self Variable used for map 'x', event 'y', and
  switch 'z' to the value of 'code' value. You can replace 'code' with a
  number like '12345', a calculation using 'value' (the current value of the
  Self Variable), or a piece of code like '$gameVariables.value(4)'.
Skill Core
Party Limit Gauge
You can use plugin commands inside events to alter the amount of Party Limit
Gauge the player's party or enemy party has.

Plugin Command

  SetPartyLimitGaugeValue x
  SetTroopLimitGaugeValue x
  - Sets the player party's or enemy party's raw Party Limit Gauge
  value to x.

  GainPartyLimitGaugeValue x
  GainTroopLimitGaugeValue x
  - The player party's or enemy party's raw Party Limit Gauge gains
  x value.

  LosePartyLimitGaugeValue x
  LoseTroopLimitGaugeValue x
  - The player party's or enemy party's raw Party Limit Gauge gains
  x value.

  SetPartyLimitGaugeIncrement x
  SetTroopLimitGaugeIncrement x
  - Sets the player party's or enemy party's Party Limit Gauge value
  to x increments.

  GainPartyLimitGaugeIncrement x
  GainTroopLimitGaugeIncrement x
  - The player party's or enemy party's Party Limit Gauge gains
  x increments.

  LosePartyLimitGaugeIncrement x
  LoseTroopLimitGaugeIncrement x
  - The player party's or enemy party's Party Limit Gauge gains
  x increments.

  ShowPartyLimitGauge
  HidePartyLimitGauge
  ShowTroopLimitGauge
  HideTroopLimitGauge
  - Shows or hides the Party/Troop Limit Gauge.
Skill Learn System
You can use the following Plugin Commands from the Event Editor to alter
whether or not you want the 'Learn Skill' command to appear in the skill
scene or to have it enabled.

Plugin Command:
  ShowLearnSkill            Shows the 'Learn Skill' command.
  HideLearnSkill            Hides the 'Learn Skill' command.
  EnableLearnSkill          Enables the 'Learn Skill' command.
  DisableLearnSkill         Disables the 'Learn Skill' command.
  OpenLearnSkill actor x    Opens Learn Skill menu for actor x.
  OpenLearnSkill party x    Opens Learn Skill menu for party member x.
Stat Allocation
You can use the following plugin commands for various Stat Allocation
related effects in your game!

Plugin Commands:

  ShowStatAllocate
  HideStatAllocate
  - This will show or hide the main menu's Stat Allocation command.

  EnableStatAllocate
  DisableStatAllocate
  - This will enable or disable the main menu's Stat Allocation command.

  ShowRevertAllocate
  HideRevertAllocate
  - This will show or hide the Allocation scene's 'Revert' command.

  EnableRevertAllocate
  DisableRevertAllocate
  - This will enable or disable the Allocation scene's 'Revert' command.

  OpenStatAllocate x
  - This will open up the stat allocation menu for the party member whose
  index is equal to x. 0 is the first slot.
Status Menu Core
Actor Variables
These are plugin commands to allow you to hide/show specific variables
throughout your game.

Plugin Command:

HideActorVariable 1
Hides variable 1 from being shown in the actor status menu.

ShowActorVariable 2
Disables any hidden properties for variable 2 in the actor status menu.
Profile Status Page
The following plugin commands can be used to alter an actor's profile page.

Plugin Commands:

ClearProfileText actorId
This will clear out all of actorId's profile text.

AddProfileText actorId text
This will add to actorId's profile text the line of text.

ProfileTextLine lineIndex actorId text
This will change the specific lineIndex of the profile text for actorId to
display a specific text. For example, if you wish to the 50th line of the
profile text for actor 3 to 'Hello World', you'll write this out as the
plugin command:
ProfileTextLine 49 3 Hello World

ProfileImage actorId filename
This will change the profile image for actorId to filename without the file
extension. For example, if you wish to change actor 3's profile image to
Aldo.png, you'll write out this as the plugin command:
ProfileImage 3 Aldo

ProfileImageAlign actorId align
This will change the profile image alignment for actorId. Replace 'align'
with 'left', 'center', or 'right' without the quotes. If a nonexistant word
is used for the alignment, then the right alignment will be used. If you
wish to make the image aligned to the left for actor 3, you'll use:
ProfileImageAlign 3 Left
Victory Aftermath
If you wish to alter the Victory Aftermath sequence a bit, you can use the
following Plugin Commands.

Plugin Commands:
  DisableVictoryAftermath   - Disables the Victory Aftermath sequence and
                              bypasses the Victory Aftermath music, too.
  EnableVictoryAftermath    - Enables the Victory Aftermath sequence if
                              it has been previously disabled.
  DisableVictoryMusic       - Disables the Victory Aftermath music to just
                              continue playing whatever was playing.
  EnableVictoryMusic        - Enables the Victory Aftermath music if it has
                              been previously disabled.
Aftermath Level Up
You can use these plugin commands to adjust whether or not the Level Up
portion of the Victory Aftermath will occur.

Plugin Command:

  ShowVictoryLevelUp
  This will cause the level up segment of the Victory Aftermath to appear if
  there is an actor that leveled up in the current battle.

  HideVictoryLevelUp
  This will cause the level up segment of the Victory Aftermath to not
  appear at all regardless of any actors leveling up in that battle.
Weather In Battle
Plugin Commands:

  SaveWeather
  - Saves the current weather settings, meaning the type, power, and
  duration to change will be saved.

  RecallWeather
  - Recalls the last saved weather settings. If nothing was last saved,
  then nothing will happen. Using this plugin command will not remove the
  last saved weather settings from memory.
Pages in category "Plugin Commands (MV)"
The following 82 pages are in this category, out of 82 total.